- How to make Android apps without IDE from command line
- How to do Android development faster without Gradle
- IntelliJ IDE, but not Gradle
- 1. Install Java
- 2. Install all SDK tools
- Download Android Studio and SDK Tools | Android Studio
- Download the official Android IDE and developer tools to build apps for Android phones, tablets, wearables, TVs, and…
- 3. Code the application
- How to use JavaMail on Android (without Gradle)
- Hello guys!
- 4. Build the code
- 5. Sign the package
- 6. Align the package
- 7. Test the application
- 8. Make a script
- Notes
- Android Application Class
- Android Activity Lifecycle
- Android activity lifecycle is first thing to be known as android developer. Here I’m sharing with you some facts and…
- Understanding the Android Application Class
- Publishing Android Application
- Android development life cycle
- Export Android Application Process
- Apk development process
- Google Play Registration
- Signing Your App Manually
How to make Android apps without IDE from command line

Nov 26, 2017 · 5 min read
A HelloWorld without Android Studio
Update: I’ve made a new course that explain how you can avoid Android Studio and Gradle, but still use IntelliJ iDE:
How to do Android development faster without Gradle
IntelliJ IDE, but not Gradle
In this tutorial, I will show you how you can build/compile an APK (an A n droid app) from your java code using terminal (on Linux) without IDE or in other words without Android Studio. At the end, I will also show you a script to automate the process. In this example, I will use Android API 19 (4.4 Kitkat) to make a simple HelloWorld. I want to say that I will do this tutorial without android command which is deprecated.
1. Install Java
First, you need to install java, in my case, I install the headless version because I don’t use graphics (only command line):
2. Install all SDK tools
Then download the last SDK tools of Android which you can find here:
Download Android Studio and SDK Tools | Android Studio
Download the official Android IDE and developer tools to build apps for Android phones, tablets, wearables, TVs, and…
I recommend to unzip it in the /opt directory inside another directory that we will call “android-sdk”:
Now, we have to install platform tools (which contain ADB), an Android API and build tools.
In fact, if you are on Debian, you can avoid installing platform-tools package and only install ADB like that:
3. Code the application
In this example, I want to compile a simple HelloWorld. So, first, we need to make a project directory:
Then we have to make the files tree:
If you use exernal libraries (.jar files), also make a folder for them:
You have an example here:
How to use JavaMail on Android (without Gradle)
Hello guys!
Make the file src/com/example/helloandroid/MainActivity.java and put that inside:
Make the strings.xml file in the res/values folder. It contains all the text that your application uses:
The activity_main.xml is a layout file which have to be in res/layout:
You also have to add the file AndroidManifest.xml at the root:
4. Build the code
Now, I recommend to store the project path in a variable:
First, we need generate the R.java file which is necessary for our code:
- -m instructs aapt to create directories under the location specified by -J
- -J specifies where the output goes. Saying -J src will create a file like src/com/example/helloandroid/R.java
- -S specifies where is the res directory with the drawables, layouts, etc.
- -I tells aapt where the android.jar is. You can find yours in a location like android-sdk/platforms/android-/android.jar
Now, we have to compile the .java files:
If you have use an external, add it the classpath:
The compiled .class files are in obj folder, but Android can’t read them. We have to translate them in a file called “classes.dex” which will be read by the dalvik Android runtime:
But if you use external libraries, do rather:
If you have the error UNEXPECTED TOP-LEVEL EXCEPTION , it can be because you use old build tools and DX try to translate java 1.7 rather than 1.8. To solve the problem, you have to specify 1.7 java version in the previous javac command:
The -source option specify the java version of your source files. Note that we can use previous versions of Java even we use OpenJDK 8 (or 1.8).
We can now put everything in an APK:
Be aware: until now, we used three AAPT commands, the first and the second one are similar but they don’t do the same. You have to copy the classes.dex file at the root of project like above! Otherwise, AAPT won’t put this file at right place in the APK archive (because an APK is like a .zip file).
The generated package can’t be installed by Android because it’s unaligned and unsigned.
If you want, you can check the content of the package like this:
5. Sign the package
To do so, we firstly create a new keystore with the command keytool given by Java:
Just answer the questions and put a password.
You can sign an APK like this:
Note that apksigner only exist since Build Tools 24.0.3.
6. Align the package
It’s as simple as that:
Alignment increase the performance of the application and may reduce memory use.
7. Test the application
To test the application, connect your smartphone with a USB cable and use ADB:
But before run this command, I recommend to run this one:
If there is an error during installation or running, you see it with that command.
Voila! Here’s the result:

8. Make a script
If you don’t want to run all these steps every time you would like to compile your app, make a script! Here’s mine:
Notes
- You can remove “test” if you just want to compile without testing.
- This script only compile and run the app on the phone. But I can also make a script to automatically generate a new project like this one. I think I have a good idea to do so, but I need to know if you are interested. If it’s the case, please leave a comment or send me an e-mail.
- I can also complete the script for external libraries. Likewise, let me know if you want this.
If you have any questions, don’t hesitate to ask them below or by e-mail ;-)! EDIT: Well I’m very busy actually…
Источник
Android Application Class

W hile Starting App development, we tend to miss out simple basic stuffs either by ignorance or by curiosity to build million dollar app. But, Hey! Why so serious !. Building a App is bit of Art ,bit of Engineering and frequently both.

Activity Life Cycle is stages of activity in run time, knowing these would save you from headaches while you dive deeper in development.
I have written a post that will help you to understand activity lifecycle in a practical approach. Check it out
Android Activity Lifecycle
Android activity lifecycle is first thing to be known as android developer. Here I’m sharing with you some facts and…
Application class is a base class of Android app containing components like Activities and Services. Application or its sub classes are instantiated before all the activities or any other application objects have been created in Android app.
You Don’t have to import or extend application class, they are predefined. We cannot change application class but we could give additional instruction to it by extending it. Refer here for more info.
Create a java class named SubApplication and Application as Superclass

By extending Application class you could get boilerplate code like this
Check in AndroidManifest.xml and set Application name to SubApplication that you created
Lets take a situation where we should know which activity is currently running and we have to use register network receiver in all our activities. To this we used to write same code in all the activities or write a base class and extend that class instead of extending AppCompactActivity.
We have Activity Life cycle in one hand and Application class in another, what sense they make? Well actually they do? Let’s look into it.
- In application class create static Activity variable it is accessible from whole project.
2. Register Activity Life Cycle callback in onCreate method in application class. By this step we can get currently running activity in our app from mActivity.
3.Moving on to next, Create a Broadcast Receiver and write a method to check the internet connection. you can get the code here .
4. Register your broadcast receiver in Manifest File
But for SDK Above Nougat we need to register receiver and unregister in every activity we use programmatically or We can just register and unregister Commonly in Application class.
5. Create a Object for Broadcast Receiver in application class and Register it in onResume method and Unregister in onPause method.
Bit confused! Don’t Worry, Here is the Link to the files.
Thanks for reading out the article. Let me know if I have missed out something interesting so that I can be added. Be sure to clap/recommend as much as you can and also share with your friends.
Источник
Understanding the Android Application Class
The Application class in Android is the base class within an Android app that contains all other components such as activities and services. The Application class, or any subclass of the Application class, is instantiated before any other class when the process for your application/package is created.

This class is primarily used for initialization of global state before the first Activity is displayed. Note that custom Application objects should be used carefully and are often not needed at all.
In many apps, there’s no need to work with an application class directly. However, there are a few acceptable uses of a custom application class:
- Specialized tasks that need to run before the creation of your first activity
- Global initialization that needs to be shared across all components (crash reporting, persistence)
- Static methods for easy access to static immutable data such as a shared network client object
Note that you should never store mutable shared data inside the Application object since that data might disappear or become invalid at any time. Instead, store any mutable shared data using persistence strategies such as files, SharedPreferences or SQLite .
If we do want a custom application class, we start by creating a new class which extends android.app.Application as follows:
And specify the android:name property in the the node in AndroidManifest.xml :
That’s all you should need to get started with your custom application.
There is always data and information that is needed in many places within your app. This might be a session token, the result of an expensive computation, etc. It might be tempting to use the application instance in order to avoid the overhead of passing objects between activities or keeping those in persistent storage.
However, you should never store mutable instance data inside the Application object because if you assume that your data will stay there, your application will inevitably crash at some point with a NullPointerException . The application object is not guaranteed to stay in memory forever, it will get killed. Contrary to popular belief, the app won’t be restarted from scratch. Android will create a new Application object and start the activity where the user was before to give the illusion that the application was never killed in the first place.
So how should we store shared application data? We should store shared data in one of the following ways:
- Explicitly pass the data to the Activity through the intent.
- Use one of the many ways to persist the data to disk.
Bottom Line: Storing data in the Application object is error-prone and can crash your app. Prefer storing your global data on disk if it is really needed later or explicitly pass to your activity in the intent’s extras.
Источник
Publishing Android Application
Android application publishing is a process that makes your Android applications available to users. Infect, publishing is the last phase of the Android application development process.
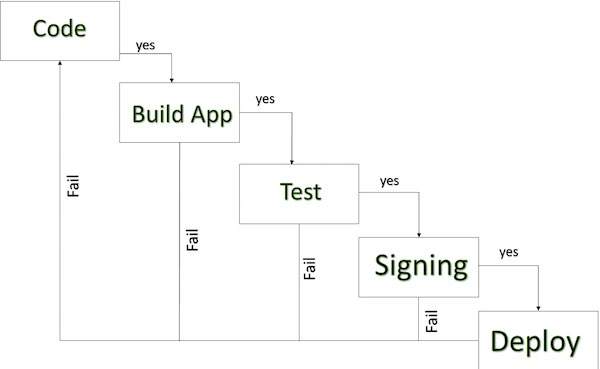
Android development life cycle
Once you developed and fully tested your Android Application, you can start selling or distributing free using Google Play (A famous Android marketplace). You can also release your applications by sending them directly to users or by letting users download them from your own website.
You can check a detailed publishing process at Android official website, but this tutorial will take you through simple steps to launch your application on Google Play. Here is a simplified check list which will help you in launching your Android application −
| Step | Activity |
|---|---|
| 1 | Regression Testing Before you publish your application, you need to make sure that its meeting the basic quality expectations for all Android apps, on all of the devices that you are targeting. So perform all the required testing on different devices including phone and tablets. |
| 2 | Application Rating When you will publish your application at Google Play, you will have to specify a content rating for your app, which informs Google Play users of its maturity level. Currently available ratings are (a) Everyone (b) Low maturity (c) Medium maturity (d) High maturity. |
| 3 | Targeted Regions Google Play lets you control what countries and territories where your application will be sold. Accordingly you must take care of setting up time zone, localization or any other specific requirement as per the targeted region. |
| 4 | Application Size Currently, the maximum size for an APK published on Google Play is 50 MB. If your app exceeds that size, or if you want to offer a secondary download, you can use APK Expansion Files, which Google Play will host for free on its server infrastructure and automatically handle the download to devices. |
| 5 | SDK and Screen Compatibility It is important to make sure that your app is designed to run properly on the Android platform versions and device screen sizes that you want to target. |
| 6 | Application Pricing Deciding whether you app will be free or paid is important because, on Google Play, free app’s must remain free. If you want to sell your application then you will have to specify its price in different currencies. |
| 7 | Promotional Content It is a good marketing practice to supply a variety of high-quality graphic assets to showcase your app or brand. After you publish, these appear on your product details page, in store listings and search results, and elsewhere. |
| 8 | Build and Upload release-ready APK The release-ready APK is what you you will upload to the Developer Console and distribute to users. You can check complete detail on how to create a release-ready version of your app: Preparing for Release. |
| 9 | Finalize Application Detail Google Play gives you a variety of ways to promote your app and engage with users on your product details page, from colourful graphics, screen shots, and videos to localized descriptions, release details, and links to your other apps. So you can decorate your application page and provide as much as clear crisp detail you can provide. |
Export Android Application Process
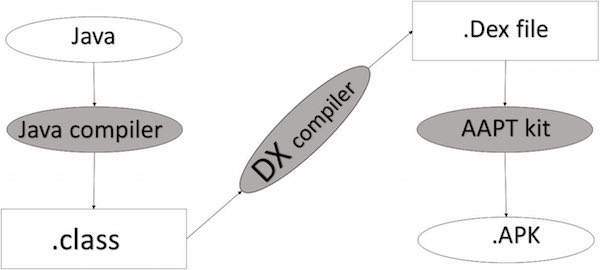
Apk development process
Before exporting the apps, you must some of tools
Dx tools(Dalvik executable tools ): It going to convert .class file to .dex file. it has useful for memory optimization and reduce the boot-up speed time
AAPT(Android assistance packaging tool):it has useful to convert .Dex file to.Apk
APK(Android packaging kit): The final stage of deployment process is called as .apk.
You will need to export your application as an APK (Android Package) file before you upload it Google Play marketplace.
To export an application, just open that application project in Android studio and select Build → Generate Signed APK from your Android studio and follow the simple steps to export your application −
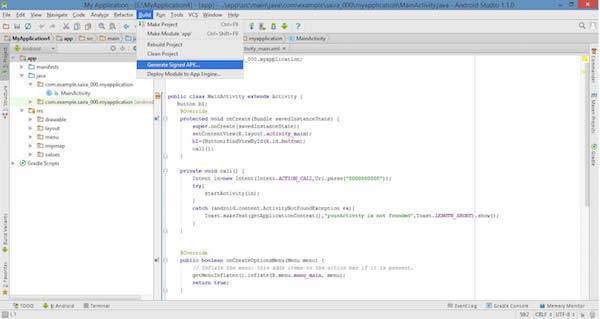
Next select, Generate Signed APK option as shown in the above screen shot and then click it so that you get following screen where you will choose Create new keystore to store your application.
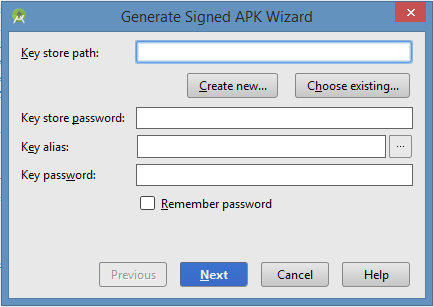
Enter your key store path,key store password,key alias and key password to protect your application and click on Next button once again. It will display following screen to let you create an application −

Once you filled up all the information,like app destination,build type and flavours click finish button While creating an application it will show as below

Finally, it will generate your Android Application as APK formate File which will be uploaded at Google Play marketplace.
Google Play Registration
The most important step is to register with Google Play using Google Play Marketplace. You can use your existing google ID if you have any otherwise you can create a new Google ID and then register with the marketplace. You will have following screen to accept terms and condition.
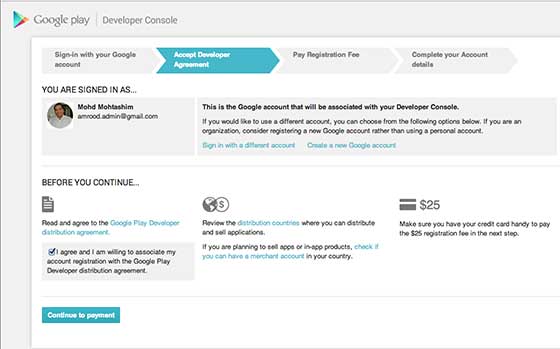
You can use Continue to payment button to proceed to make a payment of $25 as a registration fee and finally to complete your account detail.
Once you are a registered user at Google Play, you can upload release-ready APK for your application and finally you will complete application detail using application detail page as mentioned in step 9 of the above mentioned checklist.
Signing Your App Manually
You do not need Android Studio to sign your app. You can sign your app from the command line using standard tools from the Android SDK and the JDK. To sign an app in release mode from the command line −
- Generate a private key using keytool
Compile your app in release mode to obtain an unsigned APK
Sign your app with your private key using jarsigner
Align the final APK package using zipalign.
Источник


