- Take and edit Live Photos
- How to take a Live Photo
- How to find and play your Live Photos
- How to change the key photo
- How to add Live Photo effects
- How to edit Live Photos
- How to share your Live Photos
- How to turn off Live Photos
- Guide-Apple
- Самые интересные новости о технике Apple и не только.
- Как включить/выключить Live Photo на iPhone?
- Как сделать/отключить Live Photo на iPhone?
- Где выключить/включить Live Photo
- Сохраняем настройку
- Everything You Need to Know About iPhone Live Photos
- How Live Photos work and what to do with them
- Who Can Use Them?
- How Do Live Photos Work?
- How to Take a Live Photo on iPhone
- How to View a Live Photo
- How to Find Live Photos in the Photos App
- How to Add Effects to Live Photos
- How to Edit a Live Photo
- How to Change a Live Photo Key Photo
- How to Turn Off Live Photos
- Can You Make a Live Photo a Regular Photo?
- How Much Space Do Live Photos Take Up?
- What Else Can You Do With Live Photos?
Take and edit Live Photos
With Live Photos, your iPhone records what happens 1.5 seconds before and after you take a picture. You take a Live Photo just like you do a traditional photo. Then you can pick a different key photo, add a fun effect, edit your Live Photo, and share with your family and friends.
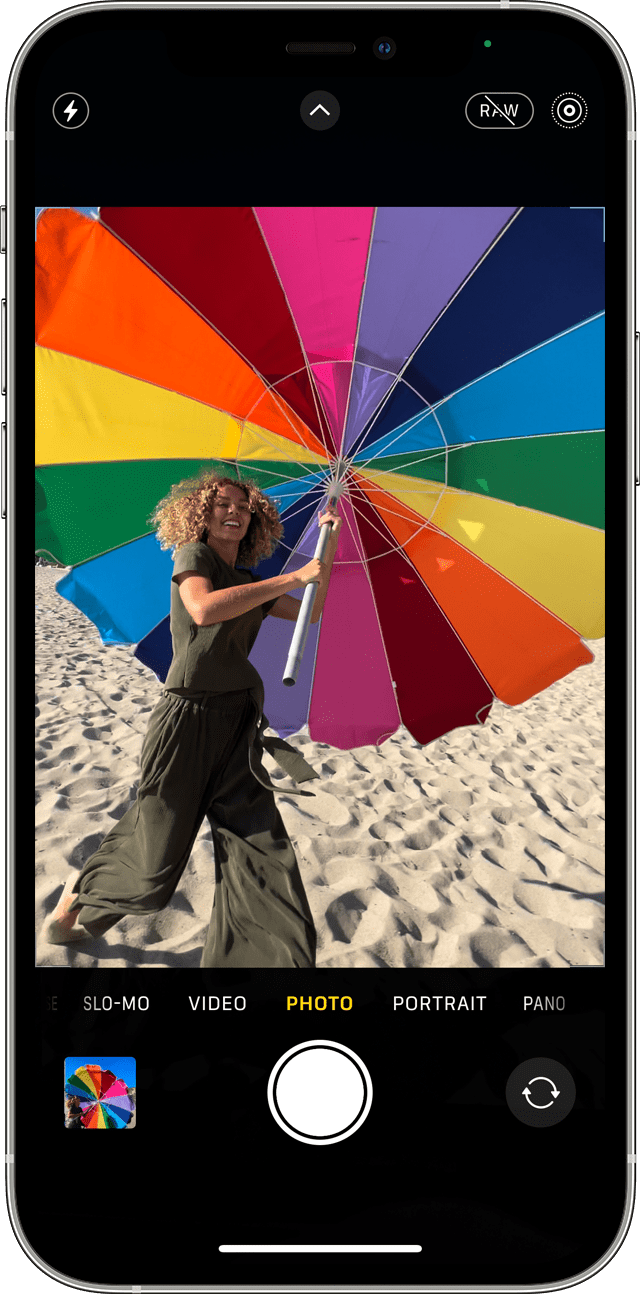
How to take a Live Photo
- Open the Camera app.
- Make sure that your Camera is set to photo mode and that Live Photos is turned on. When it’s on, you see the Live Photos button at the top of your Camera.

- Hold your device* still.
- Tap the shutter button .
Live Photos is on by default. You can turn Live Photos off temporarily or permanently.
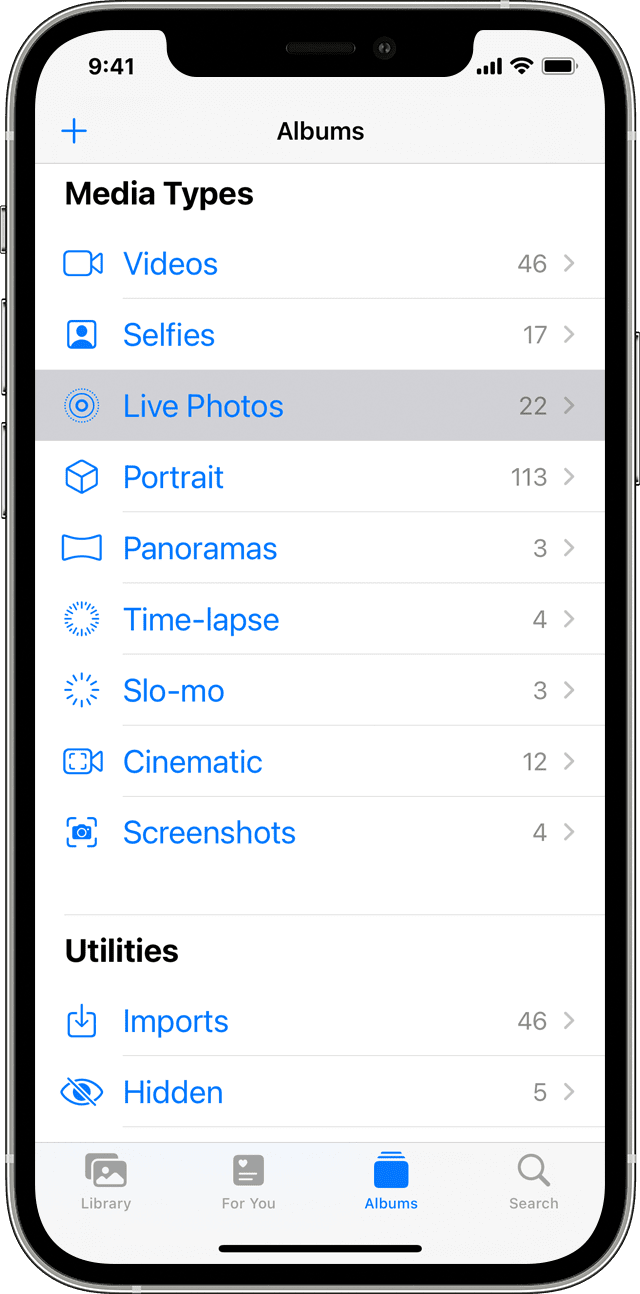
How to find and play your Live Photos
- Open the Photos app.
- Tap the Albums tab.
- Scroll down to Media Types and tap Live Photos.
- Tap one of the photos to open it.
- Press and hold the screen to play the Live Photo.
You can enjoy your Live Photo every time you unlock your device too. Just set it as your Lock Screen wallpaper.
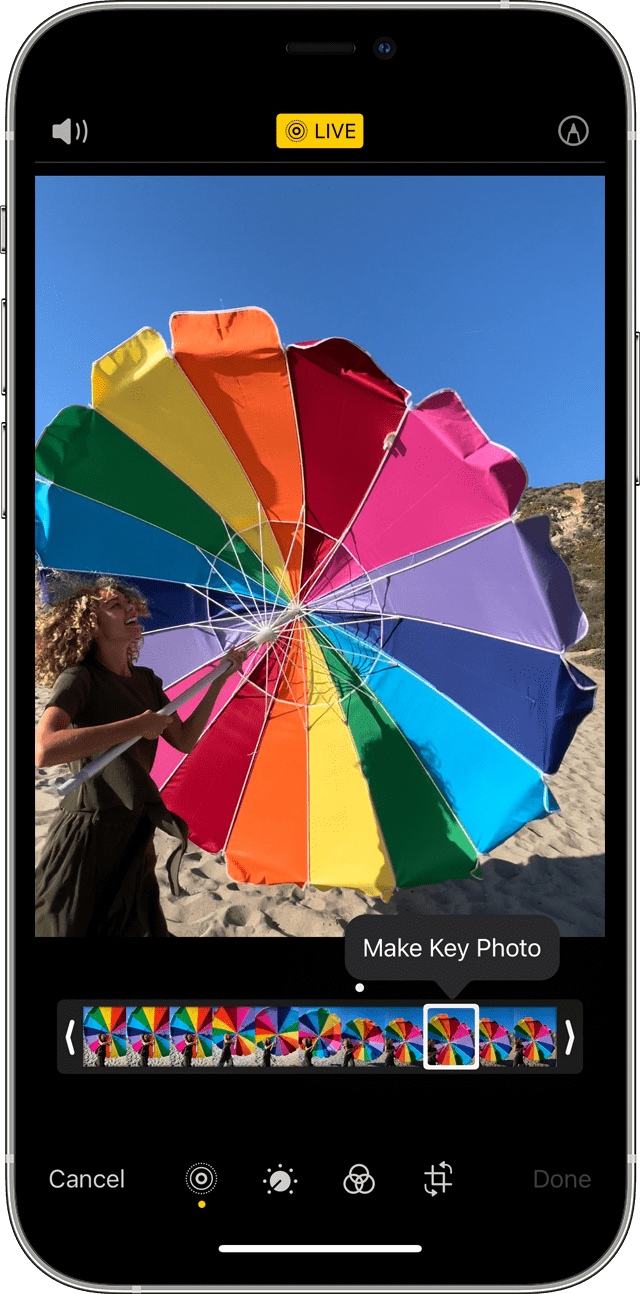
How to change the key photo
- Open the Live Photo and tap Edit.
- Tap the Live Photos button .
- Move the slider to change the frame.
- Release your finger, then tap Make Key Photo.
- Tap Done.
You can also toggle the Live Photo effect between off and on. When you’re editing a Live Photo, tap the LIVE button at the top of the screen to turn Live Photo off or back on.
How to add Live Photo effects
- Open the Live Photo.
- Tap the Live Photos button near the top of the screen.
- Choose Loop, Bounce, or Long Exposure.
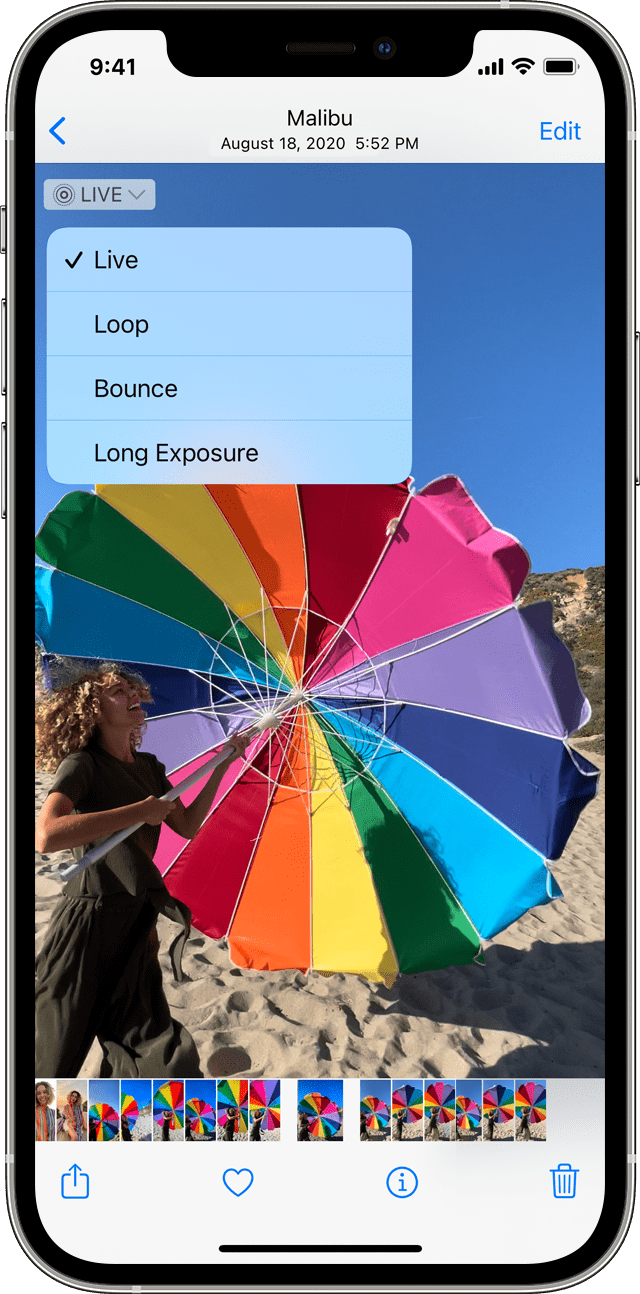
Loop: Turn a Live Photo you love into a video loop. Choose an image yourself, or look in the For You tab to see photos that would make great loops.
Bounce: Make your Live Photo rock back and forth. Watch your Live Photo as it happened, then it instantly plays in reverse.
Long Exposure: Capture the elements of time and movement. Create a beautiful effect that used to be possible only with a DSLR camera. Fireworks become bright streaks across the night sky. A waterfall becomes a magical blur.
How to edit Live Photos
- Open the Photos app and tap the Albums tab.
- Go to Live Photos under Media Types.
- Tap the Live Photo that you want to edit.
- Tap Edit, then make your adjustments.
- Tap Done.
If you edit your Live Photo in a third-party app, you might lose any Live Photo effects that you’ve applied.
How to share your Live Photos
- Open the photo that you want to share, then tap the Share button .
- If you want to share the still photo and not the Live Photo, tap Live in the upper-left corner of the photo.
- Choose how you want to share your photo. Note that if you share via Mail, the Live Photo is sent as a still image.
When you receive a Live Photo on your iPhone, iPad, or iPod touch via Messages, tap the photo to open it, then firmly press and hold to see it come to life.
If you’re using Messages on your Mac, double-click the Live Photo to open it. The Live Photo plays through once. To play it again, click the LIVE button in the bottom-left corner of the photo.
How to turn off Live Photos
From the Camera app, tap the Live Photos button to turn off Live Photos. A slash through the Live Photos button means that the feature is off.
The Camera app turns Live Photos on again automatically. To keep Live Photos off permanently, follow these steps:
- Go to Settings.
- Tap Camera > Preserve Settings.
- Make sure that the switch next to Live Photo is turned on.
Источник
Guide-Apple
Самые интересные новости о технике Apple и не только.
Как включить/выключить Live Photo на iPhone?
Иногда Apple делает функции, которые многие считают абсолютно бесполезными, а некоторые — просто боготворят их. Как говорится: «Сколько людей, столько и мнений».
Именно так можно выразится о функции Live Photo, которая позволяет при съемке фото, получить небольшой трехсекундный ролик. В итоге имеем 1.5 сек до и после самого фото.
Сегодня попробуем разобраться, как включить или выключить Лайф Фото на любом Айфоне, который работает на iOS 11(ниже версии, примерно также) и поддерживает данную функцию.
Если что, эта фича работает на iPhone SE, iPhone 6S и 6S Plus, iPhone 7 и iPhone 7 Plus, iPhone 8 и iPhone 8 Plus и конечно же iPhone X (10).
Как сделать/отключить Live Photo на iPhone?
Некоторые объясняют желание побыстрее избавится от этой функции тем, что такие фото занимают больше места. Но как показывает практика, иногда можно снять очень крутые моменты.
Ну и весьма полезно, если снимок получился неудачным, то очень легко выбрать другой кадр при редактировании.
Есть много плюсов и минусов, но в любом случае, давайте уже приступать к инструкции и она кстати, состоит из двух этапов. Отключение Лайф Фото и Сохранение этой настройки.
Где выключить/включить Live Photo
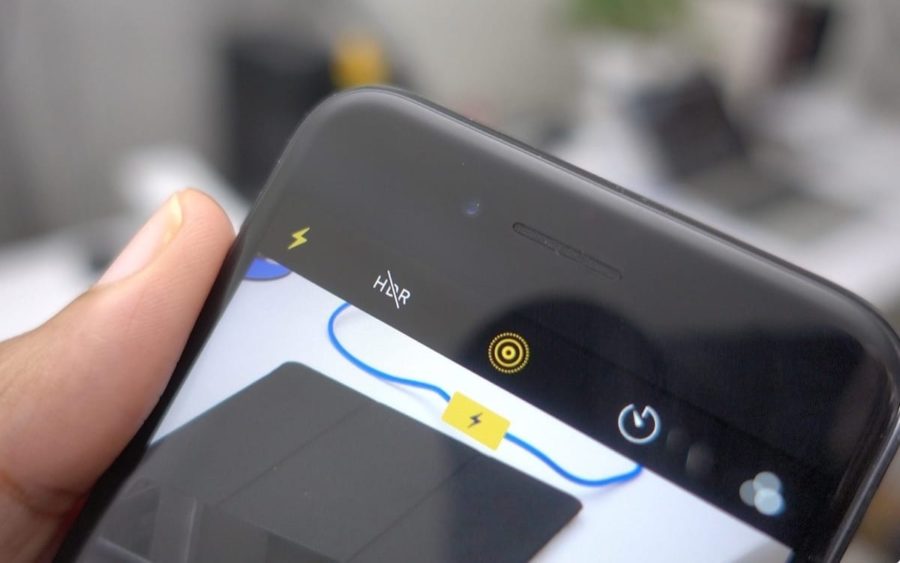
Каждый раз, когда вы используете камеру, сверху можно найти иконку Лайф Фото. Чаще всего она горит желтым цветом и это означает, что функция активна.
Нажимаем на значок Live Photo
Вам нужно нажать на нее и когда она станет белой и перечеркнутой, то вы успешно отключили данную фичу. Но это еще не всё, очень важно выполнить второй шаг.
Сохраняем настройку
Если вы не выполняете второй этап, то через некоторое время, Live Photo автоматически станет активным. Но чтобы этого не произошло, нужно сохранить заданные нами настройки.
Просто следуем таким шагам:
- переходим в Настройки;
- листаем вниз, пока не увидим пункт Камера и нажимаем его;
- сверху находим Сохранение настроек;
- напротив Live Photo, ползунок должен быть активным и зеленого цвета.
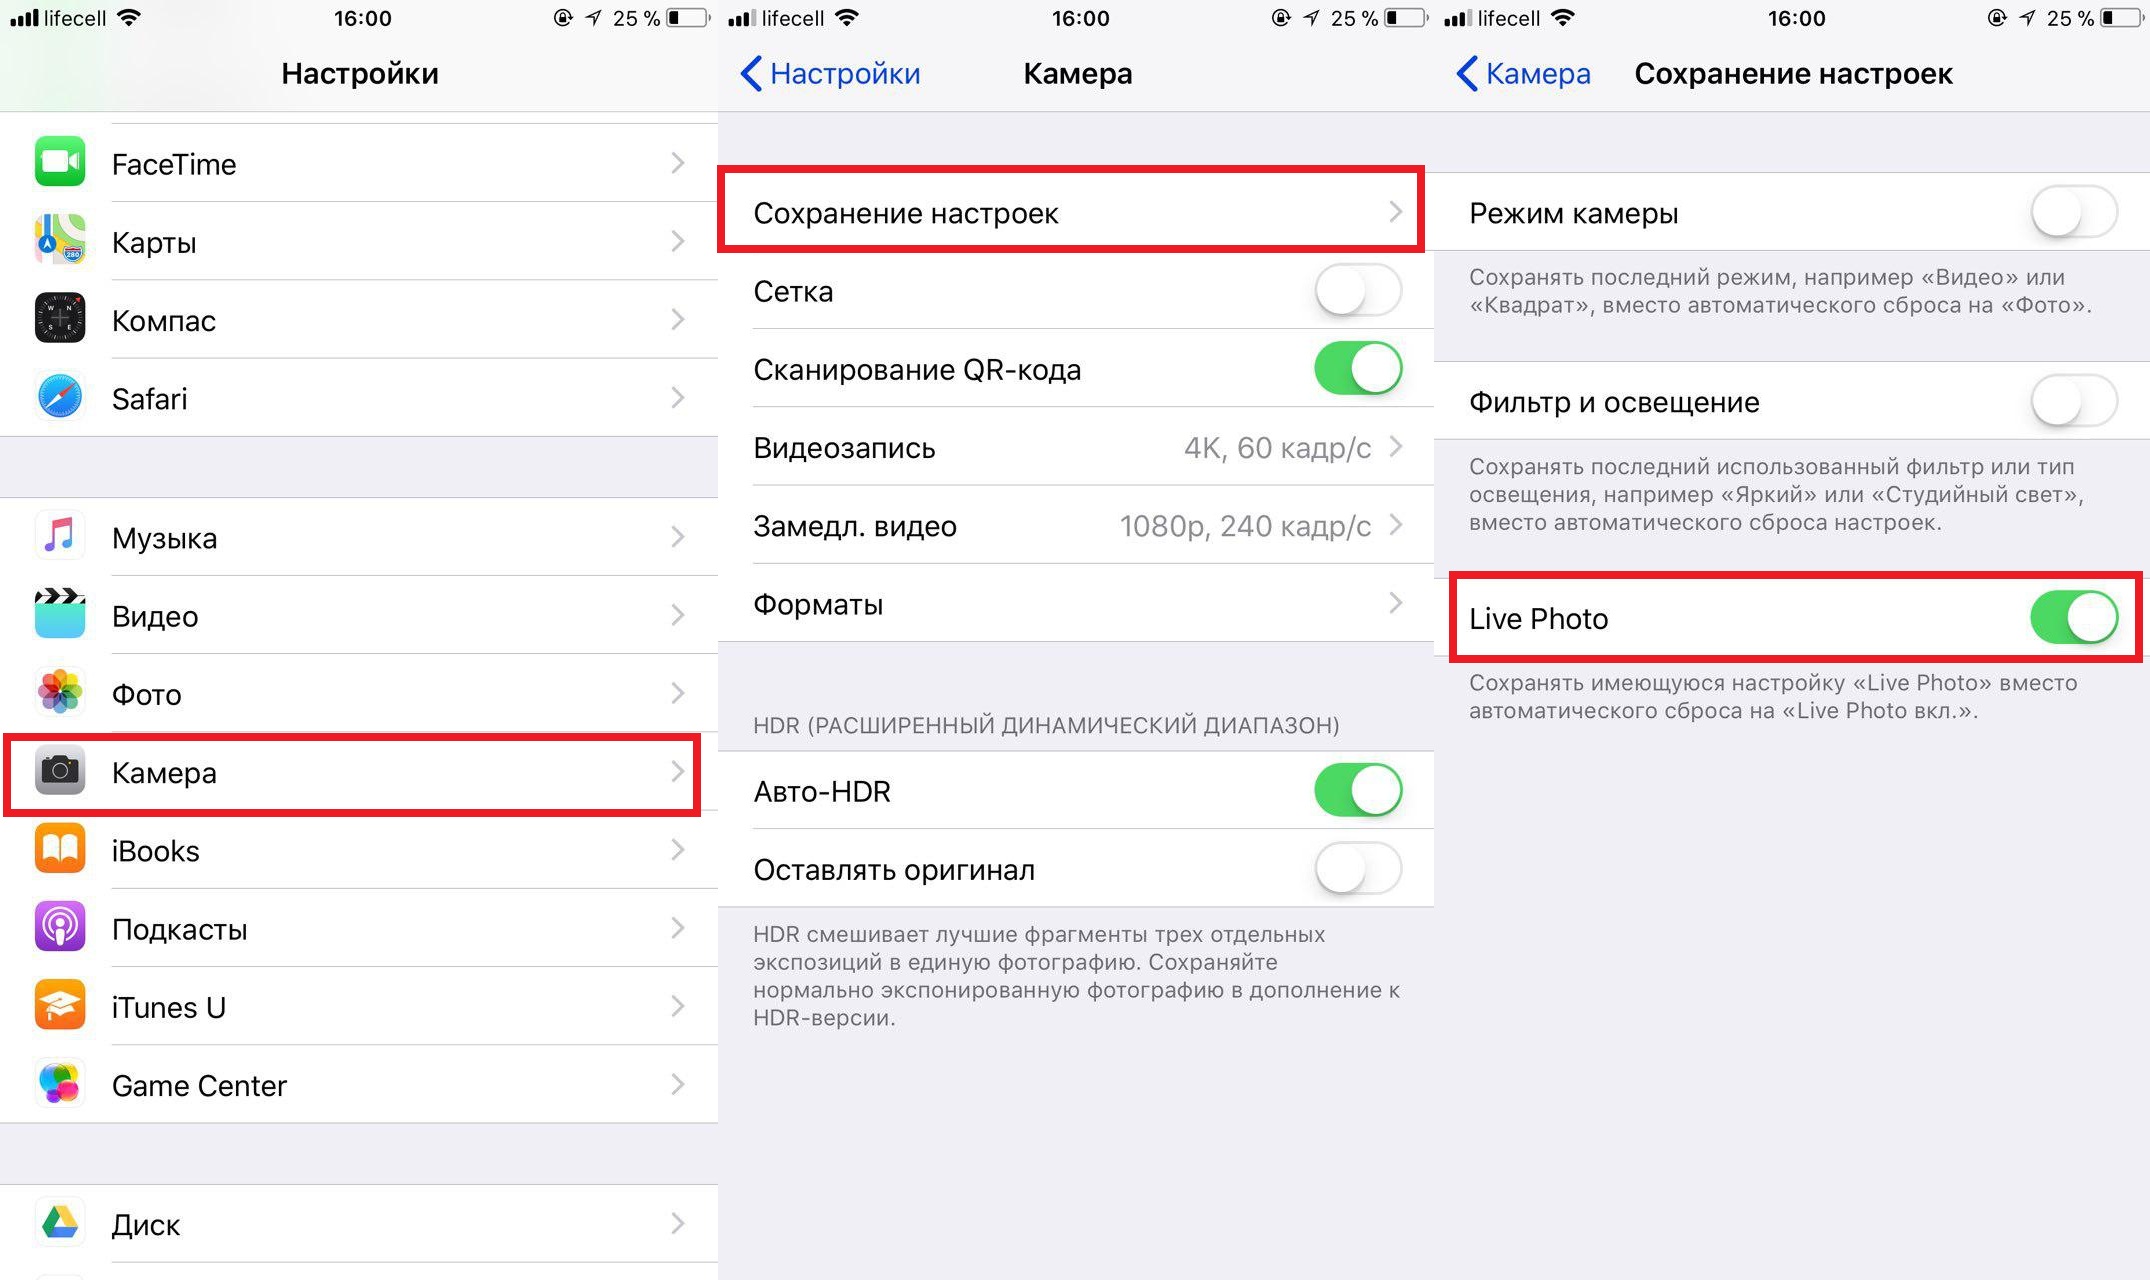
Камера — Сохранение настроек — Live Photo
Теперь, даже через любой промежуток времени, эта фича будет активной или неактивной. Это уже выбирать вам. Как включать функцию, я думаю вы тоже поняли.
Источник
Everything You Need to Know About iPhone Live Photos
How Live Photos work and what to do with them
:max_bytes(150000):strip_icc()/SamCostello-d7fcf106ec2048ccb06d1e2190b3396d.jpg)
Live Photos is an Apple technology that allows a single photo to both be a still image and, when activated, a short video with motion and sound. Imagine an animated GIF with audio, automatically created from your pictures, and you’ll have a decent idea of what Live Photos are. But there’s a lot more to iPhone Live Photos than that.
The instructions in this article were written using iOS 14, but the basic concepts apply to iOS 9 and up. The exact steps and menu names may be slightly different in older versions of the iOS.
:max_bytes(150000):strip_icc()/live-photos-iphone-591209203df78c9283c6f205.jpg)
Who Can Use Them?
Live Photos were introduced in Sept. 2015 along with the iPhone 6S series. Live Photos were one of the flagship features for the 6S since they use the 3D Touchscreen which was also introduced on those devices. Since then, the list of devices that can support Live Photos has expanded significantly and is no longer limited to devices with 3D Touch screens (which is good: Apple discontinued that technology). To use Live Photos, you need:
- iPhone 6S or newer (including the iPhone X, XS and XR, 11 series, and 12 series), or iPhone SE.
- 5th generation iPad or newer.
- 3rd generation iPad Air or newer.
- 5th generation iPad mini or newer.
- iPad Pro models from 2016 and newer.
- iOS 9 or higher.
How Do Live Photos Work?
Live Photos work using a background feature that many iPhone users aren’t aware of. When you open the iPhone’s Camera app, the app automatically begins taking pictures even if you don’t tap the shutter button. This allows the phone to capture photos as quickly as possible. Those photos are automatically deleted if they’re not needed without the user ever being aware of them.
When you take a Live Photo, instead of just capturing the photo, the iPhone captures the photo and retains the photos it’s been taking in the background. It then saves photos from before and after you take the photo. By doing this, it’s able to stitch all of these photos together into a smooth animation that lasts around 1.5 seconds—that’s the Live Photo.
At the same time that it saves photos, the iPhone is also saving audio from that those seconds to add a soundtrack to the Live Photo.
It’s not quite the same as a video—think of it more like stop-motion animation—and it’s not ultra-high-resolution, but it’s fun and useful.
How to Take a Live Photo on iPhone
Taking an iPhone Live Photo is very easy. Just follow these steps:
Open the Camera app.
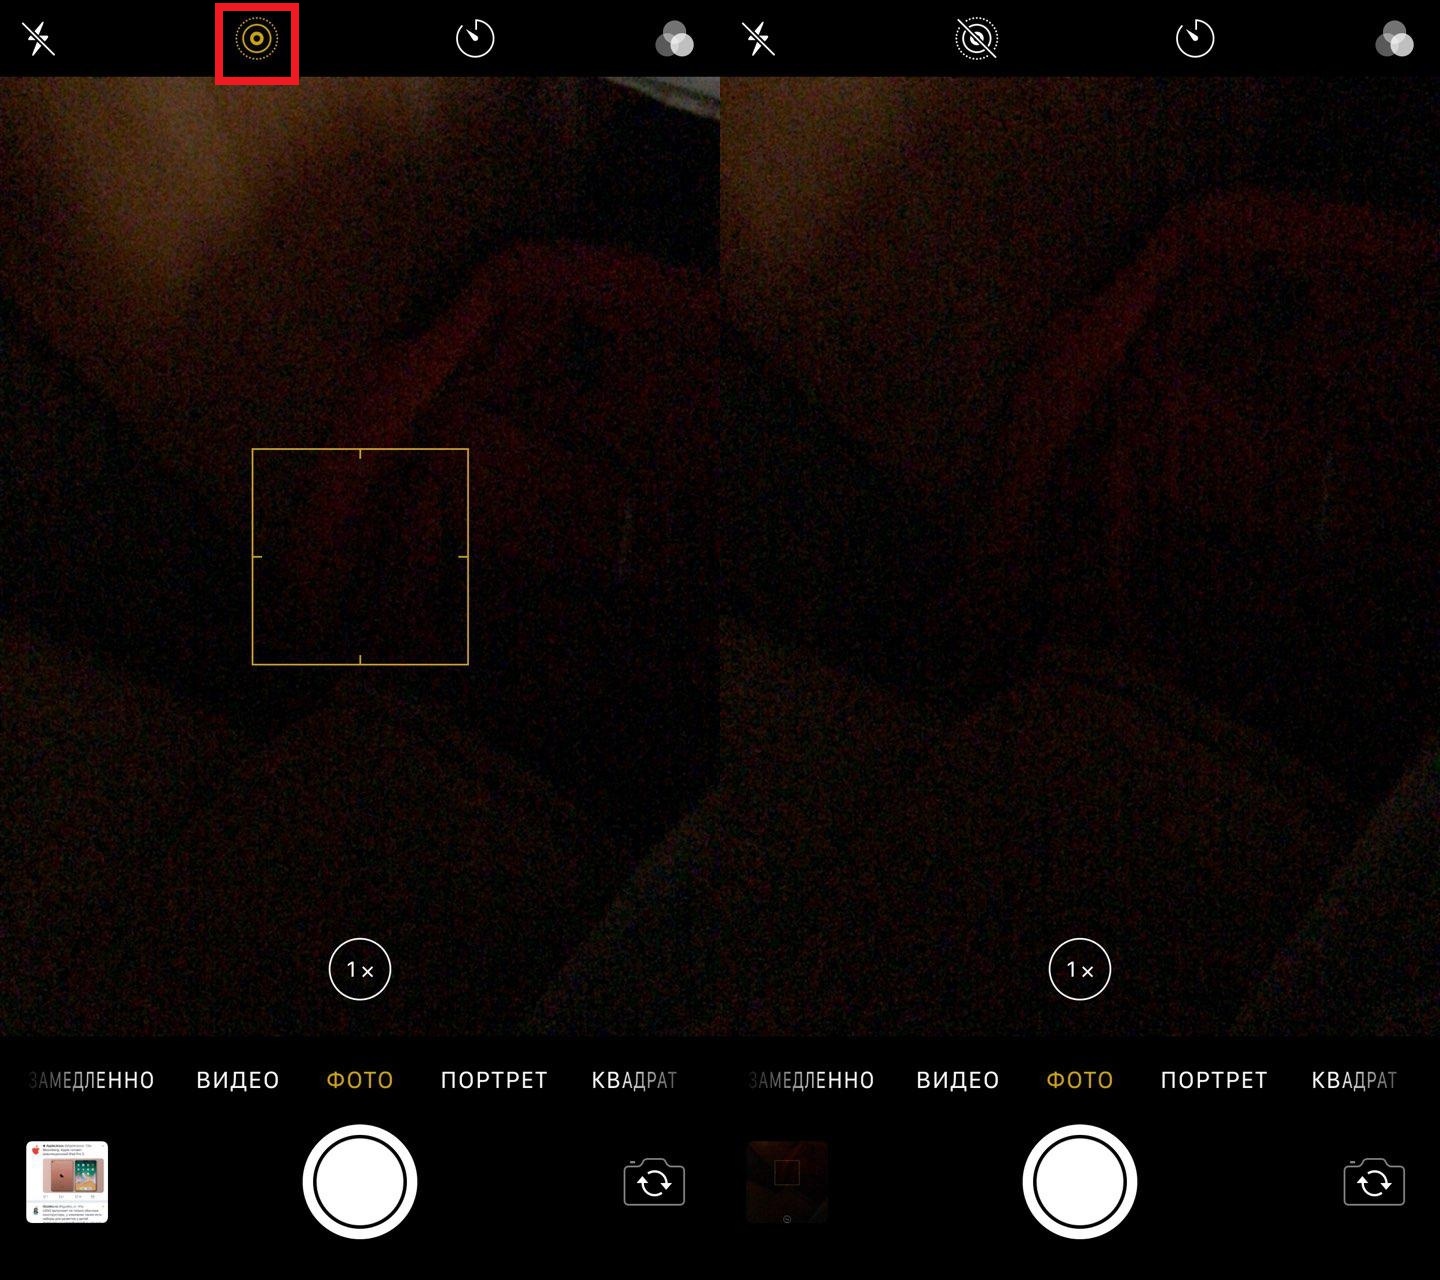
At the top of the screen, find the icon that’s three concentric circles (on some versions of the iOS, it’s in the center. In newer versions, it’s at the top right). Make sure that it’s enabled (it lights up when it is and doesn’t have a line through it).
Take your photo as you normally would.
How to View a Live Photo
Watching a Live Photo come to life—seeing a static photo magically transformed with movement and sound—is where things really get fun. To view a Live Photo:
Open the Photos app (or, if you’ve just taken the Live Photo, tap the photo icon in the bottom left corner of the Camera app. If you do this, skip to Step 3).
Tap the Live Photo you want to view so it fills the screen.
Tap and hold the screen until the Live Photo comes to life.
How to Find Live Photos in the Photos App
Apple didn’t originally add a special section to the Photos app for Live Photos, so it was hard to find them. These days, though, it’s a snap. Here’s how to find Live Photos in your iOS Photos app:
:max_bytes(150000):strip_icc()/find-live-photos-a1306d79ffd54b3ba393cfa6cdf3f986.jpg)
Tap the Photos app to open it.
Tap Albums.
Scroll to the Media Types section and tap Live Photos. All of the Live Photos you’ve taken are stored here.
How to Add Effects to Live Photos
In recent versions of the iOS, you can add cool effects to Live Photos, like Bounce (an automatic forward and reverse of the animation) or Loop. To add these and other effects, follow these steps:
:max_bytes(150000):strip_icc()/live-photo-effects-1492b4c82cb14eadbd20977ae0bb715a.jpg)
Open the Photos app and find the Live Photo you want to add effects to. Tap it.
Swipe up on the Live Photo to reveal the Effects section.
Tap an Effect to apply it. As long as that Effect is selected, it will play every time you long press the Live Photo.
How to Edit a Live Photo
Want to trim out some of the frames of the Live Photo to make it the perfect animation? Here’s how:
:max_bytes(150000):strip_icc()/edit-live-photos-9ecb5d6bd630401b83c045040b22957c.jpg)
Open the Photos app and find the Live Photo you want to edit. Tap it.
Tap Edit.
Tap the Live Photos icon at the bottom.
Tap and hold the left end of the frame bar just beneath the photo. When the frame bar is highlighted in yellow, drag the end of the bar to the place you want the Live Photo to start.
If you want to change where the Live Photo ends, repeat the process at the right end of the frame bar.
Tap Done to save the edited Live Photo.
How to Change a Live Photo Key Photo
You can choose the still frame that represents the Live Photo in your Photos app by choosing they Key Photo in this way:
:max_bytes(150000):strip_icc()/live-photo-key-frame-e8ad812b061744dc8071bdae292f17d9.jpg)
Open the Photos app and find the Live Photo whose Key Photo you want to change. Tap it.
Tap Edit.
Tap the Live Photos icon at the bottom of the screen.
Tap the frame bar just beneath the photo. When a frame is selected, tap Make Key Photo.
Tap Done to save the change.
How to Turn Off Live Photos
Decided that you don’t want to ever take Live Photos and you want the feature turned off by default? That’s actually trickier than it seems. By default, the Camera app turns on Live Photos every time you use it, even if you disabled the option the last time you used the Camera. Luckily, Apple has provided a way to prevent Camera from always turning on Live Photos. Just follow these steps:
:max_bytes(150000):strip_icc()/live-photos-settings-9f1698e8a1cc4395ae68ef5c4624ba15.jpg)
Tap Settings.
Tap Camera.
Tap Preserve Settings.
Move the Live Photo slider to off/white.
Now, go to the Camera app and tap the Live Photo icon to disable it (it’s off when the icon isn’t lit up and has a line through it). Because you choose to preserve the off setting in the last few steps, Live Photos will now be off by default.
These steps apply to upgrading to a new phone, too. If you don’t have the Preserve Settings option enabled, when you upgrade to a new phone, Live Photos will be turned on again by default. Just make sure this setting is on and, when you restore your new phone with your old data, Live Photos will be turned off.
Can You Make a Live Photo a Regular Photo?
You can’t transform a standard photo in a Live Photo, but you can take photos that are Live and make them static by following these steps:
:max_bytes(150000):strip_icc()/remove-live-photos-7855f887bdf849b888e4d54e667b28e1.jpg)
Open the Photos app.
Select the Live Photo you want to edit.
Tap Edit.
Tap the Live Photo icon so that it’s not enabled.
At the top of the screen, tap Live, so that the word is grayed out and a line is through the icon.
Tap Done.
Now, if you long press the photo, you won’t see any movement. You can always restore a Live Photo that you’ve edited by following those steps and tapping the Live icon to highlight it and saving again.
How Much Space Do Live Photos Take Up?
We all know that video files take up more space than still photos. Does that mean you have to worry about Live Photos causing you to run out of storage?
Probably not. According to reports, Live Photos on average only take up about twice as much space as a standard photo; that’s a lot less than a video does.
What Else Can You Do With Live Photos?
Once you’ve got some exciting Live Photos on your iPhone, you can share Live Photos via email, social media, and text message.
To learn how to use Live Photos as wallpapers, which adds animation to your Home and Lock screens, check out How to Use Live Wallpapers on Your iPhone.
Источник


