- Глубокое погружение в определение местоположения
- Покажи мне код!
- Что оно делает на самом деле?
- Теперь у вас есть код, давайте подробнее рассмотрим его
- Свежесть — значит никогда не ждать
- Используйте Intent’ы для получения обновлений местоположения
- Получение данных во время автономной работы
- Оптимизация времени работы аккумулятора: умные сервисы и использование состояния устройства для переключения ресиверов
- Мониторинг состояния аккумулятора для уменьшения функциональности и экономии энергии
- How to Get Current Location in Android Using Location Manager
- How to Get Current Location in Android Using Location Manager
- Full Source Code
- You May Also Like:
- 27 thoughts on “How to Get Current Location in Android Using Location Manager”
- Subscribe For Latest Updates
- Location services on Android
- Location fundamentals
- Location providers
- Location permissions
- Using the fused location provider
- Checking if Google Play Services is installed
- FusedLocationProviderClient
- Getting the last known location
- Subscribing to location updates
- Using the Android Location Service API
- Location Manager
- Request location updates from the LocationManager
- Responding to updates from the LocationManager
- Unsubscribing to LocationManager updates
- Determining the best location provider for the LocationManager
- Summary
Глубокое погружение в определение местоположения
Этот пост является переводом топика из блога android-developers. Далее повествование ведется от Рето Майера, автора книги Professional Android 2 Application Development. Он пишет о том, как можно улучшить приложения, использующие местоположение, в смысле кэширования результатов, скорости работы и так далее.
Без разницы, ищете ли вы место, где бы поесть, или ближайшее место велосипедов Boris Bike, всегда есть задержка при получении данных местоположения от GPS и заполнении абстрактного списка результатов в вакууме. Когда вы находитесь в месте, где хотели бы получить контекстную информацию, то часто вы сталкиваетесь с отсутствием подключения к данным.
Вместо того, чтобы грозить кулаком в небо, я написал open-source приложение, которое включает в себя советы и рекомендации по сокращению времени между открытием приложения и просмотром актуальной информации о близлежащих местах, вкупе с разумным обеспечением offline режима работы. И всё это, сохраняя использование аккумулятора на возможном минимуме.
Покажи мне код!
Вы можете проверить мой проект Android Protips for Location. Не забудьте прочесть Readme.txt, чтобы успешно скомпилировать и запустить приложение.
Что оно делает на самом деле?
Оно использует Google Places API для реализации базовой функциональности приложений, которые которые используют местоположение для определения списка близлежащих достопримечательностей (точек на карте), позволяют просмотреть их детали, а также проверить или оценить.
Код реализует многие из лучших практик, о которых я подробно рассказал на своей сессии на Google I/O 2011, Android Protips: Advanced Topics for Expert Android Developers (видео). В том числе использование Intent’ов для получения обновлений о местоположении, используя Passive Location Provider, наблюдение за состоянием устройства для изменения частоты обновлений, переключение Receiver’ов во время исполнения приложения, и также используя Cursor Loader.
Приложение написано для Honeycomb, но также может работать и на версия 1.6 и выше.
Теперь у вас есть код, давайте подробнее рассмотрим его
Мой главный приоритет — свежесть: минимизация задержек между открытием приложения и возможностью проверить нужные места, и в то же время минимизировать использование аккумулятора.
Требования:
- Текущее местоположение должно находиться так быстро, как это возможно
- Список мест должен обновляться при изменение местоположения
- Список близлежащих мест должен быть доступен (в деталях) в автономном режиме
- Отметки также должны быть доступны в автономном режиме
- Данные о местоположении и другие данные пользователя должны быть правильно обработаны (см. более ранний пост с лучшими практиками )
Свежесть — значит никогда не ждать
Можно значительно сократить время ожидания получения первого приближения к местоположению, путём выбора последнего известного из Location Manager’a каждый раз, когда приложение переходит в активный режим.
В этом примере из GingerbreadLastLocationFinder, мы перебираем все провайдеры местоположения на устройстве, даже те, которые на данный момент недоступны, чтобы найти наиболее точное последнее местоположение.
Если есть координаты одного или более местоположений, то выбирается самое точное. Иначе, просто возвращается самый недавний результат.
Во втором случае (когда определено, что последнее обновление местоположения недостаточно недавнее), значение так или иначе возвращается, но мы запрашиваем одно обновление местоположения, используя самый быстрый провайдер.
К сожалению, мы не можем определить наибыстрейших провайдеров, но, на практике, понятно, что определение местоположения при помощи сети возвращает результаты быстрее.
Отметим также, что этот фрагмент кода показывает GingerbreadLastLocationFinder, который использует метод requestSingleUpdate для получения единоразового обновления местоположения. Эта функциональность не была доступна до Gingerbread — проверьте LegacyLastLocationFinder, посмотрите как я реализовал такую же функциональность для более ранних версий Android.
singleUpdateReceiver передает полученное обновление назад к вызывающему классу через слушателя Location Listener.
Используйте Intent’ы для получения обновлений местоположения
Получив наиболее точную/своевременную оценку текущей позиции, мы также хотим получать её обновления.
Класс PlacesConstants включает в себя набор значений, которые определяют частоту обновления местоположения. Настройте их, чтобы убедиться, что обновления приходят так часто, как это требуется.
Следующий шаг — запросить обновление местоположения от Location Manager. В следующем фрагменте кода, взятом из GingerbreadLocationUpdateRequester мы можем передать критерии, используемые для определения — какой Location Manager будет запрашивать обновления напрямую в вызове метода requestLocationUpdates.
Обратите внимание, что мы передаём Pending Intent, а не Location Listener.
Вообще, я предпочитаю использовать Location Listener’ов, потому что они предоставляют гибкость в регистрации приёмников в нескольких Activity или Сервисах, или напрямую в манифесте.
В этом приложении, новое местоположение означает обновленный список близлежащих мест. Это происходит через сервисы, которые отправляют запросы к серверу и обновляют Контент-провайдер, который заполняет список мест.
Так как изменение местоположения напрямую не обновляет UI, то имеет смысл создавать и регистрировать связанный LocationChangedReceiver в манифесте, а не в Activity.
LocationChangedReceiver извлекает местоположение из каждого обновления и запускает сервис PlaceUpdateService, чтобы обновить базу близлежащих мест.
Получение данных во время автономной работы
Чтобы добавить поддержку режима offline, мы начнём с кэширования результатов поиска по PlacesContentProvider и PlaceDetailsContentProvider.
Также, при определенный обстоятельствах нужно проводить выборку сведений о местоположении. Этот фрагмент кода из сервиса PlacesUpdateService демонстрирует, как предварительная выборка включается для ограниченного количества мест.
Обратите внимание на то, что предварительная выборка данных потенциально выключается при низком заряде аккумулятора.
Похожая техника используется для реализации offline отметок.
Оптимизация времени работы аккумулятора: умные сервисы и использование состояния устройства для переключения ресиверов
Нет смысла запускать сервис обновления, когда устройство находится в автономном режиме. Сервис PlaceUpdateService проверяет возможность соединения, прежде чем пытаться получить обновление.
Если соединения нет, то ActiveLocationChangedReceiver и PassiveLocationChangedReceiver выключаются, а ConnectivityChangedReceiver включается.
ConnectivityChangedReceiver прослушивает все изменения сетевого соединения. Когда производится новое подключение, то он просто выключает себя и включает слушателей местоположения.
Мониторинг состояния аккумулятора для уменьшения функциональности и экономии энергии
Когда телефон на последних 15%, то большинство приложений не работает, для того чтобы сохранить заряд. Мы можем зарегистрировать ресиверов в манифесте, чтобы выдавать предупреждение, когда устройство входит или выходит из состояния низкой батареи.
Этот фрагмент из PowerStateChangedReceiver выключает PassiveLocationChangedReceiver всякий раз, когда устройство переходит в состояние низкого аккумулятора и включает его, когда заряд в порядке.
Можно расширить эту логику, отключив все упреждающие выборки или уменьшив частоту обновления в условиях низкого заряда аккумулятора.
Источник
How to Get Current Location in Android Using Location Manager
In this GPS tutorial you will learn how to get current location in android.
LocationManager class provides the facility to get latitude and longitude coordinates of current location. The class in which you want to get location should implement LocationListener and override all its abstract methods.
How to Get Current Location in Android Using Location Manager
Add following permissions to AndroidManifest.xml file.
Following lines of code helps in getting current location.
In requestLocationUpdates() method the 2nd argument is time in milliseconds and 3rd argument is distance in meters. Here I have used 5000 and 5 that means after every 5 seconds and 5 meter the current location is fetched.
To get coordinates use getLatitude() and getLongitude() method on variable of Location class.
Whenever location is changed it can be fetched inside onLocationChanged() method.
Below is simple application that fetches current location on button click and displays it in textview.
Full Source Code
activity_main.xml
AndroidManifest.xml
MainActivity.java
Screenshot
Comment below if found anything incorrect or have doubts related to above android gps tutorial to get current location.
You May Also Like:
27 thoughts on “How to Get Current Location in Android Using Location Manager”
I’m studying 2nd yr cs engineering . will yu plz give some idea to do mini project in c,c++…..
locationManager.requestLocationUpdates(LocationManager.GPS_PROVIDER, 0, 0, this);
locationManager.requestLocationUpdates(LocationManager.NETWORK_PROVIDER, 0, 0, this);
it works if you add NETWORK_PROVIDER
Hi,
When i click the buton it show nothing lang and lat…but i add Toast between this,
Toast.makeText(getApplicationContext(), “Your Location”, Toast.LENGTH_LONG).show();
getLocation();
Toast.makeText(getApplicationContext(), “Your Location showing”, Toast.LENGTH_LONG).show();
But,Am able to find long and lat.
Advance Thanks
Hi
how do you solve it please ,i add Toast but nothing change
plz tell us where we needed to insert these toast..we are unable to do correct thsi
after clicking button it is not displaying any location
Makes sure the gps is one, test it in real android device.
I am running the tutorial code on a real device and gps is on but onLocationChanged is never called. I was wondering what version of the sdk you are running?
code not working
if(checkLocationPermission()) <
locationManager = (LocationManager) getSystemService(Context.LOCATION_SERVICE);
locationManager.requestLocationUpdates(LocationManager.GPS_PROVIDER, 0, 0, this);
Location location = locationManager.getLastKnownLocation(LocationManager.GPS_PROVIDER);
Log.e(“Current Location”,”lat: “+location.getLatitude()+” Lon: “+location.getLongitude());
this code is properly work.nycccc and easy code for get loacation.thank you
your code is not working
just button is getting displayed
when i clicked on that button,nothing got displayed
how to get current location not like above.. means current location place name should be displayed
its not working
It is not working
code is not working
I am running the tutorial code on a real device and gps is on but onLocationChanged is never called.
For this to work on my phone(Nougat). I needed to go to Settings, Location Services, App-Level Permission. My newly deployed app appeared in the list. I needed toggle the on button.
Then go back to your app, press the button, wait a few seconds and the location appears
Hope this helps.
thanx man.
.
.
your comment is really helpful
Thank you. This works. The problem at the above code is they are not asking for permission. You must give the permission manually.
your code is not working
just button is getting displayed
when i clicked on that button (GET CURRENT LOCATION),nothing got displayed, i have already GPS on
In above code you displaying the current location of your.,
But what if we want to find the location of other…
can you code for that.
Many Thanks sir,
It is working fine…We have to add device permission dynamically for latest versions of android…
Hi how to give device pemission. me too working on this code.. please help me.
Hi thank you for sharing. i need to get current location. but i click button i didn’t get any values.
am trying 1 week but i can’t get any code. please help me.
Hi, this code works accurately fine. This was not working on emulator. I installed this app in my mobile device and still it was not working. Then as Matt suggested above, I went to Settings of my mobile and typed Permissions in search box to access Permission Settings. There I opened App Permissions options and in App Permissions options I opened Your Location Permissions. There I saw all installed Apps of my device. I just turned on Your Location Permission for this app. Then I turned on GPS and ran the app. It worked.
Also be careful about package name while pasting the above code in your code.
Regards,
Subscribe For Latest Updates
Subscribe to our mailing list and get interesting stuff and updates to your email inbox.
Thank you for subscribing.
Something went wrong.
we respect your privacy and take protecting it seriously
Источник
Location services on Android
This guide introduces location-awareness in Android applications and illustrates how to get the user’s location using the Android Location Service API, as well as the fused location provider available with the Google Location Services API.
Android provides access to various location technologies such as cell tower location, Wi-Fi, and GPS. The details of each location technology are abstracted through location providers, allowing applications to obtain locations in the same way regardless of the provider used. This guide introduces the fused location provider, a part of the Google Play Services, which intelligently determines the best way to obtain the location of the devices based on what providers are available and how the device is being used. Android Location Service API and shows how to communicate with the system location Service using a LocationManager . The second part of the guide explores the Android Location Services API using the LocationManager .
As a general rule of thumb, applications should prefer to use the fused location provider, falling back the older Android Location Service API only when necessary.
Location fundamentals
In Android, no matter what API you choose for working with location data, several concepts remain the same. This section introduces Location Providers and location-related permissions.
Location providers
Several technologies are used internally to pinpoint the user’s location. The hardware used depends on the type of location provider selected for the job of collecting data. Android uses three location providers:
GPS Provider – GPS gives the most accurate location, uses the most power, and works best outdoors. This provider uses a combination of GPS and assisted GPS (aGPS), which returns GPS data collected by cellular towers.
Network Provider – Provides a combination of WiFi and Cellular data, including aGPS data collected by cell towers. It uses less power than the GPS Provider, but returns location data of varying accuracy.
Passive Provider – A «piggyback» option using providers requested by other applications or Services to generate location data in an application. This is a less reliable but power-saving option ideal for applications that don’t require constant location updates to work.
Location providers are not always available. For example, we might want to use GPS for our application, but GPS might be turned off in Settings, or the device might not have GPS at all. If a specific provider is not available, choosing that provider might return null .
Location permissions
A location-aware application needs access a device’s hardware sensors to receive GPS, Wi-Fi, and cellular data. Access is controlled through appropriate permissions in the application’s Android Manifest. There are two permissions available – depending on your application’s requirements and your choice of API, you will want to allow one:
ACCESS_FINE_LOCATION – Allows an application access to GPS. Required for the GPS Provider and Passive Provider options (Passive Provider needs permission to access GPS data collected by another application or Service). Optional permission for the Network Provider.
ACCESS_COARSE_LOCATION – Allows an application access to Cellular and Wi-Fi location. Required for Network Provider if ACCESS_FINE_LOCATION is not set.
For apps that target API version 21 (Android 5.0 Lollipop) or higher, you can enable ACCESS_FINE_LOCATION and still run on devices that do not have GPS hardware. If your app requires GPS hardware, you should explicitly add an android.hardware.location.gps uses-feature element to the Android Manifest. For more information, see the Android uses-feature element reference.
To set the permissions, expand the Properties folder in the Solution Pad and double-click AndroidManifest.xml. The permissions will be listed under Required Permissions:
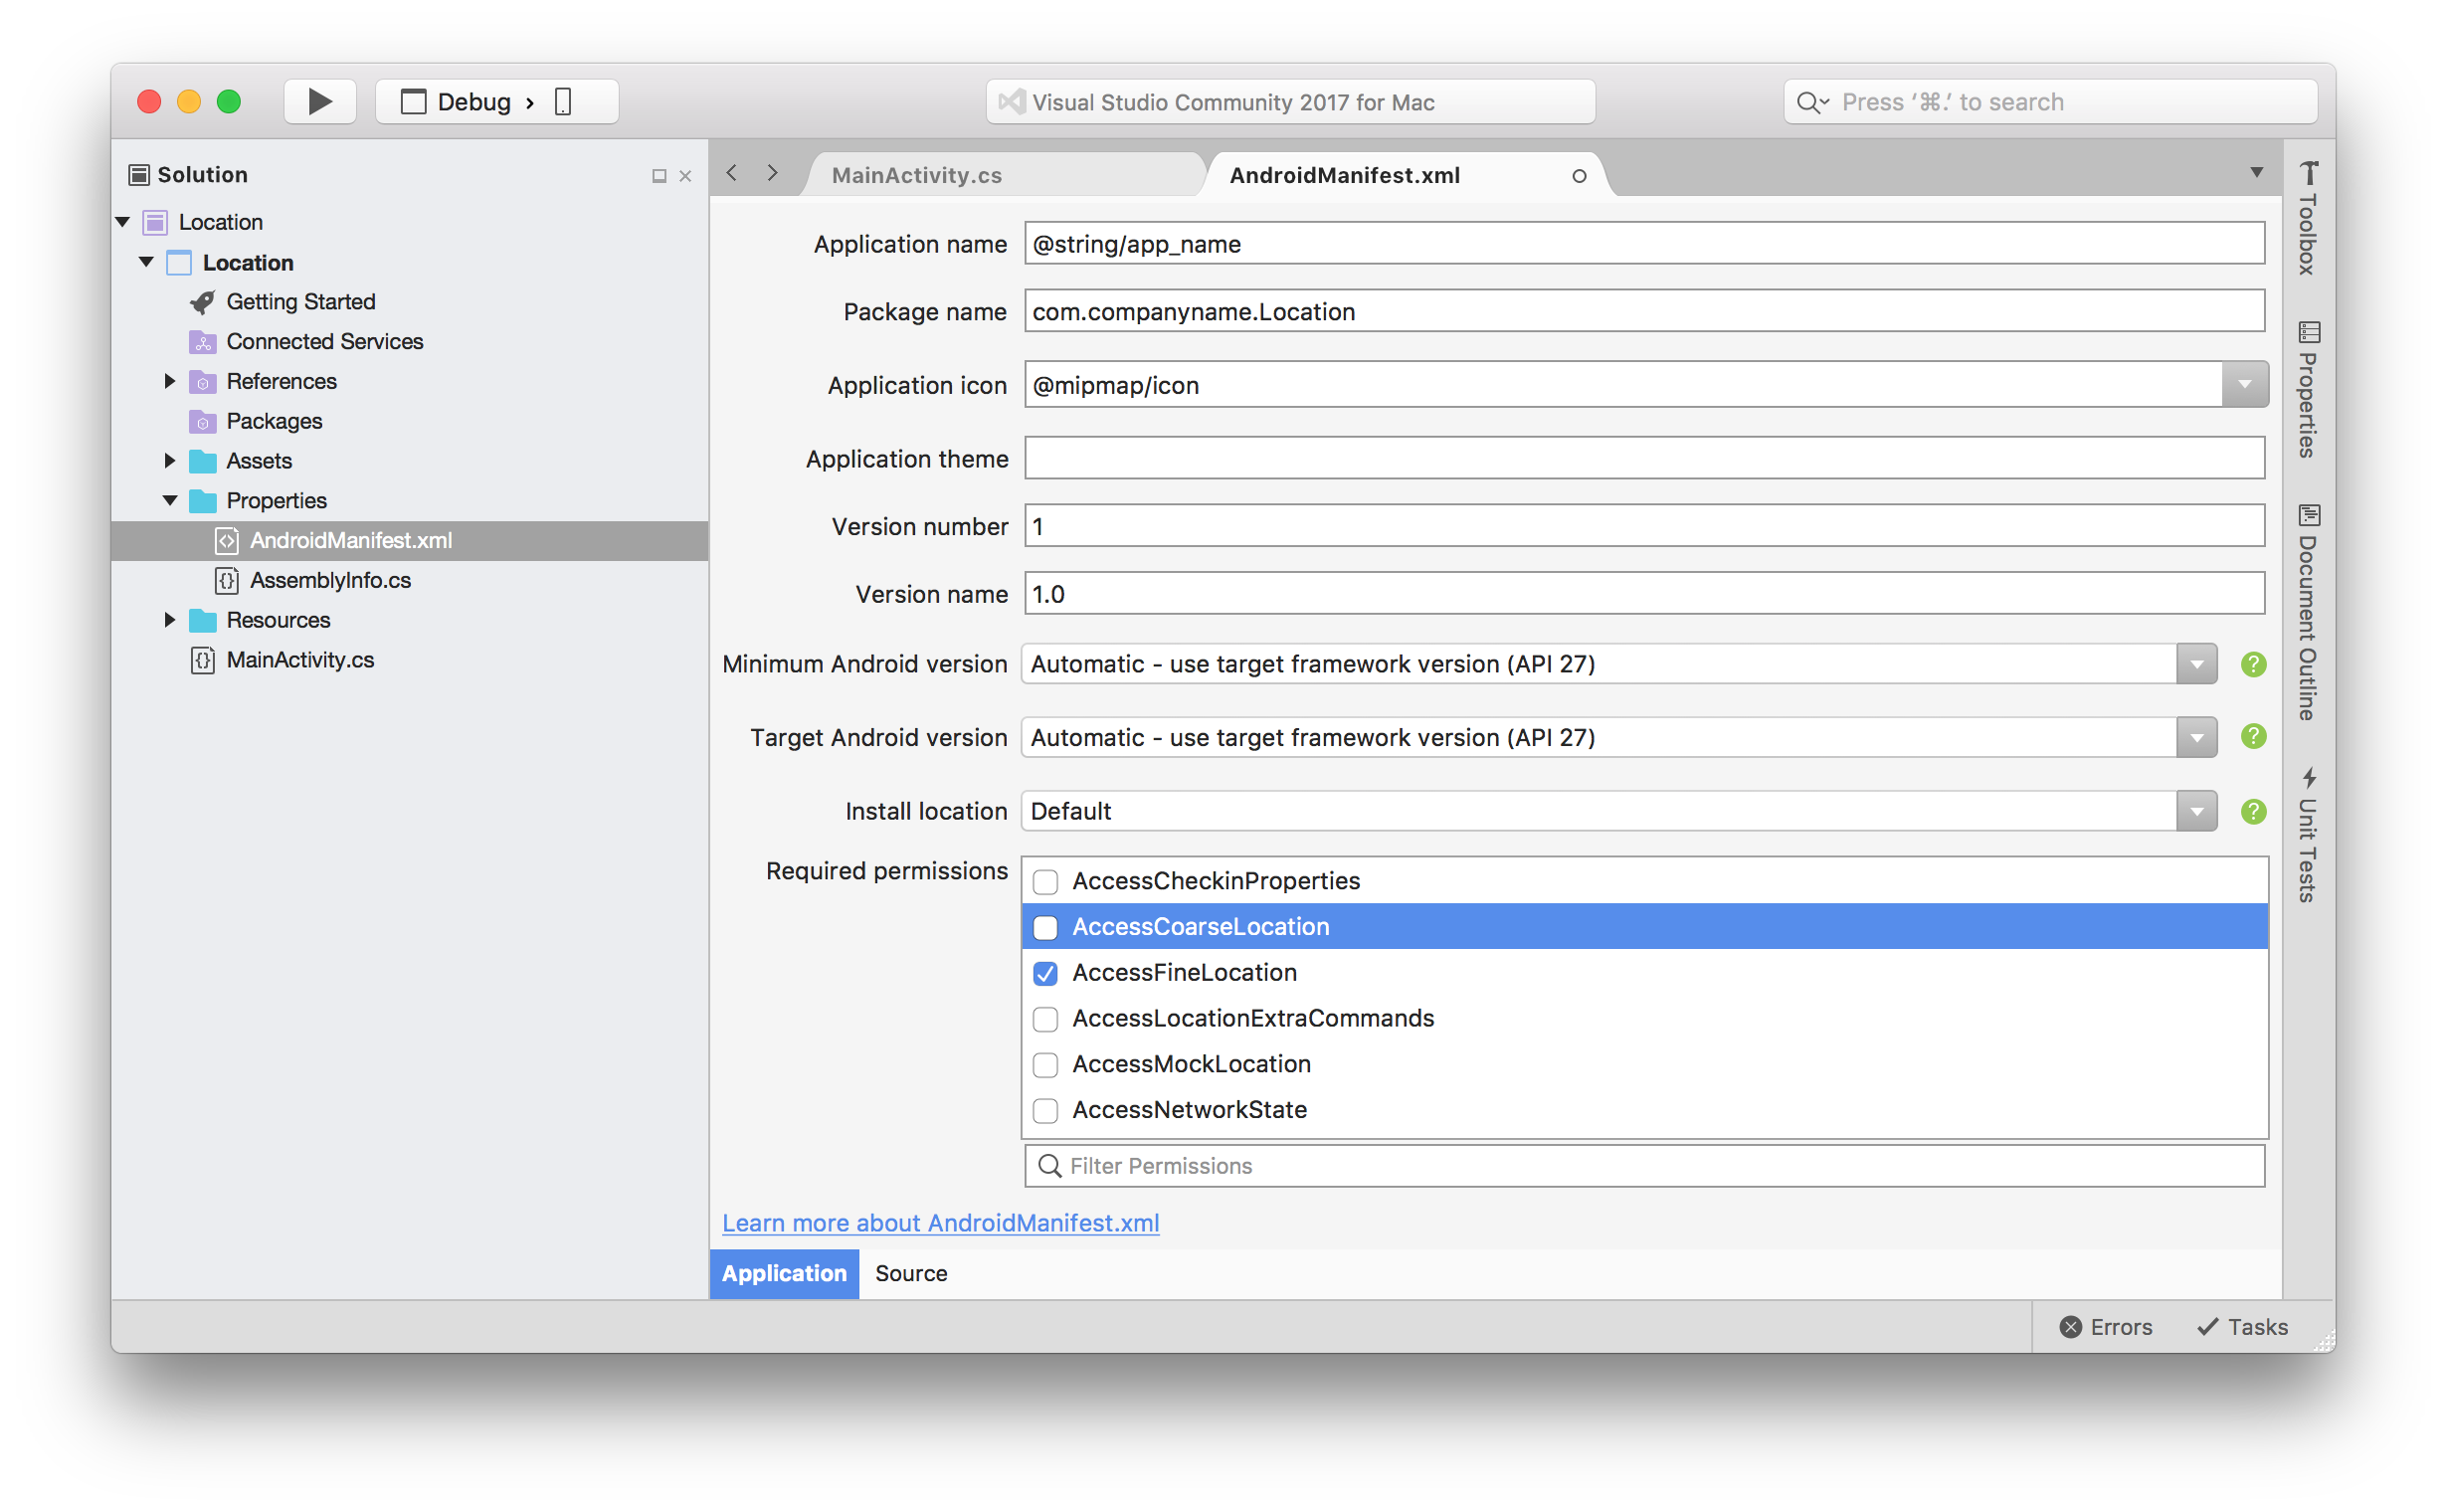
Setting either of these permissions tells Android that your application needs permission from the user in order to access to the location providers. Devices that run API level 22 (Android 5.1) or lower will ask the user to grant these permissions each time the app is installed. On devices running API level 23 (Android 6.0) or higher, the app should perform a run-time permission check before making a request of the location provider.
Note: Setting ACCESS_FINE_LOCATION implies access to both coarse and fine location data. You should never have to set both permissions, only the minimal permission your app requires to work.
This snippet is an example of how to check that an app has permission for the ACCESS_FINE_LOCATION permission:
Apps must be tolerant of the scenario where the user will not grant permission (or has revoked the permission) and have a way to gracefully deal with that situation. Please see the Permissions guide for more details on implementing run-time permission checks in Xamarin.Android.
Using the fused location provider
The fused location provider is the preferred way for Android applications to receive location updates from the device because it will efficiently select the location provider during run time to provide the best location information in a battery-efficient fashion. For example, a user walking around outdoors gets the best location reading with GPS. If the user then walks indoors, where GPS works poorly (if at all), the fused location provider may automatically switch to WiFi, which works better indoors.
The fused location provider API provides a variety of other tools to empower location-aware applications, including geofencing and activity monitoring. In this section, we are going to focus on the basics of setting up the LocationClient , establishing providers, and getting the user’s location.
The fused location provider is part of Google Play Services. The Google Play Services package must be installed and configured properly in the application for the fused location provider API to work, and the device must have the Google Play Services APK installed.
Before a Xamarin.Android application can use the fused location provider, it must add the Xamarin.GooglePlayServices.Location package to the project. In addition, the following using statements should be added to any source files that reference the classes described below:
Checking if Google Play Services is installed
A Xamarin.Android will crash if it tries to use the fused location provider when Google Play Services is not installed (or out of date) then a runtime exception would occur. If Google Play Services is not installed, then the application should fall back to the Android Location Service discussed above. If Google Play Services is out of date, then the app could display a message to the user asking them to update the installed version of Google Play Services.
This snippet is an example of how an Android Activity can programmatically check if Google Play Services is installed:
FusedLocationProviderClient
To interact with the fused location provider, a Xamarin.Android application must have an instance of the FusedLocationProviderClient . This class exposes the necessary methods to subscribe to location updates and to retrieve the last known location of the device.
The OnCreate method of an Activity is a suitable place to get a reference to the FusedLocationProviderClient , as demonstrated in the following code snippet:
Getting the last known location
The FusedLocationProviderClient.GetLastLocationAsync() method provides a simple, non-blocking way for a Xamarin.Android application to quickly obtain the last known location of the device with minimal coding overhead.
This snippet shows how to use the GetLastLocationAsync method to retrieve the location of the device:
Subscribing to location updates
A Xamarin.Android application can also subscribe to location updates from the fused location provider using the FusedLocationProviderClient.RequestLocationUpdatesAsync method, as shown in this code snippet:
This method takes two parameters:
Android.Gms.Location.LocationRequest – A LocationRequest object is how a Xamarin.Android application passes the parameters on how the fused location provider should work. The LocationRequest holds information such as how frequent requests should be made or how important an accurate location update should be. For example, an important location request will cause the device to use the GPS, and consequently more power, when determining the location. This code snippet shows how to create a LocationRequest for a location with high accuracy, checking approximately every five minutes for a location update (but not sooner than two minutes between requests). The fused location provider will use a LocationRequest as guidance for which location provider to use when trying to determine the device location:
Android.Gms.Location.LocationCallback – In order to receive location updates, a Xamarin.Android application must subclass the LocationProvider abstract class. This class exposed two methods which maybe invoked by the fused location provider to update the app with location information. This will be discussed in more detail below.
To notify a Xamarin.Android application of a location update, the fused location provider will invoke the LocationCallBack.OnLocationResult(LocationResult result) . The Android.Gms.Location.LocationResult parameter will contain the update location information.
When the fused location provider detects a change in the availability of location data, it will call the LocationProvider.OnLocationAvailability(LocationAvailability locationAvailability) method. If the LocationAvailability.IsLocationAvailable property returns true , then it can be assumed that the device location results reported by OnLocationResult are as accurate and as up to date as required by the LocationRequest . If IsLocationAvailable is false, then no location results will be return by OnLocationResult .
This code snippet is a sample implementation of the LocationCallback object:
Using the Android Location Service API
The Android Location Service is an older API for using location information on Android. Location data is collected by hardware sensors and collected by a system service, which is accessed in the application with a LocationManager class and an ILocationListener .
The Location Service is best suited for applications that must run on devices that do not have Google Play Services installed.
The Location Service is a special type of Service managed by the System. A System Service interacts with the device hardware and is always running. To tap into location updates in our application, we will subscribe to location updates from the system Location Service using a LocationManager and a RequestLocationUpdates call.
To obtain the user’s location using Android Location Service involves several steps:
- Get a reference to the LocationManager service.
- Implement the ILocationListener interface and handle events when the location changes.
- Use the LocationManager to request location updates for a specified provider. The ILocationListener from the previous step will be used to receive callbacks from the LocationManager .
- Stop location updates when the application it is no longer appropriate to receive updates.
Location Manager
We can access the system location service with an instance of the LocationManager class. LocationManager is a special class that lets us interact with the system location Service and call methods on it. An application can get a reference to the LocationManager by calling GetSystemService and passing in a Service type, as shown below:
OnCreate is a good place to get a reference to the LocationManager . It’s a good idea to keep the LocationManager as a class variable, so that we can call it at various points in the Activity lifecycle.
Request location updates from the LocationManager
Once the application has a reference to the LocationManager , it needs to tell the LocationManager what type of location information that are required, and how often that information is to be updated. Do this by calling RequestLocationUpdates on the LocationManager object, and passing in some criteria for updates and a callback that will receive the location updates. This callback is a type that must implement the ILocationListener interface (described in more detail later in this guide).
The RequestLocationUpdates method tells the system location Service that your application would like to start receiving location updates. This method allows you to specify the provider, as well as time and distance thresholds to control update frequency. For example, the method below requests location updates from the GPS location provider every 2000 milliseconds, and only when the location changes more than 1 metre:
An application should request location updates only as often as required for the application to perform well. This preserves battery life and creates a better experience for the user.
Responding to updates from the LocationManager
Once an application has requested updates from the LocationManager , it can receive information from the Service by implementing the ILocationListener interface. This interface provides four methods for listening to the location Service and the location provider, OnLocationChanged . The System will call OnLocationChanged when the user’s location changes enough to qualify as a location change according to the Criteria set when requesting location updates.
The following code shows the methods in the ILocationListener interface:
Unsubscribing to LocationManager updates
In order to conserve system resources, an application should unsubscribe to location updates as soon as possible. The RemoveUpdates method tells the LocationManager to stop sending updates to our application. As an example, an Activity may call RemoveUpdates in the OnPause method so that we are able to conserve power if an application doesn’t need location updates while its Activity is not on the screen:
If your application needs to get location updates while in the background, you’ll want to create a custom Service that subscribes to the system Location Service. Refer to the Backgrounding with Android Services guide for more information.
Determining the best location provider for the LocationManager
The application above sets GPS as the location provider. However, GPS may not be available in all cases, such as if the device is indoors or does not have a GPS receiver. If this is the case, the result is a null return for the Provider.
To get your app to work when GPS is not available, you use the GetBestProvider method to ask for the best available (device-supported and user-enabled) location provider at application launch. Instead of passing in a specific provider, you can tell GetBestProvider the requirements for the provider — such as accuracy and power — with a Criteria object. GetBestProvider returns the best provider for the given Criteria.
The following code shows how to get the best available provider and use it when requesting location updates:
If the user has disabled all location providers, GetBestProvider will return null . To see how this code works on a real device, be sure to enable GPS, Wi-Fi, and cellular networks under Google Settings > Location > Mode as shown in this screenshot:

The screenshot below demonstrates the location application running using GetBestProvider :

Keep in mind that GetBestProvider does not change the provider dynamically. Rather, it determines the best available provider once during the Activity lifecycle. If the provider status changes after it has been set, the application will require additional code in the ILocationListener methods – OnProviderEnabled , OnProviderDisabled , and OnStatusChanged – to handle every possibility related to the provider switch.
Summary
This guide covered obtaining the user’s location using both the Android Location Service and the fused location provider from Google Location Services API.
Источник


