- Programming VIP
- Namespaces for XML in Android
- Namespace
- Common Namespaces in Android
- 1,android
- 2,tools
- 2.1. tools only works at the development stage
- 2.2. Viewing Activity Layout Effect in tools:context Development
- 2.3. Viewing fragment layout effect in tools:layout development
- 3. Customizing Namespaces
- Inheriting View Class
- Drawing Views
- Use custom layout
- Custom Properties
- Parsing attributes
- Use custom properties
- summary
- Android styling: common theme attributes
- Android Styling: Themes vs Styles
- The Android styling system offers a powerful way to specify your app’s visual design, but it can be easy to misuse…
- Colors
- Dimens
- Drawables
- TextAppearances
- Shape
- Button Styles
- Floats
- App vs Android namespace
- More Resources
- Do It Yourself
- Question (mark) everything
Programming VIP
Very Interesting Programming
Namespaces for XML in Android
Introduction to basic concepts
Namespace
XML namespaces provide a way to avoid element naming conflicts.
For example, there is a student named Lin Xiaoming in School A and a student named Lin Xiaoming in School B. How can we identify these two students with the same name? Namespace will come in handy at this time. A and B can then be considered namespaces. In other words, the namespace contains a collection of specific attributes.
Common Namespaces in Android
The following sections introduce android, tools, and app (custom namespaces), which are common namespaces.
1,android
xmlns:android=»http://schemas.android.com/apk/res/android»
In the Android layout file, we all have to define such a namespace on the root element. Next, we will explain this line of code one by one.
xmlns: xml namespace, declaring that we are going to start defining a namespace
The string in which android is located, which we call namespace-prefix, actually means giving the namespace a name.
http://schemas.android.com/apk/res/android This looks like a URL, but this address is not accessible. In fact, this is a URI (Unified Resource Identifier), so its value is fixed, equivalent to a constant.
With him, you will be prompted to enter something, which can also be understood as a grammar file.
So what does this line of code do? The attributes in the namespace that we write in the code for the root element can be referenced, such as:
In this layout, as long as the attribute begins with android: it refers to the attribute in the namespace. As mentioned above, Android gives the namespace a name, just like we usually define variables, so the name can also be taken as our favorite. For example, if I take it as myns, then the code above We can also write as follows:
2,tools
Next, I will introduce three ways to use tools, which are also his characteristics.
2.1. tools only works at the development stage
We can think of him as a tool namespace, a tool to help developers. It only works at the development stage. When an app is packaged, all tools attributes will be discarded!
For example, basically in the android namespace, we want to test the effect of a component on the screen at the coding stage, and when app is installed on the phone, discard this code, then we can replace android with tools namespace:
This is the layout in the layout. When we switch to the view window (Design), we see that the top of the label is centered.
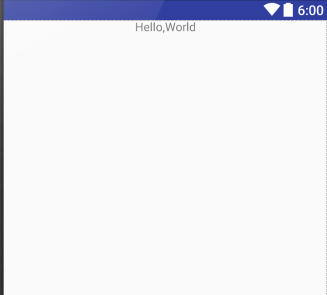
Then, when we run it on our mobile phone, it’s like this:
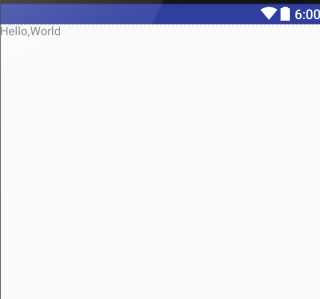
As shown above, tools:layoutgravity= «center» is indeed abandoned behind the runtime!
2.2. Viewing Activity Layout Effect in tools:context Development
The use of context is followed by the full package name of an Activty. What does it do?
When we set an Activity theme, it is set in AndroidManifest.xml, and the effect of the theme can only be displayed in Activty after running. With the help of context attribute, we can see the effect of the theme set in Activity in the layout in the development stage.
tools:context=»com.littlehan.myapplication.MainActivity»
By adding this line of code to the layout, you can see the effect of binding the theme to MainActivity in the design view.
2.3. Viewing fragment layout effect in tools:layout development
When we load a fragment on Activity, we need to see the effect after loading after running. Is there a way to display it in the layout preview window during the testing phase? The answer is yes, with the help of the layout attribute, for example,
Add such a line of code to the layout:
tools:layout=@layout/yourfragmentlayoutname
In this way, your fragment layout will be previewed on the specified main layout.
3. Customizing Namespaces
If you use DataBinding, you will use the app attribute in xml, which is actually a custom namespace.
Some friends may ask, where is the reflection of self-definition?
In fact, it can also be written as follows:
xmlns:app=»http://schemas.android.com/apk/res/ Complete package name»
Just fill in our package name after res/ However, in my own Android Studio 2.0, this is not recommended, so it is more recommended that you use the first naming method.
Usually custom namespaces are inseparable from custom views. When Android’s own controls can’t meet our needs, we will draw some views ourselves. When we add custom attributes to these customized views, we need to create our own namespaces.
As I said at the beginning, the namespace contains a collection of specific attributes, so the idea is clear, that is to say, the actual process of customizing a namespace is to customize attributes.
We learn about custom namespaces through a simple custom TextView. The process of customizing the View can be divided into the following steps:
Inheriting View Class
Create a class named CustomTextView Inheritance View
(View is the parent class of all views) and implements its three constructions
Drawing Views
Overload the onDraw() method to draw a paragraph of text
Use custom layout
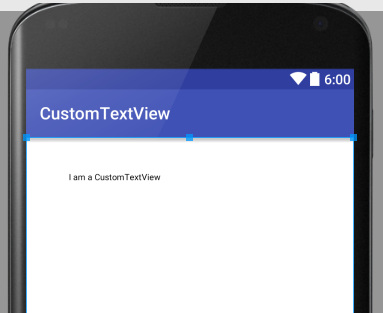
Introducing custom controls into layout
Here, a custom control is introduced into the layout, and we can switch to the view window to see the effect.
But this custom control can not change the font color, font size, custom text and so on in xml. The implementation of this function is actually the process of creating custom attributes in XML and parsing attributes in custom View s.
Custom Properties
Create a new xml file named attrs under the values root directory to customize our attributes (the attributes defined here are the attributes in our custom namespace)
Name defines the name of an attribute
format defines the type of attribute
Parsing attributes
Resolve these attributes in CustomeTextView
Use custom properties
To use custom attributes, you need to customize the attribute namespace by inserting such a line of code under the root element of the layout file:
xmlns:app=»http://schemas.android.com/apk/res-auto»
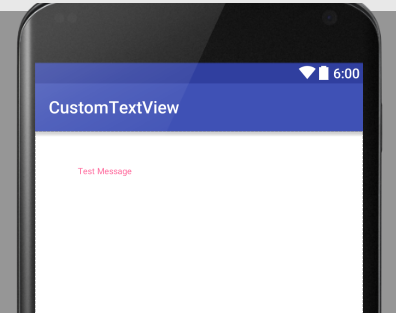
So we can use custom attributes:
Switch to the view preview window and you can see that the custom properties are in effect:
summary
In Android, namespaces can be divided into three categories:
Among them, the attributes in 1 and 2 namespaces are encapsulated by the system, and the attributes in the third namespace are user-defined.
Added by vijayfreaks on Thu, 18 Jul 2019 04:11:20 +0300
Источник
Android styling: common theme attributes

In the previous article in this series on Android styling, we looked at the difference between themes and styles and how themes allow you to write more flexible styles and layouts which isolate changes:
Android Styling: Themes vs Styles
The Android styling system offers a powerful way to specify your app’s visual design, but it can be easy to misuse…
Specifically we recommended using theme attributes to provide a point of indirection to resources, so that you can vary them (e.g. in dark theme). That is, if you find yourself writing a direct resource reference (or worse yet, a hardcoded value 😱) in a layout or style, consider if you should use a theme attribute instead.
But what theme attributes are available to use? This post highlights the common ones that you should know about; those that come from Material, AppCompat or the platform. This is not a complete list (for that I’d recommend browsing the attrs files linked below where they are defined) but these are the attributes that I use all the time.
Colors
Many of these colors come from the Material color system, which defines semantic names for colors that you can use throughout your app (implemented as theme attrs).
- ?attr/colorPrimary The primary branding color for the app.
- ?attr/colorSecondary The secondary branding color for the app, usually a bright complement to the primary branding color.
- ?attr/colorOn[Primary, Secondary, Surface etc] A color which contrasts against the named color.
- ?attr/color[Primary, Secondary]Variant An alternate shade of the given color.
- ?attr/colorSurface A color for surfaces of components, such as cards, sheets, and menus.
- ?android:attr/colorBackground The background for the screen.
- ?attr/colorPrimarySurface switches between colorPrimary in the Light themes, colorSurface in the Dark theme.
- ?attr/colorError A color for displaying errors.
Other handy colors:
- ?attr/colorControlNormal The color applied to icons/controls in their normal state.
- ?attr/colorControlActivated The color applied to icons/controls in their activated state (e.g. checked).
- ?attr/colorControlHighlight The color applied to control highlights (e.g. ripples, list selectors).
- ?android:attr/textColorPrimary The most prominent text color.
- ?android:attr/textColorSecondary Secondary text color.
Dimens
- ?attr/listPreferredItemHeight Standard (min) height for list items.
- ?attr/actionBarSize The height of a toolbar.
Drawables
- ?attr/selectableItemBackground A ripple/highlight for interactive items (also handy for foregrounds!!)
- ?attr/selectableItemBackgroundBorderless An unbounded ripple.
- ?attr/dividerVertical A drawable that may be used as a vertical divider between visual elements.
- ?attr/dividerHorizontal A drawable that may be used as a horizontal divider between visual elements.
TextAppearances
Material defines a type scale — a discrete set of text styles that you should use throughout your app, each of which is provided as a theme attribute which can be set as a textAppearance . Check out the Material type scale generator to help generate a scale for different fonts.
- ?attr/textAppearanceHeadline1 defaults to light 96sp text.
- ?attr/textAppearanceHeadline2 defaults to light 60sp text.
- ?attr/textAppearanceHeadline3 defaults to regular 48sp text.
- ?attr/textAppearanceHeadline4 defaults to regular 34sp text.
- ?attr/textAppearanceHeadline5 defaults to regular 24sp text.
- ?attr/textAppearanceHeadline6 defaults to medium 20sp text.
- ?attr/textAppearanceSubtitle1 defaults to regular 16sp text.
- ?attr/textAppearanceSubtitle2 defaults to medium 14sp text.
- ?attr/textAppearanceBody1 defaults to regular 16sp text.
- ?attr/textAppearanceBody2 defaults to regular 14sp text.
- ?attr/textAppearanceCaption defaults to regular 12sp text.
- ?attr/textAppearanceButton defaults to medium all caps 14sp text.
- ?attr/textAppearanceOverline defaults to regular all caps 10sp text.
Shape
Material employs a shape system which is implemented as theme attrs for small, medium and large components. Note that if you’re setting a shape appearance on a custom component, you likely want to use a MaterialShapeDrawable as it’s background which understands and implements the shaping.
- ?attr/shapeAppearanceSmallComponent used for Buttons, Chips, Text Fields etc. Defaults to rounded 4dp corners.
- ?attr/shapeAppearanceMediumComponent used for Cards, Dialogs, Date Pickers etc. Defaults to rounded 4dp corners.
- ?attr/shapeAppearanceLargeComponent used for Bottom Sheets etc. Defaults to rounded 0dp corners (i.e. square!)
Button Styles

This might seem super specific, but Material defines three types of buttons: Contained, Text and Outlined. MDC offers theme attrs that you can use to set the style of a MaterialButton :
- ?attr/materialButtonStyle defaults to contained (or just omit the style).
- ?attr/borderlessButtonStyle for a text style button.
- ?attr/materialButtonOutlinedStyle for outlined style.
Floats
- ?android:attr/disabledAlpha Default disabled alpha for widgets.
- ?android:attr/primaryContentAlpha The alpha applied to the foreground elements.
- ?android:attr/secondaryContentAlpha The alpha applied to secondary elements.
App vs Android namespace
You might have noticed that some attributes are referenced by
? android:attr/foo and others just by ?attr/bar . This is because some are defined by the Android platform, and as such you need the android part to reference them by their namespace (just like with view attributes in layouts: android:id ). Those without come from static libraries (i.e. AppCompat or MDC) which are compiled into your application, so don’t need the namespace (similar to how you might use app:baz in a layout). Some elements are defined both in the platform and in a library e.g. colorPrimary . In these cases, prefer the non-platform version, as this can be used on all API levels i.e. they’re duplicated in a library precisely to backport them. In these cases, I’ve listed the non-platform versions above.
prefer non-platform attributes which can be used on all API levels
More Resources
For a complete list of the theme attributes available to use, go to the source of truth:
Material Design Components:
Do It Yourself
Sometimes there isn’t a theme attribute which abstracts something you’d like to vary by theme. No worries… create your own! Here’s an example from the Google I/O app which shows a list of conference sessions in two screens.
They’re largely similar but the left screen must leave space for the sticky time headers while the right screen does not. We implemented this by abstracting where to align items behind a theme attribute so that we can vary them by theme and use the same layout across two different screens:
1. Define the theme attribute in attrs.xml
2. Provide different values in different themes:
3. Use the theme attr in the single layout used on both screens (each using one of the above themes):
Question (mark) everything
Knowing what theme attributes are available, equips you to use them when writing your layouts, styles or drawables. Using theme attributes makes it much easier to support theming (like dark theme) and to write more flexible, maintainable code. For a deep dive on this, join us in our next post in this series:
Источник


