- Android NDK Native APIs
- On this page
- Overview
- Major Native API Updates
- Android API level 3
- C library
- C++ library
- Android-specific log support
- ZLib compression library
- Dynamic linker library
- Android API level 4
- OpenGL ES 1.x Library
- Android API level 5
- OpenGL ES 2.0 library:
- Android API level 8
- jnigraphics
- Android API level 9
- OpenSL ES
- Android native application APIs
- Android API level 14
- OpenMAX AL
- OpenSL ES
- Android API level 18
- OpenGL ES 3.0
- Android API level 21
- OpenGL ES 3.1
- Android Native Modules
- Create a Calendar Native Module
- Setup
- Create A Custom Native Module File
- Module Name
- Export a Native Method to JavaScript
- Synchronous Methods
- Register the Module (Android Specific)
- Test What You Have Built
- Building as You Iterate
- Recap✨
- Beyond a Calendar Native Module
- Better Native Module Export
- Argument Types
- Exporting Constants
- Callbacks
- Promises
- Sending Events to JavaScript
- Getting Activity Result from startActivityForResult
- Listening to Lifecycle Events
- Threading
Android NDK Native APIs
On this page
The Android NDK provides a set of native headers and shared library files that has gradually increased with successive releases of new Android API levels. This page explains these headers and files, and maps them to specific Android API levels.
Overview
There are two basic steps to enable your app to use the libraries that the NDK provides:
- Include in your code the headers associated with the libraries you wish to use.
- Tell the build system that your native module needs to link against the libraries at load time. For example, to link against /system/lib/libfoo.so , add the following line to your Android.mk file:
To list multiple libraries, use a space as a delimiter. For more information about using the LOCAL_LDLIBS variable, see Android.mk.
For all API levels, the build system automatically links the standard C libraries, the standard C++ libraries, real-time extensions, and pthread ; you do not need to include them when defining your LOCAL_LDLIBS variable. For more information about the C and C++ libraries, see Android API level 3.
Table 1 shows the correspondence between NDK-supported API levels and Android releases.
Table 1. NDK-supported API levels and corresponding Android releases.
| NDK-supported API level | Android release |
|---|---|
| 3 | 1.5 |
| 4 | 1.6 |
| 5 | 2.0 |
| 8 | 2.2 |
| 9 | 2.3 through 3.0.x |
| 12 | 3.1.x |
| 13 | 3.2 |
| 14 | 4.0 through 4.0.2 |
| 15 | 4.0.3 and 4.0.4 |
| 16 | 4.1 and 4.1.1 |
| 17 | 4.2 and 4.2.2 |
| 18 | 4.3 |
| 19 | 4.4 |
| 21 | 4.4W and 5.0 |
Each new release of NDK headers and libraries for a given Android API level is cumulative; you are nearly always safe if you use the most recently released headers when building your app. For example, you can use the NDK headers for Android API level 21 for an app targeting API level 16. By doing so, however, you increase your APK’s footprint.
For more information about Android API levels, see What is API Level?.
Major Native API Updates
Android API level 3
The NDK provides the following APIs for developing native code that runs on Android 1.5 system images and above.
C library
The C library headers for Android 1.5 are available through their standard names, such as stdlib.h and stdio.h . If a header is missing at build time, it’s because the header is not available on the 1.5 system image.
C++ library
An extremely minimal C++ support API is available. For more information on C++ library support, see C++ Library Support.
Android-specific log support
You can write your own wrapper macros to access this functionality. If you wish to perform logging, your native module should link to /system/lib/liblog.so . Implement this linking by including the following line in your Android.mk file:
ZLib compression library
You can use the Zlib compression library by including zlib.h and zconf.h . You must also link your native module against /system/lib/libz.so by including the following line in your Android.mk file:
Dynamic linker library
You can access the Android dynamic linker’s dlopen() , dlsym() , and dlclose() functions by including dlfcn.h . You must also link against /system/lib/libdl.so by including the following line in your Android.mk file:
Android API level 4
The NDK provides the following APIs for developing native code that runs on Android 1.6 system images and above.
OpenGL ES 1.x Library
The standard OpenGL ES headers gl.h and glext.h contain the declarations necessary for performing OpenGL ES 1.x rendering calls from native code.
To use these headers, link your native module to /system/lib/libGLESv1_CM.so by including the following line in your Android.mk file:
All Android-based devices support OpenGL ES 1.0, because Android provides an Open GL 1.0-capable software renderer that can be used on devices without GPUs.
Only Android devices that have the necessary GPU fully support OpenGL ES 1.1. An app can query the OpenGL ES version string and extension string to determine whether the current device supports the features it needs. For information on how to perform this query, see the description of glGetString() in the OpenGL specification.
Additionally, you must put a tag in your manifest file to indicate the version of OpenGL ES that your application requires.
The EGL APIs are only available starting from API level 9. You can, however, use the VM to perform some of the operations that you would get from those APIS. These operations include surface creation and flipping. For an example of how to use GLSurfaceView , see Introducing GLSurfaceView.
The san-angeles sample application provides an example of how to perform these operations, rendering each frame in native code. This sample is a small Android port of the excellent San Angeles Observation demo program.
Android API level 5
The NDK provides the following APIs for developing native code that runs on Android 2.0 system images and above.
OpenGL ES 2.0 library:
The standard OpenGL ES 2.0 headers and contain the declarations needed for performing OpenGL ES 2.0 rendering calls from native code. These rendering calls provide the ability to use the GLSL language to define and use vertex and fragment shaders.
To use OpenGL ES 2.0, link your native module to /system/lib/libGLESv2.so by including the following line in your Android.mk file:
Not all devices support OpenGL ES 2.0. An app can query the OpenGL ES version string and extension string to determine whether the current device supports the features it needs. For information on how to perform this query, see the description of glGetString() in the OpenGL specification.
Additionally, you must put a tag in your manifest file to indicate which version of OpenGL ES your application requires. For more information about the OpenGL ES settings for , see OpenGL ES.
The hello-gl2 sample application provies a basic example of how to use OpenGL ES 2.0 with the NDK.
The EGL APIs are only available starting from API level 9. You can, however, use the VM to perform some of the operations that you would get from those APIs. These operations include surface creation and flipping. For an example of how to use GLSurfaceView , see Introducing GLSurfaceView.
Note: The Android emulator does not support OpenGL ES 2.0 hardware emulation. Running and testing code that uses this API requires a real device with hardware that can support OpenGL ES 2.0.
Android API level 8
The NDK provides the following APIs for developing native code that runs on Android 2.2 system images and above.
jnigraphics
The jnigraphics library exposes a C-based interface that allows native code to reliably access the pixel buffers of Java bitmap objects. The workflow for using jnigraphics is as follows:
- Use AndroidBitmap_getInfo() to retrieve information from JNI, such as width and height, about a given bitmap handle.
- Use AndroidBitmap_lockPixels() to lock the pixel buffer and retrieve a pointer to it. Doing so ensures that the pixels do not move until the app calls AndroidBitmap_unlockPixels() .
- In native code, modify the pixel buffer as appropriate for its pixel format, width, and other characteristics.
- Call AndroidBitmap_unlockPixels() to unlock the buffer.
To use jnigraphics , include the header in your source code, and link against jnigraphics by including the following line in your Android.mk file:
Additional details about this feature are in the comments of the bitmap.h file.
Android API level 9
The NDK provides the following APIs for developing native code that runs on Android 2.3 system images and above.
EGL provides a native platform interface for allocating and managing OpenGLES surfaces. For more information about its features, see EGL Native Platform Interface.
EGL allows you to perform the following operations from native code:
- List supported EGL configurations.
- Allocate and release OpenGLES surfaces.
- Swap or flip surfaces.
The following headers provide EGL functionality:
- EGL/egl.h : the main EGL API definitions.
- EGL/eglext.h : EGL extension-related definitions.
To link against the system’s EGL library, add the following line to your Android.mk file:
OpenSL ES
Android native audio handling is based on the Khronos Group OpenSL ES 1.0.1 API.
The standard OpenSL ES headers OpenSLES.h and OpenSLES_Platform.h contain the declarations necessary for performing audio input and output from the native side of Android. The NDK distribution of the OpenSL ES also provides Android-specific extensions. For information about these extensions, see the comments in OpenSLES_Android.h and OpenSLES_AndroidConfiguration.h .
The system library libOpenSLES.so implements the public native audio functions. Link against it by adding the following line to your Android.mk file:
For more information about the OpenSL ES API, refer to $NDK/docs/Additional_library_docs/opensles/index.html , where $NDK is your NDK installation root directory.
Android native application APIs
Starting from API level 9, you can write an entire Android app with native code, without using any Java.
Note: Writing your app in native code is not, in itself, enough for your app to run in the VM. Moreover, your app must still access most features of the Android platform via JNI.
This release provides the following native headers:
For more information about these headers, see the NDK API Reference documentation, as well as the comments in the headers, themselves. Also, for more information about the larger topic of writing native apps, see Native Activities and Applications.
When you include one or more of these headers, you must also link against the libandroid.so library. To link against libandroid.so , include the following line in your Android.mk file:
Android API level 14
The NDK provides the following APIs for developing native code that runs on Android 4.0 system images and above.
OpenMAX AL
Android native multimedia handling is based on Khronos Group OpenMAX AL 1.0.1 API.
The standard OpenMAX AL headers and contain the declarations necessary for performing multimedia output from the native side of Android.
The NDK distribution of OpenMAX AL also provides Android-specific extensions. For information about these extensions, see the comments in OpenMAXAL_Android.h .
The system library libOpenMAXAL.so implements the public native multimedia functions. To link against this library, include the following line in your Android.mk file:
For more information about this topic, see $NDK/docs/openmaxal/index.html , where $NDK is the root directory of your NDK installation.
OpenSL ES
OpenSL ES support for this Android API level adds PCM support. For more information about OpenSL ES support in the NDK, see OpenSL ES.
Android API level 18
The NDK provides the following APIs for developing native code that runs on Android 4.3 system images and above.
OpenGL ES 3.0
The standard OpenGL ES 3.0 headers gl3.h and gl3ext.h contain the declarations needed for performing OpenGL ES 3.0 rendering calls from native code. These rendering calls provide the ability to use the GLSL language to define and use vertex and fragment shaders.
To use OpenGL ES 3.0, link your native module against /system/lib/libGLESv3.so by including the following line in your Android.mk file:
Not all devices support OpenGL ES 3.0. An app can query the OpenGL ES version string and extension string to determine whether the current device supports the features it needs. For information on how to perform this query, see the description of glGetString() in the OpenGL specification.
Additionally, you must put a tag in your manifest file to indicate which version of OpenGL ES your application requires. For more information about the OpenGL ES settings for , see OpenGL ES.
The gles3jni sample application provides a basic example of how to use OpenGL ES 3.0 with the NDK.
Note: The Android emulator does not support OpenGL ES 3.0 hardware emulation. Running and testing code that uses this API requires a real device with hardware that can support OpenGL ES 3.0.
Android API level 21
The NDK provides the following APIs for developing native code that runs on Android 4.3 system images and above.
OpenGL ES 3.1
The standard OpenGL ES 3.1 headers gl31.h and gl3ext.h contain the declarations needed for performing OpenGL ES 3.1 rendering calls from native code. These rendering calls provide the ability to use the GLSL language to define and use vertex and fragment shaders.
To use OpenGL ES 3.1, link your native module against /system/lib/libGLESv3.so by including the following line in your Android.mk file:
Not all devices support OpenGL ES 3.1. An app can query the OpenGL ES version string and extension string to determine whether the current device supports the features it needs. For information on how to perform this query, see the description of glGetString() in the OpenGL specification.
Additionally, you must put a tag in your manifest file to indicate which version of OpenGL ES your application requires. For more information about the OpenGL ES settings for , see OpenGL ES.
The gles3jni sample application provides a basic example of how to use OpenGL ES 3.1 with the NDK.
Note: The Android emulator does not support OpenGL ES 3.1 hardware emulation. Running and testing code that uses this API requires a real device with hardware that can support OpenGL ES 3.1.
Источник
Android Native Modules
Welcome to Native Modules for Android. Please start by reading the Native Modules Intro for an intro to what native modules are.
Create a Calendar Native Module
In the following guide you will create a native module, CalendarModule , that will allow you to access Android’s calendar APIs from JavaScript. By the end, you will be able to call CalendarModule.createCalendarEvent(‘Dinner Party’, ‘My House’); from JavaScript, invoking a Java method that creates a calendar event.
The React Native team is currently working on a re-architecture of the Native Module system. This new system is called TurboModules, and it will help facilitate more efficient type-safe communication between JavaScript and native, without relying on the React Native bridge. It will also enable new extensions that weren’t possible with the legacy Native Module system. You can read more about it here. Throughout these docs we have added notes around parts of Native Modules that will change in the TurboModules release and how you can best prepare for a smooth upgrade to TurboModules.
Setup
To get started, open up the Android project within your React Native application in Android Studio. You can find your Android project here within a React Native app:
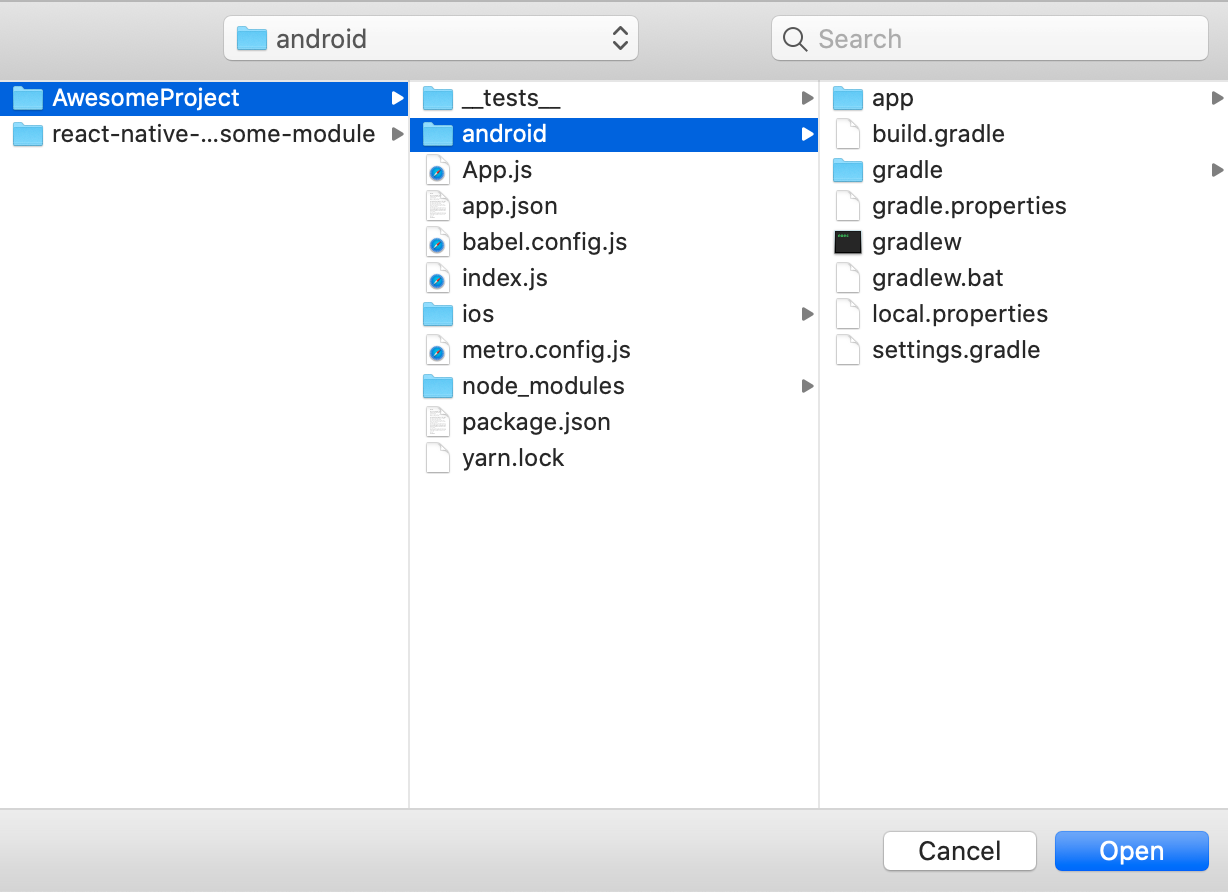 Image of where you can find your Android project
We recommend using Android Studio to write your native code. Android studio is an IDE built for Android development and using it will help you resolve minor issues like code syntax errors quickly.
We also recommend enabling Gradle Daemon to speed up builds as you iterate on Java code.
Create A Custom Native Module File
The first step is to create the CalendarModule.java Java file inside android/app/src/main/java/com/your-app-name/ folder . This Java file will contain your native module Java class.
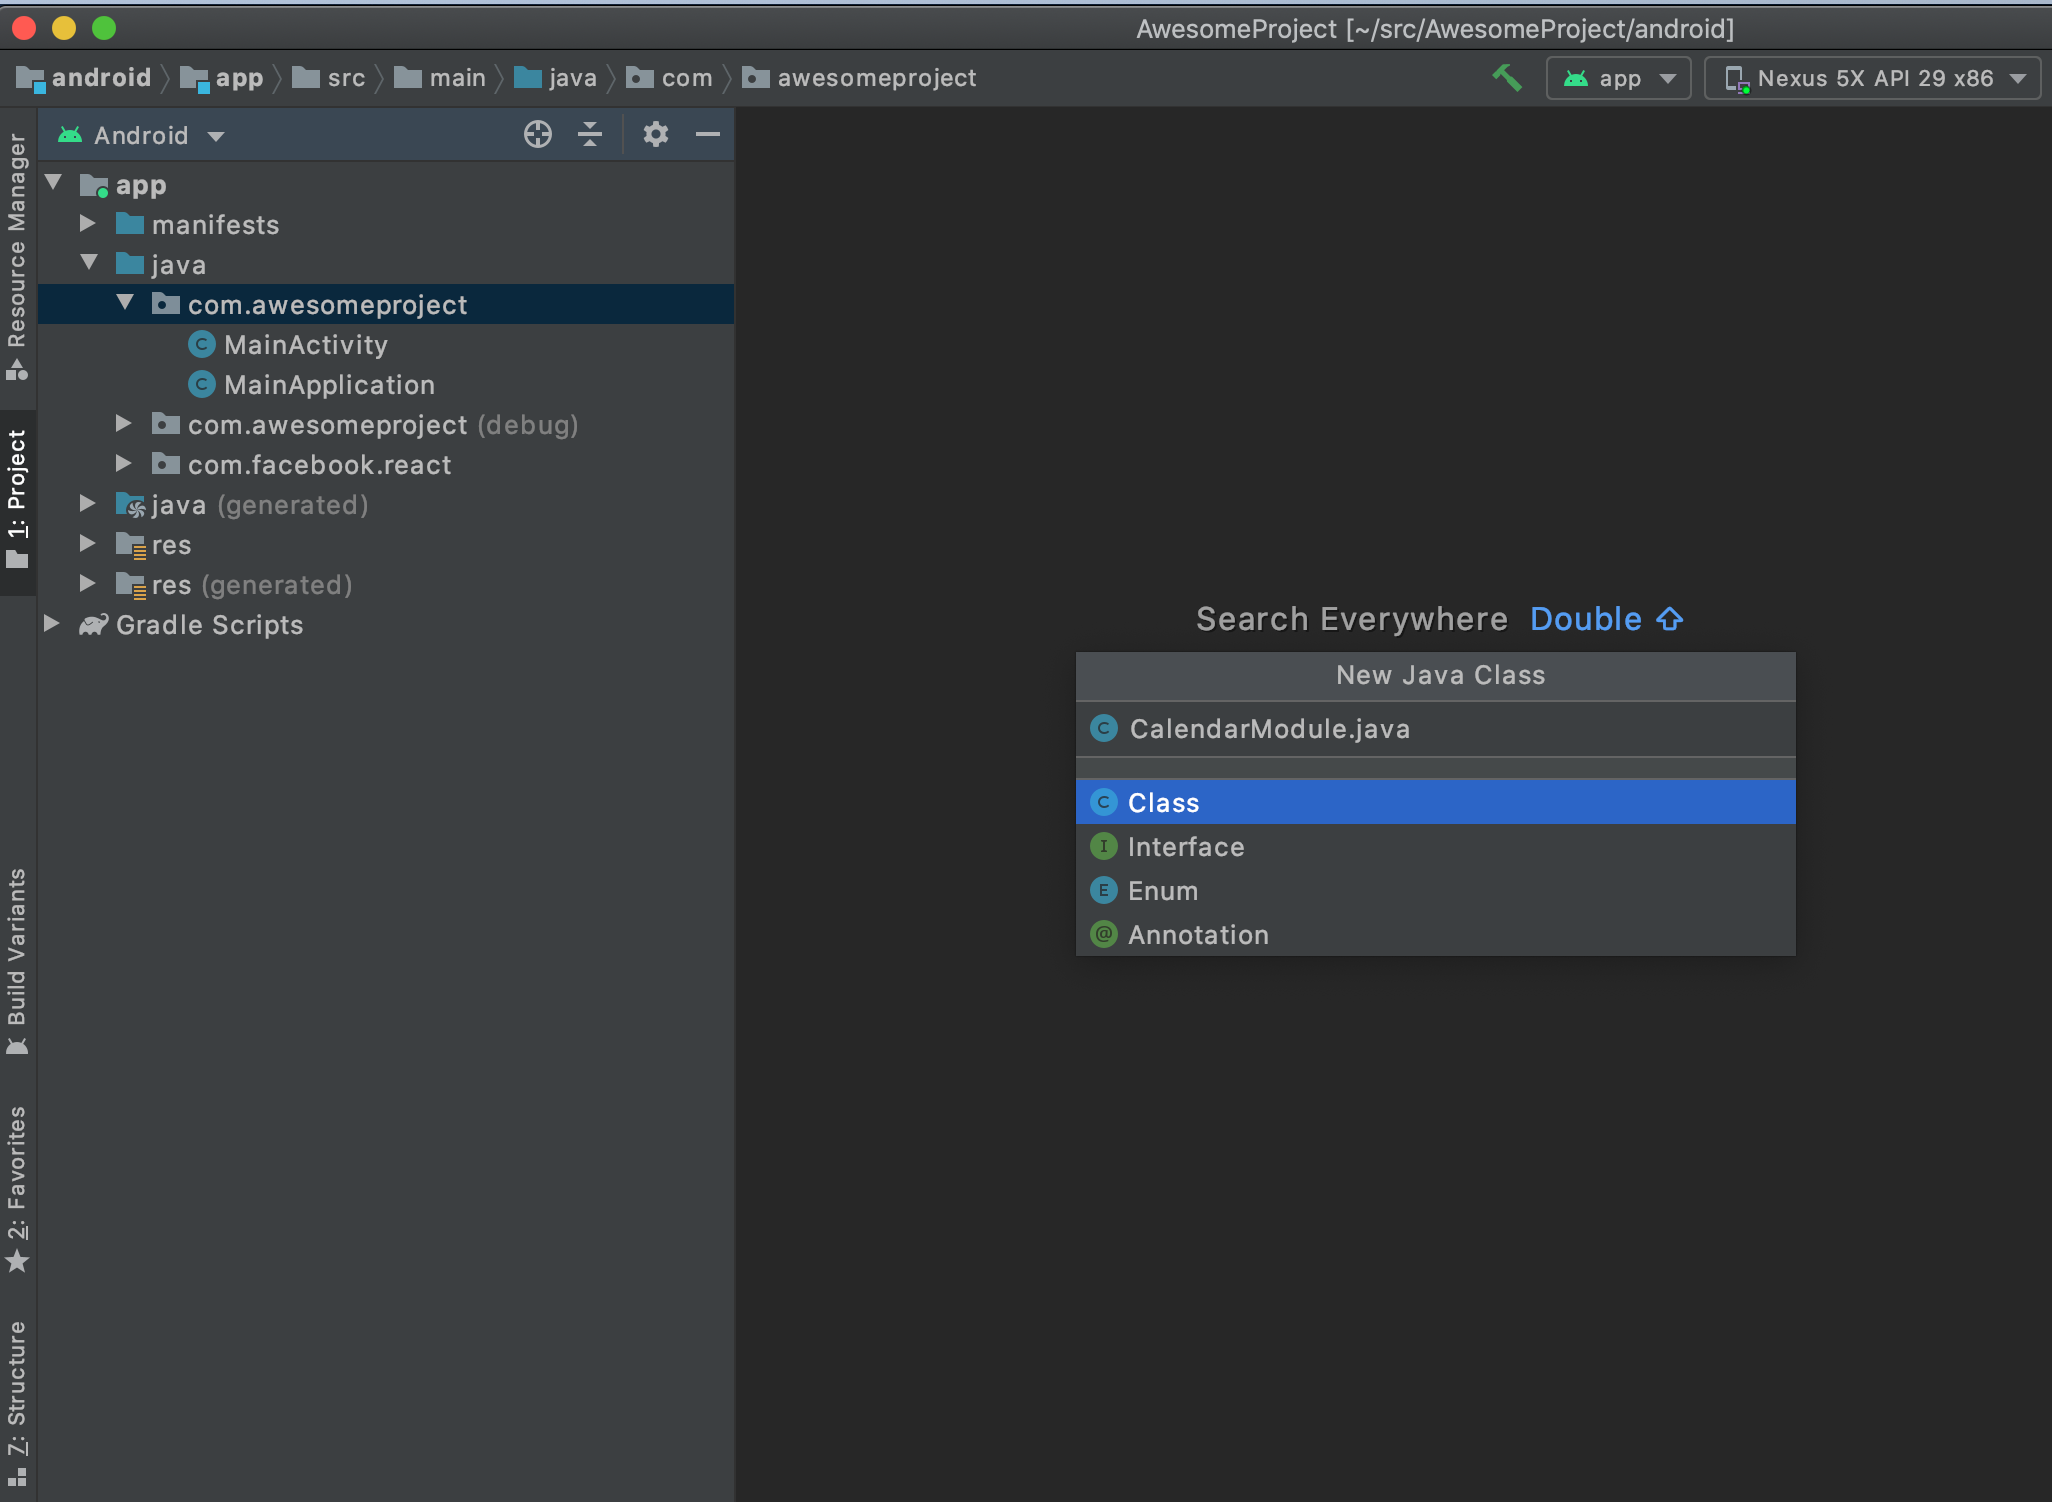 Image of how to add the CalendarModuleClass
Then add the following content:
As you can see, your CalendarModule class extends the ReactContextBaseJavaModule class. For Android, Java native modules are written as classes that extend ReactContextBaseJavaModule and implement the functionality required by JavaScript.
It is worth noting that technically Java classes only need to extend the BaseJavaModule class or implement the NativeModule interface to be considered a Native Module by React Native.
However we recommend that you use ReactContextBaseJavaModule , as shown above. ReactContextBaseJavaModule gives access to the ReactApplicationContext (RAC), which is useful for Native Modules that need to hook into activity lifecycle methods. Using ReactContextBaseJavaModule will also make it easier to make your native module type-safe in the future. For native module type-safety, which is coming in future releases, React Native looks at each native module’s JavaScript spec and generates an abstract base class that extends ReactContextBaseJavaModule .
Module Name
All Java native modules in Android need to implement the getName() method. This method returns a string, which represents the name of the native module. The native module can then be accessed in JavaScript using its name. For example, in the below code snippet, getName() returns «CalendarModule» .
The native module can then be accessed in JS like this:
Export a Native Method to JavaScript
Next you will need to add a method to your native module that will create calendar events and can be invoked in JavaScript. All native module methods meant to be invoked from JavaScript must be annotated with @ReactMethod .
Set up a method createCalendarEvent() for CalendarModule that can be invoked in JS through CalendarModule.createCalendarEvent() . For now, the method will take in a name and location as strings. Argument type options will be covered shortly.
Add a debug log in the method to confirm it has been invoked when you call it from your application. Below is an example of how you can import and use the Log class from the Android util package:
Once you finish implementing the native module and hook it up in JavaScript, you can follow these steps to view the logs from your app.
Synchronous Methods
You can pass isBlockingSynchronousMethod = true to a native method to mark it as a synchronous method.
At the moment, we do not recommend this, since calling methods synchronously can have strong performance penalties and introduce threading-related bugs to your native modules. Additionally, please note that if you choose to enable isBlockingSynchronousMethod , your app can no longer use the Google Chrome debugger. This is because synchronous methods require the JS VM to share memory with the app. For the Google Chrome debugger, React Native runs inside the JS VM in Google Chrome, and communicates asynchronously with the mobile devices via WebSockets.
Register the Module (Android Specific)
Once a native module is written, it needs to be registered with React Native. In order to do so, you need to add your native module to a ReactPackage and register the ReactPackage with React Native. During initialization, React Native will loop over all packages, and for each ReactPackage , register each native module within.
React Native invokes the method createNativeModules() on a ReactPackage in order to get the list of native modules to register. For Android, if a module is not instantiated and returned in createNativeModules it will not be available from JavaScript.
To add your Native Module to ReactPackage , first create a new Java Class named MyAppPackage.java that implements ReactPackage inside the android/app/src/main/java/com/your-app-name/ folder:
Then add the following content:
This file imports the native module you created, CalendarModule . It then instantiates CalendarModule within the createNativeModules() function and returns it as a list of NativeModules to register. If you add more native modules down the line, you can also instantiate them and add them to the list returned here.
It is worth noting that this way of registering native modules eagerly initializes all native modules when the application starts, which adds to the startup time of an application. You can use TurboReactPackage as an alternative. Instead of createNativeModules , which return a list of instantiated native module objects, TurboReactPackage implements a getModule(String name, ReactApplicationContext rac) method that creates the native module object, when required. TurboReactPackage is a bit more complicated to implement at the moment. In addition to implementing a getModule() method, you have to implement a getReactModuleInfoProvider() method, which returns a list of all the native modules the package can instantiate along with a function that instantiates them, example here. Again, using TurboReactPackage will allow your application to have a faster startup time, but it is currently a bit cumbersome to write. So proceed with caution if you choose to use TurboReactPackages.
To register the CalendarModule package, you must add MyAppPackage to the list of packages returned in ReactNativeHost’s getPackages() method. Open up your MainApplication.java file, which can be found in the following path: android/app/src/main/java/com/your-app-name/MainApplication.java
Locate ReactNativeHost’s getPackages() method and add your package to the packages list getPackages() returns:
You have now successfully registered your native module for Android!
Test What You Have Built
At this point, you have set up the basic scaffolding for your native module in Android. Test that out by accessing the native module and invoking its exported method in JavaScript.
Find a place in your application where you would like to add a call to the native module’s createCalendarEvent() method. Below is an example of a component, NewModuleButton you can add in your app. You can invoke the native module inside NewModuleButton ‘s onPress() function.
In order to access your native module from JavaScript you need to first import NativeModules from React Native:
You can then access the CalendarModule native module off of NativeModules .
Now that you have the CalendarModule native module available, you can invoke your native method createCalendarEvent() . Below it is added to the onPress() method in NewModuleButton :
The final step is to rebuild the React Native app so that you can have the latest native code (with your new native module!) available. In your command line, where the react native application is located, run the following:
Building as You Iterate
As you work through these guides and iterate on your native module, you will need to do a native rebuild of your application to access your most recent changes from JavaScript. This is because the code that you are writing sits within the native part of your application. While React Native’s metro bundler can watch for changes in JavaScript and rebuild on the fly for you, it will not do so for native code. So if you want to test your latest native changes you need to rebuild by using the npx react-native run-android command.
Recap✨
You should now be able to invoke your createCalendarEvent() method on your native module in the app. In our example this occurs by pressing the NewModuleButton . You can confirm this by viewing the log you set up in your createCalendarEvent() method. You can follow these steps to view ADB logs in your app. You should then be able to search for your Log.d message (in our example “Create event called with name: testName and location: testLocation”) and see your message logged each time you invoke your native module method.
 Image of ADB logs in Android Studio
At this point you have created an Android native module and invoked its native method from JavaScript in your React Native application. You can read on to learn more about things like argument types available to a native module method and how to setup callbacks and promises.
Beyond a Calendar Native Module
Better Native Module Export
Importing your native module by pulling it off of NativeModules like above is a bit clunky.
To save consumers of your native module from needing to do that each time they want to access your native module, you can create a JavaScript wrapper for the module. Create a new JavaScript file named CalendarModule.js with the following content:
This JavaScript file also becomes a good location for you to add any JavaScript side functionality. For example, if you use a type system like Typescript you can add type annotations for your native module here. While React Native does not yet support Native to JS type safety, all your JS code will be type safe. Doing so will also make it easier for you to switch to type-safe native modules down the line. Below is an example of adding type safety to the CalendarModule:
In your other JavaScript files you can access the native module and invoke its method like this:
This assumes that the place you are importing CalendarModule is in the same hierarchy as CalendarModule.js . Please update the relative import as necessary.
Argument Types
When a native module method is invoked in JavaScript, React Native converts the arguments from JS objects to their Java object analogues. So for example, if your Java Native Module method accepts a double, in JS you need to call the method with a number. React Native will handle the conversion for you. Below is a list of the argument types supported for native module methods and the JavaScript equivalents they map to.
| Java | JavaScript |
|---|---|
| Boolean | ?boolean |
| boolean | boolean |
| Double | ?number |
| double | number |
| String | string |
| Callback | Function |
| ReadableMap | Object |
| ReadableArray | Array |
The following types are currently supported but will not be supported in TurboModules. Please avoid using them:
For argument types not listed above, you will need to handle the conversion yourself. For example, in Android, Date conversion is not supported out of the box. You can handle the conversion to the Date type within the native method yourself like so:
Exporting Constants
A native module can export constants by implementing the native method getConstants() , which is available in JS. Below you will implement getConstants() and return a Map that contains a DEFAULT_EVENT_NAME constant you can access in JavaScript:
The constant can then be accessed by invoking getConstants on the native module in JS:
Technically it is possible to access constants exported in getConstants() directly off the native module object. This will no longer be supported with TurboModules, so we encourage the community to switch to the above approach to avoid necessary migration down the line.
That currently constants are exported only at initialization time, so if you change getConstants values at runtime it won’t affect the JavaScript environment. This will change with Turbomodules. With Turbomodules, getConstants() will become a regular native module method, and each invocation will hit the native side.
Callbacks
Native modules also support a unique kind of argument: a callback. Callbacks are used to pass data from Java to JavaScript for asynchronous methods. They can also be used to asynchronously execute JavaScript from the native side.
In order to create a native module method with a callback, first import the Callback interface, and then add a new parameter to your native module method of type Callback . There are a couple of nuances with callback arguments that will soon be lifted with TurboModules. First off, you can only have two callbacks in your function arguments- a successCallback and a failureCallback. In addition, the last argument to a native module method call, if it’s a function, is treated as the successCallback, and the second to last argument to a native module method call, if it’s a function, is treated as the failure callback.
You can invoke the callback in your Java method, providing whatever data you want to pass to JavaScript. Please note that you can only pass serializable data from native code to JavaScript. If you need to pass back a native object you can use WriteableMaps , if you need to use a collection use WritableArrays . It is also important to highlight that the callback is not invoked immediately after the native function completes. Below the ID of an event created in an earlier call is passed to the callback.
This method could then be accessed in JavaScript using:
Another important detail to note is that a native module method can only invoke one callback, one time. This means that you can either call a success callback or a failure callback, but not both, and each callback can only be invoked at most one time. A native module can, however, store the callback and invoke it later.
There are two approaches to error handling with callbacks. The first is to follow Node’s convention and treat the first argument passed to the callback as an error object.
In JavaScript, you can then check the first argument to see if an error was passed through:
Another option is to use an onSuccess and onFailure callback:
Then in JavaScript you can add a separate callback for error and success responses:
Promises
Native modules can also fulfill a Promise, which can simplify your JavaScript, especially when using ES2016’s async/await syntax. When the last parameter of a native module Java method is a Promise, its corresponding JS method will return a JS Promise object.
Refactoring the above code to use a promise instead of callbacks looks like this:
Similar to callbacks, a native module method can either reject or resolve a promise (but not both) and can do so at most once. This means that you can either call a success callback or a failure callback, but not both, and each callback can only be invoked at most one time. A native module can, however, store the callback and invoke it later.
The JavaScript counterpart of this method returns a Promise. This means you can use the await keyword within an async function to call it and wait for its result:
The reject method takes different combinations of the following arguments:
For more detail, you can find the Promise.java interface here. If userInfo is not provided, ReactNative will set it to null. For the rest of the parameters React Native will use a default value. The message argument provides the error message shown at the top of an error call stack. Below is an example of the error message shown in JavaScript from the following reject call in Java.
Java reject call:
Error message in React Native App when promise is rejected:
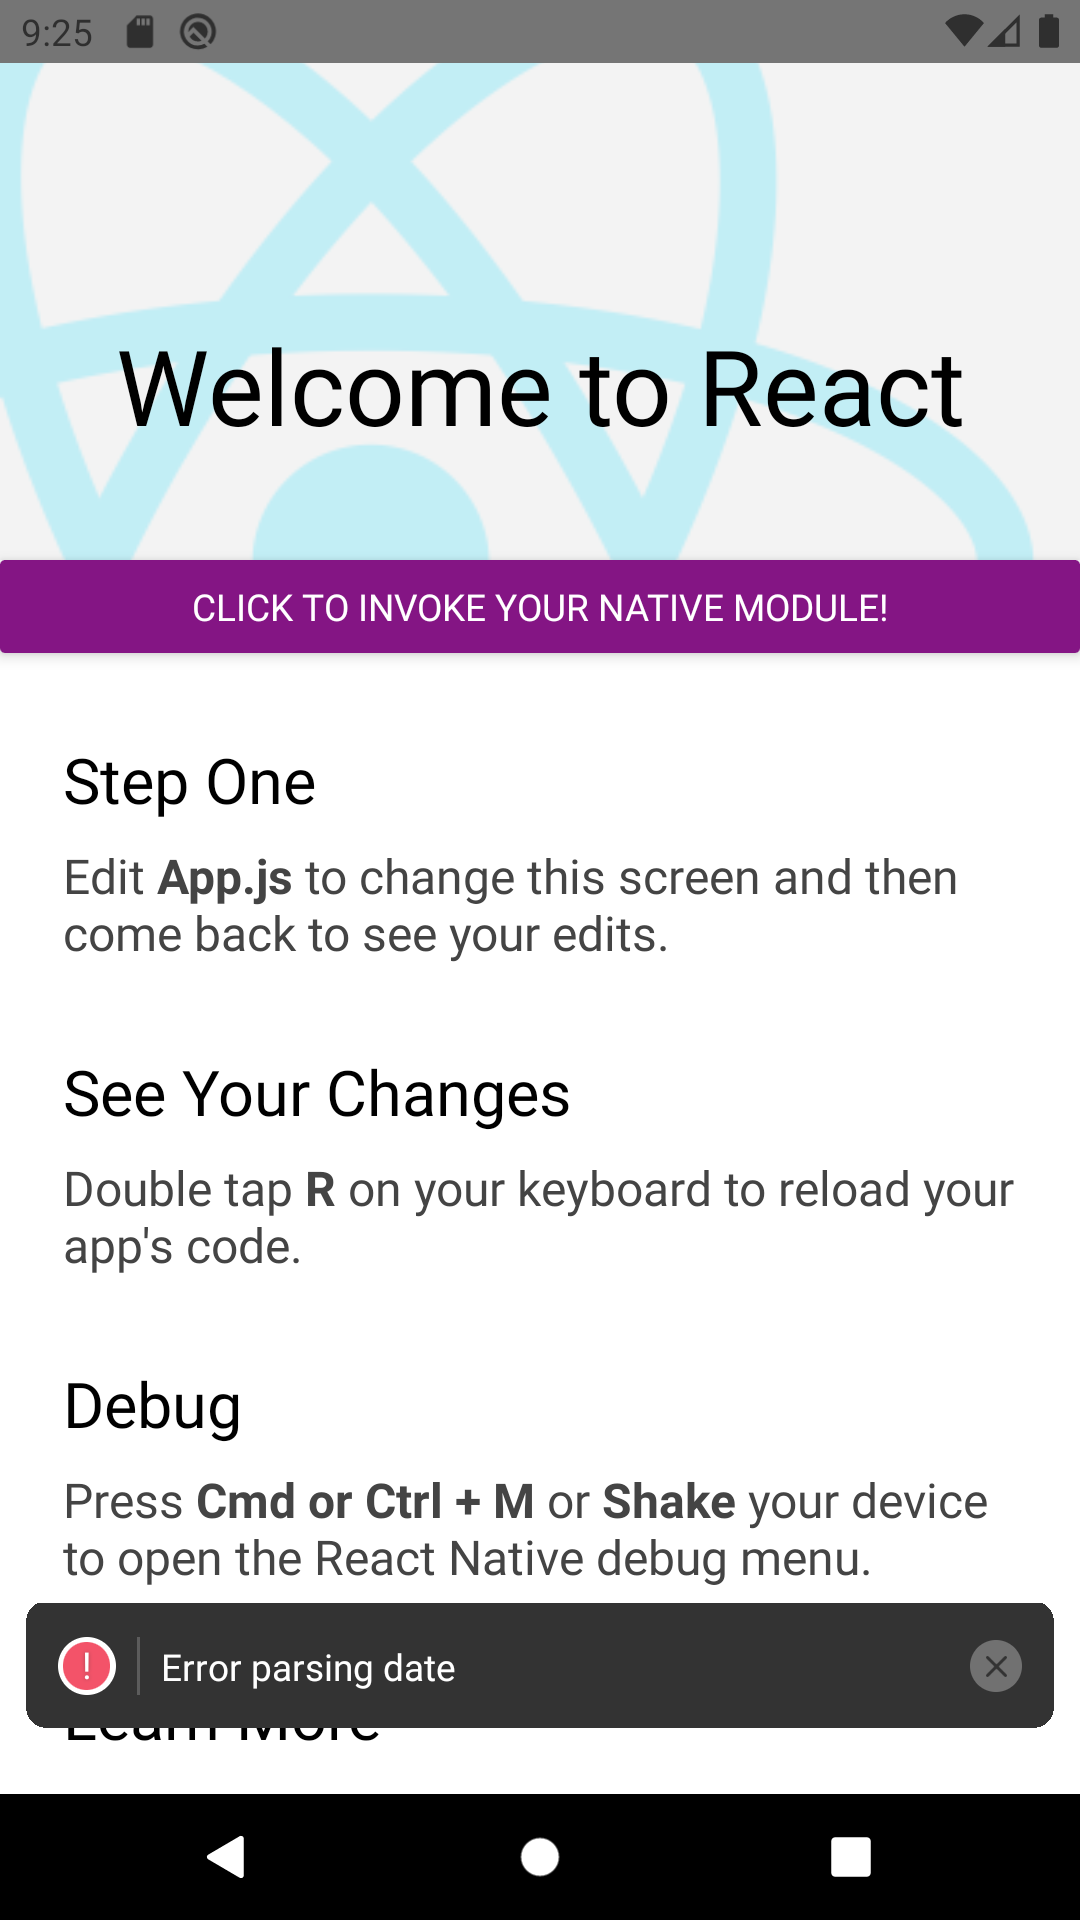 Image of error message
Sending Events to JavaScript
Native modules can signal events to JavaScript without being invoked directly. For example, you might want to signal to JavaScript a reminder that a calendar event from the native Android calendar app will occur soon. The easiest way to do this is to use the RCTDeviceEventEmitter which can be obtained from the ReactContext as in the code snippet below.
JavaScript modules can then register to receive events by addListener on the NativeEventEmitter class.
Getting Activity Result from startActivityForResult
You’ll need to listen to onActivityResult if you want to get results from an activity you started with startActivityForResult . To do this, you must extend BaseActivityEventListener or implement ActivityEventListener . The former is preferred as it is more resilient to API changes. Then, you need to register the listener in the module’s constructor like so:
Now you can listen to onActivityResult by implementing the following method:
Let’s implement a basic image picker to demonstrate this. The image picker will expose the method pickImage to JavaScript, which will return the path of the image when called.
Listening to Lifecycle Events
Listening to the activity’s LifeCycle events such as onResume , onPause etc. is very similar to how ActivityEventListener was implemented. The module must implement LifecycleEventListener . Then, you need to register a listener in the module’s constructor like so:
Now you can listen to the activity’s LifeCycle events by implementing the following methods:
Threading
To date, on Android, all native module async methods execute on one thread. Native modules should not have any assumptions about what thread they are being called on, as the current assignment is subject to change in the future. If a blocking call is required, the heavy work should be dispatched to an internally managed worker thread, and any callbacks distributed from there.
Источник


