- Как вставить SIM карту в iPhone
- Как вставить SIM карту в iPhone 4 и в более новые версии
- Как вставить SIM карту в iPhone 3GS и в более старых версиях
- Какую SIM карту можно вставить в iPhone
- About eSIM on iPhone
- What you need
- How to set up an eSIM
- Scan a QR code
- Install an assigned cellular plan
- Use a carrier app
- Enter the information manually
- Transfer an eSIM from your previous iPhone
- If you can’t set up an eSIM
- Erase your eSIM
- Using Dual SIM with two nano-SIM cards
- What you need
- How to install the nano-SIM cards
- Label your plans
- Set your default number
- Use two phone numbers for calls, messages, and data
- Let your iPhone remember which number to use
- Make and receive calls
Как вставить SIM карту в iPhone
Первая задача, с которой сталкивается пользователь после покупки iPhone, это установка SIM карты. Если до этого вы не пользовались смартфонами с не разборным корпусом, то с этим могут возникнуть некоторые сложности. В данной статье мы расскажем о том, как вставить SIM карту в iPhone 4, 4s, 5, 5c, 5s, SE, 6, 6s или 7. Также в статье вы сможете узнать о поддерживаемых размерах SIM карт и некоторых особенностях моделей iPhone 3GS, iPhone 3G и оригинального iPhone.
Как вставить SIM карту в iPhone 4 и в более новые версии
Перед тем, как вставлять SIM карту выключите свой iPhone. Для этого нужно нажать на кнопку включения и удерживать ее пока на экране не появится предложение выключить iPhone. Нажимаем «Выключить» и
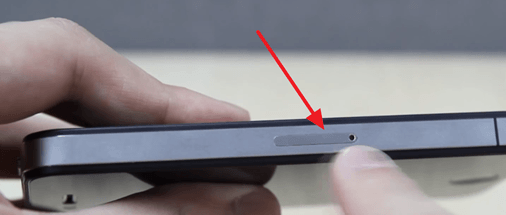
Если у вас iPhone 4 или более новая версия Айфона (например, iPhone 4s, 5, 5c, 5s, SE, 6, 6s или 7), то слот для установки SIM карты находится на правой грани устройства. Если по посмотрите на правую сторону устройства, то сразу его заметите. Это небольшой прямоугольник с отверстием под скрепку.
Для того чтобы вставить СИМ карту, данный слот нужно сначала извлечь из Айфона. Для этого вам понадобится обычная канцелярская скрепка или та скрепка, которая идет в комплекте с Айфоном. Скрепку нужно вставить в отверстие в слоте и аккуратно надавить. Надавливать нужно аккуратно, постепенно увеличивая усилие.
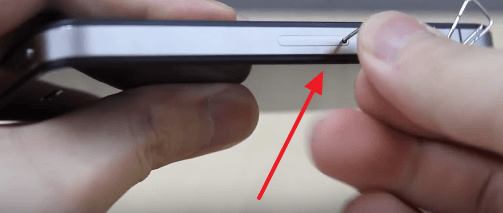
Когда сила нажатия будет достаточной, вы услышите небольшой щелочек и слот для установки СИМ карты выдвинется из Айфона. Теперь нужно аккуратно поддеть слот с помощью ногтя и извлечь его полностью.

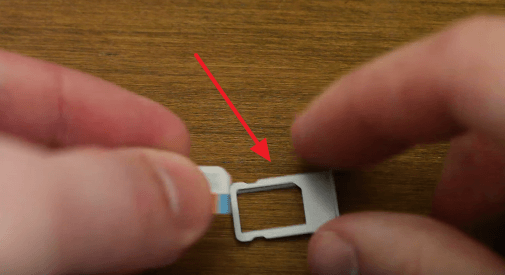
После этого аккуратно вкладываем СИМ карту в слот и вставляем его в Айфон. При установке СИМ карты ее нужно вставлять таким образом, чтобы контакты СИМ карты смотрели вниз, а срезанный угол СИМ карты совпадал со срезанным углом на слоте.
После того как СИМ карта установлена в слот, его можно вставлять в Айфон. При это нужно следить, чтобы отверстия на слоте для СИМ карты и на Айфоне совпадали.
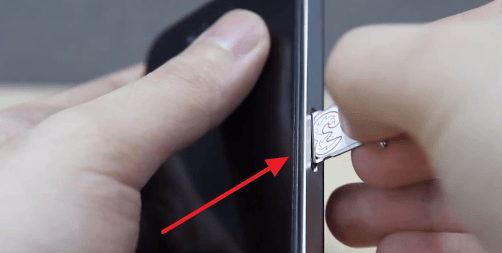
Вставлять СИМ карту в Айфон также нужно аккуратно с небольшим усилием. После того, как слот для СИМ карты сровнялся с боковой гранью Айфона – сим карта вставлена.
Как вставить SIM карту в iPhone 3GS и в более старых версиях
Если у вас iPhone 3GS, iPhone 3G или оригинальный iPhone первого поколения, то процесс установки СИМ карты точно такой же, как описано выше. Единственное отличие, место расположение слота для СИМ карты.

В iPhone 3GS, iPhone 3G и первом iPhone слот для СИМ карты вставляется с верхней грани смартфона, а не с боковой, как на более современных моделях.
Какую SIM карту можно вставить в iPhone
Разные модели iPhone поддерживают разные СИМ карты. Поэтому перед тем, как начинать что-то вставлять нужно уточнить, какая СИМ карта вам нужна. Для этого можете воспользоваться таблицей, которую мы приводим ниже.
| Модель смартфона | SIM карта | Размеры SIM карты |
| iPhone 7, iPhone 7 Plus | Nano SIM | 12.3 mm x 8.8 mm |
| iPhone 6s, iPhone 6s Plus | Nano SIM | 12.3 mm x 8.8 mm |
| iPhone 6, iPhone 6 Plus | Nano SIM | 12.3 mm x 8.8 mm |
| iPhone 5 | Nano SIM | 12.3 mm x 8.8 mm |
| iPhone 5s | Nano SIM | 12.3 mm x 8.8 mm |
| iPhone SE | Nano SIM | 12.3 mm x 8.8 mm |
| iPhone 5c | Nano SIM | 12.3 mm x 8.8 mm |
| iPhone 4s | Micro SIM | 15 mm x 12 mm |
| iPhone 4 | Micro SIM | 15 mm x 12 mm |
| iPhone 3GS | Standard SIM | 25 mm x 15 mm |
| iPhone 3G | Standard SIM | 25 mm x 15 mm |
| Original iPhone | Standard SIM | 25 mm x 15 mm |
Если ваша SIM карта больше чем нужно, то вас есть два варианта. Первый вариант – обрезать СИМ карту. Это можно сделать самостоятельно или обратиться в магазин с мобильной техникой. Второй вариант – заменить СИМ карту. Для этого нужно будет зайти в офис вашего мобильного оператора.
Если же ваша СИМ карта наоборот меньше того размера, который нужен для вашей модели Айфона, то вы можете воспользоваться специальным переходником, который позволит вставить меньшую СИМ карту в слот большего размера. Обычно такие переходники идут в комплекте с новыми СИМ картами.
Источник
About eSIM on iPhone
An eSIM is a digital SIM that allows you to activate a cellular plan from your carrier without having to use a physical nano-SIM. Learn about setting up an eSIM, transferring your SIM, what to do if you can’t set one up, and how to erase an eSIM, if you ever need to.
You can install multiple eSIM profiles on an iPhone that supports eSIM. If your iPhone is unlocked, you can subscribe to several cellular plans.
What you need
- An iPhone XS, iPhone XS Max, iPhone XR, or later
- A wireless carrier that supports eSIM
eSIM on iPhone is not offered in mainland China. In Hong Kong and Macao, iPhone 13 mini, iPhone 12 mini, iPhone SE (2nd generation), and iPhone XS feature eSIM. Learn about using Dual SIM with two nano-SIM cards in mainland China, Hong Kong, and Macao.
How to set up an eSIM
If you purchased an iPhone 13 model from an Apple Retail Store or Apple Online Store in the United States, your iPhone won’t arrive with a SIM card installed. To activate your iPhone, turn it on, connect to a Wi-Fi network, and follow the onscreen instructions.
Otherwise, if you do need to set up an eSIM, you can scan the QR code your carrier gave you, use your carrier’s iPhone app, install an assigned plan, enter the information manually, or transfer an eSIM from your previous iPhone:
Scan a QR code
- Open the Camera app and scan your QR code.
- When the Cellular Plan Detected notification appears, tap it.
- Tap Continue, at the bottom of the screen.
- Tap Add Cellular Plan.
If you’re asked to enter a confirmation code to activate the eSIM, enter the number that your carrier provided.
Install an assigned cellular plan
With iOS 13 and later, some carriers can assign a cellular plan for you to install. Contact your carrier for more information.
If a plan was assigned to you, follow these steps:
- When a notification appears that says Carrier Cellular Plan Ready to Be Installed, tap it.
- In the Settings app, tap Carrier Cellular Plan Ready to Be Installed.
- Tap Continue, at the bottom of the screen.
If you’re asked to «Transfer Cellular Plan» while setting up your iPhone, learn how to transfer your eSIM.
Use a carrier app
- Go to the App Store and download your carrier’s app.
- Use the app to purchase a cellular plan.
Enter the information manually
If necessary, you can manually enter your plan information. To enter your plan information manually, follow these steps:
- Go to Settings.
- Tap either Cellular or Mobile Data.
- Tap Add Cellular Plan.
- Tap Enter Details Manually, at the bottom of your iPhone screen.
Transfer an eSIM from your previous iPhone
To transfer an eSIM to your new iPhone, you can scan the QR code your carrier gave you, use your carrier’s iPhone app, or install an assigned cellular plan. When your cellular plan is activated on your new iPhone, the plan on your previous iPhone will deactivate.
If you can’t set up an eSIM
- Make sure that carrier or carriers support eSIM.
- Open Control Center: Swipe down from the upper-right corner of the screen. Then make sure that your carrier appears in the status bar. If not, try turning Airplane Mode on and off.
- Go to Settings > General > About and look for any numbers under EID. If there are no numbers, contact Apple Support.
- If you still can’t set up your eSIM, contact your carrier.
Erase your eSIM
If you need to erase your eSIM, follow these steps:
- Go to Settings.
- Tap either Cellular or Mobile Data.
- Tap the plan you want to erase.
- Tap Remove Cellular Plan.
If you erase all content and settings from your iPhone, you can choose to erase your eSIM as well or keep it. If you want to cancel your cellular plan, you still need to contact your carrier.
Источник
Using Dual SIM with two nano-SIM cards
In China mainland, Hong Kong, and Macao, certain iPhone models feature Dual SIM with two nano-SIM cards. This gives you two phone numbers to make and receive calls and text messages.
If you have an iPhone 13 mini, iPhone 12 mini, iPhone SE (2nd generation), or an iPhone XS in Hong Kong or Macao, learn how to use Dual SIM with an eSIM.
Here are a few of the many ways you can use Dual SIM:
- Use one number for business and another number for personal calls.
- Add a local data plan when you travel outside of the country or region.
- Have separate voice and data plans.
Both of your phone numbers can make and receive voice and FaceTime calls and send and receive messages using iMessage SMS and MMS. * Your iPhone can use one cellular data network at a time.
* This uses Dual SIM Dual Standby (DSDS) technology, which means that both SIMs can make and receive calls.
What you need
To use Dual SIM, you need iOS 12.1 or later, two nano-SIM cards, and one of these iPhone models:
- iPhone 13
- iPhone 13 Pro
- iPhone 13 Pro Max
- iPhone 12
- iPhone 12 Pro
- iPhone 12 Pro Max
- iPhone 11
- iPhone 11 Pro
- iPhone 11 Pro Max
- iPhone XS Max
- iPhone XR
![]()
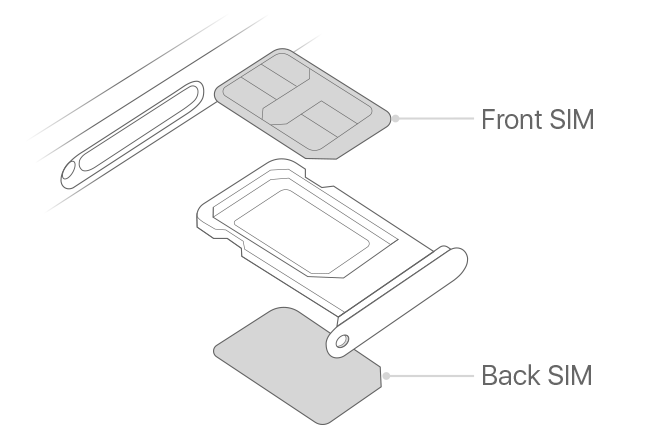
How to install the nano-SIM cards
Insert a paper clip or SIM eject tool into the small hole of the SIM card tray, then push in toward iPhone to remove your SIM tray, notice the notch in one corner of the new SIM card. Place the new SIM card into the bottom of the tray—it will fit only one way, because of the notch. Then insert the other SIM card into the top tray.
With the two nano-SIM cards in place, insert the SIM tray back into the device completely and in the same orientation that you removed it. The tray fits only one way.
If your SIM cards are protected with a personal identification number (PIN), note the position—front or back—of each SIM card in the tray. If asked, carefully enter the PINs for the front SIM card and back SIM card.
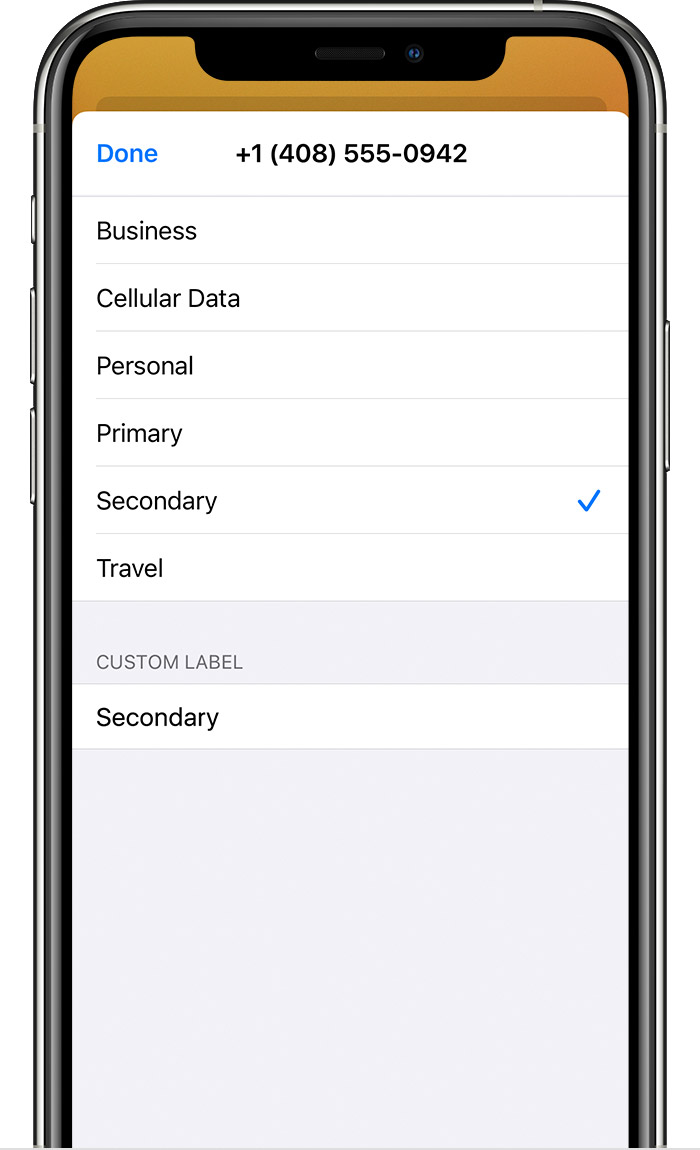
Label your plans
After your second plan is activated, label your plans. For example, you can label one plan Business and the other plan Personal.
You’ll use these labels when you choose which phone number to use for making or receiving calls and messages, to designate a number for cellular data, and to assign a number to your contacts so you know which number you will use.
If you change your mind later, you can change your labels by going to Settings > Cellular, or Settings > Mobile Data, and tapping the number whose label you want to change. Then tap Cellular Plan Label and select a new label or enter a custom label.
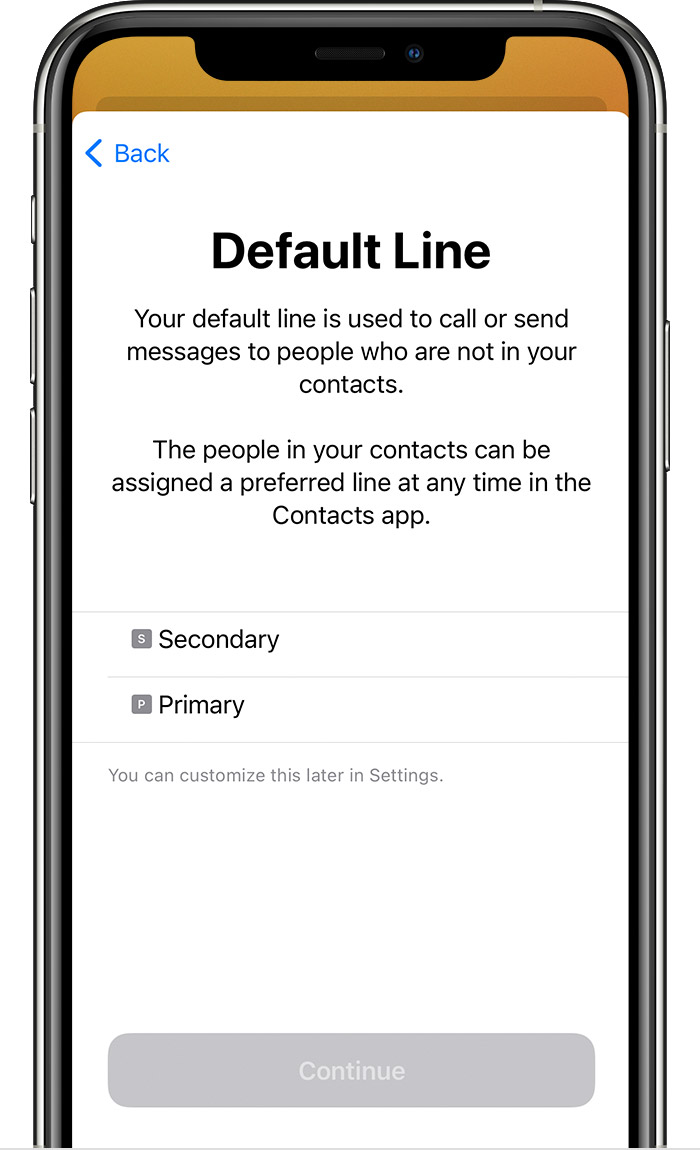
Set your default number
Choose a number to use when you call or send a message to someone who isn’t in your Contacts app. Choose which cellular plans you want to use for iMessage and FaceTime. With iOS 13 and later, you can choose either or both numbers.
On this screen, choose a number to be your default, or you can choose which number is to be used only for cellular data. Your other number will be your default. If you want your iPhone to use cellular data from both plans, depending on coverage and availability, turn on Allow Cellular Data Switching.
Use two phone numbers for calls, messages, and data
Now that your iPhone is set up with two phone numbers, here’s how to use them.
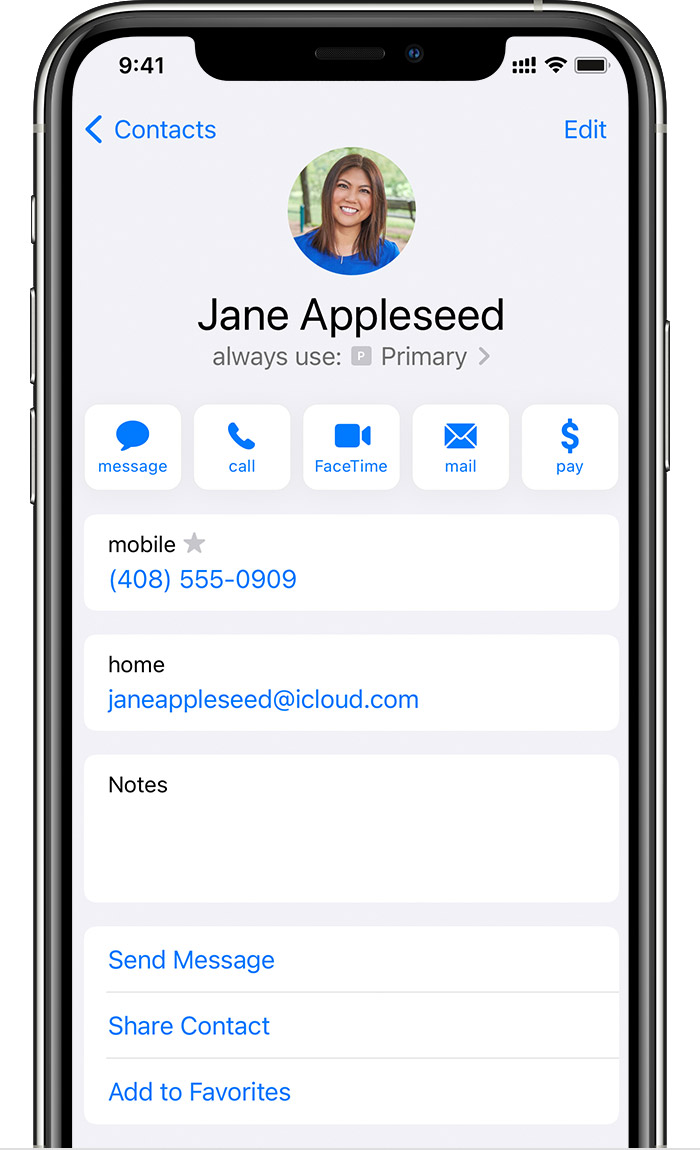
Let your iPhone remember which number to use
When you call one of your contacts, you don’t need to choose which number to use every time. By default, your iPhone uses the same number that you used the last time you called that contact. If you haven’t called that contact, your iPhone uses your default number. If you want to, you can specify which number to use for your calls with a contact. Follow these steps:
- Tap the contact.
- Tap Preferred Cellular Plan.
- Tap the number you want to use with that contact.
Make and receive calls
You can make and receive phone calls with either phone number.
With iOS 13 and later, when you’re on a call, if the carrier for your other phone number supports Wi-Fi calling, you can answer incoming calls on your other number. You will need to turn on Allow Cellular Data Switching when you are on a call that isn’t your default data line. Or, if you ignore the call and you have voicemail set up with your carrier, you’ll get a missed-call notification and the call will go to voicemail. Check with your carrier for Wi-Fi calling availability, and find out if additional fees or data usage applies from your data provider.
If your carrier doesn’t support Wi-Fi calling or you don’t have Wi-Fi calling turned on, 1 then when you’re on a call, an incoming call on your other phone number will go to voicemail, if you have voicemail set up with your carrier. 2 However, you won’t get a missed-call notification from your secondary number. Call Waiting works for incoming calls on the same phone number. To avoid missing an important call, you can turn on call forwarding and forward all calls from one number to the other. Check with your carrier for availability and to find out if additional fees apply.
1. Or if you’re using iOS 12. Update to iOS 13 or later to receive calls when you’re using your other number.
2. If data roaming is on for the number that uses cellular data, then Visual Voicemail and MMS will be disabled on your voice-only number.
Источник


