- Android от А до Я: Оверклокинг (Overclocking)
- How To Overclock Your Android Device
- What is overclocking?
- Risks and Benefits
- Pre-requisites before overclocking
- How to use SetCPU to Overclock your Android device
- Other apps to Overclock your device
- CPU Tuner
- Tegra Overclock
- Conclusion
- How to overclock Android: a guide to using kernels
- Jump to:
- What is a kernel?
- Before you start: read this
- Getting the right kernel for overclocking
- Overclocking software for your kernel
- How to overclock your Android phone
- Changing your CPU clock speed
Android от А до Я: Оверклокинг (Overclocking)

Android девайсы постепенно приближаются по своим возможностям к десктопным компьютерам. Вы можете смотреть на них фильмы в HD, устанавливать 3D игры, разрабатывать приложения и осуществлять многие другие действия, которые еще недавно ассоциировались только с ПК. Но это все доступно только для последних поколений устройств, или нет?
Благодаря оверклокингу более старые девайсы также можно разогнать, получив необходимую производительность. Но операция эта достаточно рискованная, так что проводить ее самостоятельно не стоит. Лучше всего найти подходящее для вашего девайса руководство и детально его изучить. Но для начала давайте попробуем разобраться с тем, что из себя представляет оверклокинг, и какие у него негативные и позитивные стороны.
Оверклокинг — это увеличение тактовой частоты работы процессора. Цель операции — повышение производительности девайса. Так что, если вас не устраивает скорость работы вашего Android устройства, то оверклокинг может стать отличным решением существующей проблемы. Сам процесс практически такой же, как и на ПК, разница заключается лишь в том, что процессор Android устройства тяжелее спалить, так как при его производстве используются другие механизмы безопасности.
Что касается самой безопасности, то разгонять девайс необходимо на 10-20%. Это достаточно серьезно изменит производительность, но батарея при этом не будет садиться слишком быстро. Хотя тут все зависит от того, как интенсивно вы будете пользоваться устройством.
Также отметьте себе, что, разгоняя процессор до определенной частоты, вы выставляете максимальный лимит, а не постоянную скорость работы. При этом девайс будет использовать все ресурсы только в тех ситуациях, когда это необходимо (при работе с 3D инструментами, воспроизведении HD видео и во врея игрового процесса).
Теперь, когда вы знаете, что собой представляет оверклокинг, необходимо ознакомиться с рядом подготовительных действий, которые позволят вам успешно завершить процедуру разгона процессора вашего Android девайса:
- для начала нужно получить root-доступ, это необходимо для установки кастомного ядра, которое позволяет осуществить оверклокинг;
- получение root-доступа ведет к тому, что ваш девайс лишается гарантии. Восстановить ее можно, вернув стоковую версию прошивки;
- для прошивки нового ядра придется установить кастомный образ рекавери. Можно использовать как CWM, так и TWRP;
- отметьте себе также, что многие кастомные прошивкиподдерживают оверклокинг. Если на вашем девайса установлена одна из них, то ставить новое ядро не надо;
- кроме того, рекомендуется создать резервные копии всех важных данных и настроек, так как в процессе смены ядра может потребоваться вайп;
- текущий ROM можно сохранить при помощи Nandroid бэкапа;
- также необходимо иметь под рукой работающий компьютер, сам девайс, который вы собрались разгонять, и USB шнур;
- на ПК необходимо установить все драйвера для вашего девайса и деактивировать инструменты безопасности;
- на Android устройстве нужно включить опцию USB отладки, а сам девайс — зарядить.
Вот собственно и все требования к смартфону/планшету. Далее необходимо установить кастомную прошивку или ядро. Для этого потребуется соответствующее руководство. Затем необходимо скачать одно из приложений для оверклокинга (SetCPU, No-frills CPU Control или IncrediControl), установить его и разогнать девайс на 10-20%. Здесь можете найти уже имеющиеся руководств. Их пока не много, но количество будет постепенно расти.
Источник
How To Overclock Your Android Device
Does your Android device lag while gaming? Or do you just want to boost your device’s performance for a specific function? If you do not get a speedy experience by default from your phone or tablet, you can easily overclock your processor, and run those games or heavy apps smoothly.
What is overclocking?
Overclocking simply means increasing the maximum frequency that your processor can run which consequently increases the performance of your android device. So for example, if your CPU runs at a stock 1.5 GHz, you can coax it to up to 1.8 GHz if you wish. You can also underclock your device (decrease maximum clock speed) to save battery life.
Risks and Benefits
The major benefit of overclocking your device is that it feels very fast and snappy even when you have many processes running in the background. Overclocking will help get rid of performance woes on your device, however, it is not without its risks.
First, there is a possibility that you may damage your hardware. A lack of caution may overheat your CPU and thus sacrifice long-term performance. Also, when your device is overclocked, you will surely see an increase in battery drain but you can combat that by overclocking only when your device is plugged in.
Pre-requisites before overclocking
Before you attempt overclocking your Android smartphone or tablet, the following requirements must be satisfied:
- Your Android device must be rooted.
- Make sure your device is fully charged or at least 80% charged.
- Make a complete nandroid backup of your device so that you can have a fallback if things go wrong.
- To overclock, you will need to get an overclocking app such as SetCPU from the Google Play Store
How to use SetCPU to Overclock your Android device
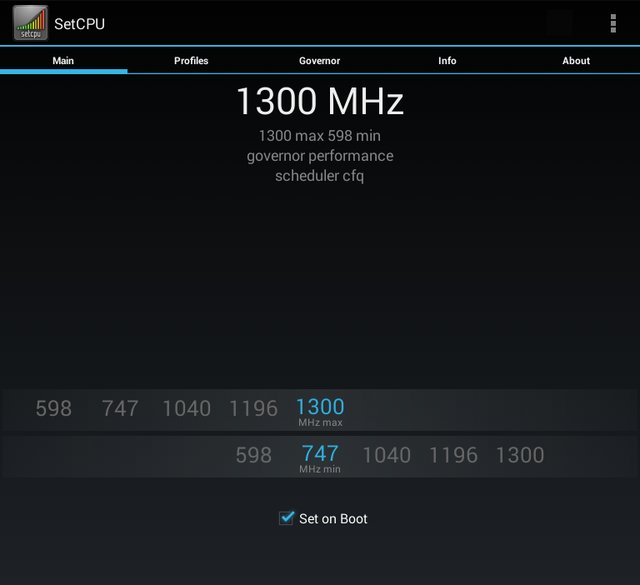
SetCPU is a very simple application that helps you overclock or underclock your processor with ease. It has sliders which indicate the maximum and frequencies you can set your CPU to run and you can also create user profiles to automate this process.
If you haven’t already, get the SetCPU app from Google Play. Please note that it is a paid app and will cost you $1.99. Once installed, you can proceed with the following instructions:
- Launch the application, use the recommended settings and grant it root access.
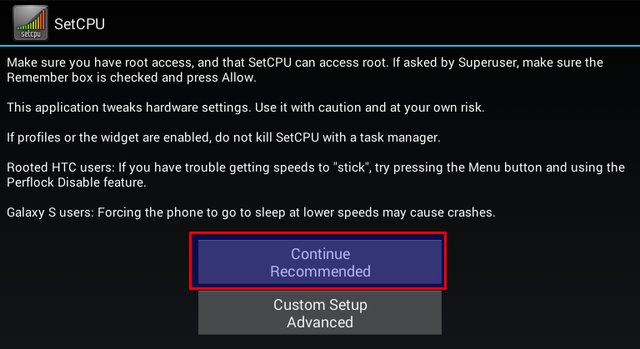
- Now you need to select the maximum and minimum clock speed for your processor. Remember this should not not be too high or too low or else your device may behave strangely.
- You can also tick the “Set on Boot” checkbox if you want SetCPU to apply your selected speed limits automatically on booting your device.
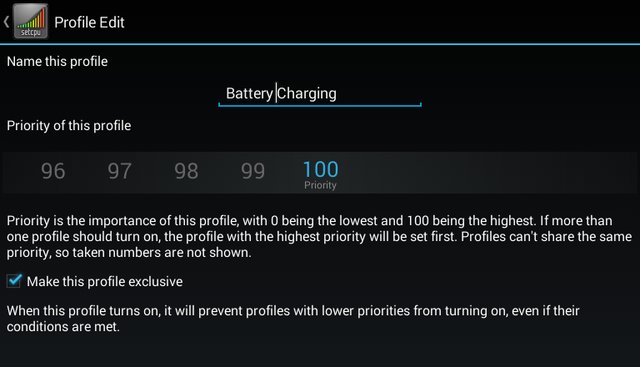
- Once you are satisfied with the clock speed, you can create profiles so that you can set the times or conditions when SetCPU should overclock or underclock your processor.
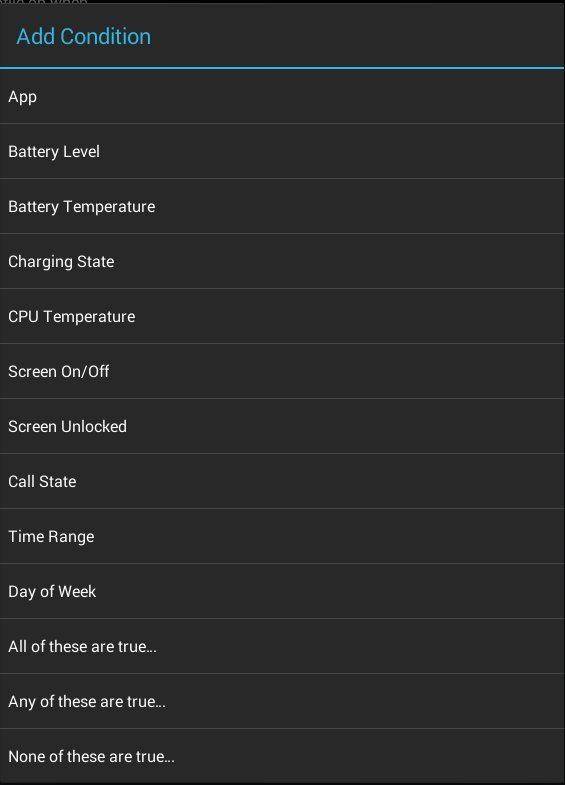
- For example, when your device is charging, you can overclock your device to increase performance. You will need to name and set different priorities for each profile.
So that’s it. SetCPU is incredibly easy to use and works quite well for most people as evidenced by it’s high 4.6 average rating on the Play store so it’s my first recommendation if you want to overclock or underclock your device.
However, if it doesn’t work for you or you simply do not want to pay $1.99 for the app, there are others you can try which perform the same function.
Other apps to Overclock your device
CPU Tuner
A very lightweight application with plenty of good reviews on the market, CPU Tuner works as a battery saver to give you control over your device’s power consumption but it can be used to overclock your device at the same time as long as your kernel supports it. With this app, you can modify the thresholds and clock frequencies of your CPU.
Availability: CPU Tuner (Free) – Google Play Store
Tegra Overclock
Tegra Overclock allows you to switch between a battery saving mode (by underclocking) or give your device a performance boost (by overclocking). You can select the desired number of active CPUs and configuring internal and core voltage is just a click away. For gamers, it helps to get a consistent frame rate and thus saves battery while gaming.
Availability: Tegra Overclock ($4.99) – Google Play Store
Conclusion
That’s all there is to overclocking your Android device. You can easily improve your device performance using the methods described above, however, don’t forget to make a full nandroid backup before attempting this. Let us know your experiences with overclocking (or underclocking) and any other apps that are well suited for this purpose.
Источник
How to overclock Android: a guide to using kernels

No matter how fast our phones are, there is always room to make them be a little bit faster. Fortunately, Android lets you do just that. The process is called overclocking and it simply means forcing your CPU to run a bit faster than it normally does. Here’s how to overclock your Android phone and supercharge it.
Hardcore PC users might already be familiar with overclocking. Gamers especially have been overclocking their hardware for years, pushing more performance out of their machines. The same possibility exists for Android: you can tell your CPU to run faster than the manufacturer’s recommended settings. The process is surprisingly easy and can give you as much as 30 percent more power. Here’s everything you need to know:
Jump to:
What is a kernel?
The kernel is a computer program that is the core of a computer’s operating system. It is often one of the first programs loaded when you start up a computer device, sometimes referred to as a bootloader. The kernel performs tasks such as running processes, managing the hard disk, handling interrupts, and sorting out the rest of the startup process. It does this in a protected part of the memory, known as the kernel space Android uses the Linux kernel, but you can change this if you root your device.
Before you start: read this
First I need to give you the standard warning. Overclocking your phone CPU comes with some risks. Increasing the clock speed of your CPU generates more heat and drains more power. It isn’t likely to set your phone on fire or kill your battery, but excess heat production can create instability and affect your battery life.
The key is to take your time. Don’t try to jump to a 30 percent increase in clock speed straight away. Take it slowly and evaluate how stable the system is with each increase. If Android runs fine, your phone’s heat and battery life are acceptable and there are no crashes or odd behavior, you can try increasing your clock speed further. If things get weird, back off to the last stable clock speed.
Getting the right kernel for overclocking
Happy with that? Let’s proceed. The only thing you need to tweak the CPU settings of your Android phone is a kernel that supports overclocking. Overclocking is a staple of the modding community, so there is no shortage of good kernels to choose from. You just need to get the right kernel for your particular phone model.
 Take some time to find the right kernel for your device. / © NextPit
First, find the model number of your phone. Go to Settings > About Phone and take a look. You’ll also want to make a note of the version of Android you’re running. Your phone will also need to be rooted in order to overclock your CPU. For more info on what is root on Android, check our guide. Naturally, this process is not covered under warranty, so proceed at your own risk. You’ll also need a custom recovery installed. More on that below.
 You’ll need to install a custom recovery, such as TWRP or CWM. / © NextPit
Replacing the kernel and overclocking takes no time at all, but it’s worth investing some time into finding the right kernel. Sites like XDA Developers are an awesome place to start. There are four things you’re looking for in a kernel: that it supports overclocking, that it’s compatible with your phone model, that it works on your current Android version and that it has a good reputation.
The more popular a kernel is the easier it will be to get help from the community if you need it or to track down some suggested settings (if you’d rather learn from others’ efforts rather than do the figuring out yourself). The more feedback there is on a kernel, the more informed a decision you can make.
Overclocking software for your kernel
Some kernels come with dedicated software that’s tailored to helping you get the most out of the kernel. This can involve a simple overclocking slider, CPU governor settings, undervolting options and more. If the kernel you choose has a companion app, use it. If it doesn’t, search around the Play Store for a generic overclocking or CPU manager app with a good rating and positive comments.
 Some custom kernels come with software to help you change your CPU clock speed easily. / © NextPit
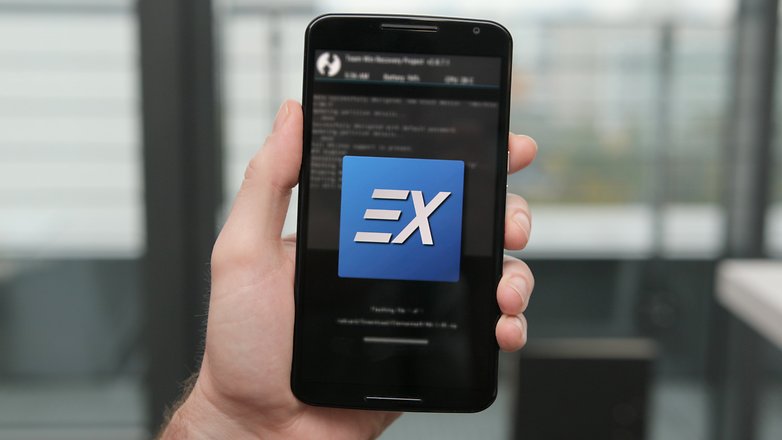
Once you’ve got the kernel for your particular model of phone, and have ensured it works with your version of Android and supports overclocking, you’re good to go. For this tutorial we’re overclocking a rooted Nexus 6 running stock Android 6.0 Marshmallow using the ElementalX kernel.
Many custom ROM kernels already support overclocking however, so if you are using a custom ROM, read up on it to see if you even need to change your kernel.
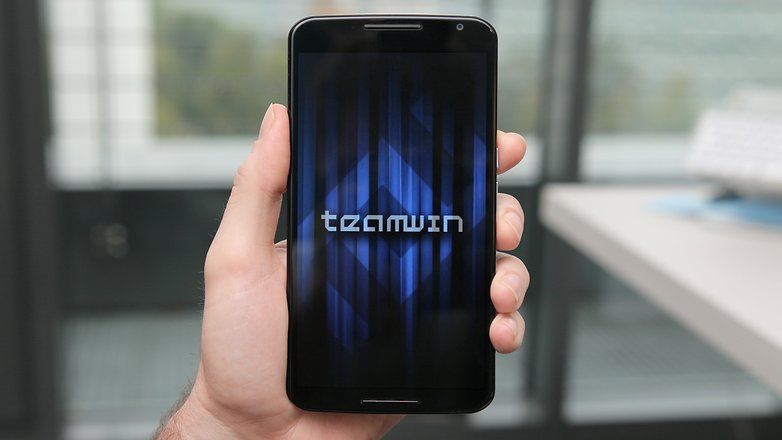
 We’re installing ElementalX kernel on our stock Nexus 6. / © NextPit
How to overclock your Android phone
Your phone needs to be rooted in order to flash a custom kernel. You’ll also need a custom recovery installed (because you can’t flash kernels using stock recovery). If you need help with this, follow our guide on how to install a custom recovery. The guide at the link is for a Nexus 5 but the same process applies.
1. Make sure you have a backup of your data. You can do this through your custom recovery or with any number of apps or PC-based solutions. If you need help with this, follow our guide on how to back up everything on Android.
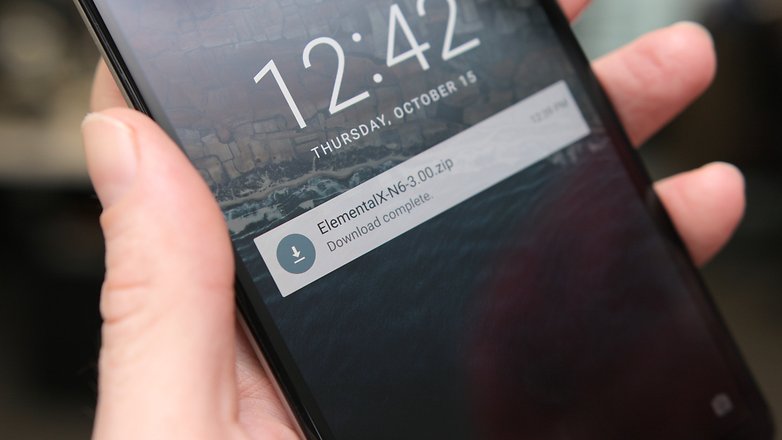 First, download the kernel to your Android. / © NextPit
2. Once you’ve chosen the kernel you want to use, download it (and any software it might have come with) onto your Android (you can leave it in the Downloads folder). You can also download the kernel to your computer and copy the zip file to the root directory of your phone if you prefer, but it’s just as easy to just do it on your phone through recovery.
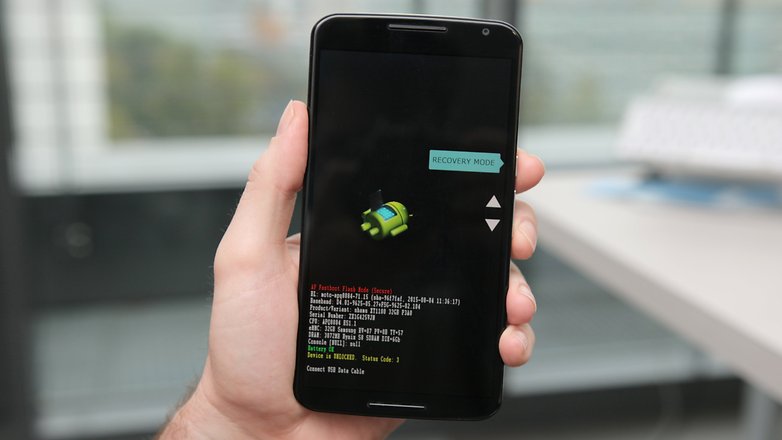 Reboot into fastboot and go to recovery mode. / © NextPit
3. Turn off your phone and enter fastboot. This is usually achieved by pressing Power and Volume Down but some manufacturers have a different button combination.
4. On the fastboot screen, use the volume buttons to highlight Recovery mode and press the power button to select it.
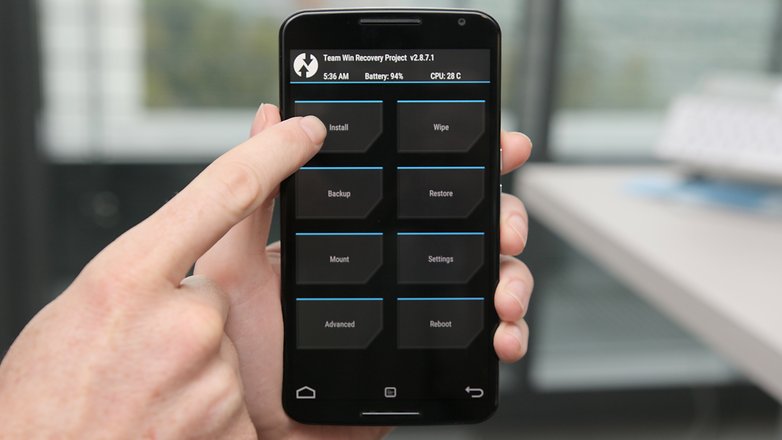 Hit install. / © NextPit
5. You will now enter your custom recovery. We’re using TWRP.
6. Tap the Install button (or ‘Install zip’ in CWM recovery) and navigate to the location where you saved the kernel zip file.
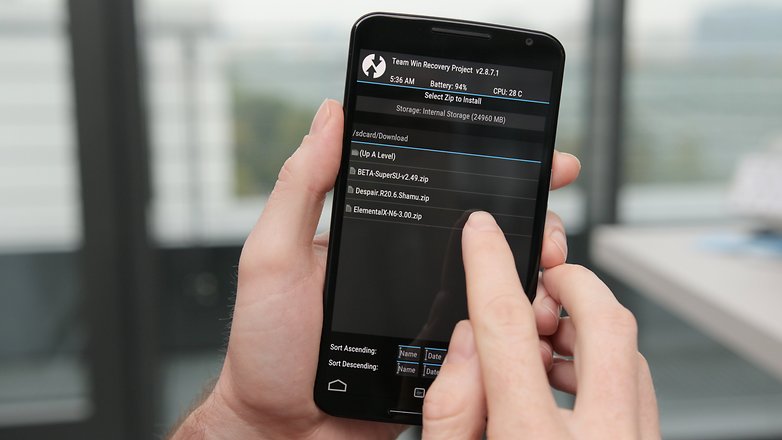 Locate the kernel you downloaded earlier. / © NextPit
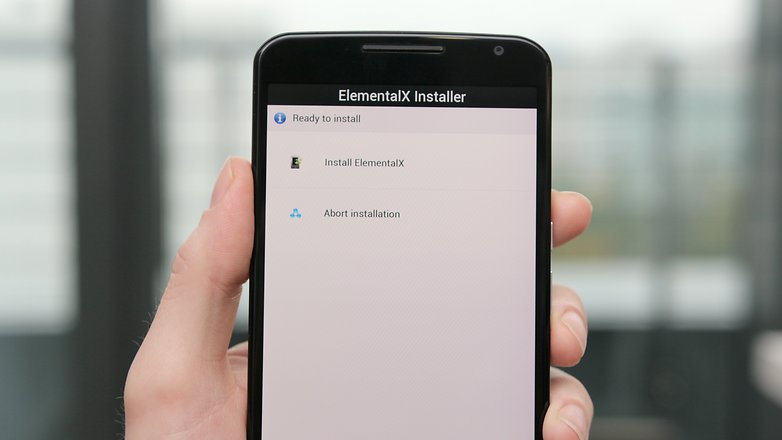
7. Flash the kernel zip file and wait for a success message. Some kernels (like Elemental X in our example) will run you through a series of screens like the Install Wizard on your computer.
Some kernels will allow you to set the CPU clock speed during installation. You can make changes then and there or later through the CPU manager app you installed. See below for instructions on the latter.
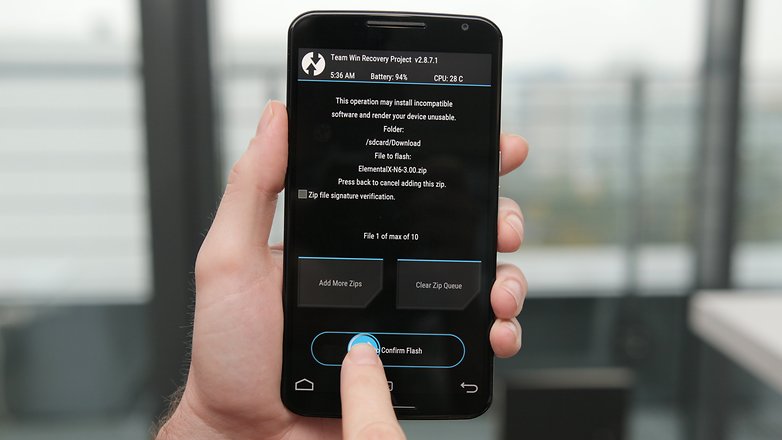 Flash the kernel. / © NextPit
8. Wipe the cache once the kernel has been flashed successfully.
![]() Clear your cache. / © NextPit
Clear your cache. / © NextPit
9. Go to the Advanced settings in recovery and tap ‘Fix Permissions’.
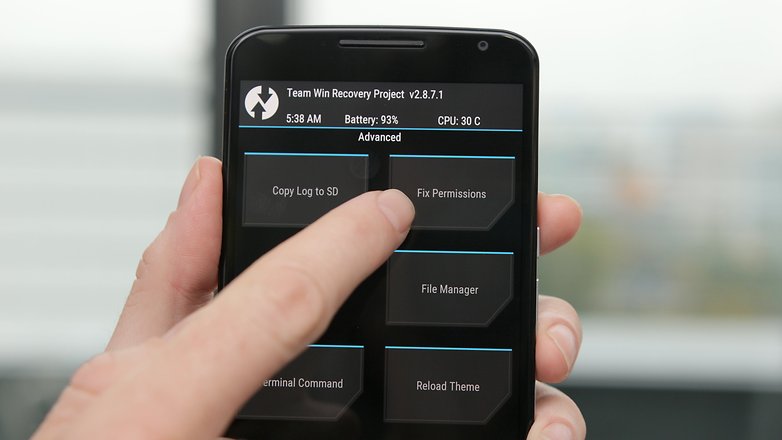 Fix permissions after flashing. / © NextPit
10. Reboot your system.
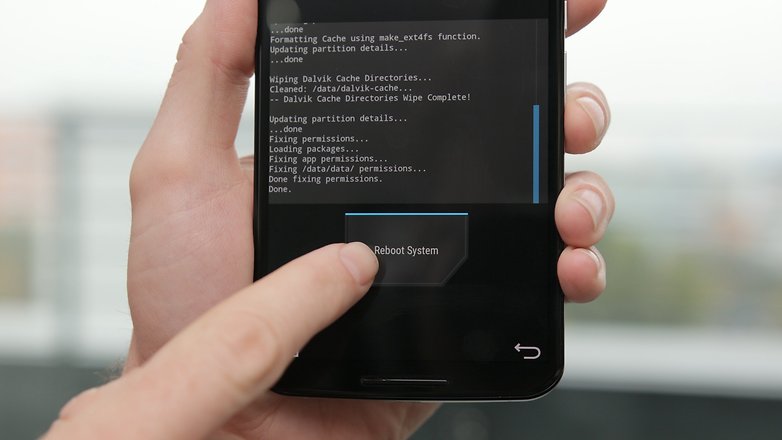 Reboot. / © NextPit
Changing your CPU clock speed
If you didn’t change the CPU settings during installation of your custom kernel you can now launch your CPU manager or kernel app. If you haven’t already installed compatible software for your kernel you’ll need to find an app in the Play Store.
There are plenty that work well, but I’m using a free app called Kernel Adiutor. You’ll need to grant your kernel app root permission and you might be required to install BusyBox as well (which will also require root privileges).
Kernel Adiutor (ROOT) 
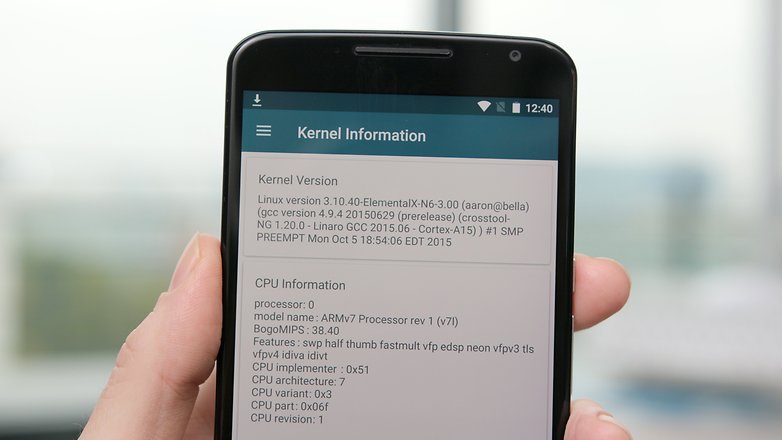 You can see we now have a custom kernel installed. / © NextPit
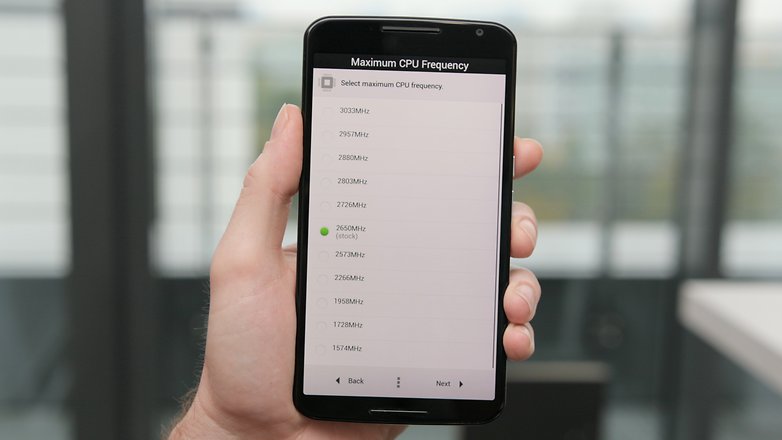
Look for the settings that control CPU clock speed. Depending on the app you’re using, you can choose a max CPU speed from a drop down menu or use a slider. Remember, take it slowly and try each clock speed out for a while to see how it affects stability, battery life and heat. Start at around 10 percent more than your current clock speed and work your way upwards.
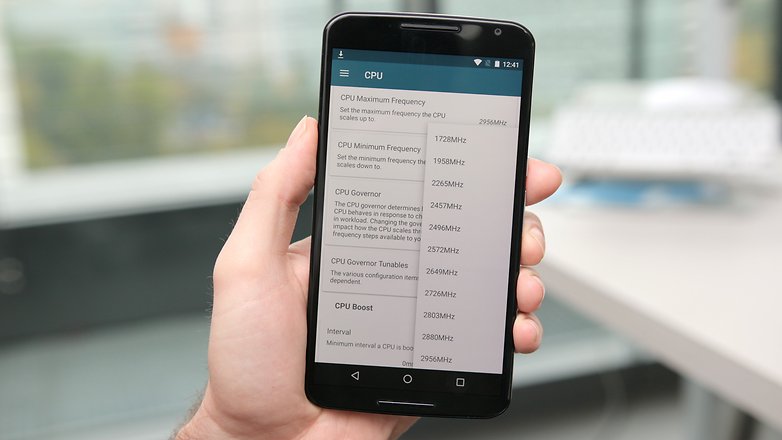 Select your max CPU clock speed and enjoy an instant power boost. / © NextPit
Don’t be surprised if your CPU speed doesn’t instantly jump up to that new setting. What you’re doing when you overclock is changing the CPU’s maximum speed, so it will be able to deliver higher performance when necessary.
While you can also change the minimum clock speed, that just puts unnecessary strain on your processor and battery. After all, there’s no need to be maxing out your CPU just to read emails.
If you encounter any instability with your new settings just go back and drop your max clock speed a little and see how you go.
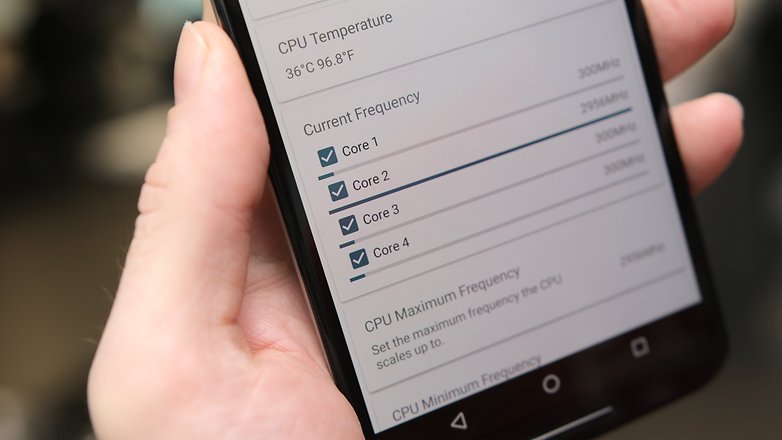 You can see our Nexus 6 is now peaking at 20 percent higher than normal. / © NextPit
If you encounter any problems that seem out of the ordinary, hit the forums or the place you grabbed your kernel from and read through the entries to see if anyone else has already solved your problem. If not, ask for help from the community. If all else fails you can simply re-flash the original kernel your device came with.
Let us know how you got on, and how much better your overclocked Android is now.
Источник


