- Margin vs. Padding Attributes
- Margin and Padding with a View
- Margin → android:layout_margin
- Padding → android:padding
- Margin and Padding with Layout
- Margin
- Padding
- What is padding android
- Android setPadding(int, int, int, int) method
- Android setPaddingRelative(int, int, int, int) method
- Example
- Basics of Android layouts and views
- What is a ViewGroup?
- Types of ViewGroups
- Adding Padding in Tabs in Android
- Live Code Templates in Android Studio
- May 2, 2018
- Sealed Classes in Kotlin
- April 30, 2018
- Why would I want to fitsSystemWindows?
- Customizing fitsSystemWindows
- Examples of customizing fitsSystemWindows
- Use the system, don’t fight it
Margin vs. Padding Attributes
There is always a confusion between the padding and margin attribute when you just start designing User interfaces. Be it web development or Android development, margin and padding is standard parameters to position and style User interface elements.
Both provides extra space/gap inside or outside the container. Then what’s the exact difference? Let’s get it cleared. In simple words, margin means to push outside, whereas padding means to push inside.
Now, lets understand what happens when we use these attributes for a View in Android.
Margin and Padding with a View
Let’s see how we can use these attributes with a View in android and how it affects the View’s position and styling.
Margin → android:layout_margin
When we say push outside, the view i.e the rectangle pushes its surrounding contents from itself by the dimension specified in the margin attribute. Here, the surrounding contents can be other Views. The following diagram will make it more clear.
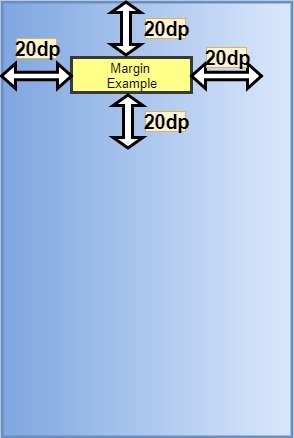
Here is how we secify this is our layout XML:
Hence, the other views will be separated from this view by at least 20dp.
We can also different margin values for all the sides, like:
Padding → android:padding
When we say push inside, the view i.e the rectangle pushes its contents from itself by the dimension specified in the padding attribute towards its center. Padding can be considered as margin but inside the View. The following diagram will make it more clear.
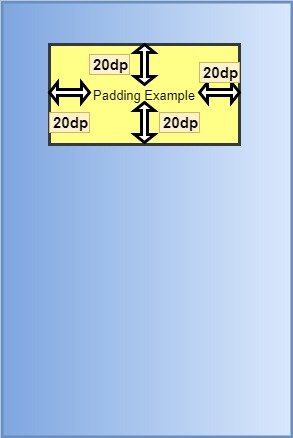
Here is how we secify this is our layout XML:
Hence, its content (here text) will be pushed inside of the rectangle by 20dp.
We can also different padding values for all the sides, like:
Margin and Padding with Layout
Now, lets understand what happens when we write these attributes for a Layout.
Margin
When we say push outside, the root layout i.e the rectangle pushes its surrounding contents from itself by the dimension specified in the margin attribute. Here, the surrounding content will be the screen of the mobile. Hence, the layout(rectangle) pushes itself from the screen of the mobile. The following diagram will make it more clear.
The syntax to apply margin to a layout is similar to that for a view.
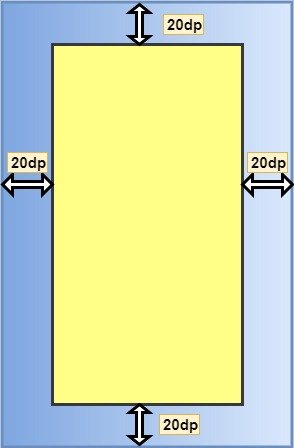
Padding
When we say push inside, the root layout i.e the rectangle pushes its contents from itself by the dimension specified in the padding attribute. Here, its content will be the different views that it holds like TextView, ImageView etc. The following diagram will make it more clear.

Note: In Android, padding attribute applied to the parent(root layout) looks the same as margin attribute applied to the child(views inside the layout).
Источник
What is padding android
In the previous lesson, we learned how to work with Margin in Android Layouts. In this lesson, we will learn how to work with Padding in Android Layout. Padding is within the view and expressed in Android in pixels for the left, top, right and bottom parts of the view.
Here, we will learn what is padding and how it can be worked easily on Android layout. Demo app will be shown to make it easy for a Beginner to understand.
Let’s start with the following illustration, explaining the concept of Padding in Linear Layout. Here the text Studyopedia, is our TextView text. Whereas, the Gray rectangular Box is the space for our View TextView.
A widget in Android occupies a rectangular space. Black line shows padding,
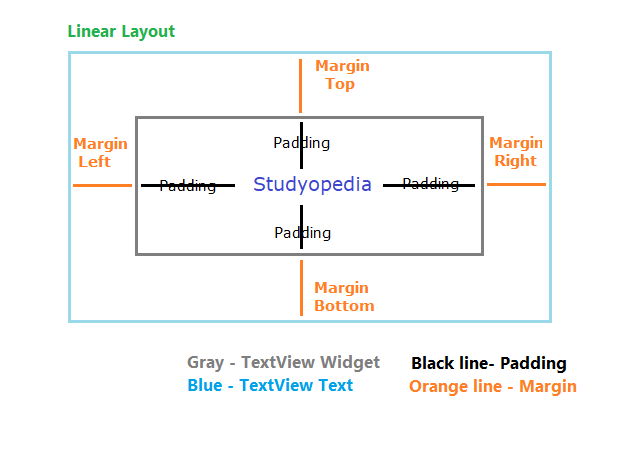
For example, a right padding of 2 will push the view’s content by 2 pixels to the left of the right edge.
The following methods are used to set padding,
setPadding(int, int, int, int): Sets Padding
setPaddingRelative(int, int, int, int): Sets relative padding
Let’s learn about the above two methods,
Android setPadding(int, int, int, int) method
It sets the padding. Here’s the syntax for setPadding() method,
left: left padding in pixels
top: top padding in pixels
right: right padding in pixels
bottom: bottom padding in pixels
Android setPaddingRelative(int, int, int, int) method
It sets the relative padding. Here’s the syntax for setPaddingRelative() method,
start: start padding in pixels
top: end padding in pixels
end: end padding in pixels
bottom: bottom padding in pixels
Padding can be queried by calling the following methods. The methods return the padding value of this view,
| Method | Description |
|---|---|
| getPaddingLeft() | It returns the left padding. |
| getPaddingTop() | It returns the top padding. |
| getPaddingRight() | It returns the right padding. |
| getPaddingBottom() | It returns the bottom padding. |
| getPaddingStart() | It returns the start padding depending on its resolved layout direction. |
| getPaddingEnd() | It returns the end padding depending on its resolved layout direction. |
Example
Time for some examples of the usage of padding in Android, with the emulator output.
Note:
If the minSdkVersion is 17 or higher, then
Use paddingStart instead of paddingLeft attribute, &
Use paddingEnd instead of paddingRight attribute.
If the minSdkVersion is 16 or less, then
Use both older paddingLeft and paddingStart attribute, &
paddingRight and paddingEnd attribute.
Let’s say, you have the following code for TextView, without padding,
Источник
Basics of Android layouts and views

What is a ViewGroup?
A viewgroup is a parent class of all the views. It holds all the children views (and viewgroups) within, as depicted by the structure above.
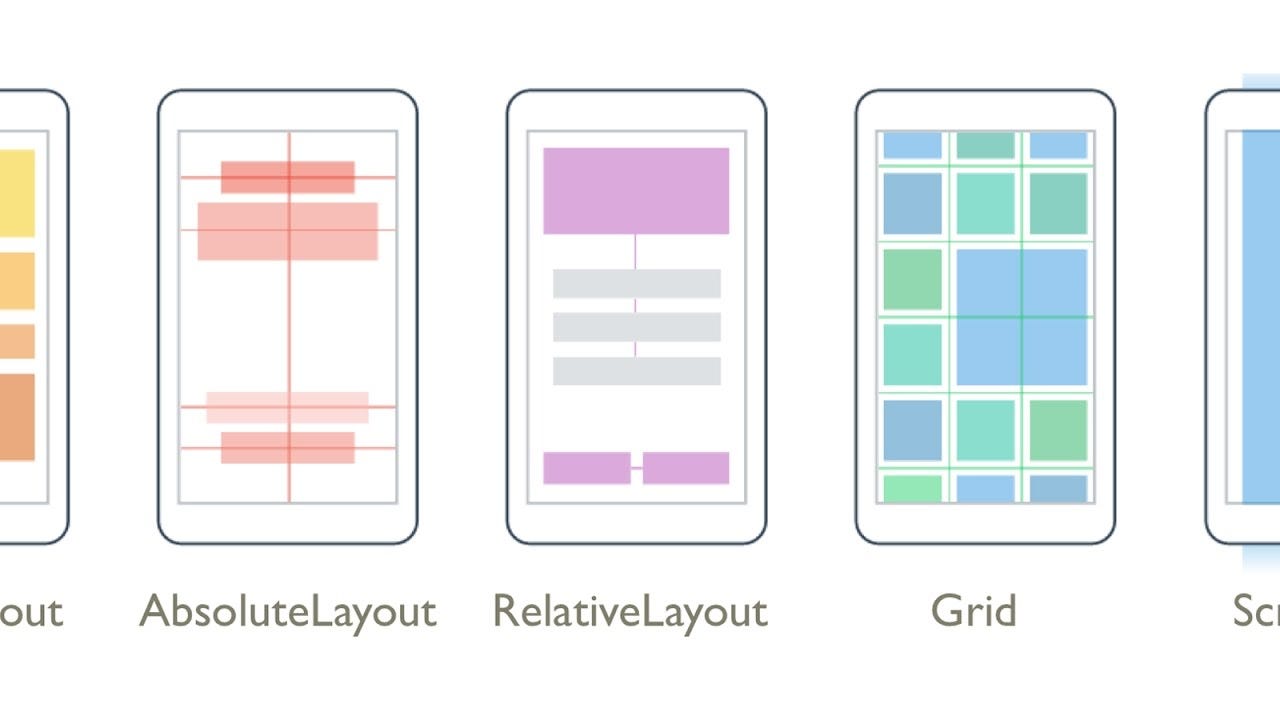
Types of ViewGroups
- Absolute Layout
- By using an Absolute Layout, you can specify the exact locations (x/y coordinates) of its children.
- They are less flexible and harder to maintain, rarely used nowadays.
- One needs to remember too many coordinate values for placing a view at a position, it would rather be much easier to remember a view with respect to which one needs to place a view on screen.
- It is usually used to block out an area on the screen and display only a single child on screen.
- If multiple children are used within it then all the children are placed on top of each other.
- Position of children can only be controlled by assigning gravity to them.
- Usually used to display single fragments on screen.
- Aligns the children views either horizontally or vertically.
- The attribute android:orientation specifies wheher to horizontally or vertically align children views.
- We usually use the attribute android:weight in the children views/viewgroups to decide what percentage of the available space they should occupy.
- An attribute android:weightSum defines the maximum weight sum, and is calculated as the sum of the layout_weight of all the children if not specified explicitly.
TRIVIA : What would happen if the weightSum is less than the sum of weights given to children explicitly?
- Relative Layout enables you to specify how child views are positioned relative to each other.
- The position of each view can be specified as relative to sibling elements or relative to the parent.
Some common attribute usages in relative layout:
Difference between android:layout_alignRight and android:layout_toRightOf : android:layout_alignRight is used to align a view’s rightmost edge to the rightmost edge of the specified view, whereas android:layout_toRightOf is used to place a view to the right of the specified view ie the left edge of a view is postioned to the right of the specified view.
Why to prefer android:layout_toEndOf instead of android:layout_toRightOf :
The views have LTR(left-to-right) orientation by default ie they start from left and end towards their righ, butthis orientation can be changed to RTL(right-to-left) where views start from right and end towards left. In suchcses,the views with the attribute android:layout_toEndOf will correctly align to the end w.r.t the view specifiedwhereas android:layout_toRightOf will still align it towards the right.
- Read more about Relative Layout here and here.
TRIVIA: Relative Layout measures a view twice, whereas Linear Layout measures only once (if weights are not used)!
Sources: Stack Overflow and Medium
- Instead of specifying the width and height of a child, we can provide a percentage of screen width or height to use.
- It is very useful in scaling layouts to various screen sizes.
- The PercentSupportLayout supports two pre-built layout — PercentRelativeLayout and PercentFrameLayout .
- Find an example for this here.
- ScrollView
- It is a subclass of FrameLayout, as the name says it is used when your contents do not fit the screen and tend to overflow.
- ScrollView can hold only one direct child. This means that you need to wrap all your views into a single viewgroup in order to use it within a ScrollView.
- ScrollView only supports vertical scrolling. Use HorizontalScrollView if you want to have horizontal scrolling.
- It is advised not to use ScrollView with ListView , GridView and Recycler View as they take care of their own vertical scrolling.
Источник
Adding Padding in Tabs in Android
In the app, which I am making at my job, I had a situation where I needed a huge number of tabs with the Fragment View Pager . I used a typical TabLayout and ViewPager with a custom FragmentPagerAdapter class as the adapter for ViewPager .
This is TabLayout and ViewPager in XML layout.
But, as I run it, this is how it looked like:
But, in Android Support library, there are two attributes for TabLayout which can fix this issue very easily. Just add these two lines in TabLayout and you’re done!
Now, when you run, app will show like this:
If you liked this article, you can read my new articles below:
Live Code Templates in Android Studio
Code completion can improve your productivity by reducing how much you have to type, but there are situations when a more powerful tool is needed. Thanks to Android Studio and IntelliJ, live templates make it much easier to focus on just the things you care about.
May 2, 2018
Sealed Classes in Kotlin
Often times, we have a situation where we usually need to manage multiple states of something. For example, our app calls a web service to fetch data from server, then we get any response from server.
April 30, 2018


7 years experience. 💻 Creator of various Open Source libraries on Android . 📝 Author of two technical books and 100+ articles on Android. 🎤 A passionate Public Speaker giving talks all over the world.
Источник
Why would I want to fitsSystemWindows?

System windows are the parts of the screen where the system is drawing either non-interactive (in the case of the status bar) or interactive (in the case of the navigation bar) content.
Most of the time, your app won’t need to draw under the status bar or the navigation bar, but if you do: you need to make sure interactive elements (like buttons) aren’t hidden underneath them. That’s what the default behavior of the android:fitsSystemWindows =»true» attribute gives you: it sets the padding of the View to ensure the contents don’t overlay the system windows.
A few things to keep in mind:
- fitsSystemWindows is applied depth first — ordering matters: it’s the first View that consumes the insets that makes a difference
- Insets are always relative to the full window — insets may be applied even before layout happens, so don’t assume the default behavior knows anything about the position of a View when applying its padding
- Any other padding you’ve set is overwritten — you’ll note that paddingLeft / paddingTop /etc is ineffective if you are using android:fitsSystemWindows=»true» on the same View
And, in many cases, such as a full screen video playback, that’s enough. You’d have your full bleed view with no attribute and another full screen ViewGroup with android:fitsSystemWindows=»true» for your controls that you want inset.
Or maybe you want your RecyclerView to scroll underneath a transparent navigation bar — by using android:fitsSystemWindows=»true» in conjunction with android:clipToPadding=»false» , your scrolling content will be behind the controls but, when scrolled to the bottom, the last item will still be padded to be above the navigation bar (rather than hidden underneath!).
Customizing fitsSystemWindows
But this default behavior is just that: a default. On KitKat and below, your custom View could override fitSystemWindows() and provide any functionality you wanted — just return true if you’ve consumed the insets or false if you’d like to give other Views a chance.
However, on Lollipop and higher devices, we provide some new APIs to make customizing this behavior much easier and consistent with other behaviors for Views. You’ll instead override onApplyWindowInsets() , which allows the View to consume as much or as little of the insets as you need and be able to call dispatchApplyWindowInsets() on child views as needed.
Even better, you don’t even need to subclass your Views if you only need custom behavior on Lollipop and higher — you can use ViewCompat.setOnApplyWindowInsetsListener() , which will be given preference over the View’s onApplyWindowInsets() . ViewCompat also provides helper methods for calling onApplyWindowInsets( ) and dispatchApplyWindowInsets() without version checking.
Examples of customizing fitsSystemWindows
While the basic layouts ( FrameLayout , LinearLayout , etc) use the default behavior, there are a number of layouts that already customize how they react to fitsSystemWindows to fit specific use cases.
One example is the navigation drawer which needs to span the whole screen and appear under a transparent status bar.

Here, DrawerLayout uses fitsSystemWindows as a sign that it needs to inset its children (such as the main content view — just like the default behavior), but still draw the status bar background (which defaults to your theme’s colorPrimaryDark ) in that space as per the material design specs.
You’ll note DrawerLayout calls dispatchApplyWindowInsets() for each child on Lollipop and higher to allow child views to also receive fitsSystemWindows , a departure from the default (where normally it would simply consume the insets and children would never receive fitsSystemWindows ).
CoordinatorLayout also takes advantage of overriding how it handles window insets, allowing the Behavior set on child Views to intercept and change how Views react to window insets, before calling dispatchApplyWindowInsets() on each child themselves. It also uses the fitsSystemWindows flag to know if it needs to paint the status bar background.
Similarly, CollapsingToolbarLayout looks for fitsSystemWindows to determine when and where to draw the content scrim — a full-bleed scrim which overlays the status bar area when the CollapsingToolbarLayout is scrolled sufficiently off the screen.
If you’re interested in seeing some of the common cases that accompany the Design Library, check out the cheesesquare sample app.
Use the system, don’t fight it
One thing to keep in mind is that it isn’t called fitsStatusBar or fitsNavigationBar . What constitutes system windows, their dimensions, and location may certainly change with different platform releases — for a perfect example, look at the differences between Honeycomb and Ice Cream Sandwich.
Just rest assured that the insets you do get from fitsSystemWindows will be correct on all platform versions to ensure your content does not overlap with system provided UI components — make sure to avoid any assumptions on their availability or size if you customize the behavior.
Источник


