- RecyclerView in Android with Example
- What is RecyclerView?
- Views
- ViewGroups
- LinearLayout
- Core Components of the RecyclerView
- RecyclerView.Adapter
- RecyclerView.LayoutManager
- RecyclerView.ViewHolder
- Large Lists
- Adding a View
- RecyclerView.Recycler
- Layout Calls – The Tweet List must be crazy
- Communication between RecyclerView Components
- RecyclerView.LayoutManager
- Gradle
- List of Items
- Layout to be used for each item in our list
- Adding the RecyclerView to main layout
- Create a ViewHolder
- Create a RecyclerViewAdapter
- Create Layout Manager
- Hook our adapter to items and set it on RecyclerView
RecyclerView in Android with Example
Updated October 6, 2021
What is RecyclerView?
The RecyclerView is a widget that is more flexible and advanced version of GridView and ListView. It is a container for displaying large datasets which can be scrolled efficiently by maintaining limited number of views. You can use RecyclerView widget when you have data collections whose elements change at runtime depend on network event or user action.
In this tutorial, you will learn:
Views
The Android platform uses the View and ViewGroup classes to draw items on the screen. These classes are abstract and are extended to different implementations to suite a use-case. TextView, for example, has a simple purpose of displaying text content on the screen. EditText extends from the same View class and adds more functionality to enable the user to input data.
It’s possible to create our own custom views to be able to achieve more flexibility when developing user interfaces. The View class provides methods we can override to draw on the screen and a means to pass in parameters such as width, height, and our own custom attributes we would want to add to our View to make it behave as we would wish.
ViewGroups
The ViewGroup class is a kind of View but, unlike the simple View class whose responsibility is simply displaying, the ViewGroup gives us the ability put multiple views into one view, which we can reference as a whole. In this case, the View that’s created at the top level that we add other simple views(we can also add viewGroups) to is called the “parent,” and the views that are added inside are “children”.
We can image a View as an Array and a ViewGroup as an Array of Arrays. Given that an Array of Arrays is an Array itself, we can see how a ViewGroup can be treated like a View.
The ViewGroup also enables us to define how the children are organized inside the view, for example, are laid our vertically or horizontally. We can have different rules for interaction inside the View. For example, TextViews following each other should be have 12dp distance while ImageViews followed by TextView should have a distance of 5dp.
This would be the case if we were developing our own ViewGroup from scratch. To make these configurations easier, Android provides a class called LayoutParams, which we can use to input these configurations.
Android documentation provides some default parameters we would implement when configuring our own ViewGroup. Some common parameters are ones that pertain width, height and margin. By default, these configurations in have the structure android:layout_height for height, for example, android:layout_width In this regard, when you create your ViewGroup, you can further create LayoutParams specific to the way you would wish your ViewGroup to behave.
Android comes with default Views and ViewGroups we can use to do a lot of the common tasks we need. One example we’ve mentioned is a TextView. That’s a simple view that comes with configurable aspects such as height, width, textSize, and the like. We have an ImageView for displaying Images and EditText as we had mentioned, among many others. Android also has custom ViewGroups that we can add our Views to and get the expected behavior.
LinearLayout
LinearLayout allows us to add View items in it. LinearLayout is an orientation attribute that dictates how it will be laid out on the screen. It also has LinearLayout.LayoutParams that dictate the rules for the views inside, for example, the attribute android:center_horizontal would center the views along the horizontal axis whereas, `android:center_vertical would center the content of the view along the vertical axis.
Here are some images to have an understanding of centering. We would take this to be a simple TextView inside 200px by 200px space, centering attributes would make it behave as follows.
android:center_horizontal
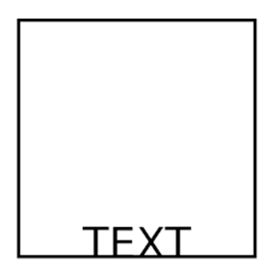 Horizontally centered content
android:center_vertical
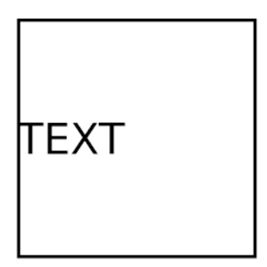 vertically centered content
android:center
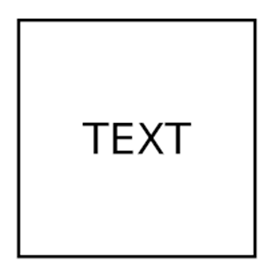 Centered content
Core Components of the RecyclerView
 Core Components of the RecyclerView
Following are the important components of RecyclerView:
RecyclerView.Adapter
Groundwork #1 – Adapter Pattern
An adapter is a device that transforms attributes of system or device to those of an otherwise incompatible device or system. Some of them modify signal or power attributes, while others simply adapt the physical form of one connector to another.
A simple example we find in real life to explain an Adapter is when we need to connect devices together, but they have connection ports that don’t match each other. This could be the case when you visit a different country where they use different kinds of sockets. If you carry your phone or laptop charger, it would be impossible to connect it to the power outlets. However, you would not give up but simply get an Adapter that would come in between the power outlet and your charger and enable charging to happen.
This is the case in programming when we want to connect two data structures together in order to fulfill the task, but their default ports don’t have a way to communicate with each other.
We’ll use the simple example of a device and a charger. We’ll have two instances of chargers. An American one and a British one
We’ll then create two devices
As an example, we can then create some instances of the devices for playing along.
We’ll then introduce the concept of charging for both of the devices by adding a method in the devices called charge() .
The method takes in as input it’s respective charger and does charging based on it.
In this case, based on our analogy, we would be for one reason or another be in need of using a BritishCharger when using an AmericanDevice or vice versa.
In the programming world, this is usually when mixing libraries together that offer the same functionality (in our context, our shared functionality is charging). We would need to find a way to enable this.
If we follow the analogy, we will need to go to an electronics shop and buy an adapter which we would enable us to charge AmericanDevices given BritishChargers. From the programming perspective, we’ll be the ones who will be the manufacturer of the adapter.
We’ll make an Adapter for one which matches the exact pattern we would need for creating the other. We’ll implement it as a class as follows. It doesn’t necessarily need to be a class and could be a function that highlights what the adapter pattern generally does. We’ll use a class as it matches up with most usage on Android.
In the programming world, the difference in the sockets is analogous to the difference in the methods inside used for charging. The chargers having different methods would make it impossible to use the chargers.
Trying to call the charge() method in myBritishDevice with americanChargerIFound would not work as the AmericanDevice only accepts an AmericanCharger
So it’s impossible to do this
In this scenario the adapter we created
AmericanToBritishChargerAdapter can now come in handy. We can use the returnNewCharger() method to create a new BritishCharger, which we can use to charge. All we need is to is create an instance of our adapter and feed it with the AmericanCharger we have, and it will create a BritishCharger we can use
RecyclerView.LayoutManager
When dealing with a ViewGroup we would have Views placed inside it. It is LayoutManager would have the task of describing how the Views are laid out inside.
For comparison purposes, when working with Linearlayout ViewGroup, the use case we want is the ability to place the items either vertically or horizontally. This is easily implemented by adding an orientation attribute, which tells us how the linearlayout will be placed on the screen. We can do this by using android:orientation=VERTICAL|HORIZONTAL attribute.
We also have another ViewGroup called GridLayout, it’s use case is when we would want to place Views in a rectangular Grid structure. This could be for reasons such as making the data we’re presenting to the app user easy to consume. By design, the GridLayout enables configurations to help you in reaching this goal by having configurations where we can define the dimensions of the grid for example, we can have a 4×4 grid, 3 x 2 grid.
RecyclerView.ViewHolder
The ViewHolder is an abstract class that we also extend from RecyclerView. The ViewHolder provides us with common methods to help us reference a View we have placed on the RecyclerView even after the Recycling machinery in the RecyclerView has changed various references we don’t know about.
Large Lists
RecyclerViews are used when we want to present a really large set of Views to the user, all the while not exhausting our RAM on our device for each and every instance of the View created.
If we were to take the case of a Contact-List, we would have a general idea of how one contact would look like in the list. What we would then do is create a template layout – which is actually a View – with slots where various data from our contacts list will fill. Following is a pseudo code that explains the whole purpose:
We would then have a ContactList of this nature
If it is the case, we were hardcoding the contents, we wouldn’t have a programmatic way of adding new content to the list without rewriting the app. Fortunately for us. Adding a View to a ViewGroup is supported by an addView(view:View) method.
Even if that’s the case, it’s not how the RecyclerView gets children views added to it.
In our use case, we would have a long list of contacts. For each contact in the list, we would need to create OneContactView and populate the data inside the View to match the fields in our Contact class. Then once we have the view, we would need to add it to RecyclerView to show the list.
We have an array of contacts called OneContactView. It contains slots to take contents from the Contact class and display them. In RecyclerView we have to add Views into it so it can help us with it’s recycling ability.
The RecyclerView doesn’t really allow us to add view but enables us to add a ViewHolder. So, in this scenario, we have two pieces of things we want to connect but don’t match. This is where our Adapter comes in. RecyclerView provides us with an Adapter much like our AmericanToBritishChargerAdapter() from earlier that enabled us to convert our AmericanCharger which was unusable with our BritishDevice to something usable, akin to power adapter in real life.
In this scenario, the adapter would take our array of Contacts and our View, and from there generate ViewHolders which the RecyclerView is willing to accept.
The RecyclerView provides an interface we can extend to create our Adapter through the RecyclerView.Adapter class. Inside this Adapter is a way to create the ViewHolder class that the RecyclerView wants to work with. So, what we have is the same situation as before, but with one extra thing, that is the Adapter.
We have an array of Contacts, a view to display one contact OneContactView. A RecyclerView is a list of Views that provide recycling services but is only willing to take on ViewHolders
But in this scenario, we now have RecyclerView.Adapter class, which has a method to create ViewHolders inside.
The RecyclerView.ViewHolder is an abstract class that takes our View as an argument and converts it to a ViewHolder.
It uses the wrapper pattern that’s used to extend abilities of classes.
Groundwork #2 – Wrapper pattern
We’ll use a simple example to demonstrate how we can make Animals speak.
In the above example, we have two animals. If by chance, we wanted to add a method to make the speak, but the library author was no fun, we could still find a way. What we need would be a wrapper for our Animal class. We would do this by taking in the Animal as a constructor for our class
Now we can pass in an animal instance to the SpeechPoweredAnimalByWrapper. Calling the sound() method on it would call the passed in animal sound() method. We also have an additional speak() method, which counts as new functionality we add to the animals passed in. We can use it as follows:
Using this pattern, we can take classes and add functionality. All we would need is to pass is a class instance and new methods defined by our wrapping class.
In our case above, we used a concrete class. It’s also possible to implement the same in an Abstract class. We would need to do is add change the SpeechPoweredAnimalByWrapper class to abstract and we’re done. We’ll change the class name to something shorter to make it more readable.
It’s the same as before, but it would mean something else. In a normal class, we can have an instance of a class in the same way we created cat1 and dog1. Abstract classes, however, aren’t meant to be instantiated but are meant to extending other classes. So how would we use the new SpeechPowered(var myAnimal:Animal) abstract class. We can use it by creating new classes that will extend it and in turn, gain it’s functionality.
In our example, we’ll create a class SpeechPoweredAnimal that extends the class
This is the same pattern used in the ViewHolder. The class RecyclerView.ViewHolder is an abstract class that adds functionality to the View, much like we’ve added the speak method to the animals. The added functionality is what makes it work when dealing with the RecyclerView.
This is how we would create a OneContactViewHolder from OneContactView
RecyclerView has an Adapter that allows us to connect our Contacts array to the ContactsView with the RecyclerView
Adding a View
The ViewGroup doesn’t redraw the ViewGroup automatically but follows a particular schedule. It may be the case on your device that it redraws every 10ms or 100ms, or if we pick an absurd number say 1 minute when we add a View to a ViewGroup you’ll see the changes 1 minute later when the ViewGroup “refreshes.”
RecyclerView.Recycler
Groundwork #3. Caching
One of the best examples of where we regularly do refreshes is in the Browser. Let’s imagine, for example, the site we’re visiting is static and isn’t sending content dynamically, we would need to keep refreshing to see the changes.
For this example, let’s imagine the site in question is twitter. We would have a series of static tweets listed and the only way we could get to see new Tweets would be through clicking the refresh button to refetch the content.
Repainting the whole screen is obviously a costly thing. If we were to imagine if it were the case, we had limited bandwidth with our phone provider. And our tweet list had a lot of images and videos, it would be costly to redownload all the contents of the page in every refresh.
We would need a way to store the already loaded Tweets and ensure our next request has an ability to say the Tweets it already has. Therefore, it doesn’t redownload everything and only gets the new Tweets it has and also check if some Tweet that had been saved locally is no longer there so that it can delete it locally. What we’re describing is called Caching.
The information we send to the website about the contents we have is called meta-data. So in real sense we’re not just saying “we want to load your site”, we say “we want to load your site, and here’s some of the contents we had already saved from the last time we loaded, please use it to only send us what’s not in there, so we don’t use a lot of bandwidth as we don’t have many resources.”
Layout Calls – The Tweet List must be crazy
An example of a layout calls is scrollToPosition
This is a common example that is present in things like chatting apps. If someone in a chat thread replies to a chat bubble from earlier, some chatting apps include the reply and a link to the chat bubble, which upon clicking navigates you to where your original message was.
In the case, we call this method before we have a LayoutManager added to our RecyclerView and before we have an RecyclerView.Adapter, the scrollToPosition(n:Int) is simply ignored .
Communication between RecyclerView Components
Groundwork #4. Callbacks
The RecyclerView, in doing its work, has a lot of moving parts. It has to deal with the LayoutManager which tells us how to organize the Views, either Linearly or in a Grid. It has to deal with an Adapter that does the job of converting our items contactList into Views OneContactView and then into ViewHolders OneContactViewHolder that the RecyclerView is willing to work within the methods it provides for us.
The raw material for the RecyclerView is our Views e.g. OneContactView and data source.
We’ve used a simple scenario as a starting point to get a feel of what the RecyclerView is trying to achieve.
A base case of when we would have a static array of 1000 contacts we want to show the user is easy to understand.
The RecyclerView machinery really starts to take life when the list is no longer static.
With a dynamic list, we have to think of what happens to the View on the screen when we add an item to the list or remove an item from the list.
RecyclerView.LayoutManager
Apart from deciding how our views are to be layed out either Linearly or in a Grid. The LayoutManager does a lot of work under the hood in helping the Recycler know when to do the Recycling.
It’s responsible for keeping track on the Views currently visible on the Screen and communicating to this information to the Recycling mechanism. As a user scrolls downwards, the Layout manager is responsible of informing the Recycling system of the Views that go out of focus at the top so that they can be reused instead of them remaining there and consuming memory or instead of destroying them and having to create new ones.
What this means is that the LayoutManager needs to keep track of where the user is as they scroll our list. It does this by having a list of positions that are index base, i.e. the first item is to start from 0 and increase to match the number of items in our list.
If we can view 10 items on our list of say 100, at the beginning, the LayoutManager is aware that it has in focus view-0 all the way to View-9 As we scroll the LayoutManager is able to calculate the views that get out of focus.
The LayoutManager is able to release these views to the Recycling mechanism so that they can be reused(new data can be bound to them e.g. a View’s contact data can be removed and new Contact data from the next segment can replace the placeholders).
This would be a happy case if the List we have is static, but one of the most common use cases of using a RecyclerView is with dynamic lists where data can come from an online endpoint or even maybe from a Sensor. Not only is data added, but data on our List is sometimes removed or updated.
The dynamic state of our data can make it very difficult to reason about the LayoutManager. For this reason, the LayoutManager maintains a list of its own about the items and positions, that is separate from the List the Recycling component uses. This ensures it does it’s layout job correctly.
At the same time, the RecyclerView’s LayoutManager doesn’t want to misrepresent the data it has. In order to operate correctly, the LayoutManager synchronizes with the RecyclerView.Adapter at given intervals (60ms) sharing information about our List items. i.e., Items added, updated, removed, moved from one position to another). The LayoutManager, upon receiving this information, reorganizes the contents on the Screen to match the changes when it’s necessary.
Many of the core operations that deal with RecylerView rotate around communication between the RecyclerView.LayoutManager and RecyclerView.Adapter that stores our lists of sometimes static or sometimes dynamic data.
More to that, RecyclerView presents us with methods we can use to listen in on events such as onBindViewHolder when our RecyclerView.Adapter binds content from our List, e.g. a Contact to a ViewHolder so that it now get used to display the info on Screen.
Another is onCreateViewHolder, which tells us when the RecyclerView.The adapter takes a regular View like OneContactView and converts it into a ViewHolder item that the RecyclerView can work with. From our ViewHolder for usage by the RecyclerView. onViewDetached
Apart from the core mechanisms that enable Recycling. The RecyclerView provides ways to customize behavior without affecting Recycling.
Reuse of Views makes it difficult to do common things we’re used to doing with static views such as reacting to onClick events.
As we’re aware that the RecyclerView.LayoutManager that presents the Views to the user might for a moment have a different list of items from the RecyclerView.Adapter that has the list that we have stored in a database or streaming in from a source. Putting OnClick events directly on Views can lead to unexpected behavior, such as deleting the wrong contact or changing.
Gradle
If we want to use RecyclerView, we need to add it as a dependency in our build .gradle file.
In the following example we have used implementation “androidx.recyclerview:recyclerview:1.1.0” which is the most current version as per this article.
After adding the dependency to our Gradle file, we will be prompted by Android Studio to Synchronize the changes,
This is how our Gradle file will look like after adding a RecyclerView in an empty project with just the defaults.
We only have one layout file at the moment. We will start with a simple example where we’ll use a RecyclerView to show a list of fruit names on the screen.
List of Items
We’ll navigate to our MainActivity file and create an array with fruit names inside right before the onCreate() method that was generated during set up.
Our next goal will be to present this list on the screen using a RecyclerView.
To do this, we’ll navigate to the layout directory that holds our Layouts and create a View that will be responsible for showing one fruit.
Layout to be used for each item in our list
In the TextView above, we have added an id field that will be used for identifying a View.
It is not generated by default. We’ve our TextView the id fruitName to match the data, which will be bound to it.
Adding the RecyclerView to main layout
In the same activity, there’s main_layout.xml layout file that was generated for us by default.
If we chose an empty project. It’ll have generated an XML containing a ConstraintLayout and inside will be a TextView with “Hello” text.
We’ll delete all the contents and have the layout only contain the RecyclerView as below:
We’ve also added an id attribute for the RecyclerView which we’ll use to reference it in our code.
We will then navigate back to our MainActivity file. Using the id’s we have created, we will be able to reference the View’s we have just created.
We will start by referencing the RecyclerView using findViewById() method provided by Android. We will do this in our onCreate() method.
Our onCreate() method will look as follows.
Create a ViewHolder
Next, we will create a RecyclerView.ViewHolder which is responsible for taking our View and converting it to a ViewHolder, which the RecyclerView uses to display our items.
We will do this right after our fun onCreate() method.
Create a RecyclerViewAdapter
Next, we will create a FruitArrayAdapter class that extends the RecyclerView.Adapter class.
The FruitArrayAdapter we create will be responsible for doing the following.
It will take fruit names from the fruit array. It will create a ViewHolder using our view one_fruit_view.xml It will then bind the fruit to a ViewHolder, and dynamically bind the contents to the View we created one_fruit_view.xml.
Android Studio will add red squiggles on our FruitArrayAdapter, telling us we need to implement a method that the RecyclerView can use to connect our array to a ViewHolder that the RecyclerView can use.
We will start with the easiest bit from the generated code is the getItemCount() method. We know how to get the number of items in our array by calling the array.length method.
Then we’ll implement the method override fun onCreateViewHolder.
This is where the RecyclerView asks us to help it construct a FruitHolder for it.
If we recall this is how our FruitViewHolder class looked like:
It requires our fruitView which we created as an xml file one_fruit_view.xml
We can be able to create a reference to this xml and convert it to a View as follows.
The remaining bit is the override
The RecyclerView.Adapter asks with a position integer, which we’ll use to fetch an item from our list. It also provides us with a holder so that we can bind the item we get from the fruitArray to the View that’s being held inside the view holder.
The View that is held inside a ViewHoder is accessible through the field ViewHolder.itemView. Once we get the view, we can use the id fruitName we created earlier to set the content.
With that our FruitArrayAdapter is complete and looks as follows.
Finally, we’re ready to wire up the remaining pieces of our RecyclerView. Which are creating a LayoutManager, which will tell the RecyclerView how to display the contents of the list. Whether to show in a linear manner using LinearLayoutManager or in a grid using GridLayoutManager or StaggeredGridLayoutManager.
Create Layout Manager
We will go back inside our onCreate function and add the LayoutManager
Hook our adapter to items and set it on RecyclerView
We have also created an fruitListAdapter instance and fed it the array of fruit names.
Источник


