- Set up your iPhone, iPad, or iPod touch
- If you’re switching to a new device
- If you’re setting up your first iOS device
- Turn on your device
- If you have another device, use Quick Start
- Activate your device
- Set up Face ID or Touch ID and create a passcode
- Restore or transfer your information and data
- Sign in with your Apple ID
- Turn on automatic updates and set up other features
- Set up Siri and other services
- Set up Screen Time and more display options
- Finish up
- [Answered!]Should I Set Up as New iPhone Or Restore from Backup?
- Part 1. About «Set Up As New Phone»
- 1. What Does It Mean to «Set Up As New Phone»?
- 2. What are the Advantages of «Set Up As New Phone»?
- 3. What are the Disadvantages of «Set Up As New Phone»?
- Part 2. About «Restore from Backup»
- 1. What Does It Mean to «Restore from Backup»?
- 2. What are the Advantages of «Restore from Backup»?
- 3. What are the Disadvantages of «Restore from Backup»?
- Your Best Choice: Set Up as New iPhone and Selectively Restore Data from Backup
- Conclusion
- FAQ on Should I Set Up as New iPhone Or Restore from Backup
- How to Set up a New iPhone
- Beginning iPhone Activation
- Turn on iPhone
- Select Language & Region
- Choose a Wi-Fi Network, Activate Phone & Enable Location Services
- Activate Phone
- Enable Location Services
- Security Features (Passcode, Touch ID)
- Touch ID
- Passcode
- iPhone Set Up Options
- Create or Enter Your Apple ID
- Set Up Apple Pay
- Enable iCloud
- Enable iCloud Drive
- Enable iCloud Keychain
- Enable Siri
- Share Diagnostic Information
- Choose Display Zoom
- Configure the New Home Button
- iPhone Activation Is Complete
Set up your iPhone, iPad, or iPod touch
Learn how to set up your iPhone, iPad, or iPod touch.
If you’re switching to a new device
If you want to transfer your information from another device to your new iPhone, iPad, or iPod touch, follow these steps:
Make sure that you back up your previous iOS device so that you can transfer the content to the new device.

If you’re setting up your first iOS device
If you already set up your new device but want to start over, learn how to erase your iPhone, iPad, or iPod touch.
Otherwise, follow these steps:
Turn on your device
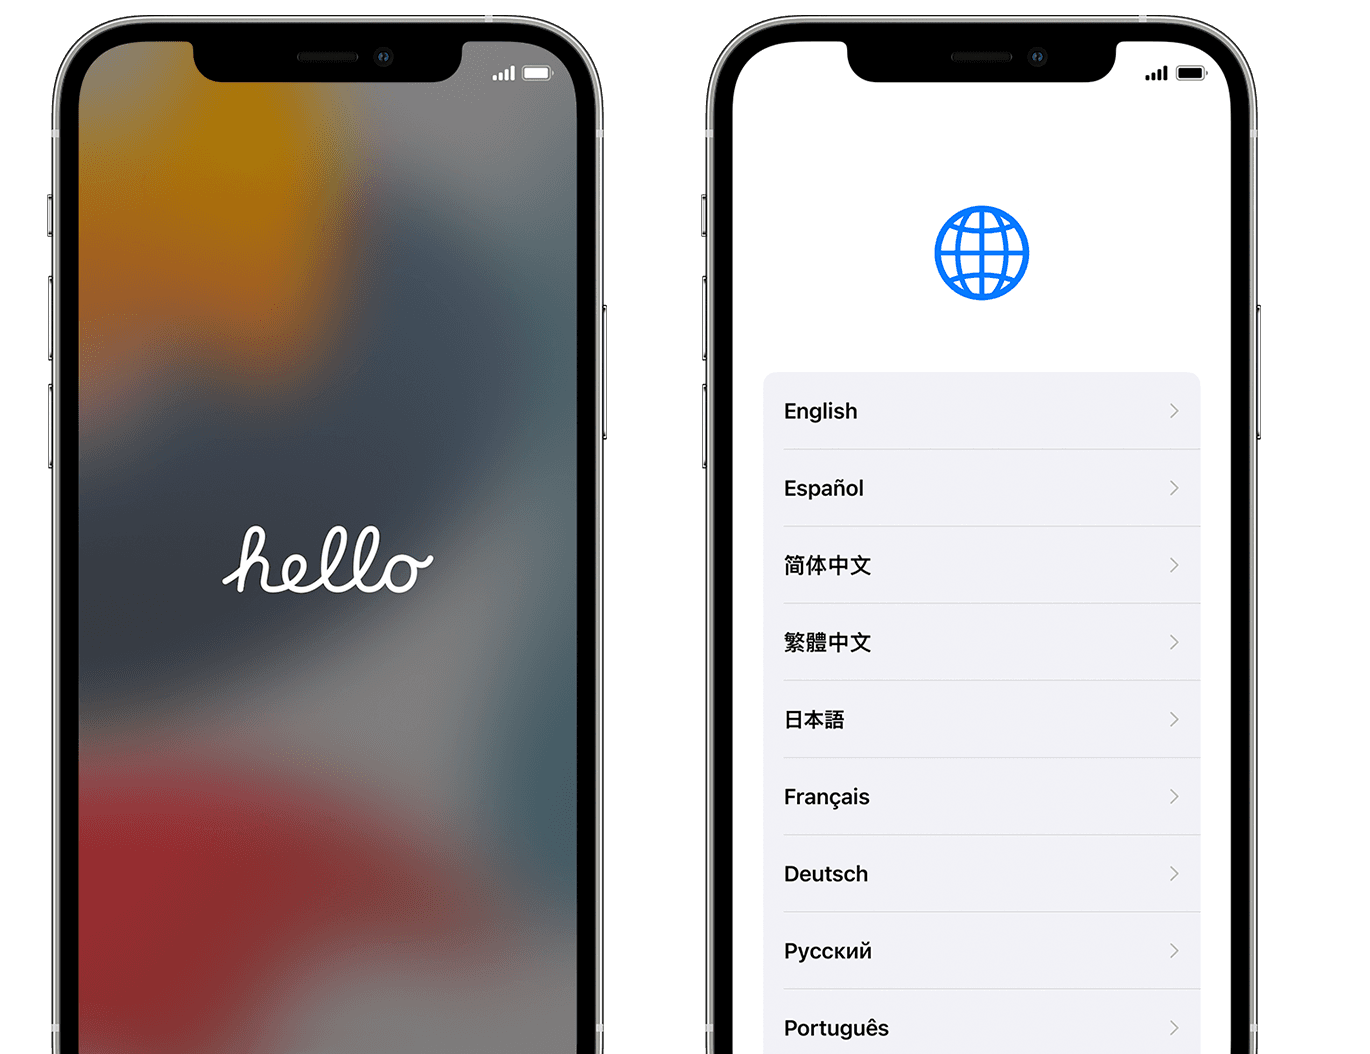
Press and hold the device’s power button until you see the Apple logo. You’ll then see «Hello» in many languages. Follow the steps to get started. If you’re blind or have low vision, you can turn on VoiceOver or Zoom from the Hello screen.
When asked, choose your language. Then tap your country or region. This affects how information looks on your device, including date, time, contacts, and more. At this point, you can tap the blue accessibility button to set up Accessibility Options that can optimize your setup experience and the use of your new device.
If you have another device, use Quick Start
If you have another device, you can use it to automatically set up your new device with Quick Start. Bring the two devices close together, and then follow the instructions.
If you don’t have another device, tap «Set Up Manually» to continue.

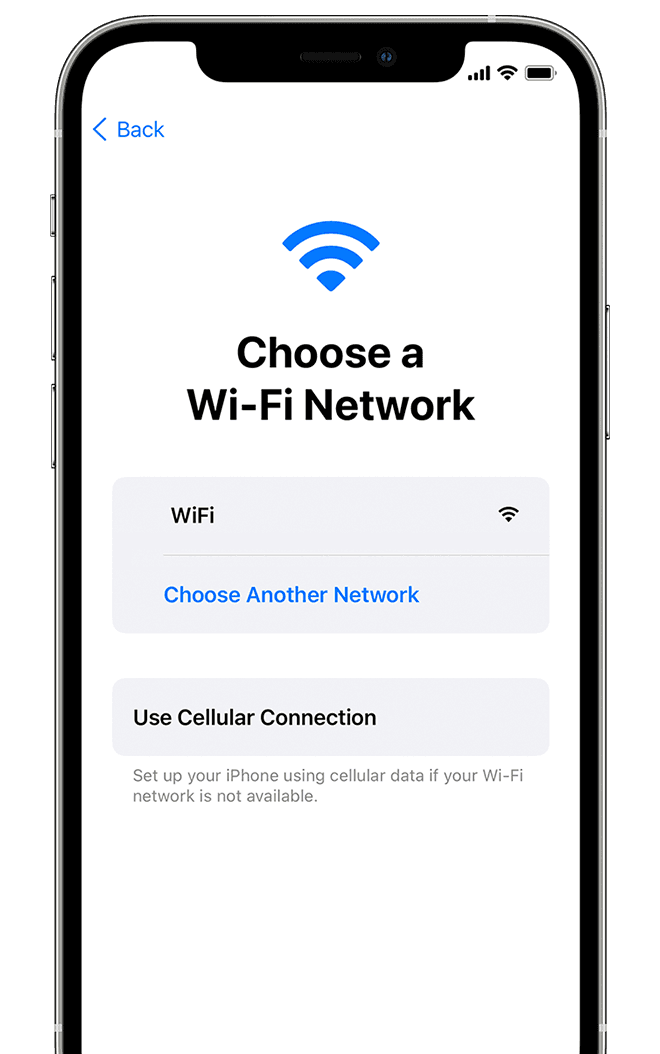
Activate your device
You need to connect to a Wi-Fi network, a cellular network, or iTunes to activate and continue setting up your device.
Tap the Wi-Fi network that you want to use or select a different option. If you’re setting up an iPhone or iPad (Wi-Fi + Cellular), you might need to insert your iPhone SIM card or iPad SIM card first.
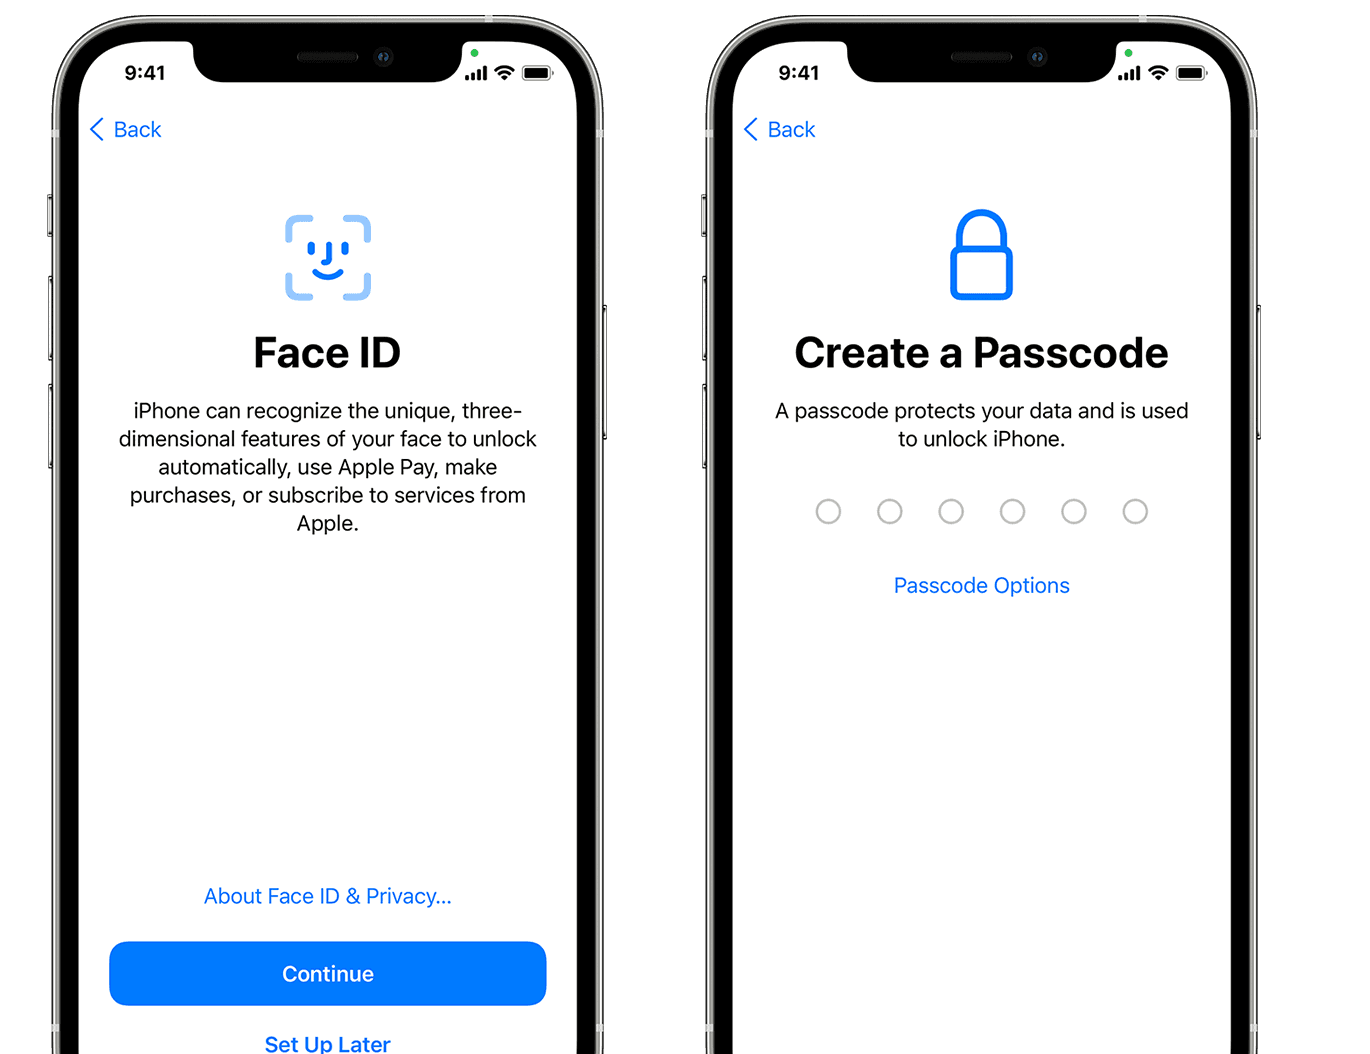
Set up Face ID or Touch ID and create a passcode
On some devices, you can set up Face ID or Touch ID. With these features, you can use face recognition or your fingerprint to unlock your device and make purchases. Tap Continue and follow the instructions, or tap «Set Up Later in Settings.»
Next, set a six-digit passcode to help protect your data. You need a passcode to use features like Face ID, Touch ID, and Apple Pay. If you’d like a four-digit passcode, custom passcode, or no passcode, tap «Passcode Options.»
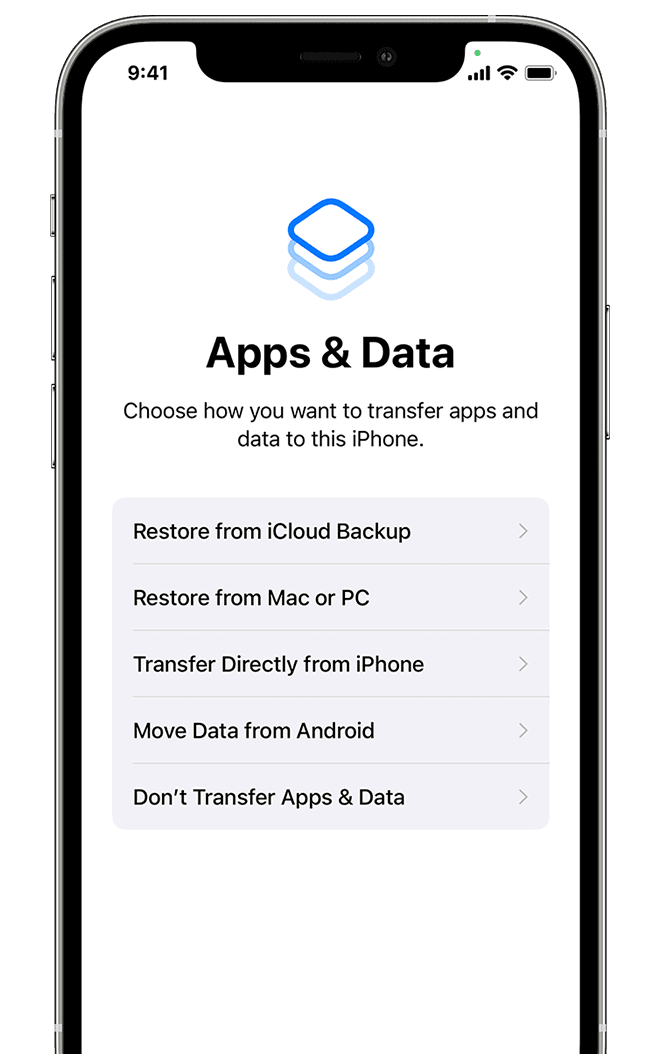
Restore or transfer your information and data
If you have an iCloud backup or a backup made from your computer or an Android device, you can restore or transfer your data from your old device to your new device.
If you don’t have a backup or another device, select Don’t Transfer Apps & Data.
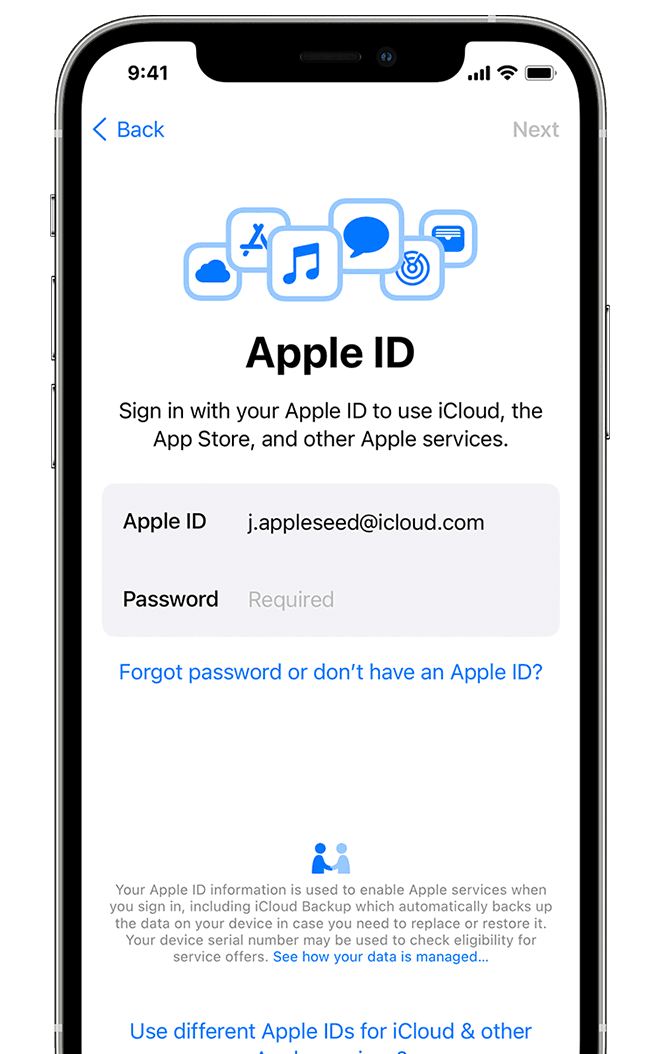
Sign in with your Apple ID
Enter your Apple ID and password, or tap «Forgot password or don’t have an Apple ID?» From there, you can recover your Apple ID or password, create an Apple ID, or set it up later. If you use more than one Apple ID, tap «Use different Apple IDs for iCloud and iTunes?»
When you sign in with your Apple ID, you might be prompted for a verification code from your previous device.
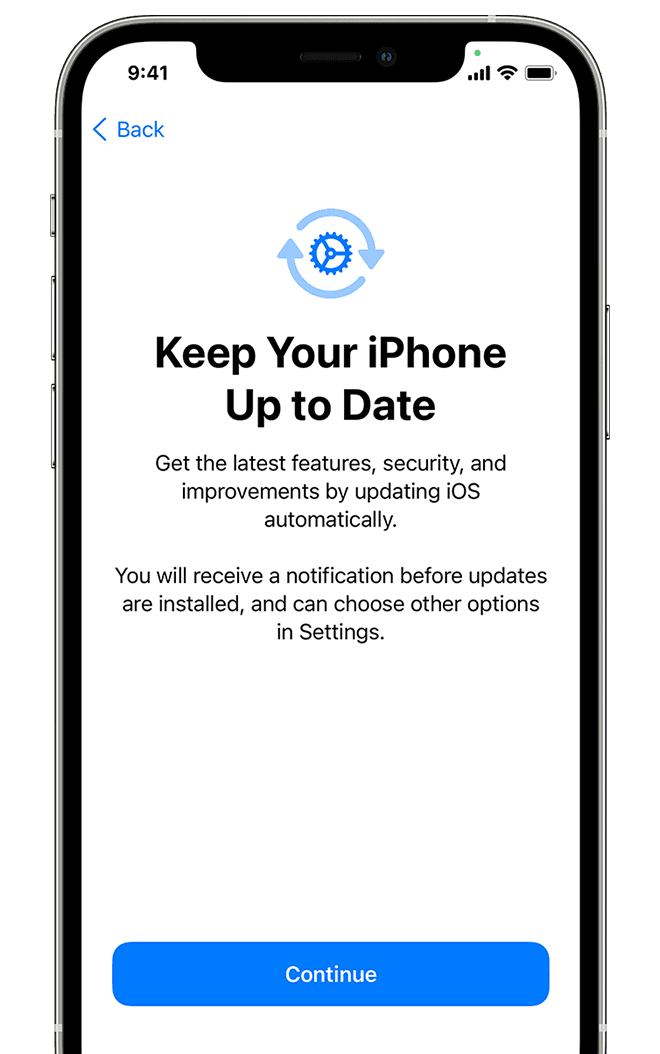
Turn on automatic updates and set up other features
On the next screens, you can decide whether to share information with app developers and allow iOS to update automatically.
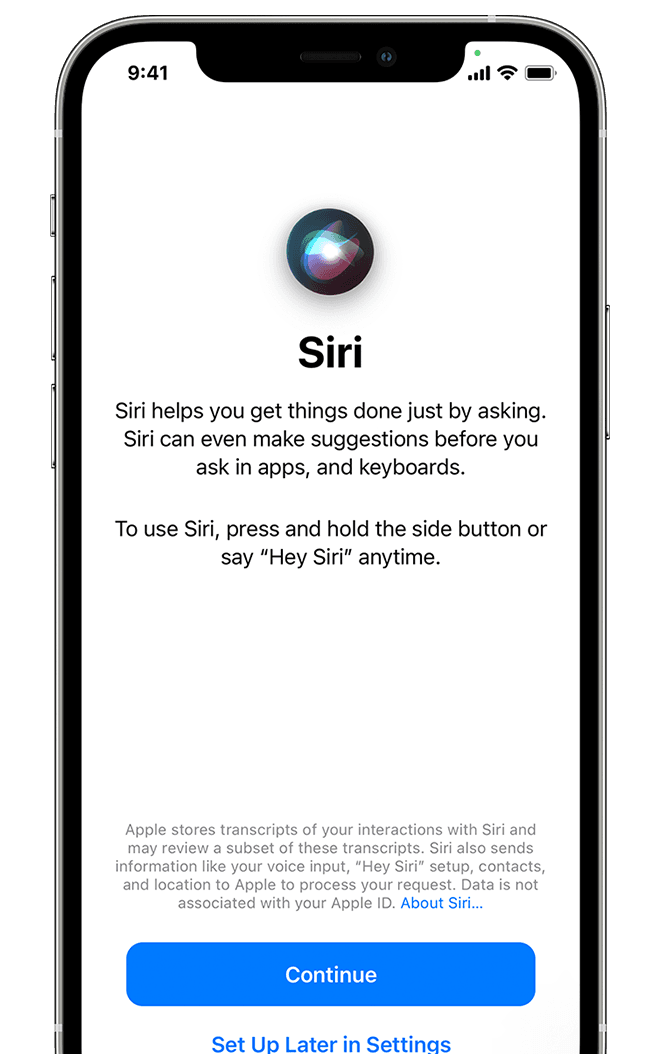
Set up Siri and other services
Next, you’ll be asked to set up or enable services and features, like Siri. On some devices, you’ll be asked to speak a few phrases so that Siri can get to know your voice.
If you signed in with your Apple ID, follow the steps to set up Apple Pay and iCloud Keychain.
Set up Screen Time and more display options
Screen Time gives you insight into how much time you and your kids spend on your devices. It also lets you set time limits for daily app use. After you set up Screen Time, you can turn on True Tone if your device supports it, and use Display Zoom to adjust the size of icons and text on your Home screen.
If you have an iPhone X or later, learn more about using gestures to navigate your device. If you have an iPhone with a Home button, you can adjust the click for your Home button.

Finish up
Tap «Get Started» to begin using your device. Make a safe copy of your data by backing up, and learn about more features in the user guide for your iPhone, iPad, or iPod touch.
Information about products not manufactured by Apple, or independent websites not controlled or tested by Apple, is provided without recommendation or endorsement. Apple assumes no responsibility with regard to the selection, performance, or use of third-party websites or products. Apple makes no representations regarding third-party website accuracy or reliability. Contact the vendor for additional information.
Источник
[Answered!]Should I Set Up as New iPhone Or Restore from Backup?
by Sophie Green Updated on 2020-10-24 / Update for iPhone Tips
If you are upgrading from an old iPhone to a new iPhone 12/12 Pro(Max)/11, you may likely wonder should I set up as new iPhone or restore from backup. Both of these things are possible to do and it is up to you to decide what way you want to go. There are both advantages and disadvantages of both methods and so you need to make an informative decision to ensure your phone is properly set up.
The following guide tells you what you get and what you lose for each of these ways of setting up your new iPhone. You will then also learn how you can selectively restore data from an iTunes backup to your iOS-based device.
Part 1. About «Set Up As New Phone»
If you are looking to set up your iPhone as a new phone, you will want to learn what exactly it means setting up your iPhone as a new phone and what its pros and cons are.
1. What Does It Mean to «Set Up As New Phone»?
When you choose to set up your iPhone as a new phone, you basically start from scratch. All the settings will be the ones that were configured when the phone was in the factory and you will need to customize them according to your preferences.
2. What are the Advantages of «Set Up As New Phone»?
There are several advantages to setting up your iPhone as a new phone.
If you had any clutter in your backup, that will not be carried over to your new iPhone and it will be totally clutter-free.
If you had even the slightest issue on your old iPhone, that can be carried over to your new iPhone with a backup. Setting up your iPhone as a new phone fixes that for you.
Customize It Your Way
If you set up your iPhone as a new phone, you can customize everything according to how you want. You can change settings, add your own wallpapers, and so on. You do not need to be stuck to your old iPhone’s preferences.
Since the new device will not have any of your old data, it will run significantly faster until it is loaded with your data.
3. What are the Disadvantages of «Set Up As New Phone»?
There are certain disadvantages to setting up your iPhone as a new phone.
Need to Download Everything Manually
If you set up your iPhone as a new phone, you need to download all of your old apps and data manually to your phone. This can be a time consuming task if you have loads of files to add to your device.
Configure Settings Again
If you customized many settings on your old phone, you will need to do the same again on your new iPhone. This can take quite a while if you need to adjust several settings options on your new iPhone.
Your Data Will Be Gone
When you set up your iPhone as a new phone, you lose all of your messages, call logs, and other data saved on your phone. You can never get it back until you restore a backup.
You will spend a lot of time adjusting the options on your phone and this will take a significant amount of time before you can actually start using your iPhone as your primary device.
That should help you decide whether to set up as new iPhone or restore a backup on your iPhone.
Part 2. About «Restore from Backup»
The other option you have is to restore your iPhone from a backup. Now let’s take a look at what it means to «Restore from Backup», the advantages and disadvantages of doing this.
1. What Does It Mean to «Restore from Backup»?
Restore from a backup means to restore all of your old iPhone’s data on your new iPhone. This includes all your messages, calls, and other data.
2. What are the Advantages of «Restore from Backup»?
There are many advantages to using a backup on your new iPhone.
No Downloading Needed
Since your backup contains all your data, you do not need to download much on your new iPhone. All your data will be restored.
No Settings Configuration Needed
You do not need to set up or customize any options as that will be done when you restore the backup.
No Loss of Data
You do not lose any of your data as everything gets restored on your iPhone from your backup.
Start Using Your iPhone Immediately
Since basically everything gets configured when you restore your iPhone, you can start using your iPhone as your primary phone immediately.
3. What are the Disadvantages of «Restore from Backup»?
This method also has some disadvantages which we think you should know.
Brings Clutter With It
Restoring from a backup brings all of your iPhone’s files which you may not need. This can immediately make your newly purchased iPhone cluttered.
If your old iPhone had issues, your new iPhone can get the same issues from your old iPhone’s backup.
Since iTunes does not allow you to selectively restore files, you will get unwanted files as well when you restore a backup.
If you restore an iTunes backup, then you need the iTunes app installed on your computer. For iCloud backups, you need an extremely fast Internet connection to retrieve your data.
That will tell should o set up my new iPhone as a new iPhone or restore from backup.
Your Best Choice: Set Up as New iPhone and Selectively Restore Data from Backup
If you are in a dilemma whether to set up as new iPhone or restore from backup, there is actually something you can do to mix things up. You can actually set up your iPhone as a new phone and then selectively restore data from an iTunes backup.
There is a software called Tenorshare UltData that allows you to selectively restore files from your iTunes backups. You can use this tool to only get the data that you actually want on your new iPhone. It will leave all your old data aside.
The following shows how you can use it.


- Install the latest version of the software on your computer.
- Connect your iPhone to your computer and open the software.
Click on Recover from iTunes Backup File at the top, select your iTunes backup, and click on Start Scan.

You will see the individual files of your iTunes backup. Select the files that you want to restore on your iPhone and click on Recover at the bottom.
Click on Recover to Device to restore the files directly to your iPhone.
You are all set. Your chosen data should now be available on your iPhone.
Conclusion
If you now ever get the would you like to set up this iPhone as a new iPhone or restore prompt on your iPhone, you would know what to do thanks to the guide above. It tells you the pros and cons of each method and also shows how to selectively restore data on your iPhone.
FAQ on Should I Set Up as New iPhone Or Restore from Backup
1. How to Setup as New iPhone?
Setting up your iPhone as a new phone is pretty easy and you can do it as follows.
- Turn on your iPhone and select a language.
- Tap on Set Up Manually on the following screen.
- Select your WiFi network.
- Create a passcode for your iPhone.
- Tap Don’t Transfer Apps & Data to set up your iPhone as a new phone. Continue with the wizard to set up your iPhone.
2. How to Selectively Restore Data from Backup?
You need to use a third-party program like UltData to selectively restore data from a backup. Connect your iPhone to your computer, and launch the software. Click on Recover from iTunes Backup File, select your backup, and hit Start Scan. Select the files to restore and click on Recover.
Updated on 2020-10-24 / Update for iPhone Tips
Источник
How to Set up a New iPhone
:max_bytes(150000):strip_icc()/SamCostello-d7fcf106ec2048ccb06d1e2190b3396d.jpg)
:max_bytes(150000):strip_icc()/iphonex-35ba990aebc9444b820a92ca4e357884.jpg)
Whether your new iPhone is your first or you’ve been using Apple’s smartphone since 2007, the first thing you must do with any new iPhone is to set it up.
Apple has changed its iPhone setup process a bit so that you can no longer get screenshots of the steps. Because of that, we don’t have updated visuals to show for iOS 11 or 12. This article covers activating an iPhone 7 Plus & 7, 6S Plus & 6S, 6 Plus & 6, 5S, 5C, or 5 running iOS 10.
That said, the process for iOS 11 or 12 is very, very similar to the steps detailed here, so you can still use these as a guide.
Before you get started, ensure that your version of iTunes is up to date. This isn’t always absolutely required, but it’s probably a good idea. Once you’ve got iTunes installed or updated, you’re ready to proceed.
Beginning iPhone Activation
:max_bytes(150000):strip_icc()/iphone-7-box-57ecfbe75f9b586c358a4adc.jpg)
Turn on iPhone
Begin by turning on/waking up your iPhone by holding down the sleep/power button in the top right corner or on the right edge, depending on your model. Swipe the slider to the right to begin iPhone activation.
Select Language & Region
Next, enter some information about the location where you’ll be using your iPhone. That involves selecting the language you want to be shown onscreen and setting your home country.
Tap the language you want to use. Then tap the country you want to use the phone in (this won’t prevent you from using it in other countries if you travel or move to them, but it determines what your home country is) and tap Next to continue.
Choose a Wi-Fi Network, Activate Phone & Enable Location Services
:max_bytes(150000):strip_icc()/set-up-iphone-ios9-step2-56a5361b3df78cf77286f3ea.jpg)
Next, you need to connect to a Wi-Fi network. This isn’t required if your phone is connected to your computer while you set it up, but if you have a Wi-Fi network in the location where you’re activating your iPhone, tap on it and then enter its password (if it has one). Your iPhone will remember the password from now on and you’ll be able to connect to that network any time you’re in range. Tap the Next button to proceed.
If you don’t have a Wi-Fi network nearby, scroll to the bottom of this screen, where you’ll see an option to use iTunes. Tap that and then plug your iPhone into your computer with the included syncing cable. Only do this on the computer you’re going to sync your phone to going forward.
Activate Phone
Once you’ve connected to Wi-Fi or iTunes, your iPhone will attempt to activate itself. This step includes a trio of tasks:
- The iPhone will display the phone number associated with it. If it’s your phone number, tap Next. If not, contact Apple at 1-800-MY-iPHONE.
- Enter the billing zip code for your phone company account and the last four digits of your Social Security number and tap Next.
- Agree to the Terms and Conditions that pop up.
Enable Location Services
Now, decide whether you want to turn on Location Services or not. Location Services are the iPhone’s GPS features, the features that allow you to get driving directions, find movies and restaurants nearby, and other things that depend on knowing your location.
Some people may not want to turn this on, but we recommend it. Not having it on will remove a lot of useful functionality from your iPhone. If you have concerns about it, though, make sure you understand your privacy settings related to Location Services.
Tap on your choice and you’ll move on to the next step.
Security Features (Passcode, Touch ID)
:max_bytes(150000):strip_icc()/set-up-iphone-ios9-step3-56a5361b3df78cf77286f3ed.jpg)
On these screens, you configure the security features you want to enable on your iPhone. They are optional, but we strongly recommend you use at least one, though we recommend using both.
Depending on what version of the operating system the phone you’re setting up uses, this step may be later in the process.
Touch ID
This option is available only to iPhone 8 series, iPhone 7 series, 6S series, 6 series, and 5S owners. Touch ID is the fingerprint scanner built into those devices’ Home button that allows you to unlock the phone, use Apple Pay, and buy at the iTunes and App Stores with just your fingerprint.
It may seem like a gimmick, but it’s surprisingly useful, secure, and efficient. If you want to use Touch ID, place your thumb on your iPhone’s Home button and follow the onscreen instructions. You can also choose Set Up Touch ID Later.
On models that support it — the iPhone X and newer — you can also set up the Face ID facial recognition system in this step.
Passcode
Another security option is to add a Passcode. This is a six-digit password that has to be entered when you turn on your iPhone and prevents anyone who doesn’t know it from using your device. It’s another important security measure and can work together with Touch ID and Face ID.
On the Passcode screen, the Passcode Options link offers different settings, including using a four-digit passcode, creating a passcode of custom length, and using a password instead of a code.
Make your choices, set your passcode, and continue to the next step.
iPhone Set Up Options
:max_bytes(150000):strip_icc()/set-up-iphone-ios9-step4-56a5361b5f9b58b7d0db8634.jpg)
Next, you have to choose how you want to set up your iPhone. There are four options:
- Restore from iCloud Backup: If you’ve used iCloud to backup your data, apps, and other content from other Apple devices, choose this to download the data from your iCloud account to your iPhone.
- Restore from iTunes Backup: This won’t work if you haven’t had an iPhone, iPod, or iPad before. If you have, though, you can install your apps, music, settings, and other data on your new iPhone from the backups that already exist on your PC. This isn’t required — you can always set up as new if you want — but it’s an option that makes the transition to a new device smoother.
- Set Up As New iPhone: This is your choice if you haven’t had an iPhone, iPad, or iPod before. This means you’re starting completely from scratch and aren’t restoring any backed up data onto your phone.
- Move Data from Android: If you’re switching to the iPhone from an Android device, use this option to transfer as much of your data as possible to your new phone.
Tap your choice to proceed.
Create or Enter Your Apple ID
:max_bytes(150000):strip_icc()/activate-iphone-4-5806e9935f9b5805c2eb6693.jpg)
Depending on your selection on the previous screen, you may be asked to log into an existing Apple ID or create a new one.
Your Apple ID is a crucial account for iPhone owners: you use it for a lot of things, from buying at iTunes to using iCloud to making FaceTime calls to setting up Genius Bar support appointments, and more.
If you have an existing Apple ID that you’ve used with a previous Apple product or to buy an iTunes, you’ll be asked to log in with it here.
If not, you’ll need to create one. Tap the button to Create a Free Apple ID and follow the onscreen prompts. You’ll need to enter information like your birthday, name, and email address to create your account.
Set Up Apple Pay
:max_bytes(150000):strip_icc()/set-up-iphone-ios9-step6-56a5361c5f9b58b7d0db8637.jpg)
For iOS 10 and up, this step has moved a little earlier in the process. On earlier versions of the iOS, it comes later, but the options are still the same.
Apple offers you the chance to configure Apple Pay on your phone. Apple Pay is Apple’s wireless payment system that works with the iPhone 5S and newer and uses NFC, Touch ID or Face ID, and your credit or debit card to make buying at tens of thousands of stores faster and more secure.
You won’t see this option if you have an iPhone 5 or 5C, or earlier since they can’t use Apple Pay.
Assuming your bank supports it, we recommend setting up Apple Pay. Once you start using it, you won’t be sorry.
- Begin by tapping the Next button on the introductory screen.
- What happens next depends on how you set up your phone back in step 4. If you restored from a backup and had Apple Pay setup on your previous phone, skip step 3.
- Enter the three-digit security code from the back of your card to verify it and tap Next.
- Accept the Apple Pay terms and conditions.
- To complete adding your debit or credit card to Apple Pay, you need to verify the card. The final screen details how you can do that (call your bank, log into an account, etc). Tap Next to continue.
Enable iCloud
:max_bytes(150000):strip_icc()/activate-iphone-step5-2015-56a5360e5f9b58b7d0db85c8.jpg)
The next step in the iPhone set up includes a pair of options related to iCloud, the free web-based service Apple offers. We generally recommend using iCloud since it allows you to do the following:
- Use Find My iPhone.
- Redownload Purchases from iTunes.
- Use iCloud Photo Library to store and access photos online.
- Use Pages, Keynote, and Numbers documents online.
- Backup your iPhone data and restore it from backup over the internet.
- Use your iCloud as a central account for your calendar, contact, and email and sync them to all iCloud-compatible devices.
- Use Apple Music
Your iCloud account will be added to the Apple ID that you entered or created in the last step.
To enable iCloud, tap the Use iCloud option and follow the instructions.
If you’re running iOS 8, next you’ll see a message telling you that Find My iPhone has been enabled by default. You can turn it off later, but this is a very bad idea — the service helps you find lost/stolen phones and protect data on them — so leave it on.
If you’re on iOS 8 or higher, tap Next on the Find My iPhone screen and move on.
Enable iCloud Drive
This step only appears if you’re running iOS 8 or higher. It gives you the option to use iCloud Drive with your phone.
ICloud Drive lets you upload files to your iCloud account from one device and then have them sync automatically to all of your other compatible devices. It’s essentially Apple’s version of cloud-based tools like Dropbox.
In this step, you can choose to either add iCloud Drive to your device (with the note, as shown on the screen, that devices running earlier Operating Systems won’t be able to access those files) or skip by tapping Not Now.
If you choose Not Now, you can always turn iCloud Drive on at a later date.
Enable iCloud Keychain
:max_bytes(150000):strip_icc()/set-up-iphone-ios9-step7-56a5361c3df78cf77286f3f1.jpg)
Not everyone will see this step. It only appears if you’ve used iCloud Keychain in the past on other devices.
ICloud Keychain allows all of your iCloud-compatible devices to share login information for online accounts, credit card information, and more. It’s a very helpful feature — passwords will be automatically entered at websites, payments become easier.
To continue using iCloud Keychain, you need to validate that your new device should have access. Do that by tapping Approve from Other Device or Use iCloud Security Code. The Other Device option will cause a message to pop up on one of your other Apple devices that is logged into iCloud Keychain, while the iCloud option will send a confirmation message. Grant access and continue.
If you’re uncomfortable with the idea of this information being stored in your iCloud account or don’t want to use iCloud Keychain anymore, tap Don’t Restore Passwords.
Enable Siri
:max_bytes(150000):strip_icc()/set-up-iphone-ios9-step8-5806e9903df78cbc28a80c44.jpg)
You’ve heard all about Siri, the iPhone’s voice-activated assistant that you can talk to perform actions. In this step, you decide whether or not to use it.
Siri is one of the most interesting features of the iPhone. It’s long held a lot of promise but hasn’t been quite as useful as you might hope. Well, things have really changed since the release of iOS 9. Siri is smart, fast, and helpful these days. It’s worth enabling Siri just try to out. You can always turn it off later if you prefer.
Tap Set Up Siri to start the setup process or Turn On Siri Later to skip it.
If you chose to set up Siri, the next few screens will ask you to speak different phrases to your phone. Doing this helps Siri learn your voice and how you speak so it can better respond to you.
When you’ve completed those steps, tap Continue to finish setting up your phone.
Share Diagnostic Information
Apple will then ask if you want to share information about your iPhone — basically information about how the iPhone is working and whether it crashes, etc.; no personal information is shared — with them. It helps improve the overall experience of using the iPhone but is strictly optional.
Choose Display Zoom
:max_bytes(150000):strip_icc()/activate-iphone-15-56a5354a5f9b58b7d0db81f3.jpg)
This feature is only available to users of the iPhone XS Max, and the iPhone 7 series, 6S series, and 6 series.
Because the screens on those devices are so much bigger than previous models, users have a choice for how their screens will appear: you can set the screen to take advantage of its size and show more data, or show the same amount of data while making it bigger and easier to see for people with poor eyesight.
This feature is called Display Zoom.
On the Display Zoom setup screen, you can choose either Standard or Zoomed. Tap the option you prefer and you’ll see a preview of how the phone will look. In the preview, swipe left and right to see the preview applied to various scenarios. You can also tap the Standard and Zoomed buttons at the top of the screen to toggle between them.
When you’ve chosen the option you want, tap Next to continue.
If you want to change this setting later:
- Tap Settings.
- Tap Display & Brightness.
- Tap Display Zoom.
- Change your selection.
Configure the New Home Button
This step only appears if you have an iPhone 8 series or iPhone 7 series phone.
On the iPhone 7 and 8 series, the Home button is no longer a true button. Earlier iPhones had buttons that could be pushed, allowing you to feel the button moving down under the pressure of your finger. That’s not the case on the iPhone 7 and 8 series. On them, the button is more like the 3D Touchscreen on the phone: a single, flat panel that doesn’t move but detects the strength of your press.
In addition to that, the iPhone 7 and 8 series provides what’s called haptic feedback — essentially vibration — when you press the «button» to simulate the action of a true button.
In iOS 10 and up, you can control the kind of haptic feedback the button provides. You can always change that in the Settings app later. To do that, tap Customize Later in Settings. To configure it now, tap Get Started.
The next screen offers three levels of feedback for Home button presses. Tap each option and then press the Home button. When you find the level you prefer, tap Next to continue.
iPhone Activation Is Complete
:max_bytes(150000):strip_icc()/set-up-iphone-ios9-step9-56a5361c3df78cf77286f3f4.jpg)
And, with that, you’ve completed the iPhone set up process. It’s time to use your new iPhone! Tap Get Started to be delivered to your home screen and start using your phone.
Want to really get control of your iPhone? Then check out The 15 Best iPhone Hacks & Tips. And, if you’ve already got an Apple Watch, you can connect it to your new iPhone by following the instructions in How to Pair an Apple Watch With a New iPhone.
Источник


