An Introduction to Android Menus

There are three types of menus in Android: Popup, Contextual and Options.
Each one has a specific use case and code that goes along with it. To learn how to use them, read on.
Each menu must have an XML file related to it which defines its layout. These are the tags associated with the menu option:
— This is the container element for your menu (similar to LinearLayout)
— This denotes an item and is nested inside of the menu tag. Be aware that an item element can hold a element to represent a submenu
— This is used to signify a certain property or feature to a couple of menu items (I.E. state/visibility)
A simple menu layout
As shown in the code snippet above, each menu item has various attributes associated with it. I’ll detail the main ones here, but if you want to see what else you can add, go here.
- id— This is a unique identifier for the item in the menu. You can use this to see exactly which item the user clicked
- icon— If you want to show an icon associated with that menu item
- title— Text that will be shown in the menu for that item
- showAsAction— This attribute should only be used when using a menu in an activity that uses an application bar(or as it is also referred to, the action bar). It controls when and how this item should appear as an action in the application bar. There are five values: always, never, ifRoom, withText, and collapseActionView
I’ll elaborate on the meaning of each of these values in the next section.
In addition, you need to add the relevant onCreate menu method to your activity.
R.menu.id is the id of the menu you created
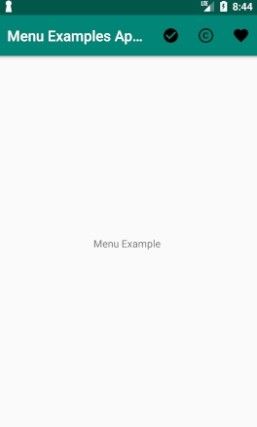
Options Menu
This menu is usually found at the top of your application and in it, you should place actions that affect the application as a whole. These could be the application’s settings or a search box.
Using the menu layout from above, we get the following options menu:
As promised, let’s go over the values that can be given for the showAsAction attribute:
- always — will always show in the action bar
- never — will never show, and therefore will be available through the overflow menu
- ifRoom — only if there is sufficient space in the action bar, then it would be shown. Keep in mind that per the documentation, there is a limit to how many icons you can have on the action bar.
- withText-will include the item’s title in the action bar
- collapseActionView — if this item has an action view associated with it, it will become collapsible(from API 14 and above)
If we go ahead and change the last item in our menu to showAsAction=”never”, we get the following:
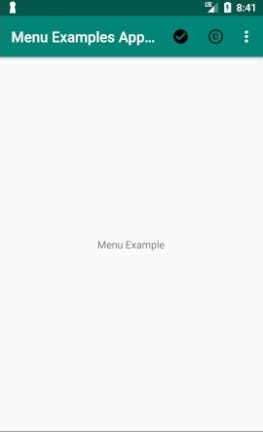 The third menu item moved to the overflow menu
Contextual Menu
This menu appears when a user performs a long click on one of your UI elements. The options found in this menu affect what UI element the user made the click on. It is common to use this type of menu in list or grid views, where the user’s interaction with each item can lead to a specific action.
Imagine a scenario where you have an application with an image, and you want to present to the user several choices when they click on the image.
A context menu can appear in two ways :
- A floating menu
- An action bar at the top of your application
We will only demonstrate how to use the first option, but you can read more about the second option here.
Using the following XML:
The layout for our context menu
And adding the following code to our main activity:
The code needed to enable context menu for our main activity’s layout
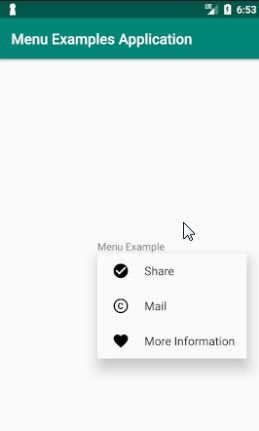
We will get the following:
 When performing a long click on the text, the context menu appears
Popup Menu
A popup menu is a type of menu that displays items in a vertical list. This list is attached to the view the user has clicked on to invoke this menu. It is important to keep in mind, that when choosing a popup menu, you do not want the user’s choice to affect the previous content the user pressed.
We will use the same menu XML layout as before, but we will need to add the following code to our activity:
The showPopupMenu method should be called when a click happens
We will get the same result as the previous screenshot, but without the need for the user to perform a long click.
Icons In Popup Menus
Now I know what you are probably here for: you want to know how you can add icons to the menus.
While I will show an example of how to do this, it is wise to understand that this is a feature that is not enabled for popup menus and may cause unexpected behavior. You can achieve this by using reflection to turn on a flag called setForceShowIcon.
I’ve just scratched the surface with Android menus, but hopefully, it is enough to inspire you to dig deeper.
Read more posts by this author.
If this article was helpful, tweet it.
Learn to code for free. freeCodeCamp’s open source curriculum has helped more than 40,000 people get jobs as developers. Get started
freeCodeCamp is a donor-supported tax-exempt 501(c)(3) nonprofit organization (United States Federal Tax Identification Number: 82-0779546)
Our mission: to help people learn to code for free. We accomplish this by creating thousands of videos, articles, and interactive coding lessons — all freely available to the public. We also have thousands of freeCodeCamp study groups around the world.
Donations to freeCodeCamp go toward our education initiatives and help pay for servers, services, and staff.
Источник
Android 4.3 пункт меню showAsAction=» всегда » игнорируется
Я использую новую библиотеку V7 appcompat, доступную начиная с Android 4.3 (уровень API 18).
независимо от того, что указано в showAsAction для элемента меню, он не отображается — он всегда создает значок меню переполнения и помещает даже один элемент меню под меню.
попытка добавить меню к такой деятельности:
и вот мое меню xml:
это ошибка новой библиотеки поддержки v7, или просто что-то не так с кодом? Я использовал подобный код с ActionBarSherlock много раз раньше.
12 ответов:
возможно, Вам не хватает необходимого пространства имен:
заменить [yourapp] С вашим именем приложения или любого пространства имен ваше сердце желает везде.
другие вещи, которые стоит проверить:
- смотрите, если ваш класс активности расширяется ActionBarActivity
проверьте, если проблема не устранена.
справочная документация по Android: Добавление Кнопок Действий. Вот соответствующий текст:
Если ваше приложение использует библиотеку поддержки для совместимости с версиями до Android 2.1, атрибут showAsAction недоступен из пространства имен android:. Вместо этого этот атрибут предоставляется библиотекой поддержки, и вы должны определить свое собственное пространство имен XML и использовать это пространство имен в качестве префикса атрибута. (Пользовательское пространство имен XML должно основываться на имени вашего приложения, но это может быть любое имя, которое вы хотите, и доступно только в области файла, в котором вы его объявляете.)
разобрался сам. С библиотекой поддержки v7 showAsAction должен идти под пользовательским пространством имен следующим образом:
также убедитесь, что вы используете правильный надуватель в ActionBarActivity.onCreateOptionsMenu() метод.
меню с пользовательским пространством имен будет запретить showAsAction от показа.
использование префикса» android: «для showAsAction будет работать, даже если Android Studio заметит вас должны используйте пользовательское пространство имен.
Это использует Android SDK 22 и поддерживает фрагменты v4, в случае, если это имеет какое-либо значение.
получил ту же проблему, но на Android 5. У меня есть 3 элемента, но ОС проигнорировала мой атрибут «всегда» и показала только 2 элемента. Вот мое решение:
в моем случае, мне пришлось удалить из сборки моего приложения.gradle compile ‘ com.андроид.поддержка: appcompat-v7: 21.0.3’.
обратите внимание: My min sdk = 14, и созданный проект android studio вставил мою ненужную зависимость.
после этой замены вы можете написать android: showAsAction= «всегда»
также убедитесь, что у вас есть правильный путь для пространства имен. Это не даст вам сообщение об ошибке, если это неправильно.
все, что я знал, что это не работает. Не знаю, как мне удалось забыть /apk часть пути, но это произошло. Нет сообщения об ошибке,просто неуловимая ошибка для отслеживания.
Это может быть не ваш случай, но я был с помощью
Источник
An Introduction to Android Menus
There are three types of menus in Android: Popup, Contextual and Options.
Each one has a specific use case and code that goes along with it. To learn how to use them, read on.
Each menu must have an XML file related to it which defines its layout. These are the tags associated with the menu option:
— This is the container element for your menu (similar to LinearLayout)
— This denotes an item and is nested inside of the menu tag. Be aware that an item element can hold a element to represent a submenu
— This is used to signify a certain property or feature to a couple of menu items (I.E. state/visibility)
A simple menu layout
As shown in the code snippet above, each menu item has various attributes associated with it. I’ll detail the main ones here, but if you want to see what else you can add, go here.
- id— This is a unique identifier for the item in the menu. You can use this to see exactly which item the user clicked
- icon— If you want to show an icon associated with that menu item
- title— Text that will be shown in the menu for that item
- showAsAction— This attribute should only be used when using a menu in an activity that uses an application bar(or as it is also referred to, the action bar). It controls when and how this item should appear as an action in the application bar. There are five values: always, never, ifRoom, withText, and collapseActionView
I’ll elaborate on the meaning of each of these values in the next section.
In addition, you need to add the relevant onCreate menu method to your activity.
R.menu.id is the id of the menu you created
Options Menu
This menu is usually found at the top of your application and in it, you should place actions that affect the application as a whole. These could be the application’s settings or a search box.
Using the menu layout from above, we get the following options menu:
As promised, let’s go over the values that can be given for the showAsAction attribute:
- always — will always show in the action bar
- never — will never show, and therefore will be available through the overflow menu
- ifRoom — only if there is sufficient space in the action bar, then it would be shown. Keep in mind that per the documentation, there is a limit to how many icons you can have on the action bar.
- withText-will include the item’s title in the action bar
- collapseActionView — if this item has an action view associated with it, it will become collapsible(from API 14 and above)
If we go ahead and change the last item in our menu to showAsAction=”never”, we get the following:
The third menu item moved to the overflow menu
Contextual Menu
This menu appears when a user performs a long click on one of your UI elements. The options found in this menu affect what UI element the user made the click on. It is common to use this type of menu in list or grid views, where the user’s interaction with each item can lead to a specific action.
Imagine a scenario where you have an application with an image, and you want to present to the user several choices when they click on the image.
A context menu can appear in two ways :
- A floating menu
- An action bar at the top of your application
We will only demonstrate how to use the first option, but you can read more about the second option here.
Using the following XML:
The layout for our context menu
And adding the following code to our main activity:
The code needed to enable context menu for our main activity’s layout
We will get the following:
When performing a long click on the text, the context menu appears
Popup Menu
A popup menu is a type of menu that displays items in a vertical list. This list is attached to the view the user has clicked on to invoke this menu. It is important to keep in mind, that when choosing a popup menu, you do not want the user’s choice to affect the previous content the user pressed.
We will use the same menu XML layout as before, but we will need to add the following code to our activity:
The showPopupMenu method should be called when a click happens
We will get the same result as the previous screenshot, but without the need for the user to perform a long click.
Icons In Popup Menus
Now I know what you are probably here for: you want to know how you can add icons to the menus.
While I will show an example of how to do this, it is wise to understand that this is a feature that is not enabled for popup menus and may cause unexpected behavior. You can achieve this by using reflection to turn on a flag called setForceShowIcon.
I’ve just scratched the surface with Android menus, but hopefully, it is enough to inspire you to dig deeper.
Read more posts by this author.
If this article was helpful, tweet it.
Learn to code for free. freeCodeCamp’s open source curriculum has helped more than 40,000 people get jobs as developers. Get started
freeCodeCamp is a donor-supported tax-exempt 501(c)(3) nonprofit organization (United States Federal Tax Identification Number: 82-0779546)
Our mission: to help people learn to code for free. We accomplish this by creating thousands of videos, articles, and interactive coding lessons — all freely available to the public. We also have thousands of freeCodeCamp study groups around the world.
Donations to freeCodeCamp go toward our education initiatives and help pay for servers, services, and staff.
Источник


