- Use iTunes to sync your iPhone, iPad, or iPod with your computer
- What you can sync with iTunes
- Sync or remove content using iTunes
- Sync your content using Wi-Fi
- Sync content between your Mac and iPhone or iPad over Wi-Fi
- Use the Finder to sync your iPhone, iPad, or iPod with your computer
- What can you sync with the Finder
- Sync or remove content using the Finder
- Sync your content using Wi-Fi
- Sync your photos manually using the Finder
- Turn on Finder syncing
- Turn off Finder syncing
- Stop syncing some albums
- Stop syncing all photos
- Keep your photos updated automatically with iCloud
- Learn more
- Sync iTunes content on PC with your devices
- Select items to sync automatically
- Add items to your device manually
- Keep items from being synced automatically
- Fill your device with a random selection of songs using Autofill
- Remove automatically synced items from your device
Use iTunes to sync your iPhone, iPad, or iPod with your computer
Learn how to sync music, movies, and more using iTunes on your Mac or PC.
If you’re using macOS Mojave or earlier or a Windows PC, use iTunes to sync content to your devices. Before you use iTunes to sync content to your iOS or iPadOS device, consider using iCloud, Apple Music, or similar services to keep content from your Mac or PC in the cloud. This way, you can access your music, photos, and more on your devices when you aren’t near your computer. Learn more about using Apple Music or iCloud Photos instead of iTunes.
If you use iCloud or other services like Apple Music to keep your content up-to-date across all of your devices, some syncing features through iTunes might be turned off.
What you can sync with iTunes
- Albums, songs, playlists, movies, TV shows, podcasts, and audiobooks.
- Photos and videos.
- Contacts and calendars.
iTunes features might vary by country or region.
Sync or remove content using iTunes
- Open iTunes and connect your device to your computer with a USB cable.
- Click the device icon in the upper-left corner of the iTunes window. Learn what to do if you don’t see the icon.

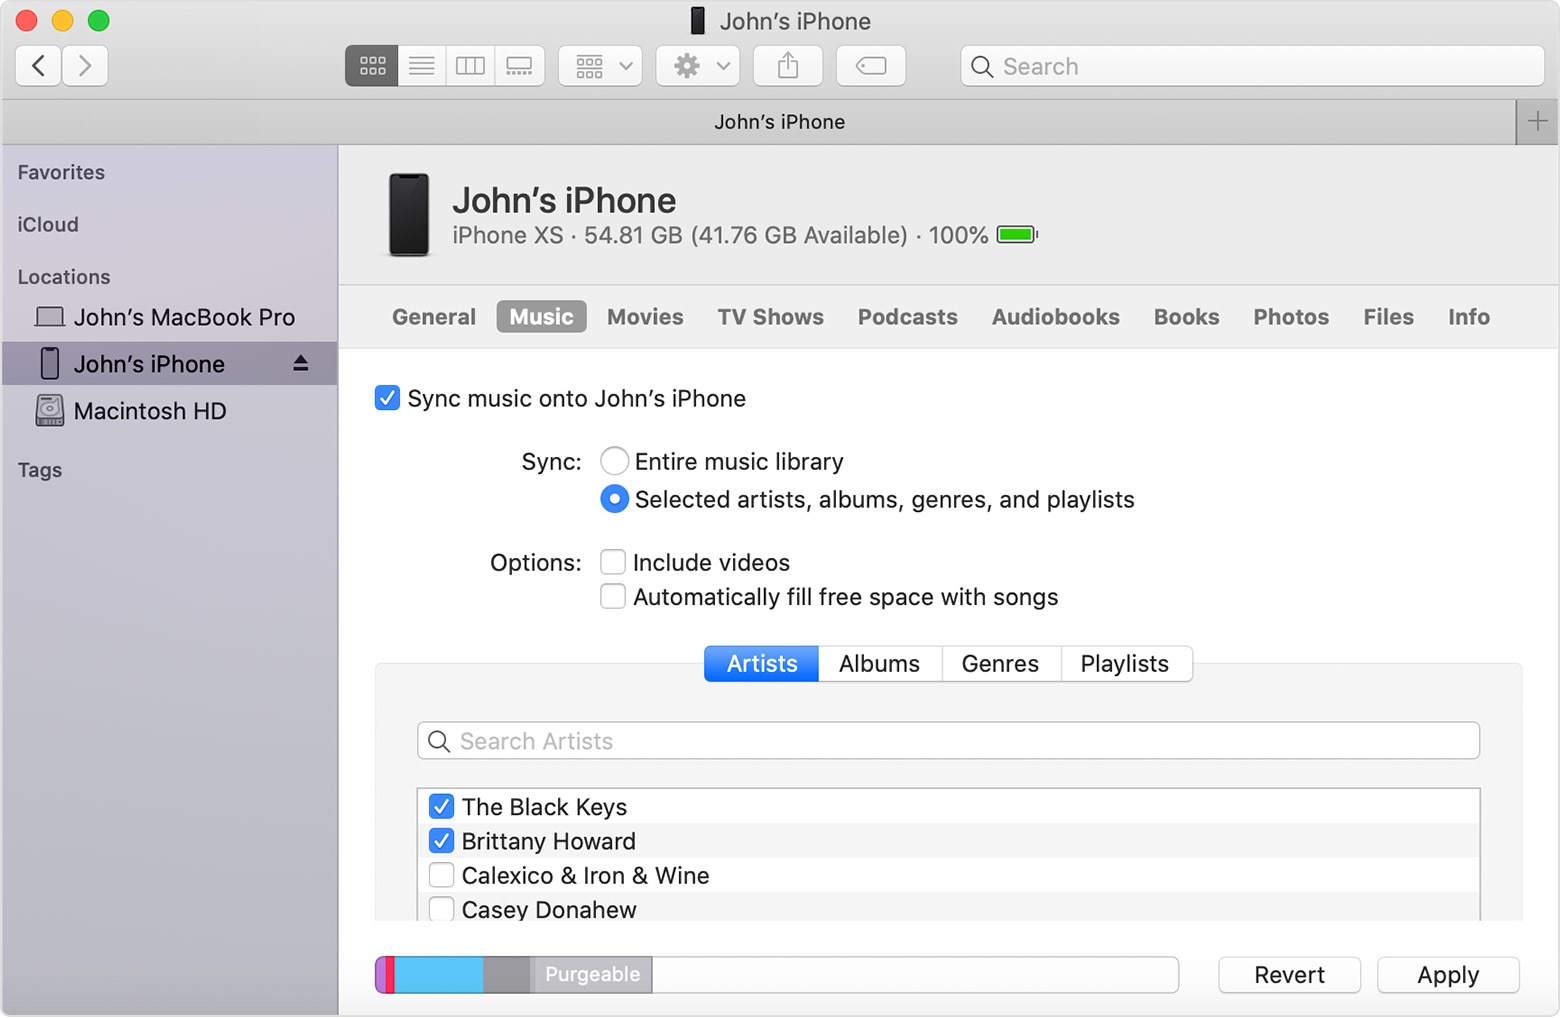
- From the list under Settings on the left side of the iTunes window, click the type of content that you want to sync or remove. * To turn syncing on for a content type, select the checkbox next to Sync.
- Select the checkbox next to each item that you want to sync.
- Click the Apply button in the lower-right corner of the window. If syncing doesn’t start automatically, click the Sync button.


* You can only sync your device with one iTunes library at a time. If you see a message that your device is synced with another iTunes library, your device was previously connected to another computer. If you click «Erase and Sync» in that message, all content of the selected type on your device will be erased and replaced with content from this computer.
Sync your content using Wi-Fi
After you set up syncing with iTunes using USB, you can set up iTunes to sync to your device with Wi-Fi instead of USB.
- Connect your device to your computer with a USB cable, then open iTunes and select your device. Learn what to do if your device doesn’t appear on your computer.
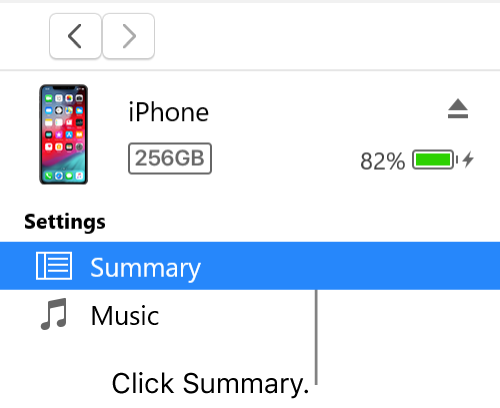
- Click Summary on the left side of the iTunes window.
- Select «Sync with this [device] over Wi-Fi.»
- Click Apply.
When the computer and the device are on the same Wi-Fi network, the device appears in iTunes. The device syncs automatically whenever it’s plugged in to power and iTunes is open on the computer.
Источник
Sync content between your Mac and iPhone or iPad over Wi-Fi
You can sync your Mac and device when they’re connected over same Wi-Fi network. To set up Wi-Fi syncing, first connect your device to your Mac using a USB or USB-C cable. You then turn on Wi-Fi syncing and choose the settings you want. Whenever your device connects to your Mac over Wi-Fi, you can select it in the sidebar and sync it. (You can turn on automatic syncing if you want.) Your device must have iOS 5 or later or iPadOS 13 or later.
Connect your device to your Mac using a USB or USB-C cable.
In the Finder  on your Mac, select the device in the Finder sidebar.

If you connect your device to your Mac using a USB cable and can’t see the device in the Finder sidebar, see If your device doesn’t appear in the sidebar.
Click General in the button bar.

Select the “Show this [device] when on Wi-Fi” tickbox.

Use the button bar to turn on and select sync settings.
Whenever your device connects to your Mac, the device’s icon appears in the sidebar. Select the device in the Finder sidebar to view or change syncing options.
Important: If you can’t see your device in the sidebar, choose Finder > Preferences, then select the CDs, DVDs and iOS Devices tickbox.
You can choose to sync your Mac and your device automatically whenever you connect them. See Turn automatic syncing on or off on Mac.
Before disconnecting your device from your Mac, click the Eject button  in the Finder sidebar. The device icon disappears, but Wi-Fi syncing remains turned on. The icon reappears automatically the next time your Mac and device are connected to the same WI-Fi network.
Note: To restore your iPhone or iPad and revert it to its factory settings, you must connect the device to your Mac using a USB or USB-C cable.
Syncing over Wi-Fi is slower than syncing over a cable. If you connect a device to your Mac while the device is syncing over Wi-Fi, syncing continues over the cable. If you disconnect the device’s cable from the Mac while syncing, syncing stops even if Wi-Fi syncing is on. Syncing resumes when you reconnect the device using a cable or over Wi-Fi.
Источник
Use the Finder to sync your iPhone, iPad, or iPod with your computer
Starting with macOS Catalina, syncing with the Finder is similar to syncing with iTunes. Learn how to sync your content to your device.
Before you use the Finder to sync content to your iOS or iPadOS device, consider using iCloud, Apple Music, or similar services to keep content from your Mac or PC in the cloud. This way, you can access your music, photos, and more on your devices when you aren’t near your computer. Learn more about using Apple Music or iCloud Photos instead of the Finder.
If you use iCloud or other services like Apple Music to keep your content up to date across all of your devices, some syncing features through the Finder might be turned off.
What can you sync with the Finder
- Albums, songs, playlists, movies, TV shows, podcasts, books, and audiobooks.
- Photos and videos.
- Contacts and calendars.

Sync or remove content using the Finder
- Open a Finder window and connect your device to your computer using a USB cable. If you connect your device to your computer with a USB cable and your computer doesn’t recognize your iPhone, iPad, or iPod, learn what to do.
- Your device appears in the sidebar of the Finder window. Click the device to select it.
- If prompted, trust your device.
- Select the type of content that you want to sync or remove. To turn syncing on for a content type, select the checkbox next to Sync.
- Select the checkbox next to each item that you want to sync.
- Click the Apply button in the lower-right corner of the window. If syncing doesn’t start automatically, click the Sync button.
* You can only sync your device with one Apple Music or Apple TV library at a time. If you see a message that your device is synced with another Apple Music or Apple TV library, your device was previously connected to another computer. If you click «Erase and Sync» in that message, all content of the selected type on your device will be erased and replaced with content from this computer.
Sync your content using Wi-Fi
After you set up syncing with the Finder using USB, you can set up the Finder to sync to your device with Wi-Fi instead of USB.
- Connect your device to your computer with a USB cable, then open a Finder window and select your device.
- Select “Show this [device] when on Wi-Fi.»
- Click Apply.
When the computer and the device are on the same Wi-Fi network, the device appears in the Finder. The device syncs automatically whenever it’s plugged in to power.
Источник
Sync your photos manually using the Finder
If you don’t use iCloud Photos, you can manually sync your photos and videos from your Mac to your iPhone, iPad, or iPod touch using the Finder.
Turn on Finder syncing
You can use the Finder on your Mac to sync photos to your iPhone, iPad, or iPod touch from the Photos app, or from a folder on your computer. Each time that you sync your iOS device with your computer, the photos and videos on your iOS device update to match the albums on your computer. If you have photos on your iPhone, iPad, or iPod touch that aren’t on your computer, learn how to import them.
- Open a Finder window and connect your device to your computer using a USB cable.
- Unlock your device.
- Your device appears in the sidebar of the Finder window. Click the device to select it.
- If prompted, trust your device.
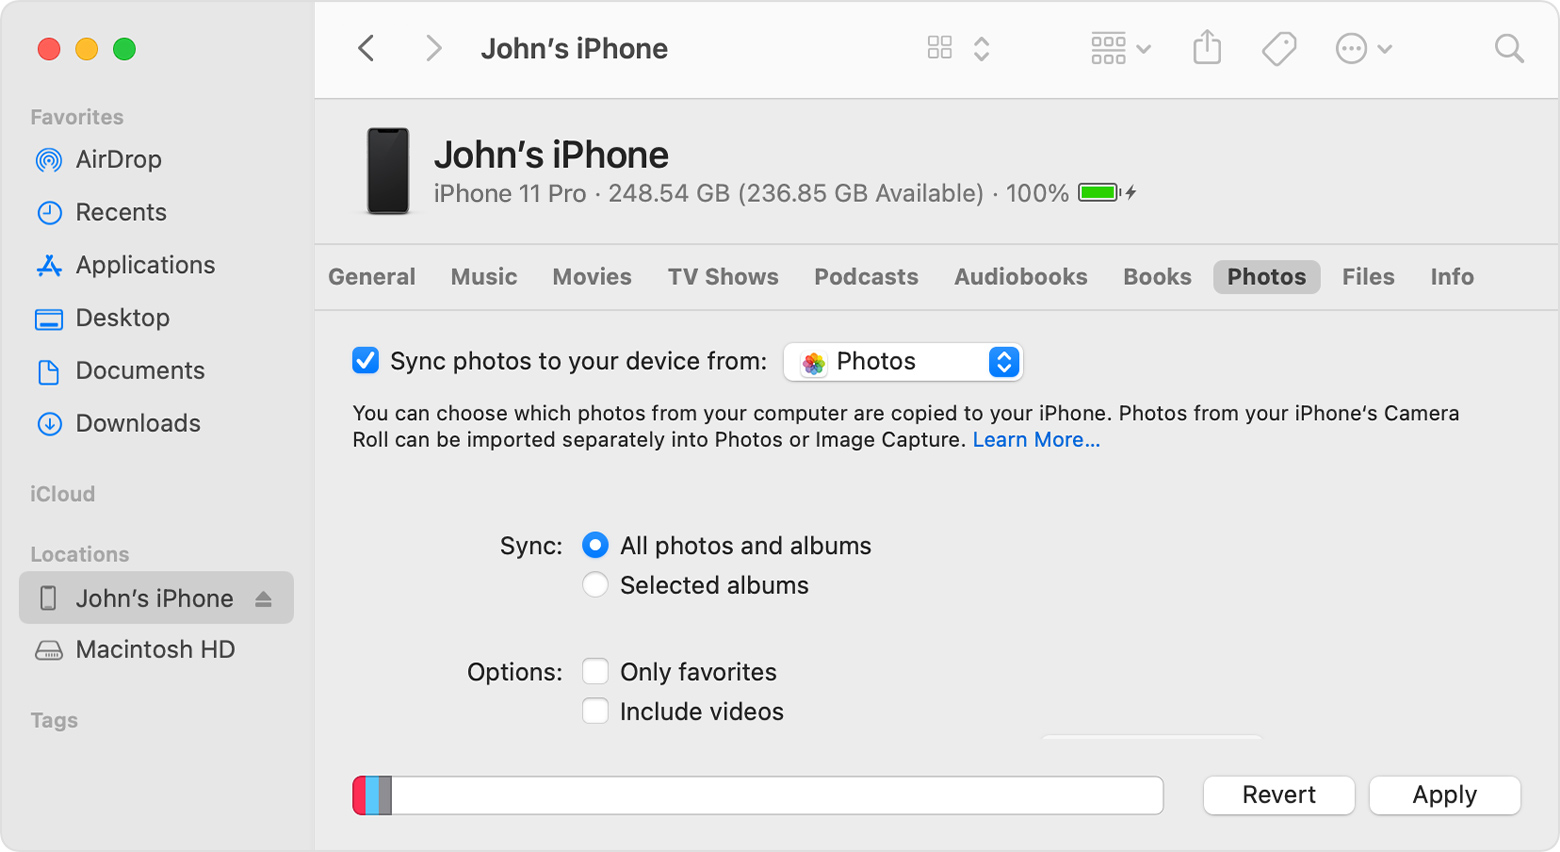
- Click the Photos tab below your device’s information.
- Select the checkbox next to Sync photos to your device from, then select Photos or a folder on your Mac.
- Choose between syncing all your photos and albums or only selected albums. You can also choose to sync only favorites, and whether to include videos.
- Click the Apply button in the lower-right corner of the window. If syncing doesn’t start automatically, click the Sync button.
You must import Slo-Mo and Time-Lapse videos through the Photos app or Image Capture in OS X Yosemite or later for their effect to be synced via the Finder. When you use iCloud Photos, Slo-Mo and Time-Lapse videos keep their effects.
Live Photos keep their effect when you import them to Photos in OS X El Capitan and later, but they lose their effect if you sync them back to your device via your computer. Use iCloud Photos so that Live Photos keep their effect, no matter what device you use.
You can sync your device only with the System Photo Library. If you have more than one photo library on your Mac, be sure that the correct one is designated as the System Photo Library.
Turn off Finder syncing
If you don’t want the synced photos on your iPhone, iPad, or iPod touch anymore, turn off syncing in the Finder and they’ll be removed from your device. You can turn off syncing for some of your photo albums or all of them at once.
Stop syncing some albums
- Open a Finder window and connect your device to your computer using a USB cable.
- Unlock your device.
- Your device appears in the sidebar of the Finder window. Click the device to select it.
- If prompted, trust your device.
- Click the Photos tab below your device’s information.
- Choose «Selected albums» and deselect the albums or collections that you want to stop syncing.
- Click Apply.
Stop syncing all photos
- Open a Finder window and connect your device to your computer using a USB cable.
- Unlock your device.
- Your device appears in the sidebar of the Finder window. Click the device to select it.
- If prompted, trust your device.
- Click the Photos tab below your device’s information.
- Deselect «Sync Photos» then click «Remove photos.»
- Click Apply.
Keep your photos updated automatically with iCloud
If you use iCloud Photos, you can keep all your photos and videos stored in iCloud. They sync seamlessly across all of your devices so you can access your library from your Mac, Apple TV, iPhone, iPad, and even your PC. Your newest shots and edits upload automatically when you’re connected to the internet.
Learn more
- iCloud Photos doesn’t upload photos and videos that you add to your device from your computer. If you’re missing photos after you turn on iCloud Photos, follow these steps.
- You can always make a copy of your photos and videos and keep them on your computer.
- Learn how to import photos and videos from your iPhone, iPad, or iPod touch to your computer.
Information about products not manufactured by Apple, or independent websites not controlled or tested by Apple, is provided without recommendation or endorsement. Apple assumes no responsibility with regard to the selection, performance, or use of third-party websites or products. Apple makes no representations regarding third-party website accuracy or reliability. Contact the vendor for additional information.
Источник
Sync iTunes content on PC with your devices
To add items on your computer to your iPhone, iPad, or iPod, you sync them using iTunes. You can have iTunes sync items automatically (which is the quickest option), or drag items to your device manually (which gives you more control)—or you can do both. You can also remove items from your device automatically or manually.
If you have an iPhone, iPad, or iPod touch with iOS 5 or later, you can sync your device wirelessly when your computer and device are connected to the same Wi-Fi network. If you don’t have a Wi-Fi connection, you need to sync your device using USB.
You can sync multiple devices with your iTunes library, and use different settings for each device.
Important: Before you begin, read the FAQs about syncing—Intro to syncing in iTunes on PC.
Select items to sync automatically
Connect your device to your computer.
You can connect your device using a USB or USB-C cable or a Wi-Fi connection. To turn on Wi-Fi syncing, see Sync iTunes content on PC with devices on Wi-Fi.
In the iTunes app  on your PC, click the Device button near the top left of the iTunes window.

Select a type of content you want to sync (for example, Music or TV Shows) in the sidebar on the left.

Note: If you use iCloud Photos and Apple Music, your photos and music are synced automatically with iCloud. When you click Music or Photos, no options appear for syncing.
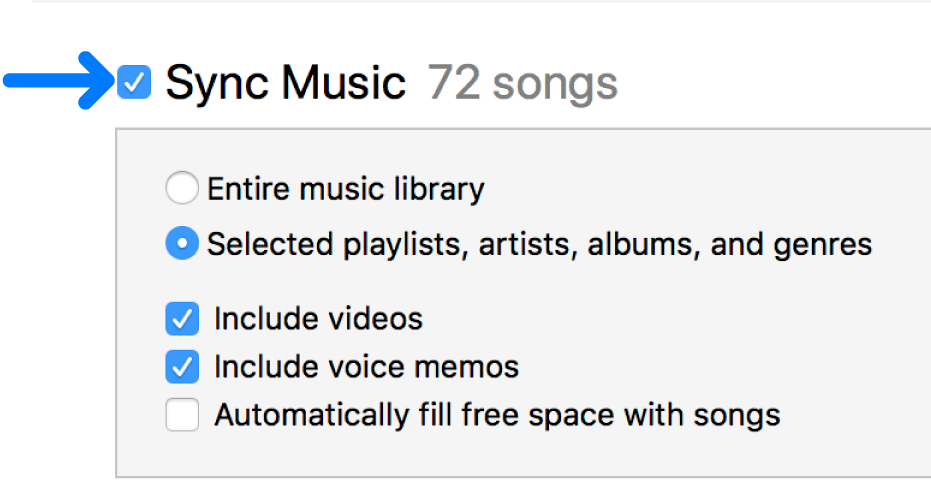
Select the Sync checkbox, then select the items you want to sync automatically each time you connect your device.
Repeat steps 3 and 4 for each type of content you want to include on your device.
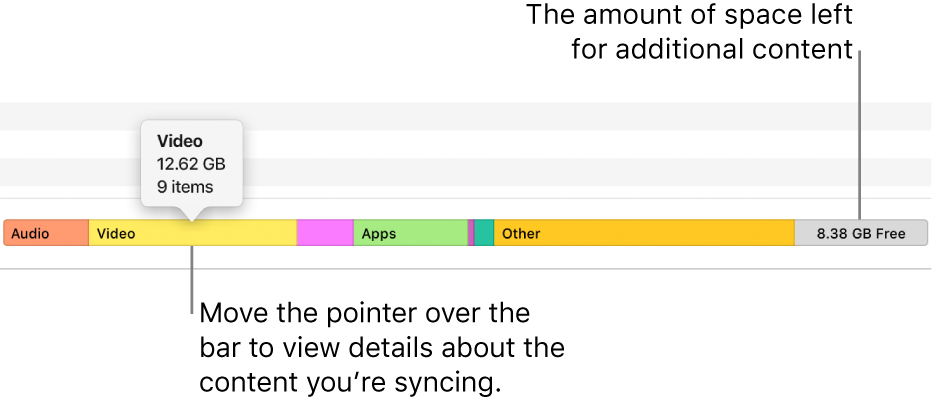
The bar at the bottom of the window shows how much free space remains on your device after you sync.
By default, iTunes syncs your device whenever you connect it to your computer. If you want iTunes to ask you before syncing, do one of the following:
Require a prompt before syncing this device: Click Summary, then deselect “Automatically sync when this [device] is connected.”
Require a prompt before syncing all devices: Choose Edit > Preferences, click Devices, then select “Prevent iPods, iPhones, and iPads from syncing automatically.”
When you’re ready to sync, click Apply.
Tip: To automatically sync a connected device at any time, choose File > Devices > Sync [device name].
WARNING: If you delete an automatically synced item from your iTunes library, the deleted item is removed from your device the next time you sync.
Add items to your device manually
You can add music, movies, TV shows, and podcasts to your device manually. You can’t add photos, contacts, or other info manually.
Connect your device to your computer.
You can connect your device using a USB or USB-C cable or a Wi-Fi connection. To turn on Wi-Fi syncing, see Sync iTunes content on PC with devices on Wi-Fi.
In the iTunes app on your PC, choose an option (Music or Movies, for example) from the pop-up menu at the top left, then click Library.

In your iTunes library, click Downloaded in the sidebar on the left.
Note: You can only add items you downloaded to a device.
Right-click an item, choose Add to Device, then choose your device.
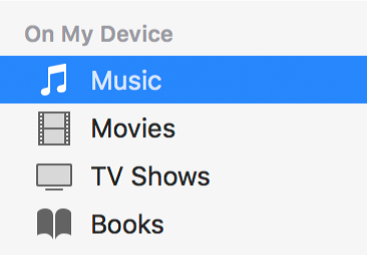
To remove an item that was added manually, click On My Device, select an item (or items), press the Delete key, then click Delete.
Keep items from being synced automatically
If there are some items you never want synced (for example, if they’re too big to fit on your device), you can keep them from being synced.
You can also turn off automatic syncing for music, movies, and TV shows. You must do this if you want to sync iPod classic, iPod nano, or iPod shuffle with more than one iTunes library, or automatically fill your device with songs using Autofill (see the next task, below).
Note: To sync content from your computer to iPod classic, iPod nano, or iPod shuffle, use iTunes on Windows 10 or later.
Connect your device to your computer.
You can connect your device using a USB or USB-C cable or a Wi-Fi connection. To turn on Wi-Fi syncing, see Sync iTunes content on PC with devices on Wi-Fi.
In the iTunes app on your PC, click the Device button near the top left of the iTunes window.
Do any of the following:
Keep individual items from being synced: Select “Sync only checked [items].” Then deselect the checkbox next to any items in your iTunes library that you don’t want synced.
Note: If you don’t see this option, choose Edit > Preferences, click General, then make sure “List view checkboxes” is selected.
Turn off automatic syncing for music, movies, and TV shows: Select “Manually manage [items].”
Fill your device with a random selection of songs using Autofill
If you get tired of hearing the same music on your device, you can have iTunes fill it with a random selection of songs using Autofill.
To use Autofill, you must turn off automatic syncing for music and video. See Keep items from being synced automatically.
Connect your device to your computer.
You can connect your device using a USB or USB-C cable or a Wi-Fi connection. To turn on Wi-Fi syncing, see Sync iTunes content on PC with devices on Wi-Fi.
In the iTunes app on your PC, click the Device button near the top left of the iTunes window.
Click Music in the sidebar on the left, below On My Device.
Click the Autofill From pop-up menu at the bottom of the Music pane, then choose which songs you want to sync.

To adjust Autofill settings, click Settings.
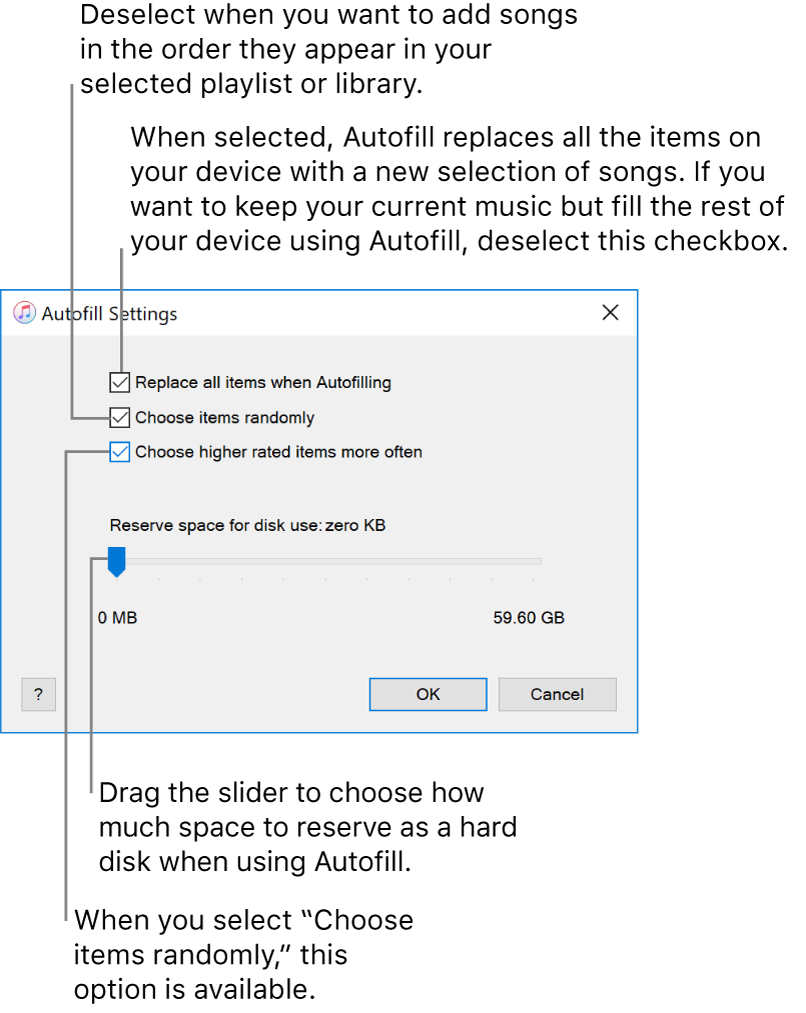
When you’re done, click OK.
Click Autofill, then click Sync.
Each time you use Autofill, iTunes adds different songs to your device.
To remove an item that was added using Autofill, click On My Device, select an item (or items), press the Delete key, then click Delete.
Remove automatically synced items from your device
Connect your device to your computer.
You can connect your device using a USB or USB-C cable or a Wi-Fi connection. To turn on Wi-Fi syncing, see Sync iTunes content on PC with devices on Wi-Fi.
In the iTunes app on your PC, do one of the following:
Deselect the checkbox for the item in your iTunes library, then select “Sync only checked [items]” in the Summary pane.
If the item was added because it’s part of a synced playlist, remove the item from the playlist.
Change your sync settings to keep the item from being synced.
The types of content you can sync depend on what device you have. For more information, see the Music chapter of the user guide for iPhone, iPad, or iPod touch. For a device that doesn’t use the latest version of iOS or iPadOS, get the user guide from the Apple Support Manuals website.
Important: Before disconnecting your device from your computer, click the Eject button  .
.
Источник


