- Как работает SystemUI в Android
- Данное приложение выполняет весьма важные функции:
- Запуск SystemUI
- Регулирование громкости
- RingtonePlayer
- PowerUI
- Задачи
- Главные функции:
- Экран блокировки
- Панель уведомлений
- How do you get/set media volume (not ringtone volume) in Android?
- 8 Answers 8
- Not the answer you’re looking for? Browse other questions tagged android get media volume android-audiomanager or ask your own question.
- Linked
- Related
- Hot Network Questions
- Subscribe to RSS
- Ready Android
- Pursuing Perfection Passionately
- Thanks to
- Evergreen Posts & Pages
- Nice to see u 🙂
- Increase and decrease the system volume and show volume control UI: Android
- A Brief Introduction to System Volume Information Folder [MiniTool Wiki]
- Quick Navigation :
- Introduction to System Volume Information
- How to Reduce the Size of System Volume Information?
- Can I Delete System Volume Information?
- Final Words
- Join for Exclusives
Как работает SystemUI в Android

В этой статье я разберу архитектуру и принцип работы основного приложения Android — SystemUI. Меня заинтересовала эта тема, потому что мне интересно, как устроена система, которой пользуется такое огромное количество пользователей и для которой ежедневно выкатываются тысячи приложений в Google Play или просто на просторы интернета. Помимо этого меня интересует вопрос информационной безопасности Android и создаваемых под него приложений.
В системе Android, SystemUI — это приложение, путь к исходному коду которого находится в platform_frameworks_base/packages/SystemUI/, на девайсе оно находится в system/priv-app/-SystemUI.
priv-app — это каталог, где хранятся привилегированные приложения. К слову, по пути system/app лежат предустановленные приложения, а обычные приложения, которые мы устанавливаем на свой девайс самостоятельно, хранятся в data/app.
Тут сразу возникает вопрос: почему нельзя засунуть все предустановленные и привилегированные приложения в один каталог, зачем нужно это разделение?
Дело в том, что некоторые приложения более системные, чем другие:) И это разделение необходимо для того чтобы уменьшить покрытие эксплойтами системных приложений, для получения доступа к защищенным операциям. Можно создавать приложение, которое будет иметь специальный ApplicationInfo.FLAG_SYSTEM и в системе получит больше прав, однако apk файл с таким разрешением будет помещен в раздел system.
Итак, SystemUI — это apk-файл, который по сути своей обычное приложение. Однако, если посмотреть на сложное устройство SystemUI, перестает казаться, что это всего лишь простое приложение, верно?
Данное приложение выполняет весьма важные функции:
Запуск SystemUI
Как я и говорила выше, SystemUI не похож на обычное приложение, так что его запуск не сопровождается запуском активности, как это происходит у большинства приложений. SystemUI — это глобальный пользовательский интерфейс, который запускается во время процесса загрузки системы и не может быть завершен.
Если мы залезем в SystemServer, который является одним из двух столпов в мире Android (второй — Zygote, но об этом я расскажу как-нибудь в другой раз), то мы можешь найти место, где стартует SystemUI при загрузке системы.
Тут мы видим как запускается сервис SystemUI с помощью непубличного API startServiceAsUser. Если бы вы захотели использовать это, то вам пришлось бы обратиться к рефлексии. Но если вы решите использовать reflection API в Android — подумайте несколько раз, стоит ли это того. Подумайте раз сто:)
Итак, тут создается отдельный процесс для приложения и по факту каждый раздел SystemUI является отдельным сервисом или независимым модулем.
Метод start() вызывается для запуска каждой службы, которые перечислены ниже.
Регулирование громкости
Мы регулярно пользуемся кнопками громкости на своих устройствах, но не задумываемся какие процессы должны произойти в системе для того чтобы мы могли прибавить или убавить звук. Операция кажется довольно простой на словах, но если заглянуть в VolumeUI, который находится в подпапке SystenUI/volume, в разных режимах интерфейс имеет свою вариацию.
Я уже говорила о том, что сервисы SystemUI запускаются методом start(). Если мы посмотрим на класс VolumeUI, то он тоже наследуется от SystemUI.
Тут мы видим что с помощью mEnabled мы определяем, следует ли нам показывать панель с настройкой звука. И судя по VolumeDialogComponent, VolumeUI отображает звуковую панель в виде диалога. Но все действия относительно нажатия на клавиши громкости обрабатываются в PhoneWindow.
Насколько мы видим, KEYCODE_VOLUME_UP (+) не обрабатывается и перейдет в обработку KEYCODE_VOLUME_DOWN (-). И в обоих событиях, как в onKeyDown, так и в onKeyUp вызывается метод dispatchVolumeButtonEventAsSystemService.
Итак, тут у нас вызывается метод adjustVolume, для того чтобы мы могли проверить наш direction, которому будет присвоен параметр события.
В итоге когда мы доберемся до AudioService, где будет вызван sendVolumeUpdate, где помимо вызова метода postVolumeChanged, будет установлен интерфейс HDMI.
RingtonePlayer
RingtonePlayer в Android выполняет роль проигрывателя. Он так же наследуется от SystemUI и в методе start() мы видим:
Здесь у нас устанавливается mCallback, который по сути является экземпляром IRingtonePlayer.
В итоге можно управлять RingtonePlayerService с помощью Binder для воспроизведения звуковых файлов.
PowerUI
PowerUI отвечает за управление питанием и уведомлениями. Аналогично наследуется от SystemUI и имеет метод start().
Как мы видим из приведенного выше кода, происодит подписка на изменения Settings.Global.LOW_POWER_MODE_TRIGGER_LEVEL, а после — вызов mReceiver.init().
Тут регистрируется широковещательный приемник, с помощью которого происходит отслеживание изменений.
Задачи
Recents — это основная и часто используемая функция в мобильных устройствах на базе Android.
Главные функции:
- Отображение всех задач
- Переключение между задачами
- Удаление задач
Помимо этого Recents так же наследуется от SystemUI. В RecentsActivity происходит создание и обновление последних задач, чтобы мы могли увидеть их на нашем экране.
А в с помощью RecentTaskInfo мы можем получить информацию о конкретной задаче.
Вообще, запущенные задачи можно вынести в отдельную тему. Я изучила ее со всех сторон, так как хотела размывать экран приложения перед переходом приложения в background, чтобы в RecentsTask отображалась нечитаемая версия снапшота. Однако, проблема заключается в том, что снапшот приложения берется раньше, чем вызывается onPause(). Эту проблему можно решить несколькими способами. Либо выставлять флаг, чтобы система просто скрывала содержимое экрана с помощью
О чем я говорила в предыдущей статье, посвященной как раз снапшотам.
Можно вообще сделать так, чтобы конкретная activity приложения не отображалось в задачах, проставив в манифесте
Либо можно воспользоваться хитростью с помощью
Можно задать основной активности выше приведенный флаг excludeFromRecents = true, для того чтобы ее экран отсутствовал в запущенных задачах, но во время загрузки приложения запустить отдельную задачу, которая будет показывать либо размытый скриншот с основной активности, либо любое другое изображение. Более подробно, как это можно сделать описано в официальной документации на примере Google Drive.
Экран блокировки
Keyguard уже посложнее всех вышеприведенных модулей. Он представляет из себя сервис, который запускается в SystemUI, а управляется при помощи KeyguardViewMediator.
Однако на самом деле KeyguardService самостоятельно не работает с интерфейсом экрана блокировки, он лишь передает информацию в модуль StatusBar, где уже и производятся действия относительно визуального вида экрана и отображения информации.
Панель уведомлений
SystemBars имеет довольно сложное устройство и структуру. Его работа разделяется на два этапа:
- Инициализация SystemBars
- Отображение уведомлений
Если посмотреть на запуск SystemBars
То мы видим ссылку на ресурс из которого читается имя класса и создается его экземпляр.
Таким образом мы видим что тут вызывается StatusBar, который будет работать с выводом уведомлений и UI.
Я думаю никто и не сомневался в том, что Android устроен очень сложно и заключает в себе много хитростей, которые описаны в огромном количестве строчек кода. SystemUI является одной из самых важных частей этой системы и мне понравилось изучать ее. Из-за того что материала на эту тему очень мало, если вы заметите какие-либо ошибки, прошу исправить меня.
Источник
How do you get/set media volume (not ringtone volume) in Android?
Is there a way to get/set media volume? I have tried the following:
but it returns the ringtone volume.

8 Answers 8

Instead of AudioManager.STREAM_RING you shoul use AudioManager.STREAM_MUSIC This question has already discussed here.
Have a try with this:

You can set your activity to use a specific volume. In your activity, use one of the following:

If you happen to have a volume bar that you want to adjust –similar to what you see on iPhone’s iPod app– here’s how.

The following code will set the media stream volume to max:
To set volume to 0
To set volume to full
the volume can be adjusted by changing the index value between 0 and 20
Not the answer you’re looking for? Browse other questions tagged android get media volume android-audiomanager or ask your own question.
Linked
Related
Hot Network Questions
Subscribe to RSS
To subscribe to this RSS feed, copy and paste this URL into your RSS reader.
site design / logo © 2021 Stack Exchange Inc; user contributions licensed under cc by-sa. rev 2021.12.3.40888
By clicking “Accept all cookies”, you agree Stack Exchange can store cookies on your device and disclose information in accordance with our Cookie Policy.
Источник
Ready Android
Pursuing Perfection Passionately
Thanks to
Evergreen Posts & Pages
Nice to see u 🙂
Increase and decrease the system volume and show volume control UI: Android
There are different kind of streams available in AudioManager, which you can manage:
/** The audio stream for phone calls */
STREAM_VOICE_CALL = AudioSystem.STREAM_VOICE_CALL;
/** The audio stream for system sounds */
STREAM_SYSTEM = AudioSystem.STREAM_SYSTEM;
/** The audio stream for the phone ring */
STREAM_RING = AudioSystem.STREAM_RING;
/** The audio stream for music playback */
STREAM_MUSIC = AudioSystem.STREAM_MUSIC;
/** The audio stream for alarms */
STREAM_ALARM = AudioSystem.STREAM_ALARM;
/** The audio stream for notifications */
STREAM_NOTIFICATION = AudioSystem.STREAM_NOTIFICATION;
/** @hide The audio stream for phone calls when connected to bluetooth */
STREAM_BLUETOOTH_SCO = AudioSystem.STREAM_BLUETOOTH_SCO;
/** @hide The audio stream for enforced system sounds in certain countries (e.g camera in Japan) */
STREAM_SYSTEM_ENFORCED = AudioSystem.STREAM_SYSTEM_ENFORCED;
/** The audio stream for DTMF Tones */
STREAM_DTMF = AudioSystem.STREAM_DTMF;
/** @hide The audio stream for text to speech (TTS) */
STREAM_TTS = AudioSystem.STREAM_TTS;
Control over volume:
ADJUST_RAISE – Increase the ringer volume.
ADJUST_LOWER – Decrease the ringer volume.
ADJUST_SAME – Maintain the previous ringer volume. This may be useful when needing to show the volume toast without actually modifying the volume.
ADJUST_MUTE – Mute the volume. Has no effect if the stream is already muted.
ADJUST_UNMUTE – Unmute the volume. Has no effect if the stream is not muted.
ADJUST_TOGGLE_MUTE – Toggle the mute state. If muted the stream will be unmuted. If not muted the stream will be muted.
To manage control UI visibility:
FLAG_SHOW_UI – Show a toast containing the current volume.
Источник
A Brief Introduction to System Volume Information Folder [MiniTool Wiki]
Quick Navigation :
What is System Volume Information? It’s a folder presented by default for each drive on your computer, even the external USB devices plugged in your PC. Usually, the folder is hidden, so if you want to see it, you need to enable the option Show Hidden Items in File Explorer.
Introduction to System Volume Information
What is System Volume Information used for? In fact, it is used for storing necessary information including System Restore Points, Volume Shadow Copy, Indexing Service Database, NTFS Disk Quota Settings, Distributed Link Tracking Service Database, DFS Replication and File deduplication service database.
However, if your drivers are formatted with the NTFS file system, then you cannot access the System Volume Information folder, even you use administrator privileges. And if you double-click the folder, you’ll receive an error message saying that “Location is not available” or “Access is denied”.
So why does this thing happen? This is because Windows uses this folder for certain system-level features. The permissions are set to protect against users and programs without the appropriate permissions amending the files inside and interfering with important system functions.
Luckily, you can open the System Volume Information folder if your drive is formatted with the exFAT or FAT32 file system. And if you open the folder, you can see that there are two files present there — WPSettings.dat and IndexerVolumeGuid.
The IndexerVolumeGuid file is used to assign a unique identifier to the drive. Then the Windows Indexing Service analyzes the drive’s files and indexes them to make you can access them faster.
Whenever a drive is connected to the computer, Windows looks for the identifier and determines which search database to query and associate with the drive. Therefore, you can use Cortana on Windows 10, the search box in the File Explorer or in the Start menu.
The WPSettings.dat file is also created by Windows service, but the function of it is not sure.
How to Reduce the Size of System Volume Information?
Is System Volume Information large? Sometimes it is. This is because it contains your system restore points. So how to reduce the size of System Volume Information? You can delete some restore points.
Here is the tutorial:
Step 1: Open Control Panel and then choose System and Security.
Step 2: Click System and then click System Protection in the left panel.
Step 3: Select the drive you want to reduce the size of the System Volume Information folder and then click Configure….
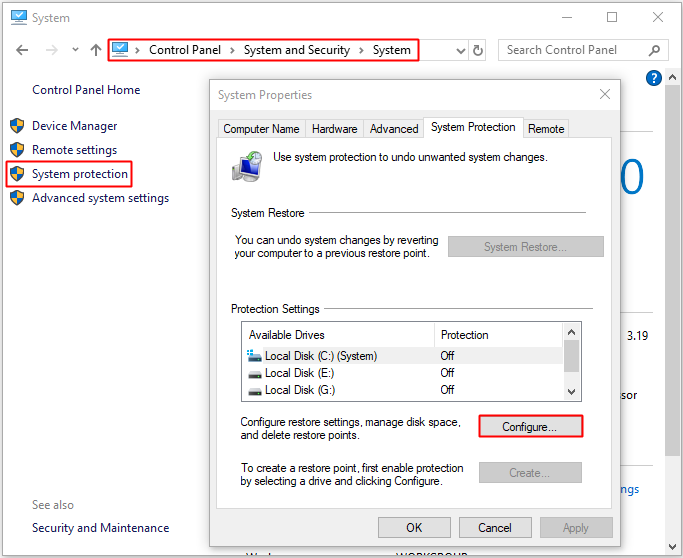
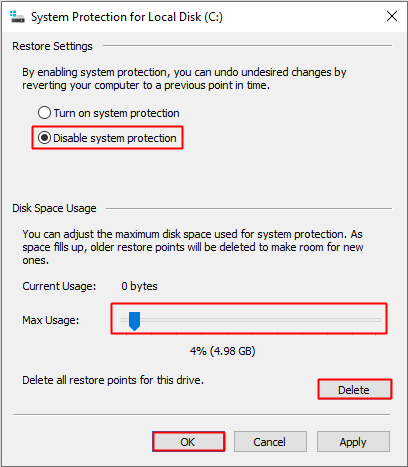
Step 4: By default, the System Restore can take up to 10 GB space for system restore per drive, which means the system restore can consume 10 GB, so you can reduce the size of the System Volume Information folder by reducing the maximum space using Max usage. Then click OK to save changes.
Note: If you are sure that you don’t need the system restore points, you can click Delete to clear the previous restore points. In addition, you can also choose to check Disable system protection to disable the system restore mechanism for the drive.
Can I Delete System Volume Information?
Actually, you shouldn’t delete the System Volume Information folder. You cannot access it on NTFS-formatted drives, leave alone deleting it. However, you can delete it on exFAT or FAT32 formatted drives, Windows will recreate it again automatically. So there is no need to delete it.
What’s more, the System Volume Information folder is vital for the Windows operation and has lots of necessary functionalities. So if the folder is too large, just reduce its size according to the method mentioned above. Never try to change the permissions on the folder to delete it.
Final Words
From this article, you can know what System Volume Information is and why you cannot delete it. Besides, you can know the methods to reduce the size of the System Volume Information folder.
Join for Exclusives
Connect with us for giveaways, exclusive promotions, and the latest news!
Источник


