- USB Debugging Mode
- What is USB Debugging Mode?
- What is USB Debugging for?
- KingoRoot on Windows
- KingoRoot for Android
- Android 101: How to Enable USB Debugging on Any Android Device
- What is USB Debugging in Android?
- How to Enable USB Debugging on Android
- Step 1: Enable Developer Options in Android Device Settings
- Step 2: Enable USB Debugging on Android
- Some Commonly Used ADB Commands
- Knowledge about USB Debugging Android
- Part1
- Part2
- Part3
- What is USB Debugging?
- Why I need to enable USB Debugging Mode?
- How to Enable USB Debugging on Android?
- How to Enable USB Debugging on Samsung Devices
- How to Enable USB Debugging on HUAWEI Devices
USB Debugging Mode
What is USB Debugging Mode?
USB Debugging Mode is one thing that you cannot skip to know if you are an Android user. The primary function of this mode is to facilitate a connection between an Android device and a computer with Android SDK (Software Development Kit). So it can be enabled in Android after connecting the device directly to a computer via USB.
USB Debugging Mode, in some versions of Android, is also called Developer Mode. Then it is relatively easy for you to understand that this USB Debugging Mode establishes a direct connection between an Android Device and a computer and readies it for deeper-level actions. You may come across a pop-out notification as it shows below:
What is USB Debugging for?
USB Debugging Mode is definitely important, as you can see. But why? What capabilities that it carries make this mode so important? What is USB Debugging for?
You’ve probably got the idea that USB Debugging Mode grants you a level of access to your device. What kind of access, you may ask. This level of access that USB Debugging Mode grants is important when you need system-level clearance, such as when coding a new app. This mode, also called Developer Mode, allows newly programmed apps to be copied via USB to the device for testing. Depending on the OS version and installed utilities, the mode must be turned on to let developers read internal logs.
But it does more than that. There are a few non-development-related benefits from this new level of access that can give you much more freedom of control over you device. For example, with Android SDK, you gain direct access to your phone through your computer and that allows you to do things or run terminal commands with ADB. These terminal commands can help you restore a bricked phone. So this mode is a useful tool for any adventurous Android owner.
Of course, the background knowledge is always complicated for those non-experts. This is exactly what Android Update exists for. Android Update incorporated all these complicated features and tools to make it easy for you.
It is best for you to keep USB Debugging Mode disabled and only enable it when you really need it.
KingoRoot on Windows
KingoRoot Android on Windows has the highest success rate. It supports almost any Android device and version.

KingoRoot for Android
KingoRoot for Android is the most convenient and powerful apk root tool. Root any Android device and version without connecting to PC.
Источник
Android 101: How to Enable USB Debugging on Any Android Device
Android has a lot of nifty hidden options and one of them is ‘USB Debugging’. It is required to be turned on in order to establish a successful connection between your PC and your Android device over ADB (Android Debug Bridge). This comprehensive guide will show you how to enable USB Debugging on Android. The instructions will work on any Android device, irrespective of the device manufacturer (OEM).
Here on our blog, we cover several tutorials for which you will need to enable the USB Debugging option on your Android device first. The process is short and it feels redundant to mention the steps every time in every tutorial where it is required. And thus, we thought of creating a separate tutorial that will not only help you turn ON USB Debugging on your phone but will also allow you to learn about what it actually is and when you might need it.
What is USB Debugging in Android?
‘USB Debugging‘ is a developer option in Android that is used to establish a successful ADB connection between a PC and an Android device. It is generally hidden within the Android device’s settings menu and is disabled by default.
So, the question is, why would you need to enable USB Debugging on your Android device? A straight answer to that is: ADB won’t be able to recognize your phone if USB Debugging is disabled. Once enabled, it allows you to execute ADB commands to perform several actions, like debugging an app, capturing a bug report to provide feedback to developers (logcat), force-reboot your Android device into recovery mode/fastboot mode, etc.
An Important Clarification First!
I and so, many users have seen a lot of online resources claiming that USB Debugging must be enabled in order to flash firmware (Stock or custom ROMs) and custom recoveries on Android devices. I say NO! Why? Read ahead.
USB Debugging is only required to establish a successful ADB connection between your PC and your Android device, while it is booted into the system (OS). Outside that, be it in recovery mode or fastboot/bootloader mode, USB Debugging doesn’t serve any purpose. Even if you’re trying to sideload OTA updates using ADB then there’s no need for USB Debugging to be enabled.
So the next time someone mentions or claims that USB Debugging is required to flash a factory image or stock firmware via Odin, then you’ll know that’s incorrect and you wouldn’t wander off in the wrong direction.
If you still don’t believe me, try it for yourself.
How to Enable USB Debugging on Android
Like I mentioned earlier, USB Debugging resides inside the ‘Developer options’ menu in the Android device settings. This menu is hidden on all Android devices by default to prevent accidental access. So, we have split the instructions into two steps. The first step will guide to enable Developer Options and then finally enable the USB Debugging option within it.
This guide supports any device, irrespective of the OEM, running the following Android OS versions:
- Ice Cream Sandwich (4.0)
- Jelly Bean (4.1, 4.2, 4.3)
- KitKat (4.4)
- Lollipop (5.0, 5.1)
- Marshmallow (6.0)
- Nougat (7.0, 7.1)
- Oreo (8.0, 8.1)
- Pie (9.0)
- Android 10
Step 1: Enable Developer Options in Android Device Settings
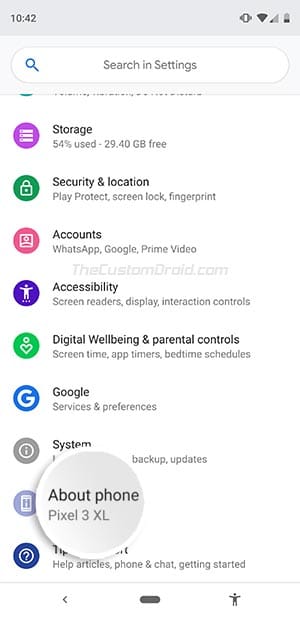
- Go to the ‘Settings‘ menu on your Android device.
 About phone to enable Developer Options» width=»300″ height=»617″ srcset=»https://www.thecustomdroid.com/wp-content/uploads/2017/09/Enable-Developer-Options-Go-to-Settings-About-phone.jpg 300w, https://www.thecustomdroid.com/wp-content/uploads/2017/09/Enable-Developer-Options-Go-to-Settings-About-phone-146×300.jpg 146w» sizes=»(max-width: 300px) 100vw, 300px»/>
 - Scroll through the settings and tap on ‘About phone‘.
- Find the ‘Build number‘ section in the ‘About phone’ menu.
- Now, continuously tap on the build number section for five (5) times to enable Developer Options.
- Enter the lock screen PIN, Password, or Pattern when prompted.
- You should now see a confirmation message like ‘You’re now a developer!‘, ‘Developer mode has been enabled.‘ or a similar message on the phone’s screen.
 About phone to enable Developer Options» width=»300″ height=»617″ srcset=»https://www.thecustomdroid.com/wp-content/uploads/2017/09/Enable-Developer-Options-Go-to-Settings-About-phone.jpg 300w, https://www.thecustomdroid.com/wp-content/uploads/2017/09/Enable-Developer-Options-Go-to-Settings-About-phone-146×300.jpg 146w» sizes=»(max-width: 300px) 100vw, 300px»/>
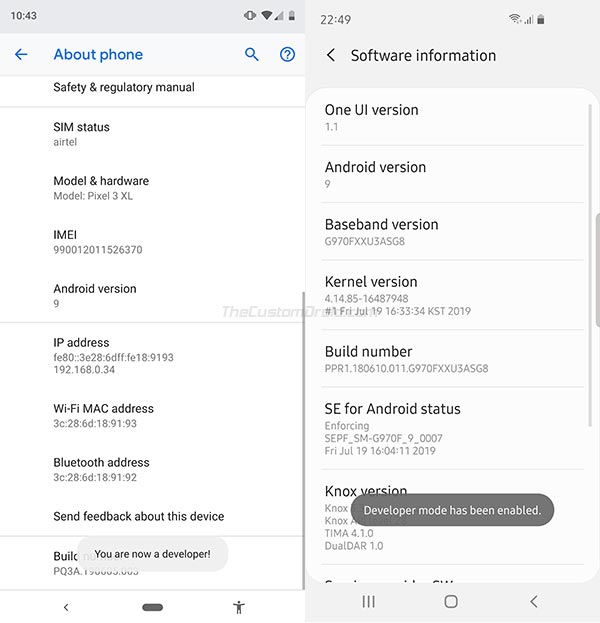
Note: In case of certain OEM devices, the Build Number section would be nested in another sub-menu. For example: In the case of Samsung Galaxy devices, you will find the ‘Build number’ section in Settings > About phone > Software information.
Step 2: Enable USB Debugging on Android
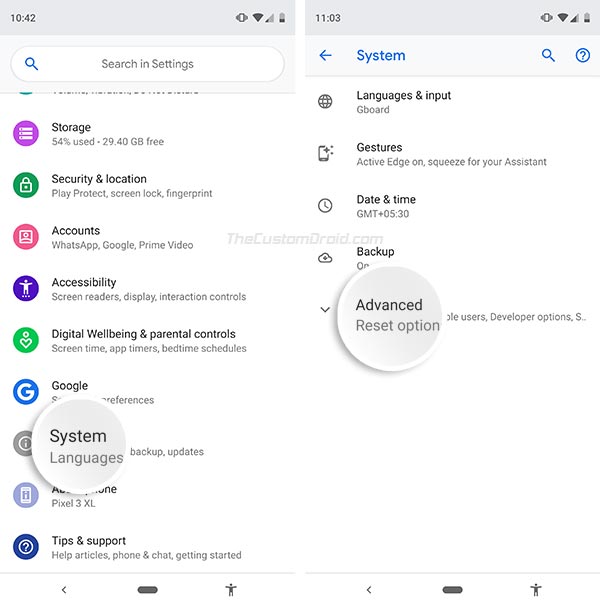
- Go to the ‘Settings‘ menu on your Android device. System and tap on ‘Advanced'» width=»600″ height=»607″ srcset=»https://www.thecustomdroid.com/wp-content/uploads/2017/09/Enable-USB-Debugging-Go-to-Settings-System-Advanced.jpg 600w, https://www.thecustomdroid.com/wp-content/uploads/2017/09/Enable-USB-Debugging-Go-to-Settings-System-Advanced-297×300.jpg 297w» sizes=»(max-width: 600px) 100vw, 600px»/>
- Select ‘System‘ and tap on ‘Advanced‘ (Only on Android 8.0 and above).
- Now tap on ‘Developer options‘.
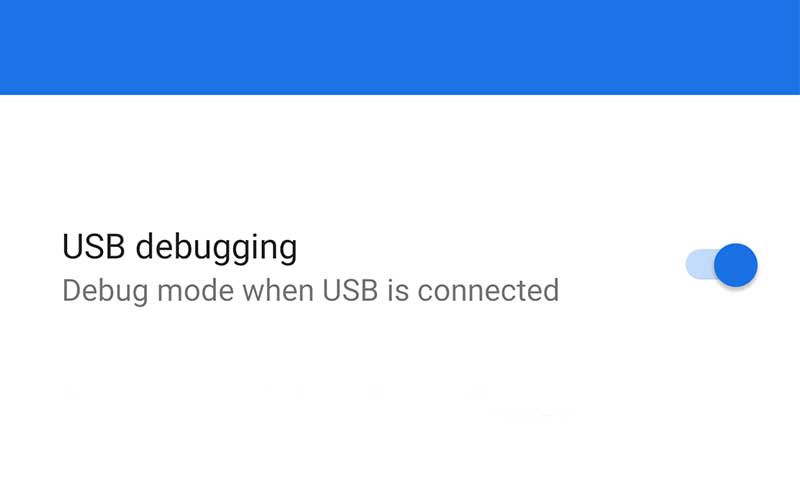
- Scroll down to the ‘Debugging‘ section.
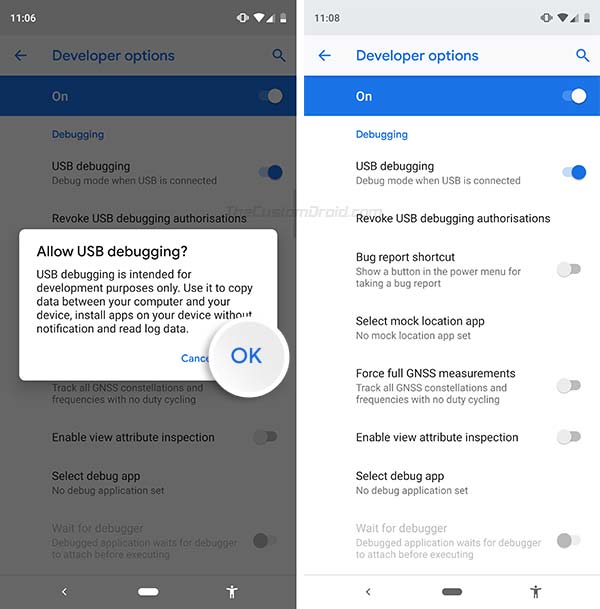
- Turn ON the ‘USB debugging‘ toggle.
- You should now see a confirmation prompt on the screen.
- Finally, tap on ‘OK‘ to confirm and enable USB Debugging on your Android device.
 System and tap on ‘Advanced'» width=»600″ height=»607″ srcset=»https://www.thecustomdroid.com/wp-content/uploads/2017/09/Enable-USB-Debugging-Go-to-Settings-System-Advanced.jpg 600w, https://www.thecustomdroid.com/wp-content/uploads/2017/09/Enable-USB-Debugging-Go-to-Settings-System-Advanced-297×300.jpg 297w» sizes=»(max-width: 600px) 100vw, 600px»/>
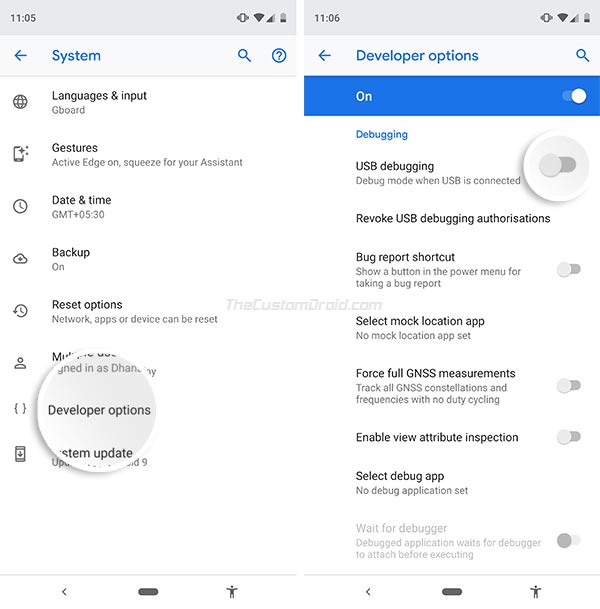
Note: In the case of Samsung Galaxy or certain other OEM devices, you will simply need to go to Settings > Developer options.
This is it! With the option now enabled, you can now go ahead, connect your phone to the PC and use the desired ADB commands.
Some Commonly Used ADB Commands
With USB Debugging enabled, you can now use your PC to communicate with your Android device and perform various actions using ADB commands. Below is the list of some commonly-used ADB commands that you might need and use from time-to-time.
So, this was our tutorial on how to enable USB Debugging on Android. If you have questions, you can simply leave a comment below.
Источник
Knowledge about
USB Debugging Android
What is USB debugging? How do I enable USB debugging?
Just follow the manual instructions in our guide, and you’ll be a master in no time.
(Recommended: Mirror Android phone after USB debugging? Tenorshare Phone Mirror can easily display Android screen on PC in real-time.)
Free Download For Windows 11/10/8.1/8/7
Part1
What is USB Debugging Android?
Part2
How to Enable USB Debugging?
Part3
How to Turn off USB Debugging?
What is USB Debugging?
In a word, USB debugging is a way for an Android device to communicate with the Android SDK (Software Developer Kit) using USB connectivity. It permits an Android device to communicate with computers directly, thus the Android device can receive terminal commands, files, etc. from the computer, and the computer can pull crucial information like log files of the Android device.
Why I need to enable USB Debugging Mode?
USB debugging mode grants you high-level access to your device. It is important when you need system-level clearance, such as coding a new app, transferring data between an Android device and the computer, mirroring Android to PC, rooting your device, flashing firmware with ADB commands, and reading log data of the Android device.
How to Enable USB Debugging on Android?
The steps to enable USB debugging depend on the version of Android and vary from the Android device brand to brand. If you are not sure about how to enable USB debugging on Samsung, Huawei, Xiaomi, HTC, LG, etc., follow the quick guide given below.
How to Enable USB Debugging on Samsung Devices
Step 1: Unlock your phone and go to «Settings» and select «About phone».
Step 2: Choose «Software information» and tap «Build number» about seven times until you see a message saying «Developer mode has been enabled».
Step 3: Go back to Settings and the «Developer options» menu is now under Settings.
Step 4: Enter «Developer options» and turn on the «USB debugging» button.
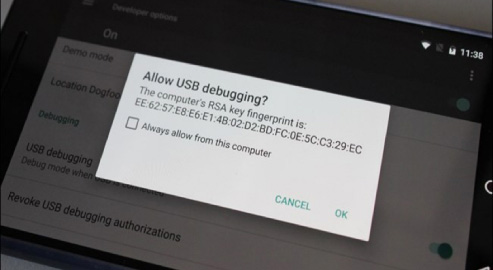
Step 5: If you see a messages «Allow USB Debugging», click «OK». Now you have enabled debugging on your Samsung Galaxy successfully.
Step 1: On your Samsung Galaxy S7/S7 Edge. Head to «Settings» > «About phone» > «Software info».
Step 2: Tap «Build number» several times until you see a message that says «Developer mode has been enabled».
Step 3: Go back to Settings and the «Developer options» menu is now under Settings.
Step 4: Enter «Developer options» and enable «USB debugging» option.
Step 5: When you connect your Samsung phone to computer using a USB cable, you will see a message «Allow USB debugging» for connection, click «OK».
Step 1: On your device, head to «Settings» > «About device» (About phone for S5).
Step 2: Scroll down and tap «Build number» several times until you see a message that says «Developer mode has been enabled».
Step 3: Go back to Settings and the «Developer options» menu is now under Settings.
Step 4: Select «Developer options» and enable the USB debugging option.
Step 5: Now you can connect your device to a desktop computer via USB and you will see a message «Allow USB debugging» for connection, click «OK».
Step 1: Turn on your Samsung Galaxy Note 10/9/8. Head to «Settings» > «About phone» > «Software information».
Step 2: Tap «Build number» about seven times and you will see a message saying «Developer mode has been enabled».
Step 3: Select on the Back button and tap on «Developer options» under Settings.
Step 4: Slide the «Developer Options» button to «On» and turn on «USB debugging». If prompted, tap OK to confirm.
Step 1: Unlock your phone and go to Settings > About device > Software info.
Step 2: Scroll down the screen and tap «Build number» several times until you see a message that says «You are now a developer! /Developer mode has been enabled».
Step 3: Go back to Settings. Tap on «Developer option» and drag the switch to right to turn it on.
Step 4: Under developer option, enable «USB debugging» and you will see a message “Allow USB debugging” when you connect your phone to the computer.
How to Enable USB Debugging on HUAWEI Devices
Step 1: Head to «Settings» > «About phone» at the bottom of the interface.
Step 2: Tap «Build number» about seven times until you get the prompt «You are now a developer!».
Step 3: Go back to setting and you can see the «Developer options», select Developer options.
Step 4: Turn on the “USB debugging”, and you have debugged your Huawei Mate 7 or Huawei Mate 8 successfully. Remember to tap «OK» to allow USB debugging when connect your Huawei phone to computer with the USB cable.
Step 1: Go to «Settings» > «About phone».
Step 2: Find «Build number» and tap seven times on it until you get a message saying that «You are now a developer!».
Step 3: Return to Settings and the «Developer options» menu in now under Settings. Select Developer options.
Step 4: Enter «Developer options» and slide to turn «USB debugging» on.
Step 5: After that, when connect your Huawei phone to computer via USB cable you will see a message «Allow USB debugging». Click «OK» to allow a connection.
Step 1: Unlock your phone and go to «Settings» > «About phone».
Step 2: Tap «Build number» seven times until you see a message saying that » You are now a developer!».
Step 3: Now you have enabled developer option. Go back to settings and you will see «Developer options» under Settings.
Step 4: Enter «Developer options» and slide to turn on the «USB debugging».
Step 5: Now you have successfully debugged your Huawei Honor 6/7/8. Next time when you connect your phone to computer using a USB cable and see a message «Allow USB debugging», click «OK» to allow a connection.
Источник


