- Use Voice Control on your iPhone, iPad, or iPod touch
- How to turn on Voice Control
- How to use Voice Control
- Here are a few other things you can do with Voice Control
- How to interact with your screen
- Show names
- Show numbers
- Show grid
- Here are a few other things you can do to interact with your screen
- How to customize Voice Control settings
- How to use VoiceOver on iPhone and iPad
- How to activate VoiceOver on iPhone and iPad
- How to use VoiceOver
- How to change speaking rate in VoiceOver
- How to enable Pitch Change in VoiceOver
- How to manage Verbosity in VoiceOver
- How to change the VoiceOver voice
- How to change VoiceOver pronunciations
- How to use the rotor
- How to add new languages to the rotor VoiceOver
- How to manage rotor options
- How to manage braille input/output options
- How to enable the braille status cell
- How to enable/disable Nemeth Code, the onscreen keyboard, and page turning while panning
- How to change the Braille translation language
- How to change the alert display duration
- How to choose a braille display
- How to enable/disable sound effects, audio ducking, and auto-select speaker
- How to change typing style when VoiceOver is on
- How to manage phonetic feedback
- How to manage typing feedback
- How to change modifier keys
- How to enable/disable Always Speak Notifications in VoiceOver
- How to change how VoiceOver navigates images
- How to enable/disable the large cursor
- How to change the double-tap timeout
- Questions?
Use Voice Control on your iPhone, iPad, or iPod touch
With Voice Control, you can navigate and interact with your device using your voice to tap, swipe, type, and more.
You need iOS 13 or later, or iPadOS to use Voice Control. Before you can use Voice Control, a file download is required. Once the download is complete, you don’t need a Wi-Fi connection to use Voice Control. It’s recommended that you connect to Wi-Fi before you turn on Voice Control for the first time.
Voice Control isn’t available in all countries or regions. Voice Control uses the Siri speech recognition engine for U.S. English only.
How to turn on Voice Control
- Go to Settings and select Accessibility.
- Select Voice Control, then select Set up Voice Control. A download will begin in the background.
When the download is complete, a microphone will appear in the status bar of your device that indicates that Voice Control is listening or not listening.

How to use Voice Control
When Voice Control is turned on, you can speak commands just like you would perform an action by touch. For example, to access Spotlight Search on the Home screen, say “Swipe down.” Or to access long-press menus for certain apps, say “Long press [app name].” Voice Control doesn’t change how your device responds to touch.
To see a list of available commands for different situations, say “Show me what to say.”
To view the full list of available commands, follow these steps:
- Go to Settings and select Accessibility.
- Select Voice Control, then Customize Commands.
Here are a few other things you can do with Voice Control
- To turn Voice Control on or off after the initial setup, you can use «Hey Siri,» the Accessibility Shortcut, or go to Settings, select Accessibility, then select Voice Control.
- To lock your device, say «Lock screen.»
- To wake your device, say «Hey Siri, turn on Voice Control.»
- To activate listening, you can say «Go to sleep» or «Wake up.» The listening feature doesn’t turn off, but puts the microphone to sleep until you wake your device with a command.
How to interact with your screen
To interact with items on your screen, speak an action, such as “Tap” then speak the name of the item. For example, say “Tap Accessibility.”
Show names
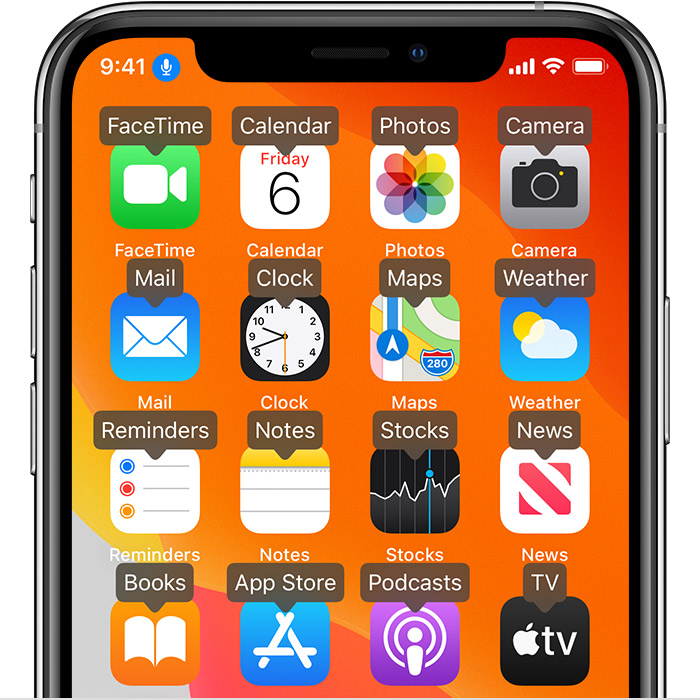
If you’re not sure what the name of the item is, you can say, “Show names” to display an overlay with the item names.
Show numbers
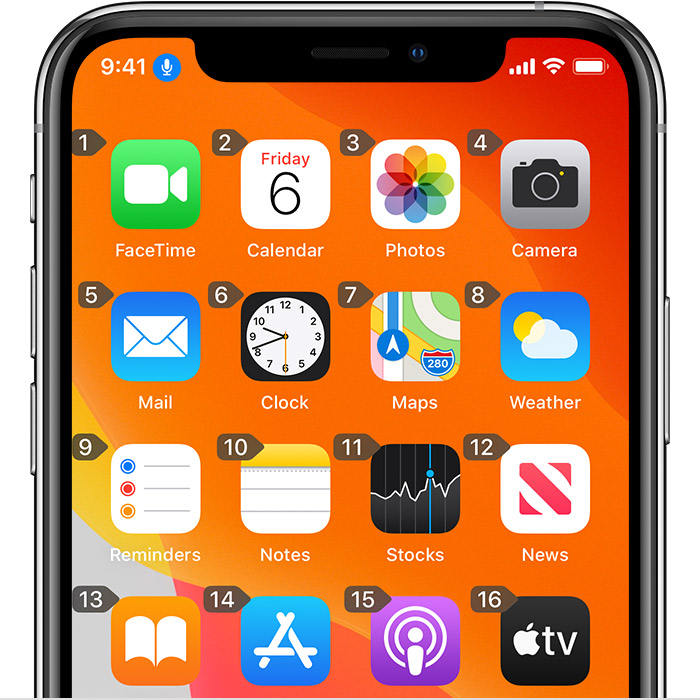
If an item doesn’t have a name, or if you would prefer to use numbers instead, you can say, “Show Numbers” to display numeric tags for each item on your screen.
Show grid
For interactions that require more precision or spacial referencing, you can say, “Show grid” to display a numbered grid overlay. Speaking a number on the grid will enlarge that area of the grid and present a new set of numbers, which will make it easier for you to select an item. The grid can also be used when dragging items on screen to identify where you would like to drop them, or when performing gesture or freehand actions.
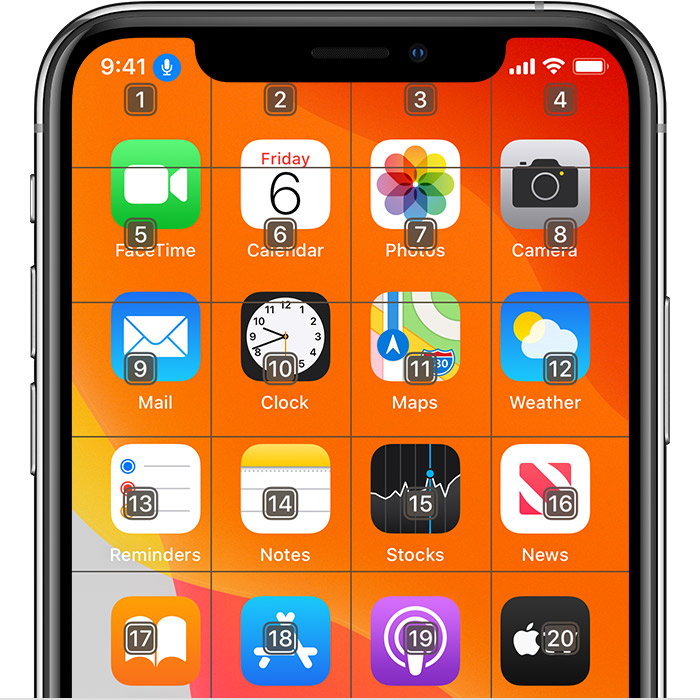
After speaking your next command, the grid will disappear. To keep the grid onscreen for multiple commands, say “Show grid continuously.”
Here are a few other things you can do to interact with your screen
- To hide overlays, say “Hide [names, numbers, grid].”
- To repeat actions, such as taps and swipes, say “Repeat that.” You can also specify how many times to repeat an action. For example, you can say “Swipe right. Repeat that three times.”
- To return to a previous screen or menu, say, “Go back.”
How to customize Voice Control settings
You can customize several settings under Voice Control. Here’s a list of some of the settings you can adjust:
- Language: Voice Control uses the the primary language that you have set on your iPhone or iPod touch.
- Customize Commands: Shows you the full list of available commands, allows you to turn commands off, or create customized commands.
- Vocabulary: Allows you to teach Voice Control new words.
- Show Confirmation: Displays a visual confirmation at the top of the screen when a command is recognized.
- Play Sound: Plays a sound effect when a command is recognized.
- Show Hints: Displays dynamic suggestions for what you can say. These appear automatically after instructions are spoken that are similar, but don’t quite match the system commands.
- Overlay: Allows you to set a continuous onscreen overlay with numbers, names, or the grid.
- Attention Aware: On devices with Face ID, this setting allows you to turn listening on or off based on whether or not you’re looking at the screen. This is helpful when using multiple devices with Voice Control.
Источник
How to use VoiceOver on iPhone and iPad
 Source: iMore
VoiceOver is an Accessibility feature that makes the iPhone and iPad easier to operate for the blind and sight-impaired. The best iPhone is the phone that anyone can use, which is why accessibility features are so important.
With VoiceOver in iOS 14, anyone with a visual impairment can have their iPhone or iPad’s screen read to them, including buttons, icons, links, and other interface elements, and use gestures to navigate and select their options. Plus, VoiceOver is included in Apple’s UIKit framework for developers, any app using default controls gets VoiceOver support built right in. Here’s how to VoiceOver on iPhone and iPad.
How to activate VoiceOver on iPhone and iPad
- Launch the Settings app from your Home screen.
Tap Accessibility.
![]() Source: iMore
Source: iMore
Tap the VoiceOver On/Off switch to enable it. The switch will turn green when the feature is enabled.
![]() Source: iMore
Source: iMore
Now that VoiceOver is enabled, the gestures you regularly use on your iPhone will change.
How to use VoiceOver
VoiceOver changes the gestures in iOS in order to make it easier for visually impaired individuals to know what they’re tapping on before they actually select it. Here are some tips to using VoiceOver:
- Single-tap anywhere on the screen and your iPhone or iPad will speak aloud the item that you’re tapping on.
- Double-tap on an item to select it.
- To scroll through a page, use three fingers. With VoiceOver off, you typically use only one finger to scroll, but in VoiceOver you’ll need to use three so that your iPhone or iPad doesn’t misread a tap as a scroll.
- Double-tap with three fingers to toggle speech commands on and off from the Lock Screen.
- A two-finger double-tap while performing an action will start or stop that action. For example, if you’re on a phone call, double-tapping the screen with two fingers will end the call. If you’re in the Camera app, double-tap with two fingers to take a photo.
- In VoiceOver options, you can customize and fine-tune options such as whether or not you’d like the device to speak notifications.
For more tips and tricks regarding VoiceOver, we recommend using the VoiceOver Practice option within the VoiceOver Settings menu.
This allows you to tap the screen as you’d like and the iPhone or iPad will speak aloud what that action does system-wide. This will help get someone used to how VoiceOver works and what commands trigger what actions.
How to change speaking rate in VoiceOver
You can change how quickly the VoiceOver speaks to you, and for tons of fun, slow it right down and it sounds drunk! This is easiest to adjust when VoiceOver is turned off.
- Launch Settings from your Home screen.
Tap Accessibility.
![]() Source: iMore
Source: iMore
Tap and drag the slider under Speaking Rate to change the rate of speech. The further right you go, the faster it speaks (I have no idea who would be able to use it on 100%, but there you go).
![]() Source: iMore
Source: iMore
How to enable Pitch Change in VoiceOver
Pitch Change makes VoiceOver speak at a higher pitch when reading the first item in a group and in a lower pitch when reading the last item in a group. It’s kind of hard to distinguish, but if you need it, it’s there!
- Launch Settings from your Home screen.
Tap Accessibility.
![]() Source: iMore
Source: iMore
Tap the Pitch Change On/Off switch. The switch will be green when its enabled.
 Source: iMore
How to manage Verbosity in VoiceOver
Verbosity is how much information is read to you and for some folks, the chatter can be too much. Under the Verbosity heading, you can control whether or not VoiceOver reads you hints (double-tap this or three-finger-swipe that) or tells you that there are emojis in text.
- Launch Settings from your Home screen.
- Tap Accessibility.
Tap VoiceOver
Tap Verbosity
Tap the Speak Hints On/Off switch to disable it.
How to change the VoiceOver voice
If you don’t like the VoiceOver voice, you can change it to a male, change to different accents, and download a bunch more. Here’s how:
- Launch Settings from your Home screen.
- Tap Accessibility.
- Tap VoiceOver.
- Tap Speech.
Tap Voice.
 Source: iMore
Tap the name to enable the voice.
Source: iMore
How to change VoiceOver pronunciations
VoiceOver isn’t perfect and it sometimes reads words out phonetically when that doesn’t make sense. Or, you might have a sibling with a name that’s hard to pronounce and VoiceOver just can’t get it. You can change how VoiceOver pronounces certain words or phrases. Here’s how:
- Launch Settings from your Home screen.
- Tap Accessibility.
- Tap VoiceOver.
- Tap Speech.
- Tap Pronunciations.
Tap the add button in the top right corner of your screen. It’s the plus sign.
Source: iMore
Tap the back button in the top left corner to add the pronunciation.
Source: iMore
You can also choose to ignore casing and to apply that pronunciation to all apps by tapping the switches below the pronunciation before you tap the back button.
How to use the rotor
The rotor is a quick menu of VoiceOver options that you can access from any screen at any time. To use the rotor:
- Twist two fingers on the screen like you’re turning a dial. VoiceOver will read out each option as you twist around the circle.
Short swipe up or down when you’re on the option you want. Depending on the option, the swipe up or down will increase volume, speaking rate, or whatever else you choose to add to the rotor
Source: iMore
How to add new languages to the rotor VoiceOver
When using the rotor in VoiceOver (twisting two fingers on the screen like turning a dial) you have quick access to VoiceOver options. To quickly change the language, you just twist to Language and swipe up or down.
- Launch Settings from your Home screen.
- Tap Accessibility.
- Tap VoiceOver.
- Tap Speech.
- Tap Add New Language.
Tap the language you want to add.
Source: iMore
How to manage rotor options
- Launch Settings from your Home screen.
- Tap Accessibility.
- Tap VoiceOver.
- Tap Rotor.
Tap each rotor option you’d like made available in the rotor. Tap the options with checkmarks next to them to turn those ones off.
Source: iMore
You can also move each option by tapping and holding the reorder button (looks like three horizontal lines) on each option and dragging it up or down.
How to manage braille input/output options
If you have a Bluetooth braille display, you can easily pair it with your iPhone or iPad so that you can still read using VoiceOver. Here’s how:
- Launch Settings from your Home screen.
- Tap Accessibility.
- Tap VoiceOver.
- Tap Braille.
Tap Output, Input, or Braille Screen Input and then tap an option.
- Braille Display Output:
- Uncontracted Six-dot Braille
- Uncontracted Eight-dot Braille
- Contracted Braille
- Braille Display Input:
- Uncontracted Six-dot Braille
- Uncontracted Eight-dot Braille
- Contracted Braille
- Automatic Braille Translation – tap the switch to turn it on or off
Braille Screen Input:
- Uncontracted Six-dot Braille
- Contracted Braille
Reverse Dot Positions – tap the switch to reverse the positions of dots 1 and 3 and dots 4 and 6
 Source: iMore
 How to enable the braille status cell
The status cell is VoiceOver’s way of providing you with more information about what’s on the screen. You can have up to three separate status cells and choose their location. Status cells will only appear when you have a wireless braille display paired with your device.
- Launch Settings from your Home screen.
- Tap Accessibility.
- Tap VoiceOver.
- Tap Braille.
- Tap Status Cell.
Tap Off, Left, or Right.
Source: iMore How to enable/disable Nemeth Code, the onscreen keyboard, and page turning while panning
- Launch Settings from your Home screen.
- Tap Accessibility.
- Tap VoiceOver.
- Tap Braille.
Tap the switches next to Equations use Nemeth Code, Show Onscreen Keyboard, or Turn Pages when Panning to enable or disable each one.
Source: iMore How to change the Braille translation language
- Launch Settings from your Home screen.
- Tap Accessibility.
- Tap VoiceOver.
- Tap Braille.
- Tap Braille Translation.
Tap a dialect to choose it.
Source: iMore How to change the alert display duration
You can change how long an alert will display on your wireless braille display. Here’s how:
- Launch Settings from your Home screen.
- Tap Accessibility.
- Tap VoiceOver.
- Tap Braille.
- Tap Alert Display Duration.
Tap the plus and minus buttons to increase or decrease how long a notification is displayed.
Source: iMore How to choose a braille display
If you have more than one braille display paired with your iPhone or iPad, you can quickly choose one right from the braille menu.
- Launch Settings from your Home screen.
- Tap Accessibility.
- Tap VoiceOver.
- Tap Braille.
Tap the braille display you want to use. It will appear at the bottom under Choose a Braille Display.
Source: iMore How to enable/disable sound effects, audio ducking, and auto-select speaker
- Launch Settings from your Home screen.
- Tap Accessibility.
- Tap VoiceOver.
- Tap Audio.
Tap the switch next to Mute Sound Effects, Audio Ducking, or Auto-select Speaker in Call to enable/disable each option.
Source: iMore How to change typing style when VoiceOver is on
- Launch Settings from your Home screen.
- Tap Accessibility.
- Tap VoiceOver.
- Tap Typing Style.
- Standard Typing
- Touch Typing
Direct Touch Typing
Source: iMore How to manage phonetic feedback
- Launch Settings from your Home screen.
- Tap Accessibility.
- Tap VoiceOver.
- Tap Phonetic Feedback.
- Off
- Character and Phonetics
Phonetics Only
Source: iMore How to manage typing feedback
You can manage the VoiceOver feedback from both software and hardware keyboards.
- Launch Settings from your Home screen.
- Tap Accessibility.
- Tap VoiceOver.
- Tap Typing Feedback.
Tap an option under Software Keyboards or Hardware Keyboards.
- Nothing
- Characters
- Words
Characters and Words
Source: iMore How to change modifier keys
Modifier keys are the commands that you must press on a hardware keyboard to activate VoiceOver key commands.
- Launch Settings from your Home screen.
- Tap Accessibility.
- Tap VoiceOver.
- Tap Modifier Keys.
Tap either Control + Option or Caps Lock.
Source: iMore How to enable/disable Always Speak Notifications in VoiceOver
If you want VoiceOver to read out your notifications, you can enable the option in the VoiceOver settings.
- Launch Settings from your Home screen.
- Tap Accessibility.
- Tap VoiceOver.
Tap the switch next to Always Speak Notifications. You’ll have to scroll down a bit to find it.
Source: iMore How to change how VoiceOver navigates images
- Launch Settings from your Home screen.
- Tap Accessibility.
- Tap VoiceOver.
- Tap Navigate Images.
- Always
- With descriptions
Never
Source: iMore How to enable/disable the large cursor
- Launch Settings from your Home screen.
- Tap Accessibility.
- Tap VoiceOver.
Tap the switch next to Large Cursor to enable it.
Source: iMore How to change the double-tap timeout
When VoiceOver is enabled, you have to double-tap items instead of single-tapping like you normally would. The time between each tap is the double-tap timeout and if you also have troubles with motor skills, you can lengthen the timeout to give you more time to make that second tap. Here’s how:
- Launch Settings from your Home screen.
- Tap Accessibility.
- Tap VoiceOver.
- Tap Double-tap Timeout. It’s all the way at the bottom.
Tap the plus and minus buttons to increase or decrease the timeout.
Source: iMore Questions?
That’s every setting in VoiceOver on iPhone and iPad. If you have any questions at all, let us know in the comments below!
Источник


