- Android wrap_content and fill_parent example
- 1. wrap_content
- 2. fill_parent – width
- 3. fill_parent – height
- 4. fill_parent – width, height
- Основы верстки для нативных андроид приложений
- FrameLayout
- LinearLayout
- RelativeLayout
- TableLayout
- Alternate Layouts
- Стили
- Android ConstraintLayout explained using a complex UI
- Creating Custom Components in Android
- Step 1: Extend a View
- Step 2: Define Custom Attributes
- Step 3: Create Custom View Layout
- Step 4: Implement Custom View
- Hands-on with Material Components for Android: Selection Controls
- Part 8 of a series covering practical usage of Material Components for Android
- Setting up a Material Components theme for Android
- Attribute by attribute
- Basic usage 🏁
- Setting and listening for checks 👂
- Grouping Selection Controls 👨👩👧👦
- Theming 🎨
- Color
- Typography
- Shape
- More resources 📚
Android wrap_content and fill_parent example
By mkyong | Last updated: August 29, 2012
Viewed: 96,526 (+14 pv/w)
In Android, you always put either “ wrap_content ” or “ fill_parent ” on component’s attribute “ layout_width ” and “ layout_height “, did you wonder what’s the different?
See following definition :
- wrap_content – The component just want to display big enough to enclose its content only.
- fill_parent – The component want to display as big as its parent, and fill in the remaining spaces. (renamed match_parent in API Level 8)
Above terms may not make sense now, let see following demonstration :
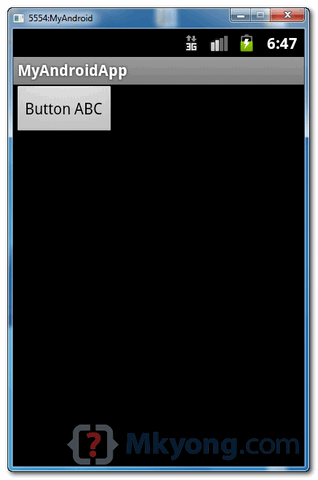
1. wrap_content
A button component, set “ wrap_content ” on both width and height attribute. It tell Android to display the button big enough to enclose it’s content “Button ABC” only.
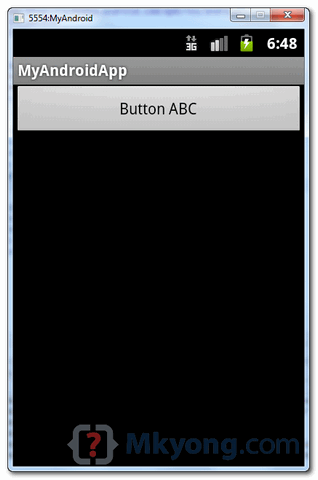
2. fill_parent – width
Change the “ layout_width ” to “ fill_parent “, now, the button’s width will fill in the remaining spaces, just as big as it’s parent “ RelativeLayout “, but button’s height is still big enough to enclose it’s content only.
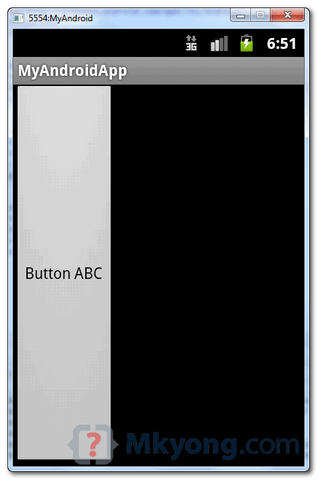
3. fill_parent – height
Change the “ layout_height ” to “ fill_parent “, now, the button’s height will fill in the remaining spaces, just as big as it’s parent “ RelativeLayout “, but button’s width is still big enough to enclose it’s content only.
4. fill_parent – width, height
Change the both “ layout_width ” and “ layout_height ” to “ fill_parent “, the button will display as big as the whole device screen, it just fill in the entire screen space.
Источник
Основы верстки для нативных андроид приложений
( пользоваться не рекомендуется, deprecated )
AbsoluteLayout — означает что каждый элемент верстки будет иметь абсолютную позицию относительно верхнего левого угла экрана задаваемую с помощью координат x и y. Т.е. верхнийлевый угол экрана при AbsoluteLayout имеет координаты x = 0, y = 0.
Позиция указывается в атрибутах элемента android:layout_x и android:layout_y.
Пример кода:

FrameLayout
FrameLayout — тип верстки внутри которого может отображаться только один элемент в строке. Т.е. если внутри FrameLayout вы поместите несколько элементов, то следующий будет отображаться поверх предыдущего.
Пример кода:
LinearLayout
LinearLayout — тип верстки при котором область верстки делится на строки и в каждую строку помещается один элемент. Разбиение может быть вертикальное или горизонтальное, тип разбиения указывается в атрибуте LinearLayout android:orientation. Внутри верстки возможно комбинировать вертикальную и горизонтальную разбивки, а кроме того, возможна комбинация нескольких разных типов верстки например использование LinearLayout внутри FrameLayout.
Пример вертикальной разбивки LinearLayout:
Пример горизонтальной разбивки LinearLayout:
Комбинация нескольких LinearLayout:
RelativeLayout
RelativeLayout — тип верстки при котором позиционирование элементов происходит относительно друг друга и относительно главного контейнера.
За то, каким образом будут позиционироваться элементы отвечают следующие атрибуты:
Атрибуты позиционирования относительно контейнера
- android:layout_alignParentBottom – Низ элемента находится внизу контейнера
- android:layout_alignParentLeft – Левая часть элемента прилегает к левой части контейнера
- android:layout_alignParentRight – Правая часть элемента прилегает к правой части контейнера
- android:layout_alignParentTop – Элемент находится в верхней части контейнера
- android:layout_centerHorizontal – Элемент позиционируется по центру относительно горизонтального размера контейнера
- android:layout_centerInParent – Элемент позиционируется по центру относительно горизонтального и вертикального размеров размера контейнера
- android:layout_centerVertical – Элемент позиционируется по центру относительно вертикального размера контейнера
Атрибуты позиционирования относительно других элементов.
В качестве значений этих атрибутов ставятся id элемента относительно которого будет производится позиционирование.
android:layout_above – Распологает элемент над указанным
android:layout_below – Распологает элемент под указанным
android:layout_toLeftOf – Распологает элемент слева от указанного
android:layout_toRightOf – Распологает элемент справа от указанного
Выравнивание относительно других элементов.
android:layout_alignBaseline – Выравнивает baseline элемента с baseline указаннго элемента
android:layout_alignBottom – Выравнивает низ элемента по низу указанного элемента
android:layout_alignLeft – Выравнивает левый край элемента с левым краем указанного элемента
android:layout_alignRight – Выравнивает правый край элемента с правым краем указанного элемента
android:layout_alignTop – Выравнивает верхнюю часть элемента в соответствие с верхней частью указанного элемента
TableLayout
TableLayout — табличная верстка.
Организует элементы в строки и столбцы таблицы.
Для организации строк служит таг
Alternate Layouts
Alternate Layouts — альтернативная верстка. Позволяет использовать различную верстку для различных ориентаций экрана.
XML для альтернативной верстки помещается в папки проекта:
res/layout-land – альтернативная верстка для landscape UI
res/layout-port –альтернативная верстка для portrait UI
res/lauout-square – альтернативная верстка для square UI
и перед тем как получить макет из res/lauout система проверяет наличие файлов в этих папках.
И в завершении немного о стилях.
Стили
Во первых стили элемента могут быть описаны в атрибутах самого элемента.
Например:
Кроме того стили можно вынести в отдельный xml файл и сохранить его в папке res/values/
Напимер:
Если мы вынесем стили в отдельный файл, то для описания стилей элемента будем использовать атрибут style.
Источник
Android ConstraintLayout explained using a complex UI

ConstraintLayout is introduced to build very complex and responsive UI for your app. Previously for building any complex UI I was using RelativeLayout till I came across this complex UI

Above screenshot is footer of a fragment in the app footer describes login process steps and on which step user is currently. There are three steps to complete login
and user currently on the first step which is to enter the mobile number.
Now take a few minutes and try building above UI using RelativeLayout or any other layout and see how it goes, do let me know in comments if anyone able to build exact using layout other than ConstraintLayout.
Those who are new to ConstraintLayout consider reading following first
First, add gradle dependency to your project.
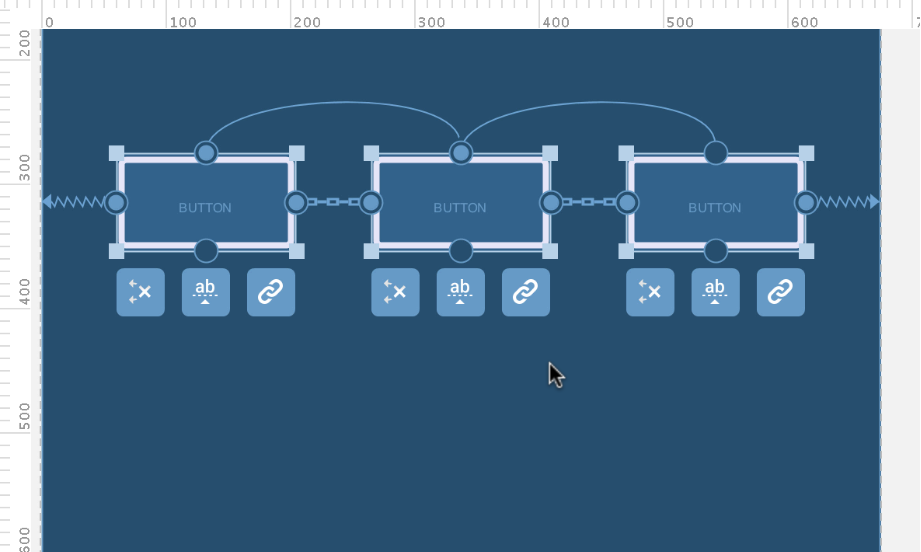
To explain it further let me show you how UI looks in design view in android studio

Building this UI was possible using Guidelines. Guidelines are noting but the virtual view they are not visible as such they can be viewed in design preview and blueprints in the above image you can see I have used two guidelines two dotted lines that can be seen in the center vertically and horizontally are nothing but guidelines.
After adding guideline this is how XML looks
Now app:layout_constraintGuide_percent=”0.5″ this defines where do you want the guideline exactly in my case I wanted in the center so the value is 0.5. Suppose you want to add a text view horizontally exactly after 3/4th width of screen you will add a vertical guideline yes don’t get confuse vertical since we are dividing screen horizontally we will use vertical guideline and guideline will look as below
Hope everyone got an idea about guideline lets get back to the original problem now.
After adding two guidelines one horizontally and one vertically exactly at center let’s add first UI element.
First will add ImageView exactly in the center of guidelines following is code
Following code is for placing ImageView exact in the center with respect to horizontal guideline
and below code to place ImageView exact in the center with respect to vertical guideline
Now to the left and right of this ImageView, we will add dividers as required in UI
Below lines are placing divider exact in the vertical center with respect to ImageView ivotp
Источник
Creating Custom Components in Android

Jul 31, 2017 · 4 min read
Three months ago I decided to switch from web development to mobile development — The Android framework to be precise, so far it’s been an awesome experience. I keep learning new concepts and improving on concepts and skills I have. In my 3 months of building Android apps one important concept I have come to appreciate is the concept of creating custom component.
When building Android applications, w e get to use many views that follow the same pattern. Android comes with some built-in views like TextView, Button, EditText, ListView etc. But there are situations where we might need to manipulate this views to meet our desired output. The Android framework is very robust and it provides means of creating our own custom components which we can customize to suit our needs.
This tutorial will teach you how to create these custom components by building a fictitious app that allows us to buy a particular song by an artist(it contains 2 TextViews and a Button). Note that this components can come handy when you have similar layout(parent or children layouts) — we can reuse this components to avoid excess boilerplate.
Step 1: Extend a View
In this tutorial I will be extending a LinearLayout, and make it very simple to understand. Note that all view classes defined in the Android framework extend View .
StyleableRes Denotes that an integer parameter, field or method return value is expected to be a styleable resource reference. The values of the index variable therefore represent the index number(position) of the components we want to create.
Declare global variables artistText , trackText and buyButton .
We then go ahead to create a constructor for our class to allow the Android framework interact with our view, at a minimum we must provide a constructor that takes a Context and an AttributeSet object as parameters. This constructor allows the layout editor to create and edit an instance of the view. The init() method is called here. I like making my code modular and explicitly so it becomes easy to understand, especially for folks new to Android.
In our init() method we simply inflate the custom_view xml, then insert our attributes in an array, please note that this array is of type int . We use a TypedArray — A container for an array of values that were retrieved with obtainAttributes(AttributeSet, int[]) . Remember to add the recycle() method when done with them. The indices used to retrieve values from this structure correspond to the positions of the attributes given to obtainStyledAttributes. The recycle() method recycles the TypedArray to be re-used by a later call. Also note that after calling this function you must not ever touch the typed array again else it will throw a RuntimeException because the TypedArray has already been recycled.
To make our code cleaner and readable I decided to abstract the initialization of the components into a private method called initComponents() .
Finally we implement the getters and setters for this components which are called in the init() method also for modularity sake.
Step 2: Define Custom Attributes
To add a built-in View to your user interface, you specify it in an XML element and control its appearance and behavior with element attributes. Well-written custom views can also be added and styled via XML. To enable this behavior in your custom view, you must:
- Define custom attributes for your view in a resource element
- Specify values for the attributes in your XML layout
- Retrieve attribute values at runtime
- Apply the retrieved attribute values to your view
Create a attrs.xml file in the values folder and add the following code
Step 3: Create Custom View Layout
See this step as a model/template of how you want your custom components to be like. If we happen not to use the concept of creating custom views we would need to repeat this code for every artist , track and button we have on the application(which doesn’t follow the DRY rule)
Step 4: Implement Custom View
NB: This tutorial is strictly for functionality implementation — don’t expect a beautiful UI. You should get the basic knowledge from here and go ahead to manipulate your UI as you desire.
Click here to download the complete code on GitHub.
Kindly give your feedback on this tutorial by commenting or reach me via twitter on @otoloye.
Источник
Hands-on with Material Components for Android: Selection Controls
Part 8 of a series covering practical usage of Material Components for Android

This post will be covering the features and APIs of Radio Button, Checkbox and Switch components. To find out how to handle initial setup of Material Components for Android (including the Gradle dependency and creating an app theme), please see my original post:
Setting up a Material Components theme for Android
Attribute by attribute
Selection Controls are small components for scenarios in which users need to select options or toggle settings. They are typically found on settings screens and dialogs.
From a design perspective, there are three main types of selection controls which can be used in different scenarios:
- Radio Buttons: A circular control with two possible states; selected or unselected. Has single-select behavior when in a group of other radio buttons (i.e. Only one control can be selected at a time).

- Checkboxes: A square control with two possible states; checked or unchecked. Has multi-select behavior when in a group of other checkboxes (i.e. Multiple controls can be selected at a time).

- Switches: A control consisting of a thumb and a track. Has two possible states; on or off.

Basic usage 🏁
A MaterialRadioButton , MaterialCheckBox or SwitchMaterial can be included in your layout like so:
Setting and listening for checks 👂
All of the selection controls extend from the base CompoundButton class. As such, they inherit a checkable behavior that can be toggled both programmatically and via touch interaction.
A selection control can be programmatically toggled:
Listening for checked/unchecked state changes is done like so:
Grouping Selection Controls 👨👩👧👦
Selection controls are commonly used in groups. Strictly speaking, any ViewGroup can be used to achieve this (eg. a RecyclerView ). That being said, the RadioGroup class exists to specifically handle single-select behavior for MaterialRadioButton s.

MaterialRadioButton s can be grouped with a RadioGroup like so:
A number of APIs exist for programmatically setting, getting and listening for changes to child MaterialRadioButton checked/unchecked state:
Theming 🎨
Selection controls can be themed in terms of the three Material Theming subsystems: color, typography and shape. When implementing global custom MaterialRadioButton , MaterialCheckBox and SwitchMaterial styles, reference them in your app theme with the radioButtonStyle , checkboxStyle and switchStyle attributes respectively.
Color
The color of selection controls defaults to colorOnSurface (unchecked) and colorControlActivated i.e. colorSecondary (checked) defined in your app theme. In order to override this on a per-control level, you will need to either:
- Use a theme overlay with the above-mentioned color attributes present, applied to the widget with the android:theme attribute.
- Set the useMaterialThemeColors attribute to false and apply a custom tint ColorStateList using CompoundButtonCompat#setButtonTintList .

Typography
The text labels of the selection controls will adopt the fontFamily attribute defined in your app theme. In order to override this in a style or on a per-control level, use the android:textAppearance attribute.

Shape
There are no aspects of any of the selection controls that can be adjusted with shape theming.
More resources 📚
- The source code for the Playground app used in this article can be found on GitHub.
- Selection Controls Design Documentation
- Radio Button API Documentation
- Checkbox API Documentation
- Switch API Documentation
I hope this post has provided some insight into radio buttons, checkboxes and switches and how they can be used in your Android app(s). If you have any questions, thoughts or suggestions then I’d love to hear from you!
Источник


