- Xmlns: android, как это работает?
- Работа с XML в Android
- Шаг 1.
- Шаг 2.
- Шаг 3.
- Шаг 4.
- Programming VIP
- Namespaces for XML in Android
- Namespace
- Common Namespaces in Android
- 1,android
- 2,tools
- 2.1. tools only works at the development stage
- 2.2. Viewing Activity Layout Effect in tools:context Development
- 2.3. Viewing fragment layout effect in tools:layout development
- 3. Customizing Namespaces
- Inheriting View Class
- Drawing Views
- Use custom layout
- Custom Properties
- Parsing attributes
- Use custom properties
- summary
- Processing and Parsing XML in Android
- What is XML?
- XML elements
- XML Parsing
- Steps involved in XML parsing
- XML parsing example
- Conclusion
Xmlns: android, как это работает?
Рассмотрим следующий отлично сформированный файл макета на android:
Я посмотрел на это и полюбил этот ULR: http://schemas.android.com/apk/res/android . Итак, я попытался ввести его в адресную строку веб-браузера, а также попытался получить его через CURL, но оба метода показали, что он фактически не существует. Я искал что-то похожее на каталог apk / res / android в папке android-sdk на моей локальной машине, но этот поиск тоже не появился. Итак, я понял, что этот ресурс на самом деле не существует, возможно, что я могу изменить строку xmlns: android на все, что захочу. Я пошел вперед и изменил его на
А затем попытался перекомпилировать мой проект. Я получил этот результат:
Это меня смущает. Если ресурс не существует в любом случае, то какое это имеет значение, если я изменил значение xmlns: android на какой-то другой несуществующий ресурс? И если это действительно существует, то где это?
xmlns:android=»http://schemas.android.com/apk/res/android» объявляет префикс пространства имен XML. xmlns указывает, что речь идет о объявлении пространства имен. android – префикс. http://schemas.android.com/apk/res/android – это URI – строка, которая однозначно определяет, к какому пространству имен относится. URI может быть чем-то абстрактным (как в данном случае); Это не обязательно URL-адрес, который физически находит что-то.
В общем, вы можете выбрать фактический префикс. Вы, скорее всего, замените android чем-то другим, и он все равно будет работать.
Так что на самом деле этот атрибут означает «Нам нужно работать с узлами из пространства имен http://schemas.android.com/apk/res/android здесь, и в этом файле мы будем ссылаться на это пространство имен как на android ,
Если в нескольких файлах вы определяете разные префиксы пространства имен, используя один и тот же URI, все эти файлы будут ссылаться на одно и то же пространство имен – потому что URI один и тот же. Префикс можно увидеть как сокращенное обозначение для обращения к фактическому пространству имен. Префикс может использоваться только внутри файла, который его определяет.
Это не ресурс, это просто URI . Обычно процессы, которые работают с XML-файлами, ожидают определенное пространство имен XML. Когда вы используете свое пространство имен, это как если бы вы переименовали атрибуты в нечто другое. И поэтому инструменты, которые работают с ними, больше не распознают их.
Источник
Работа с XML в Android

Очень часто приходится хранить информацию форм и для этого можно использовать xml файлы. В данном уроке мы это и рассмотрим, как можно работать с файлами XML.
Библиотеки Android имеют набор классов для работы с XML-документами с произвольной структурой и содержанием.
Шаг 1.
Для того чтобы упаковать статический XML файл вместе с вашим приложением, вам нужно поместить его в папку: res/xml/
В каталоге res/ создайте подкаталог xml/ в котором будет располагаться наш ХМL-файл.
После чего вы получите возможность обращаться в коде программы к этому документу.
Шаг 2.
Рассмотрим загрузку XML-документа произвольной структуры из ресурсов в код программы.
Создадим приложения, которое будет уметь способность читать список имен, фамилий и телефонов, определенных в XML-файле.
Теперь создадим XML файл который будет хранить Имена, Фамилии и номера телефонов сотрудников фирмы и сохраним его в res/xml/ под именем contacts.xml.
Вот как будут выглядеть XML файл contacts.xml
Шаг 3.
Создадим View состоять она будет с LinearLayout и ListView и назовем main.xml:
Шаг 4.
Загружаем файл contacts.xml, созданный ранее:
Метод getXml() возвращает XmlPullParser, используя который можно прочитать загруженный XML-документ в цикле while:
В конечном итоге ваше приложение должно выглядеть так:
 Весь код MyActivity:
Обратите внимание что наследуется MyActivity не от Activity а от ListActivity.
Источник
Programming VIP
Very Interesting Programming
Namespaces for XML in Android
Introduction to basic concepts
Namespace
XML namespaces provide a way to avoid element naming conflicts.
For example, there is a student named Lin Xiaoming in School A and a student named Lin Xiaoming in School B. How can we identify these two students with the same name? Namespace will come in handy at this time. A and B can then be considered namespaces. In other words, the namespace contains a collection of specific attributes.
Common Namespaces in Android
The following sections introduce android, tools, and app (custom namespaces), which are common namespaces.
1,android
xmlns:android=»http://schemas.android.com/apk/res/android»
In the Android layout file, we all have to define such a namespace on the root element. Next, we will explain this line of code one by one.
xmlns: xml namespace, declaring that we are going to start defining a namespace
The string in which android is located, which we call namespace-prefix, actually means giving the namespace a name.
http://schemas.android.com/apk/res/android This looks like a URL, but this address is not accessible. In fact, this is a URI (Unified Resource Identifier), so its value is fixed, equivalent to a constant.
With him, you will be prompted to enter something, which can also be understood as a grammar file.
So what does this line of code do? The attributes in the namespace that we write in the code for the root element can be referenced, such as:
In this layout, as long as the attribute begins with android: it refers to the attribute in the namespace. As mentioned above, Android gives the namespace a name, just like we usually define variables, so the name can also be taken as our favorite. For example, if I take it as myns, then the code above We can also write as follows:
2,tools
Next, I will introduce three ways to use tools, which are also his characteristics.
2.1. tools only works at the development stage
We can think of him as a tool namespace, a tool to help developers. It only works at the development stage. When an app is packaged, all tools attributes will be discarded!
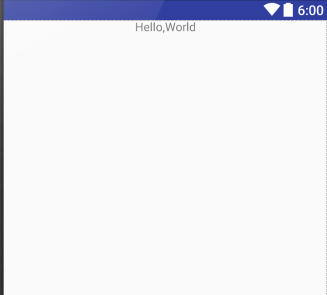
For example, basically in the android namespace, we want to test the effect of a component on the screen at the coding stage, and when app is installed on the phone, discard this code, then we can replace android with tools namespace:
This is the layout in the layout. When we switch to the view window (Design), we see that the top of the label is centered.
Then, when we run it on our mobile phone, it’s like this:
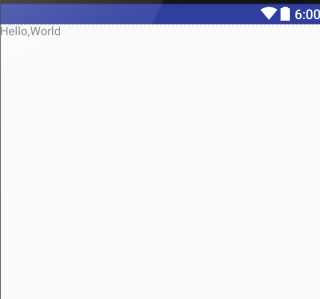
As shown above, tools:layoutgravity= «center» is indeed abandoned behind the runtime!
2.2. Viewing Activity Layout Effect in tools:context Development
The use of context is followed by the full package name of an Activty. What does it do?
When we set an Activity theme, it is set in AndroidManifest.xml, and the effect of the theme can only be displayed in Activty after running. With the help of context attribute, we can see the effect of the theme set in Activity in the layout in the development stage.
tools:context=»com.littlehan.myapplication.MainActivity»
By adding this line of code to the layout, you can see the effect of binding the theme to MainActivity in the design view.
2.3. Viewing fragment layout effect in tools:layout development
When we load a fragment on Activity, we need to see the effect after loading after running. Is there a way to display it in the layout preview window during the testing phase? The answer is yes, with the help of the layout attribute, for example,
Add such a line of code to the layout:
tools:layout=@layout/yourfragmentlayoutname
In this way, your fragment layout will be previewed on the specified main layout.
3. Customizing Namespaces
If you use DataBinding, you will use the app attribute in xml, which is actually a custom namespace.
Some friends may ask, where is the reflection of self-definition?
In fact, it can also be written as follows:
xmlns:app=»http://schemas.android.com/apk/res/ Complete package name»
Just fill in our package name after res/ However, in my own Android Studio 2.0, this is not recommended, so it is more recommended that you use the first naming method.
Usually custom namespaces are inseparable from custom views. When Android’s own controls can’t meet our needs, we will draw some views ourselves. When we add custom attributes to these customized views, we need to create our own namespaces.
As I said at the beginning, the namespace contains a collection of specific attributes, so the idea is clear, that is to say, the actual process of customizing a namespace is to customize attributes.
We learn about custom namespaces through a simple custom TextView. The process of customizing the View can be divided into the following steps:
Inheriting View Class
Create a class named CustomTextView Inheritance View
(View is the parent class of all views) and implements its three constructions
Drawing Views
Overload the onDraw() method to draw a paragraph of text
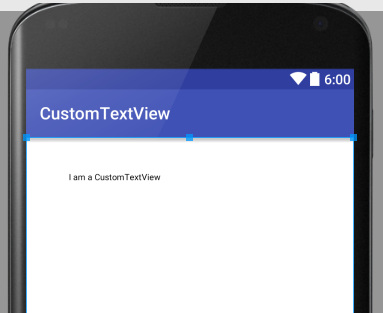
Use custom layout
Introducing custom controls into layout
Here, a custom control is introduced into the layout, and we can switch to the view window to see the effect.
But this custom control can not change the font color, font size, custom text and so on in xml. The implementation of this function is actually the process of creating custom attributes in XML and parsing attributes in custom View s.
Custom Properties
Create a new xml file named attrs under the values root directory to customize our attributes (the attributes defined here are the attributes in our custom namespace)
Name defines the name of an attribute
format defines the type of attribute
Parsing attributes
Resolve these attributes in CustomeTextView
Use custom properties
To use custom attributes, you need to customize the attribute namespace by inserting such a line of code under the root element of the layout file:
xmlns:app=»http://schemas.android.com/apk/res-auto»
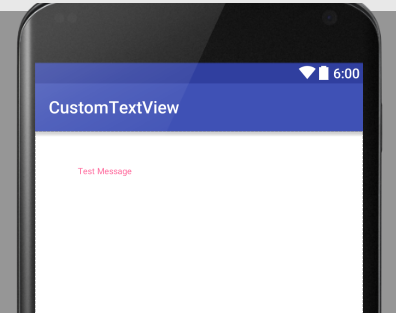
So we can use custom attributes:
Switch to the view preview window and you can see that the custom properties are in effect:
summary
In Android, namespaces can be divided into three categories:
Among them, the attributes in 1 and 2 namespaces are encapsulated by the system, and the attributes in the third namespace are user-defined.
Added by vijayfreaks on Thu, 18 Jul 2019 04:11:20 +0300
Источник
Processing and Parsing XML in Android
Sharing data over the internet is very popular. We share our information with the other users over the internet. Let’s take a very common example, since we all are developers and to be more precise, we all are Android Developers and we all must have visited the StackOverflow website whenever we are stuck into some problem in our projects and in every 99 out of 100 cases, we find the solution to our problem. The answer that we get from the StackOverflow website consists of various parts that we are less bothered about. In general, the answers or the questions present on the website contains the id of the question, type of the question, author name of the article or question, publishing data, URL and many other things are there on the website. But we want only meaningful data i.e. we want answers and the authors and nothing else.
The problem arises when you want to access the data of a particular website in your Android Application. This is because the data present on the websites are in JSON format or in XML format. So, in order to use that data or to extract the meaningful information from that data, you have to parse that XML file or a JSON file.
So, in this blog, we will learn how to process and parse the XML data in Android. So, let’s get started.
What is XML?
XML stands for Extensible Markup Language. It is a set of rules that are used to encode data or documents in a Machine-readable language. There are many websites that use an XML format to share data on the internet. For example, many blogging websites use an XML format to share data between users. So, XML parsing and processing become an important task to use that data in our Android Application.
XML elements
In general, an XML file consists of a number of elements that together make an XML file. They are the basic building blocks of XML document. These elements are used to store some text elements, attributes, media, etc. Below is the syntax of XML element:
Here, element-name is the name of the element and attributes are used to define the property of XML element. Following is an example of an XML document that is used to describe the data of the student:
We can broadly divide the XML elements in four parts:
- Prolog: It is the first line that contains the information about the XML file i.e. it is the first line of the XML file.
- Events: An XML file contains a number of events like document start, document end, Tag start, Tag end, etc.
- Text: In between the tags(opening and closing), there can be some text. For example, in the above example, “John” is the text.
- Attributes: These are the properties of XML elements.
XML Parsing
So, we have seen the introduction of XML and our next task is, How to parse the XML in Android? So, let’s find out.In Android, there are various parsers that can be used to parse the XML file in Android. Some of these are:
- XMLPullParser
- DOM Parser
- SAX Parser
Among these three parsers, XMLPullParser is the most commonly and most widely used parsers in Android. This is because XMLPullParser is very efficient and easy to use. Also, unlike the DOM Parser which loads the whole file in the memory and then parses it, the XMLPullParser consumes less memory.
Steps involved in XML parsing
Following are the steps that are involved in XML parsing:
- Analyze the feed: There are many cases when you will be provided with a number of data but you need only few of them. SO, before parsing the XML, your first step should be to find the desired element in the XML data. For example, here is example of XML file of StackOverflow:
Here, if you want to extract the data present in the entry tag and the data of its sub tags then you should keep note of these things.
- Create XMLPullParser object: Our next step is to create the object of XMLPullParser and specify the file name for the XMLPullParser that contains XML. You can use a file or a stream. Following is the code to create an object of the XMLPullParser and then passing the file name for the XMLPullParser:
- Read the desired data: Our last step is to parse the data of the XML file. The following readFeed() function is used to parse the XML file and extract only the values of entries and store it into a list:
Here, XMLPullParser.END_TAG is used to find if the parser has reached to the last tag of the file or not. If it has reached then return and it has not reached then we will check for the entry tag and if found then will add the value to the entries list. If the values are not found be to of entries type then we can skip the parser. At last, we return entries.
Following are the methods that can be used while parsing an XML file:
- getEventType(): This method is used to get the event type. For example, Document start, Document End, Tag start, Tag end, etc.
- getName(): This is used to get the tag name in a file. For example, in the above code, the tag name is entry.
- getAttributeValue(): This method is used to get the attribute value of a particular tag.
- getAttributeCount(): It returns the total number of attributes of the current tag.
- getAttributeName(int index): It returns the attribute name at a particular index.
- getColumnNumber(): It returns the current column number using a 0 based indexing.
- getName(): It returns the name of the tag.
- getText(): It returns the text present in a particular element.
XML parsing example
Now, let’s do one example to understand the concept of XML parsing ina very easy and clear manner.
Open Android Studio and create a project with Empty Activity template.
The very first step is to create the XML file. Either you create your own XML file or you can use mine. To create an XML file, go to java folder and then right click on it. Then click on New > Folder > Assets folder and then OK. One assets folder will be created for you. Now right click on that folder and create a file and name it as example.xml. Following is the XML content of example.xml file:
This is a simple example of student data containing the name, surname, mobile and section of the student. In this example, we will extract the name, surname and section of the student. We will ignore the mobile number.
Now, let’s code for the UI part of our application. Here we will display the desired data on a TextView. So, open the activity_main.xml file and add the below code:
So, we are done with the UI part. Now, let’s write the code for the XML parsing. Below is the code for the MainActivity.kt file:
Now, run the application on your mobile phone and try to add more data to your XML file i.e. the example.xml file.
Conclusion
In this blog, we learned about XML parsing in Android. We learned how to parse the data present in the XML format in Android Application. We saw how to use XMLPullParser to do XML parsing. At last, we did one example of XML parsing. You can get more contents about XML parsing at the Android Developer Website.
Источник


