- Forgot Your iPhone Passcode? Here’s How to Fix It
- Can’t remember that passcode? We’ve got your iPhone fix
- Fix a Forgotten Passcode By Erasing Your iPhone
- The Three Ways to Fix a Forgotten iPhone Passcode
- What to Do After Erasing Your iPhone
- What If You Forgot a Restrictions or Screen Time Passcode?
- The Bottom Line About Forgetting an iPhone Passcode
- If you forgot your iPhone passcode
- Step 1: Make sure that you have a computer (Mac or PC)
- Step 2: Turn off your iPhone
- Step 3: Put your iPhone in recovery mode
- Step 4: Restore your iPhone
- Need more help?
- If you forgot your iPod touch passcode
- Step 1: Make sure that you have a computer (Mac or PC)
- Step 2: Turn off your iPod touch
- Step 3: Put your iPod touch in recovery mode
- Step 4: Restore your iPod touch
- Need more help?
Forgot Your iPhone Passcode? Here’s How to Fix It
Can’t remember that passcode? We’ve got your iPhone fix
:max_bytes(150000):strip_icc()/SamCostello-d7fcf106ec2048ccb06d1e2190b3396d.jpg)
The iPhone’s passcode feature is a crucial way to keep prying eyes out of your data, but what if you forgot your iPhone passcode?
If you forget your passcode and enter the wrong one six times, your iPhone will tell you it has been disabled. Depending on your settings, entering the wrong passcode too many times could cause your iPhone to delete all its data. You don’t want that!
Whether you’ve gotten this message or know you’ve forgotten your iPhone passcode, follow these steps to regain access to your iPhone.
These directions work on all iPhone models. Although this article focuses on the iPhone, the steps also apply to the iPod touch and iPad.
Fix a Forgotten Passcode By Erasing Your iPhone
There’s only one way to fix it when you forget your iPhone passcode. You may not like it, but you have to erase all the data on your iPhone and restore it from backup (assuming you have a backup, that is).
Erasing all data from your iPhone also erases the passcode that you forgot and lets you set up the phone again with a new passcode. It may seem extreme, but it makes sense from a security perspective. If your iPhone was stolen, you wouldn’t want it to be easy to bypass the passcode and access your data.
The problem, of course, is that this approach erases all of the data on your iPhone. This scenario isn’t a problem if you have a recent backup of that data to restore onto your phone (this is a good reminder: make regular backups of the data on your iPhone!). But if you don’t, you will lose anything added to your phone between when you last synced with iCloud or iTunes and when you restore it.
The Three Ways to Fix a Forgotten iPhone Passcode
There are three ways you can erase the data from your iPhone, remove the passcode, and start fresh: using iTunes, iCloud, or Recovery Mode.
- iTunes: If you have physical access to your iPhone, sync it regularly with a computer, and have that computer nearby, this may be the easiest option.
:max_bytes(150000):strip_icc()/001_fix-forget-your-iphone-passcode-2000279-5c05763a46e0fb0001a54954.jpg)
- iCloud: If you’ve enabled Find My iPhone on your device, you can use iCloud to erase your iPhone. Use this option if you don’t have access to the phone or sync your phone with iCloud and not iTunes.
:max_bytes(150000):strip_icc()/002_fix-forget-your-iphone-passcode-2000279-5c05765046e0fb000155ca92.jpg)
- Recovery Mode:Putting your iPhone into Recovery Mode is your only option if you’ve never synced your phone with iTunes or iCloud. In that case, you probably won’t have your data backed up and will lose what’s on your phone. That’s not good, but at least you’ll be able to use your phone again.
What to Do After Erasing Your iPhone
No matter which of these options you use, you’ll end up with an iPhone that’s in the state it was when you first took it out of the box. You’ve got three options for your next step:
- Set up your iPhone from scratch: Choose this if you want to start completely fresh with your iPhone and don’t want to restore any data (or don’t have any to restore).
- Restore your iPhone from backup: This is best if you have a backup of your data, either on iTunes or iCloud and want to put it back onto your phone.
- Redownload your iPhone content: Even if you didn’t have a backup, you can redownload virtually anything you’ve bought from the iTunes, App, and Apple Books Stores to your device.
Then, set up a new passcode on your iPhone—and make sure it’s one you can remember!
In some cases, you may run into a problem restoring your iPhone that prevents you from completing the process. If you encounter this problem, learn how to solve it in How to Fix iPhone Error 4013.
What If You Forgot a Restrictions or Screen Time Passcode?
There’s one other kind of passcode you may have on your iOS device: the passcode that protects iOS Restrictions or Screen Time.
This passcode allows parents or IT administrators to block certain apps or features and prevents anyone who doesn’t know the passcode from changing those settings. But what if you’re the parent or administrator and you forget the passcode?
In that case, the options mentioned earlier for erasing and restoring from backup will work. If you don’t want to do that, third-party programs can help you bypass this passcode and regain access to your device. We haven’t tested all of the options out there, so some research at your favorite search engine is your best bet for finding a tool that can help.
The Bottom Line About Forgetting an iPhone Passcode
The iPhone’s passcode feature being strong is good for security but bad if you forget your passcode. Don’t let a forgotten passcode now stop you from using a passcode in the future; it’s too crucial to security. Just make sure that next time you use a passcode that will be easier for you to remember (but not too easy to guess!)
Источник
If you forgot your iPhone passcode
Forgot your iPhone passcode? Learn how to get your iPhone into recovery mode so you can erase it and set it up again.
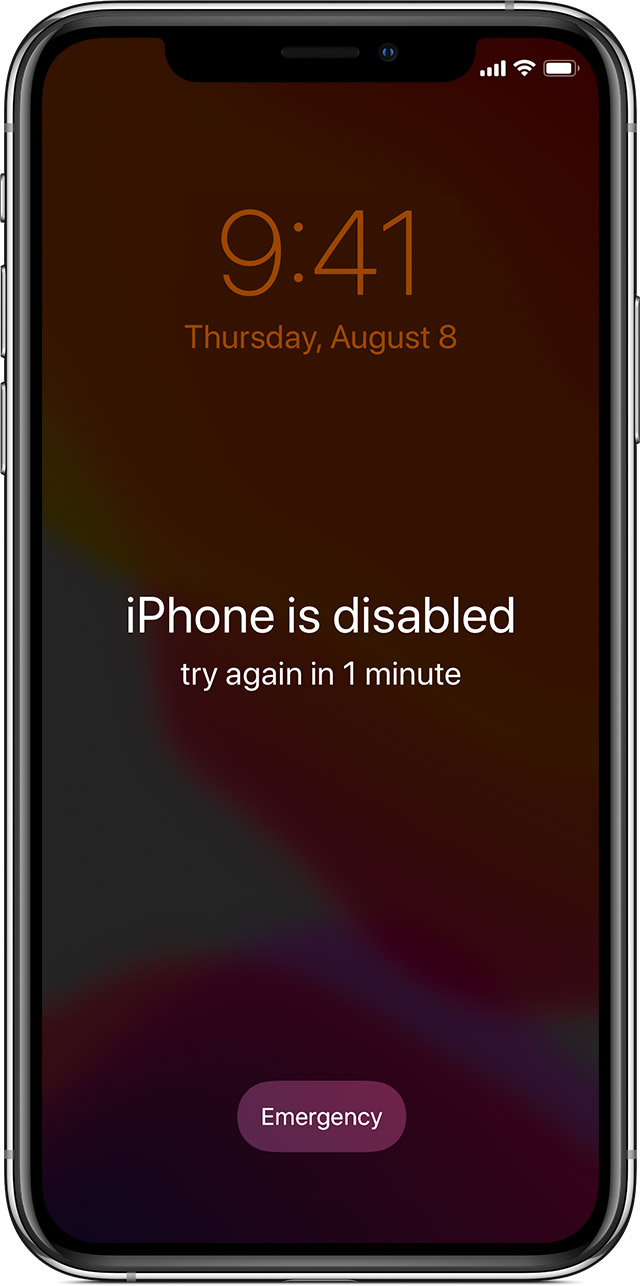
If you enter the wrong passcode on your iPhone Lock Screen too many times, an alert lets you know that your iPhone is disabled. If you can’t remember your passcode when you try again, you need to use a computer to put your iPhone in recovery mode. This process deletes your data and settings, including your passcode, giving you access to set up your iPhone again.
After you erase your iPhone, you can restore your data and settings from backup. If you didn’t back up your iPhone, you can set it up as a new device and then download any data that you have in iCloud.
![]()
Step 1: Make sure that you have a computer (Mac or PC)
This process requires a Mac or PC. If you’re using a PC, make sure that it has Windows 8 or later, and that iTunes is installed. You also need the cable that came with your iPhone, or another compatible cable, to connect your iPhone to the computer.
If you don’t have a computer and you can’t borrow one, you need to go to an Apple Retail Store or Apple Authorized Service Provider for help.

Step 2: Turn off your iPhone
- Unplug your iPhone from the computer if it’s connected.
- Turn off your iPhone using the method for your iPhone model:
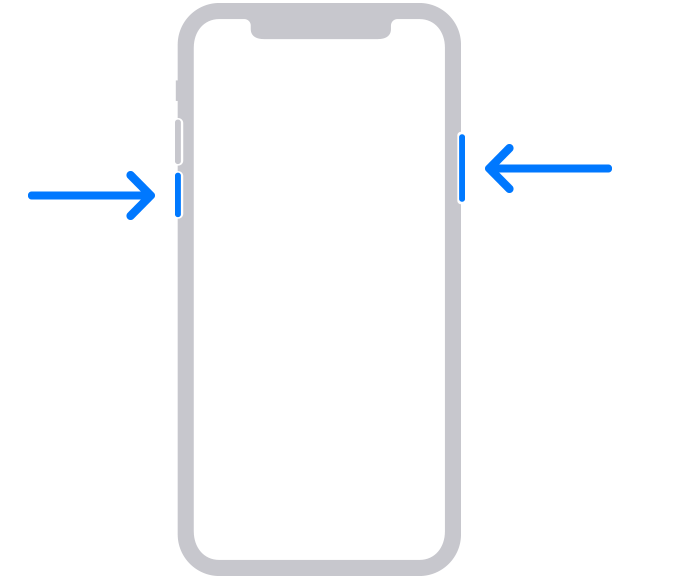
- iPhone X or later, iPhone SE (2nd generation), iPhone 8, and iPhone 8 Plus: Press and hold both the Side button and the Volume down button until the power off slider appears.

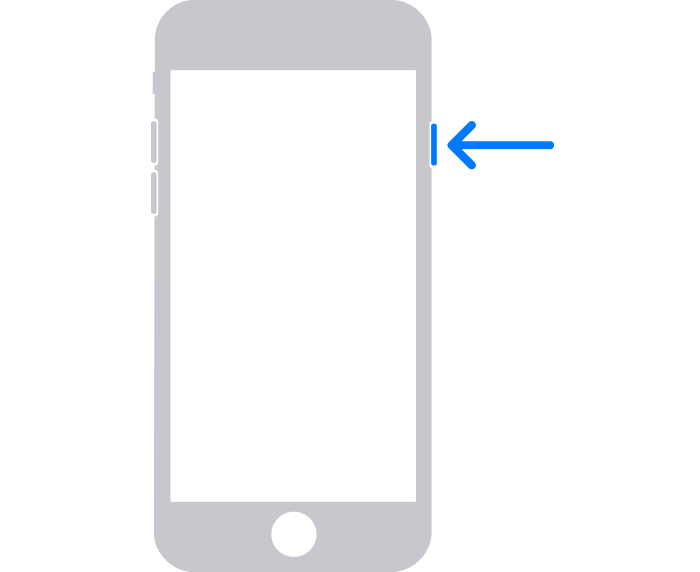
- iPhone 7 and iPhone 7 Plus: Press and hold the Side button until the power off slider appears.
- iPhone SE (1st generation), and iPhone 6s and earlier: Press and hold the Side (or Top) button until the power off slider appears.
- iPhone X or later, iPhone SE (2nd generation), iPhone 8, and iPhone 8 Plus: Press and hold both the Side button and the Volume down button until the power off slider appears.
- Drag the slider to turn off your iPhone, then wait a minute to make sure that it turns off completely.

Step 3: Put your iPhone in recovery mode
- Get ready by finding the button on your iPhone that you’ll need to hold in the next step:
- iPhone X or later, iPhone SE (2nd generation), iPhone 8, and iPhone 8 Plus use the Side button.
- iPhone 7 and iPhone 7 Plus use the Volume down button.
- iPhone SE (1st generation), and iPhone 6s and earlier use the Home button.
- Press and hold the correct button for your iPhone while immediately connecting your iPhone to the computer. Don’t let go of the button.
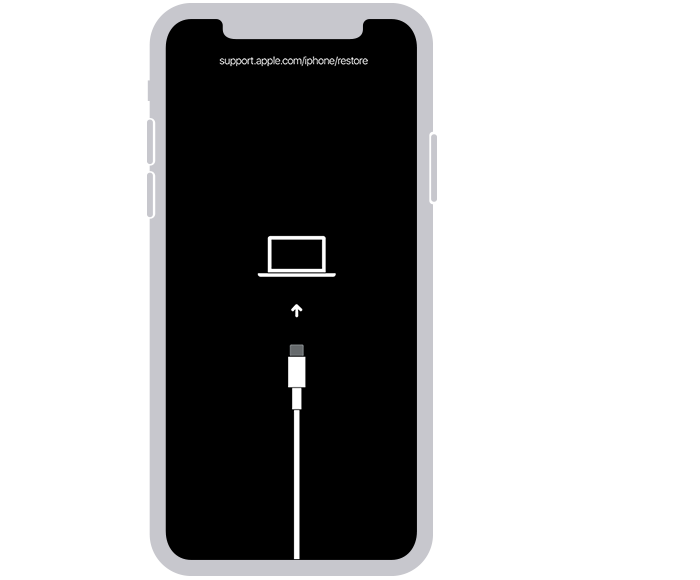
- Keep holding the button until you see the recovery mode screen on your iPhone, then let go.
If you see the passcode screen, you need to turn off your iPhone and start again.
If you can’t get your iPhone to show the recovery mode screen and you need help, contact Apple Support.
Step 4: Restore your iPhone
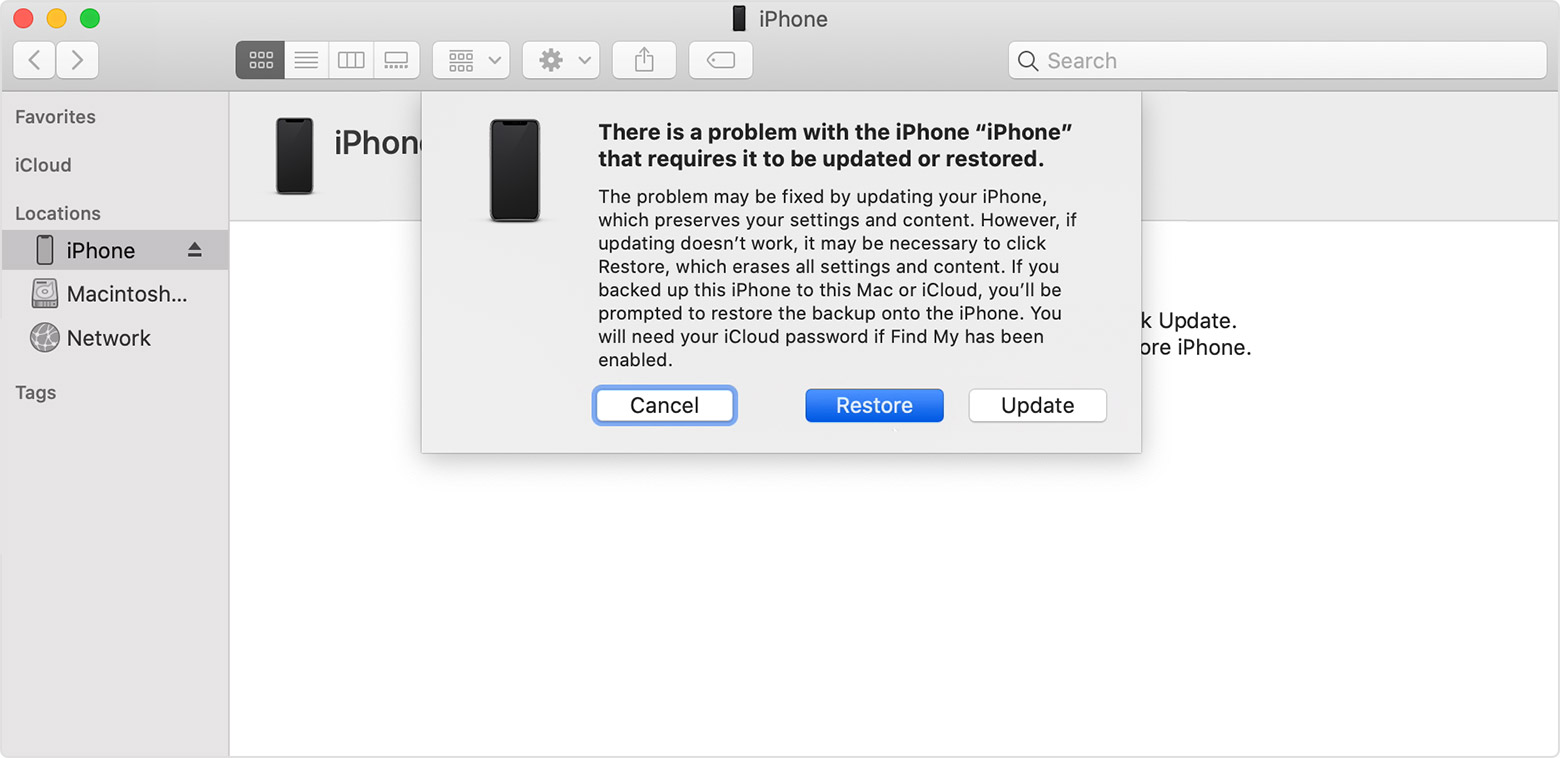
- Locate your iPhone in the Finder or in iTunes on the computer that it’s connected to. (Learn how to find your connected iPhone.)
- Choose Restore when you see the option to Restore or Update. Your computer downloads software for your iPhone and begins the restore process. If the download takes more than 15 minutes and your device exits the recovery mode screen, let the download finish, then turn off your iPhone and start again.
- Wait for the process to finish.
- Disconnect your iPhone from the computer, then set up and use your iPhone.
Need more help?
If you can’t complete any of these steps, if you’re still prompted for a passcode, or if you need any other assistance, contact Apple Support.
Источник
If you forgot your iPod touch passcode
Forgot your iPod touch passcode? Learn how to get your iPod touch into recovery mode so you can erase it and set it up again.
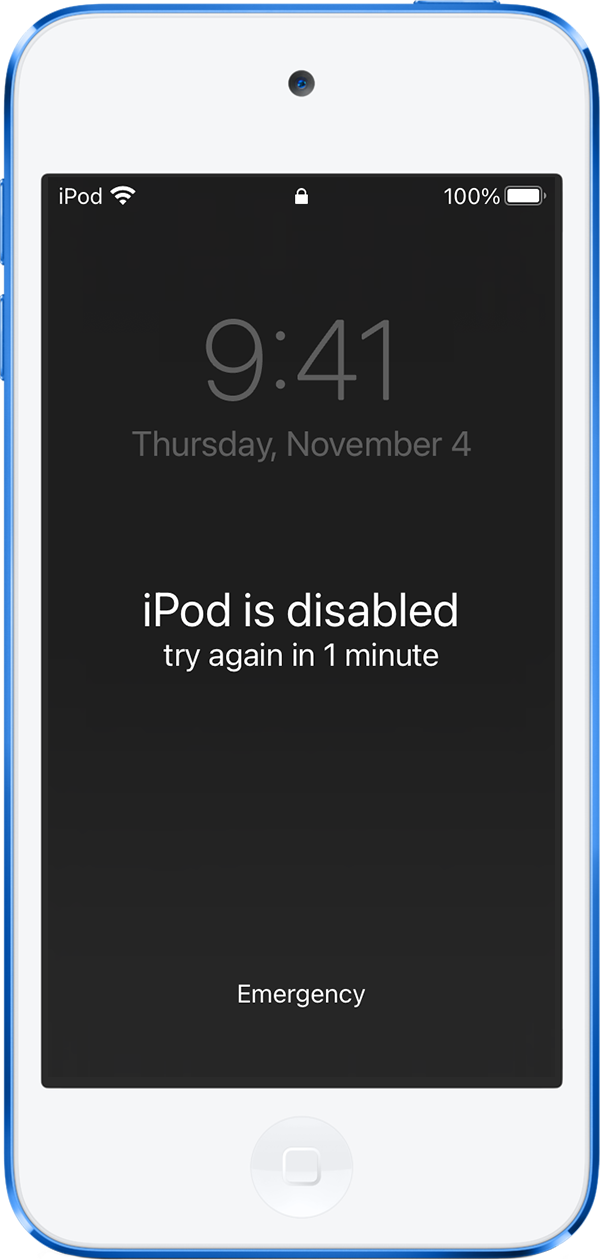
If you enter the wrong passcode on your iPod touch Lock Screen too many times, an alert lets you know that your iPod touch is disabled. If you can’t remember your passcode when you try again, you need to use a computer to put your iPod touch in recovery mode. This process deletes your data and settings, including your passcode, giving you access to set up your iPod touch again.
After you erase your iPod touch, you can restore your data and settings from backup. If you didn’t back up your iPod touch, you can set it up as a new device and then download any data that you have in iCloud.
![]()
Step 1: Make sure that you have a computer (Mac or PC)
This process requires a Mac or PC. If you’re using a PC, make sure that it has Windows 8 or later, and that iTunes is installed. You also need the cable that came with your iPod touch, or another compatible cable, to connect your iPod touch to the computer.
If you don’t have a computer and you can’t borrow one, you need to go to an Apple Retail Store or Apple Authorized Service Provider for help.
Step 2: Turn off your iPod touch
- Unplug your iPod touch from the computer if it’s connected.
- Press and hold the Top button until the power off slider appears.
- Drag the slider to turn off your iPod touch, then wait a minute to make sure that it turns off completely.
Step 3: Put your iPod touch in recovery mode
- Get ready by finding the button on your iPod touch that you’ll need to hold in the next step:
- iPod touch (7th generation) uses the volume down button.
- iPod touch (6th generation and earlier) use the Home button.
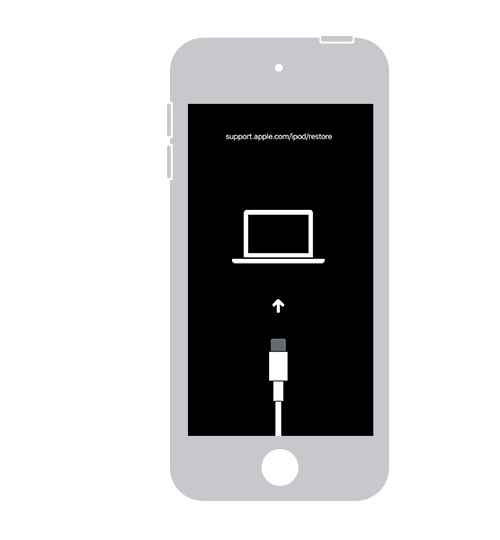
- Press and hold the correct button for your iPod touch while immediately connecting your iPod touch to the computer. Don’t let go of the button.
- Keep holding the button until you see the recovery mode screen on your iPod touch, then let go.
If you see the passcode screen, you need to turn off your iPod touch and start again.
If you can’t get your iPod touch to show the recovery mode screen and you need help, contact Apple Support.
Step 4: Restore your iPod touch
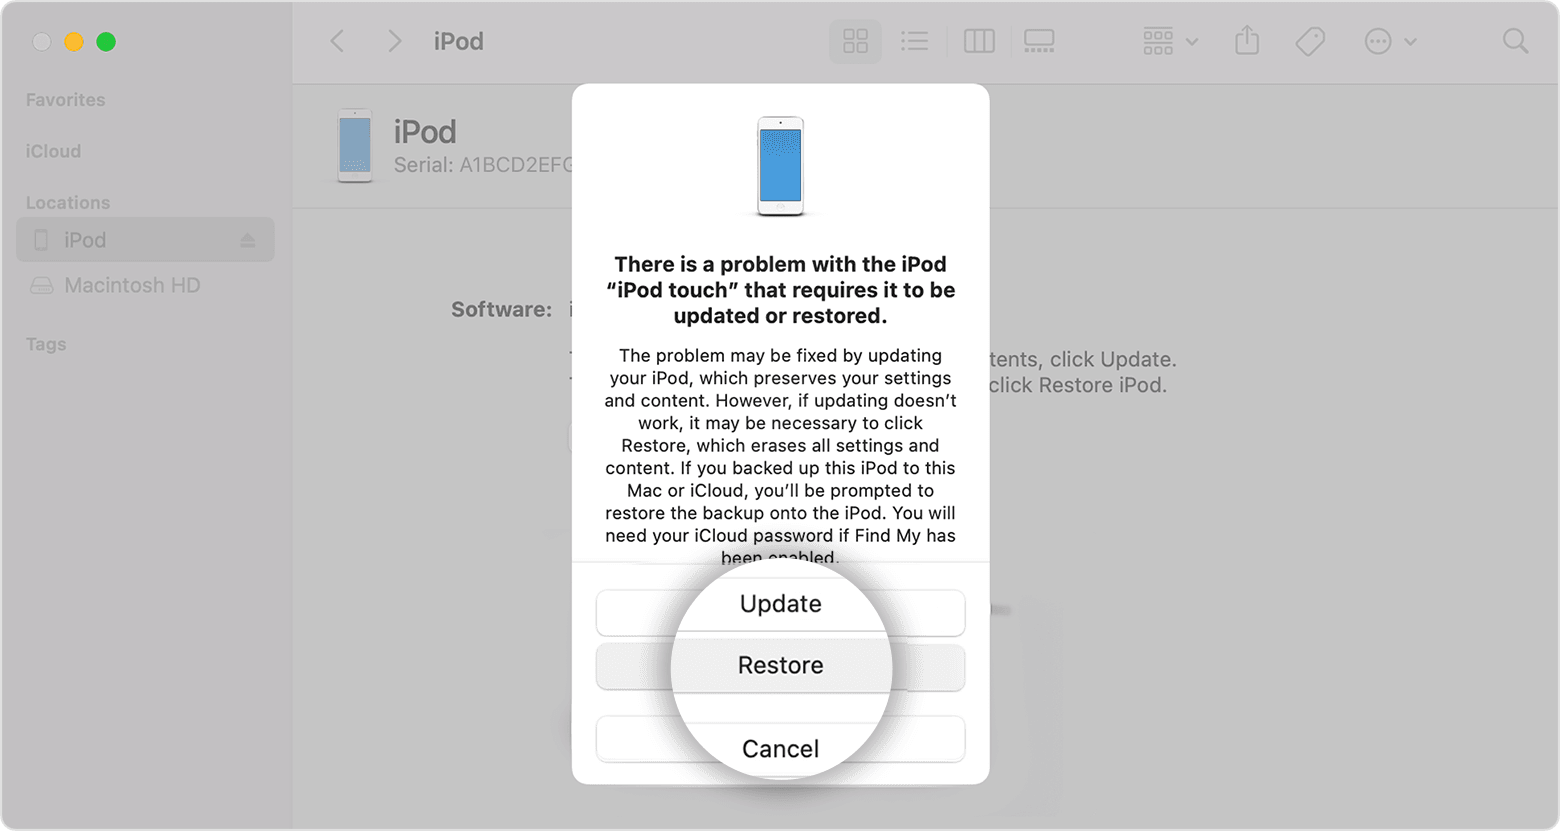
- Locate your iPod touch in the Finder or in iTunes on the computer that it’s connected to. (Learn how to find your connected iPod touch.)
- Choose Restore when you see the option to Restore or Update. Your computer downloads software for your iPod touch and begins the restore process. If the download takes more than 15 minutes and your device exits the recovery mode screen, let the download finish, then turn off your iPod touch and start again.
- Wait for the process to finish.
- Disconnect your iPod touch from the computer, then set up and use your iPod touch.
Need more help?
If you can’t complete any of these steps, if you’re still prompted for a passcode, or if you need any other assistance, contact Apple Support.
Источник


