- Основы верстки для нативных андроид приложений
- FrameLayout
- LinearLayout
- RelativeLayout
- TableLayout
- Alternate Layouts
- Стили
- Creating Dynamic Layouts in Android
- What are Dynamic Layouts?
- Why do we need them?
- Where do Dynamic Layouts excel?
- Know Your Layouts in Android
- XML-Based Layouts in Android
- The Benefits of XML-Based Layouts
- Standard Layouts in Android
- Absolute Layout
- Frame Layout
- Linear Layout
- Relative Layout
- Table Layout
- Conclusion
Основы верстки для нативных андроид приложений
( пользоваться не рекомендуется, deprecated )
AbsoluteLayout — означает что каждый элемент верстки будет иметь абсолютную позицию относительно верхнего левого угла экрана задаваемую с помощью координат x и y. Т.е. верхнийлевый угол экрана при AbsoluteLayout имеет координаты x = 0, y = 0.
Позиция указывается в атрибутах элемента android:layout_x и android:layout_y.
Пример кода:

FrameLayout
FrameLayout — тип верстки внутри которого может отображаться только один элемент в строке. Т.е. если внутри FrameLayout вы поместите несколько элементов, то следующий будет отображаться поверх предыдущего.
Пример кода:
LinearLayout
LinearLayout — тип верстки при котором область верстки делится на строки и в каждую строку помещается один элемент. Разбиение может быть вертикальное или горизонтальное, тип разбиения указывается в атрибуте LinearLayout android:orientation. Внутри верстки возможно комбинировать вертикальную и горизонтальную разбивки, а кроме того, возможна комбинация нескольких разных типов верстки например использование LinearLayout внутри FrameLayout.
Пример вертикальной разбивки LinearLayout:
Пример горизонтальной разбивки LinearLayout:
Комбинация нескольких LinearLayout:
RelativeLayout
RelativeLayout — тип верстки при котором позиционирование элементов происходит относительно друг друга и относительно главного контейнера.
За то, каким образом будут позиционироваться элементы отвечают следующие атрибуты:
Атрибуты позиционирования относительно контейнера
- android:layout_alignParentBottom – Низ элемента находится внизу контейнера
- android:layout_alignParentLeft – Левая часть элемента прилегает к левой части контейнера
- android:layout_alignParentRight – Правая часть элемента прилегает к правой части контейнера
- android:layout_alignParentTop – Элемент находится в верхней части контейнера
- android:layout_centerHorizontal – Элемент позиционируется по центру относительно горизонтального размера контейнера
- android:layout_centerInParent – Элемент позиционируется по центру относительно горизонтального и вертикального размеров размера контейнера
- android:layout_centerVertical – Элемент позиционируется по центру относительно вертикального размера контейнера
Атрибуты позиционирования относительно других элементов.
В качестве значений этих атрибутов ставятся id элемента относительно которого будет производится позиционирование.
android:layout_above – Распологает элемент над указанным
android:layout_below – Распологает элемент под указанным
android:layout_toLeftOf – Распологает элемент слева от указанного
android:layout_toRightOf – Распологает элемент справа от указанного
Выравнивание относительно других элементов.
android:layout_alignBaseline – Выравнивает baseline элемента с baseline указаннго элемента
android:layout_alignBottom – Выравнивает низ элемента по низу указанного элемента
android:layout_alignLeft – Выравнивает левый край элемента с левым краем указанного элемента
android:layout_alignRight – Выравнивает правый край элемента с правым краем указанного элемента
android:layout_alignTop – Выравнивает верхнюю часть элемента в соответствие с верхней частью указанного элемента
TableLayout
TableLayout — табличная верстка.
Организует элементы в строки и столбцы таблицы.
Для организации строк служит таг
Alternate Layouts
Alternate Layouts — альтернативная верстка. Позволяет использовать различную верстку для различных ориентаций экрана.
XML для альтернативной верстки помещается в папки проекта:
res/layout-land – альтернативная верстка для landscape UI
res/layout-port –альтернативная верстка для portrait UI
res/lauout-square – альтернативная верстка для square UI
и перед тем как получить макет из res/lauout система проверяет наличие файлов в этих папках.
И в завершении немного о стилях.
Стили
Во первых стили элемента могут быть описаны в атрибутах самого элемента.
Например:
Кроме того стили можно вынести в отдельный xml файл и сохранить его в папке res/values/
Напимер:
Если мы вынесем стили в отдельный файл, то для описания стилей элемента будем использовать атрибут style.
Источник
Creating Dynamic Layouts in Android
What are Dynamic Layouts?

Generally, we develop the layout for an Android application by creating the XML file. These are called static layouts.
Static you ask? Yes, because you can not add/delete any View Type in XML on runtime.
Dynamic layouts are developed using Java and can be used to create layouts that you would normally create using an XML file.
Why do we need them?
Let’s say we are fetching some data from our server and we want to create n number of fields/buttons/options in our layout. How do we do that using the only XML? That’s right!
But we can use Java to replicate the exact layout that we would normally create using XML.
It can be used to create LinearLayout, ScrollView, etc.which can further add TextView, EditText, RadioButtons, Checkbox inside it.
Where do Dynamic Layouts excel?
Let’s say we want to show some items in our layout that were frequently bought together(all items are of the same View Type).
There are quite a few ways to show them in our layout:
1. Adding static views in our XML(if we know the exact amount of items).
2. Using Recycler View to inflate the items in our layout.
3. Creating Dynamic Views using Java.
What if we do not know the exact number of items to be displayed and our
layout require different View Types( like 3 TextViews, 2 CheckBoxes, etc.)?
Possible solutions to tackle this problem:
1. Adding static views in our XML won’t work this time because we do not . know the exact number of views we need.
2. Using Recycler View could work but the same View Types should be grouped together in a list. There is not much flexibility in this case.
3. However, this is where Dynamic Layouts take the lead! They are flexible and can add multiple View Types to our layout in any order.
Источник
Know Your Layouts in Android
Android provides solid support for the development of UI-based applications. Android provides a variety of widgets that the application programmer can use to create a desired layout and interface. These layout elements can be created via the programming language directly, or through XML layout files. In this article, we are going to show you both methods and highlight their differences.
XML-Based Layouts in Android
In Android, an XML-based layout is a file that defines the different widgets to be used in the UI and the relations between those widgets and their containers. Android treats the layout files as resources. Hence the layouts are kept in the folder reslayout. If you are using eclipse, it creates a default XML layout file (main.xml) in the reslayout folder, which looks like the following XML code. The layout files act as an input to the Android Asset Packaging Tool (AAPT) tool, which creates an R.java file for all of the resources.
The Benefits of XML-Based Layouts
XML-based layouts are very helpful if you know the UI components at the time of compiling. If run-time UI components are needed, then those can be added using the XML code.
XML-based layout have the following advantages:
- XML is a very popular and widely-used format. Hence, a lot of developers are quite comfortable with it.
- It helps to provide separation of the UI from the code logic. This provided flexibility to change one without affecting much the other.
- Generating XML output is easier than writing direct code, making it easier to have drag-and-drop UI tools to generate interfaces for android apps.
Standard Layouts in Android
The UI in Android is a hierarchy of viewgroups and views. The viewgroups will be intermediate nodes in the hierarchy, and the views will be terminal nodes.
For example, in the above main.xml file, the LinearLayout is a viewgroup and the TextView is a view.
Android provides the following standard layouts (viewgroups) that can be used in you Android application.
- AbsoluteLayout
- FrameLayout
- LinearLayout
- RelativeLayout
- TableLayout
Now, we are going to explore each one of them in detail.
Absolute Layout
In absolute layout, we can specify the exact coordinates of each control that we want to place. In absolute layout, we will give the exact X and Y coordinates of each control. The following is an example of an absolute layout:
In this example, we have created two TextViews , two EditTexts and one button .To create an Absolute layout, you will have to use the tag in your layout’s XML file.
Then, we create the controls and specify the android:layout_x and android:layout_y properties on the control to give elements their absolute position on the screen. If we run the app with this layout, it should look like this:
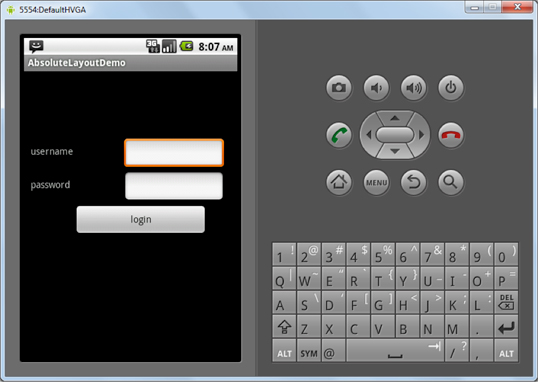
While using absolute layout, we can specify the exact position of the elements. You can move theml around by changing the android:layout_x and android:layout_y properties within the control.
Absolute layout is actually deprecated now, as it is not flexible for the wide variety of new Android devices. Hence, it should be used only if no other type of layout will suit your purposes.
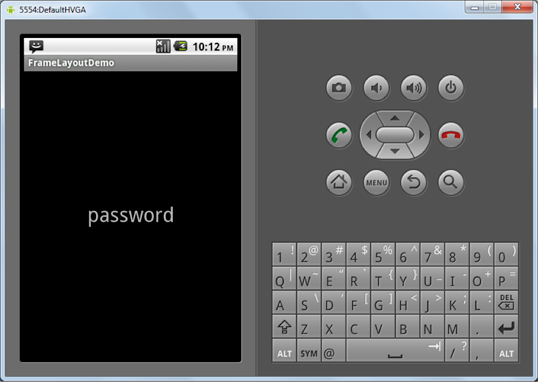
Frame Layout
Frame layout is used when you want to show one item on each screen. Using frame layout, we can have multiple items, but they will be overlapping and only only displaying themselves one at a time.
FrameLayout is particularly useful when you want to create animation or movement on screen.
Now, we are going to create a small app using frame layout that has one button and one TextView.
First, the button is displayed. Once you click on the button, the TextView is shown. The following is the code for the layout:
Here, for the button we have a Click handler is called onClick. The TextView has the property android:visibility=“gone”, which hides the TextView. The code for the activity is as follows:
If we run this frame layout program, it will look as follows:
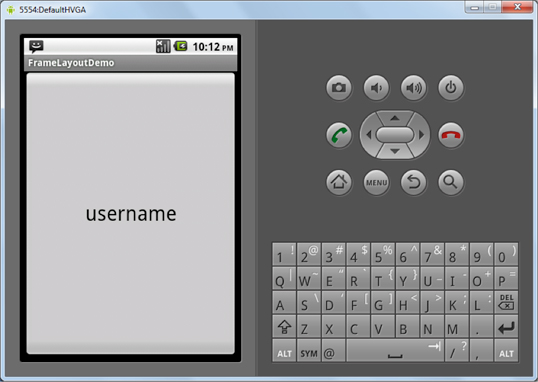
When we click on the button, the onClick function is called. In the onClick function we get username and password control, and we set the visibility for the username as “Gone” and for password as “Visible” using the function setVisibility.
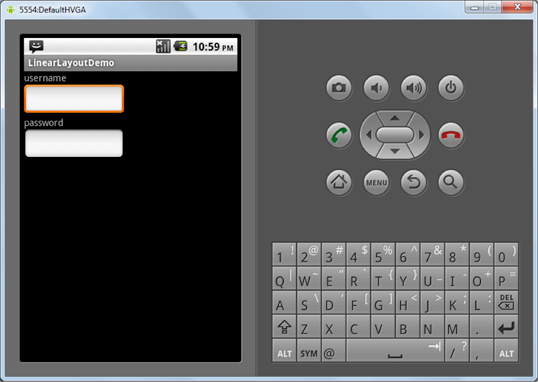
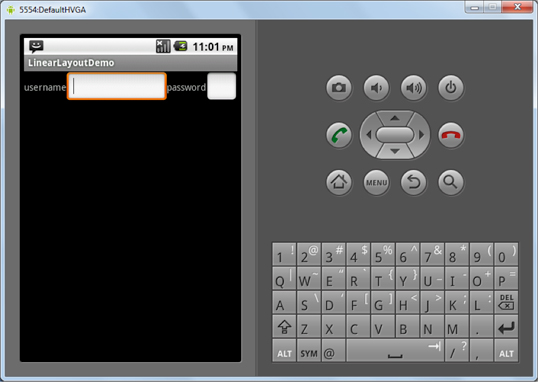
Linear Layout
Linear layout is used to place one element on each line. So, all the elements will be place in an orderly top-to-bottom fashion. This is a very widely-used layout for creating forms on Android. We are now going to create a small app to display a basic form using the linear layout. The layout.xml file is as follows:
In this design, we create a vertical linear layout, which displays a username and password, as shown below:
We can even change the orientation of our linear layout by making android:orientation=”horizontal”. This would display all the controls in one horizontal line, as shown below:
Relative Layout
Using relative layout, we can specify the position of the elements in relation to other elements, or in relation to the parent container.
In order to specify the position with relation to its parent container, we use android:layout_alignParentTop=“true” and android:layout_alignParentLeft=“true” to align elements to the top-left of the parent container. Then, to align with respect to another element we can use the properties android:layout_alignLeft=“@+id/otherelement” and android:layout_below=“@+id/otherelement”.
The following is an app employing relative layout for a basic form with a username field, password field, and a login button:
In this layout, the TextView username is positioned at the top-left of the screen using the same aforementioned properties:
Then, we position the other elements below by using the properties:
- android:layout_alignLeft=“@+id/txtpassword”
- android:layout_below=“@+id/txtpassword”
- android:layout_centerHorizontal=“true”
If we run this app, it will look like the following image:
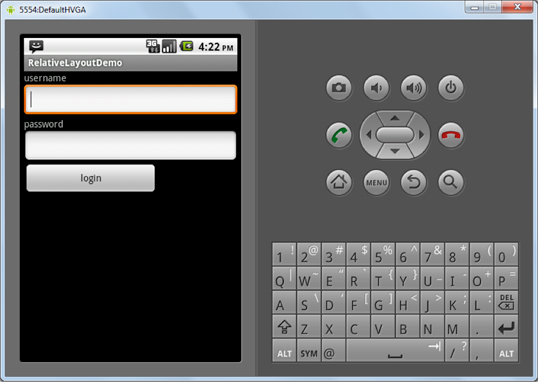
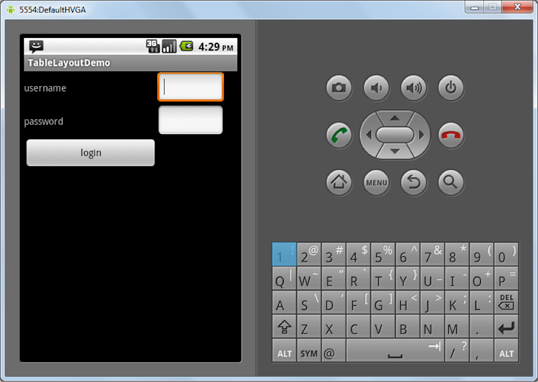
Table Layout
Using table layout, we create a table with rows and columns and place elements within them. In each row, you cam specify one or more elements.
The table row is created using the tag
The following is an example of an app with table layout:
In the first row of this example, we have added two elements: the username TextView and EditText. Within the second row, we have added two more elements: the password TextView and EditText. Then, in the third row, we added the login button.
The output of this app is as follows:
Conclusion
Android provides a very flexible way to display layouts using XML-based layouts. This helps us create apps while keeping the layout and logic completely separate. This makes it very easy for us to change the layout even after the application is written, without having any changes in the programming logic.
Android also has a variety of layouts that can be used to create more complex UIs to suit the needs of a wide variety of applications. So, have fun creating beautiful UI for your apps using the different Android layouts.
Источник


