- Android Application Launch explained: from Zygote to your Activity.onCreate()
- When does Android process start?
- Zygote : Spawning new life, new process
- When a user clicks an app icon in Launcher …
- There are three distinct phases of process launch :
- Thanks for reading through 🙌🏼. If you found this post useful, please applaud using the 👏 button and share it through your circles.
- WorkManager periodicity
- Repeating work
- Interval and FlexInterval
- Daily Jobs
- Status for Periodic Work
- Data in and out
- Unique Work
- KEEP or REPLACE?
- Testing Periodic Work
- Conclusion
Android Application Launch explained: from Zygote to your Activity.onCreate()

Apr 30, 2018 · 6 min read
This article explains how Android launches your application when a user clicks an app icon. The Android system does a lot of heavy lifting behind the curtains to make your launch activity visible to a user. This article covers this process in detail by highlighting the important phases and call sequences.
Android applications are unique in two ways:
- Multiple Entry points: Android apps are composed of different components and they can invoke the components owned by other apps. These components roughly correspond to multiple entry points for any application. Hence, they differ from traditional applications which have a single entry point like main() method.
- Own Little World: Every Android application lives in its own world, it runs in a separate process, it has its own Dalvik VM instance and is assigned a unique user ID.
When does Android process start?
An Android process is started whenever it is required.
Any time a user or some other sys t em component requests a component (could be a service, an activity or an intent receiver) that belongs to your application be executed, the Android system spins off a new process for your app if it’s not already running. Generally processes keep running until killed by the system. Application processes are created on demand and a lot of things happen before you see your application’s launch activity up and running.
Every app runs in its own process: By default, every Android app runs in its own Android process which is nothing but a Linux process which gets one execution thread to start with. For example, when you click on a hyper-link in your e-mail, a web page opens in a browser window. Your mail client and the browser are two separate apps and they run in their two separate individual processes. The click event causes Android platform to launch a new process so that it can instantiate the browser activity in the context of its own process. The same holds good for any other component in an application.
Zygote : Spawning new life, new process
Let’s step back for a moment and have a quick look on system start-up process. Like the most Linux based systems, at startup, the boot loader loads the kernel and starts the init process. The init then spawns the low level Linux processes called “daemons” e.g. android debug daemon, USB daemon etc. These daemons typically handle the low level hardware interfaces including radio interface.
Init process then starts a very interesting process called ‘ Zygote ’.
As the name implies it’s the very beginning for the rest of the Android application. This is the process which initializes a very first instance of Dalvik virtual machine. It also pre-loads all common classes used by Android application framework and various apps installed on a system. It thus prepares itself to be replicated. It stats listening on a socket interface for future requests to spawn off new virtual machines (VM)for managing new application processes. On receiving a new request, it forks itself to create a new process which gets a pre-initialized VM instance.
After zygote, init starts the runtime process.
The zygote then forks to start a well managed process called system server. System server starts all core platform services e.g activity manager service and hardware services in its own context.
At this point the full stack is ready to launch the first app process — Home app which displays the home screen also known as Launcher application.
When a user clicks an app icon in Launcher …
The click event gets translated into startActivity(intent) and it is routed to ActivityManagerService via Binder IPC. The ActvityManagerService performs multiple steps
- The first step is to collect information about the target of the intent object. This is done by using resolveIntent() method on PackageManager object. PackageManager.MATCH_DEFAULT_ONLY and PackageManager.GET_SHARED_LIBRARY_FILES flags are used by default.
- The target information is saved back into the intent object to avoid re-doing this step.
- Next important step is to check if user has enough privileges to invoke the target component of the intent. This is done by calling grantUriPermissionLocked() method.
- If user has enough permissions, ActivityManagerService checks if the target activity requires to be launched in a new task. The task creation depends on Intent flags such as FLAG_ACTIVITY_NEW_TASK and other flags such as FLAG_ACTIVITY_CLEAR_TOP.
- Now, it’s the time to check if the ProcessRecord already exists for the process.If the ProcessRecord is null, the ActivityManager has to create a new process to instantiate the target component.
As you saw above many things happen behind the scene when a user clicks on an icon and a new application gets launched. Here is the full picture :

There are three distinct phases of process launch :
- Process Creation
- Binding Application
- Launching Activity / Starting Service / Invoking intent receiver …
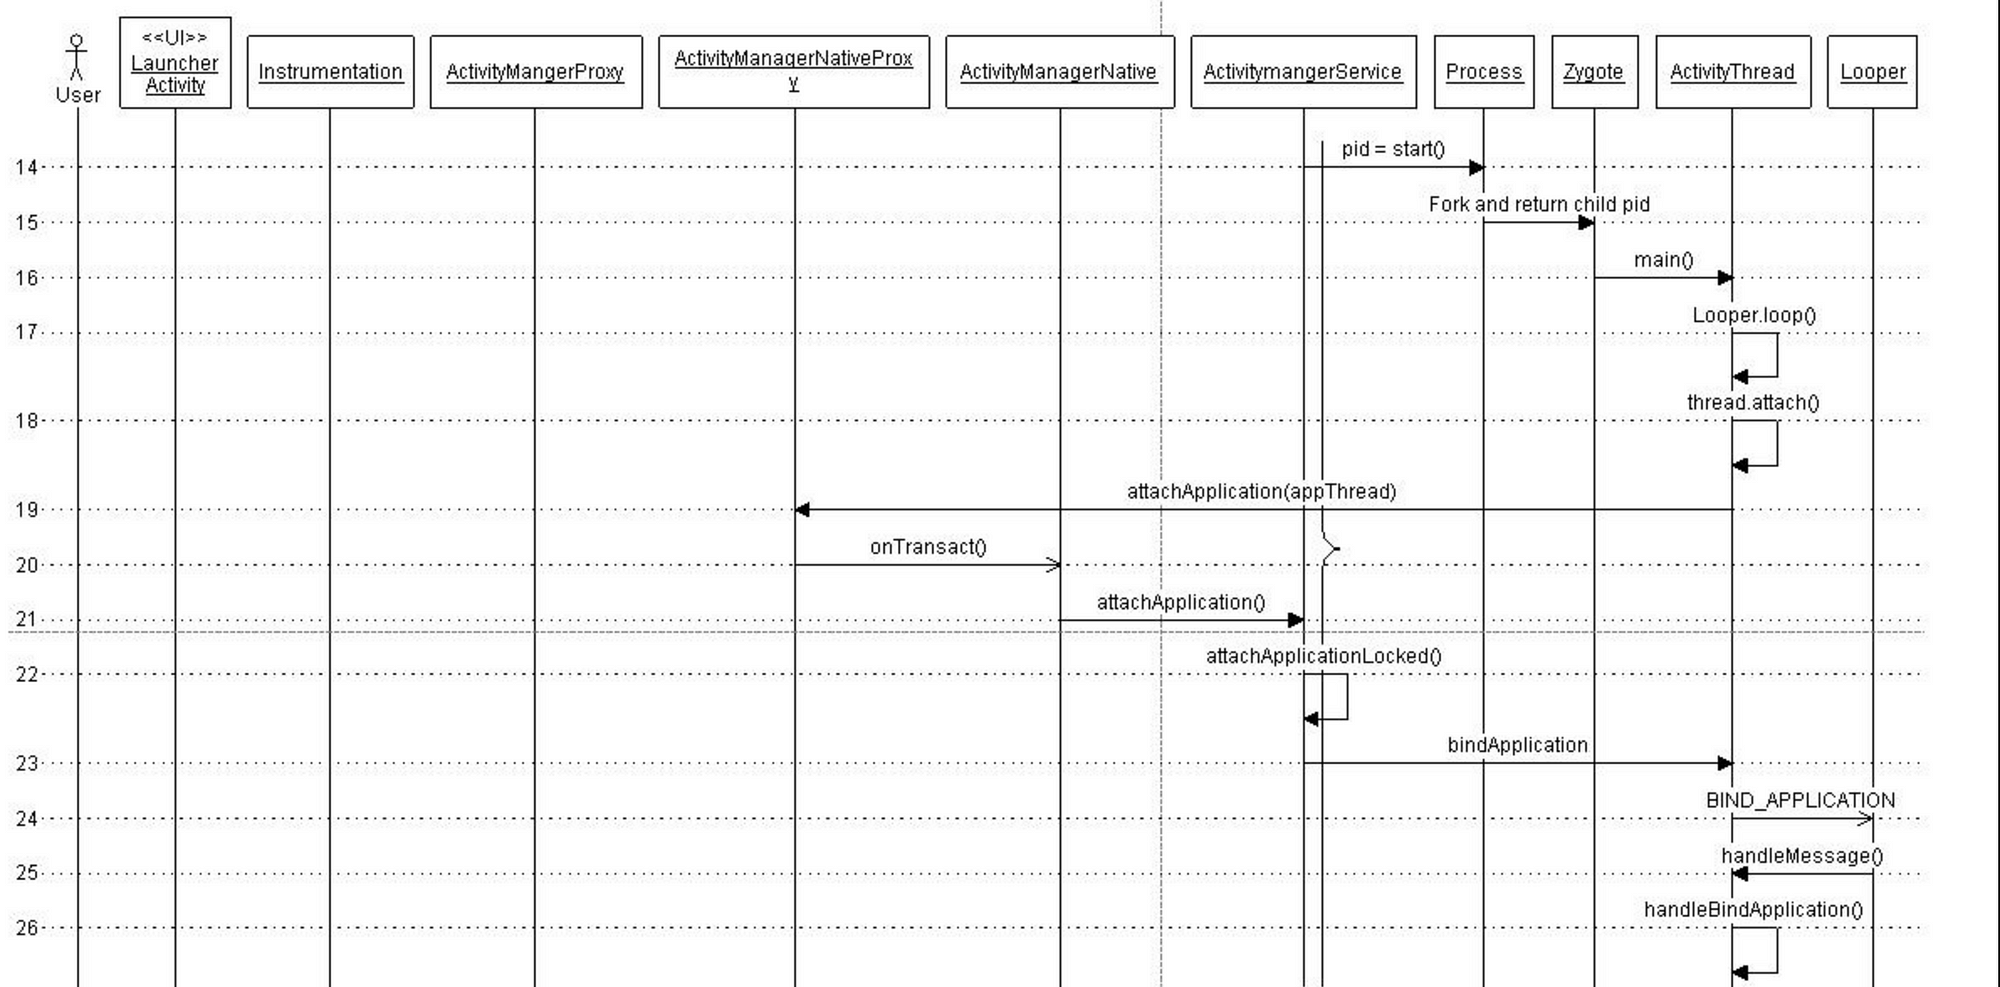
ActivityManagerService creates a new process by invoking startProcessLocked() method which sends arguments to Zygote process over the socket connection. Zygote forks itself and calls ZygoteInit.main() which then instantiates ActivityThread object and returns a process id of a newly created process.
Every process gets one thread by default. The main thread has a Looper instance to handle messages from a message queue and it calls Looper.loop() in its every iteration of run() method. It’s the job of a Looper to pop off the messages from message queue and invoke the corresponding methods to handle them. ActivityThread then starts the message loop by calling Looper.prepareLoop() and Looper.loop() subsequently.
The following sequence captures the call sequence in detail —

The next step is to attach this newly created process to a specific application. This is done by calling bindApplication() on the thread object. This method sends BIND_APPLICATION message to the message queue. This message is retrieved by the Handler object which then invokes handleMessage() method to trigger the message specific action — handleBindApplication(). This method invokes makeApplication() method which loads app specific classes into memory.
This call sequence is depicted in following figure.
Launching an Activity:
After the previous step, the system contains the process responsible for the application with application classes loaded in process’s private memory. The call sequence to launch an activity is common between a newly created process and an existing process.
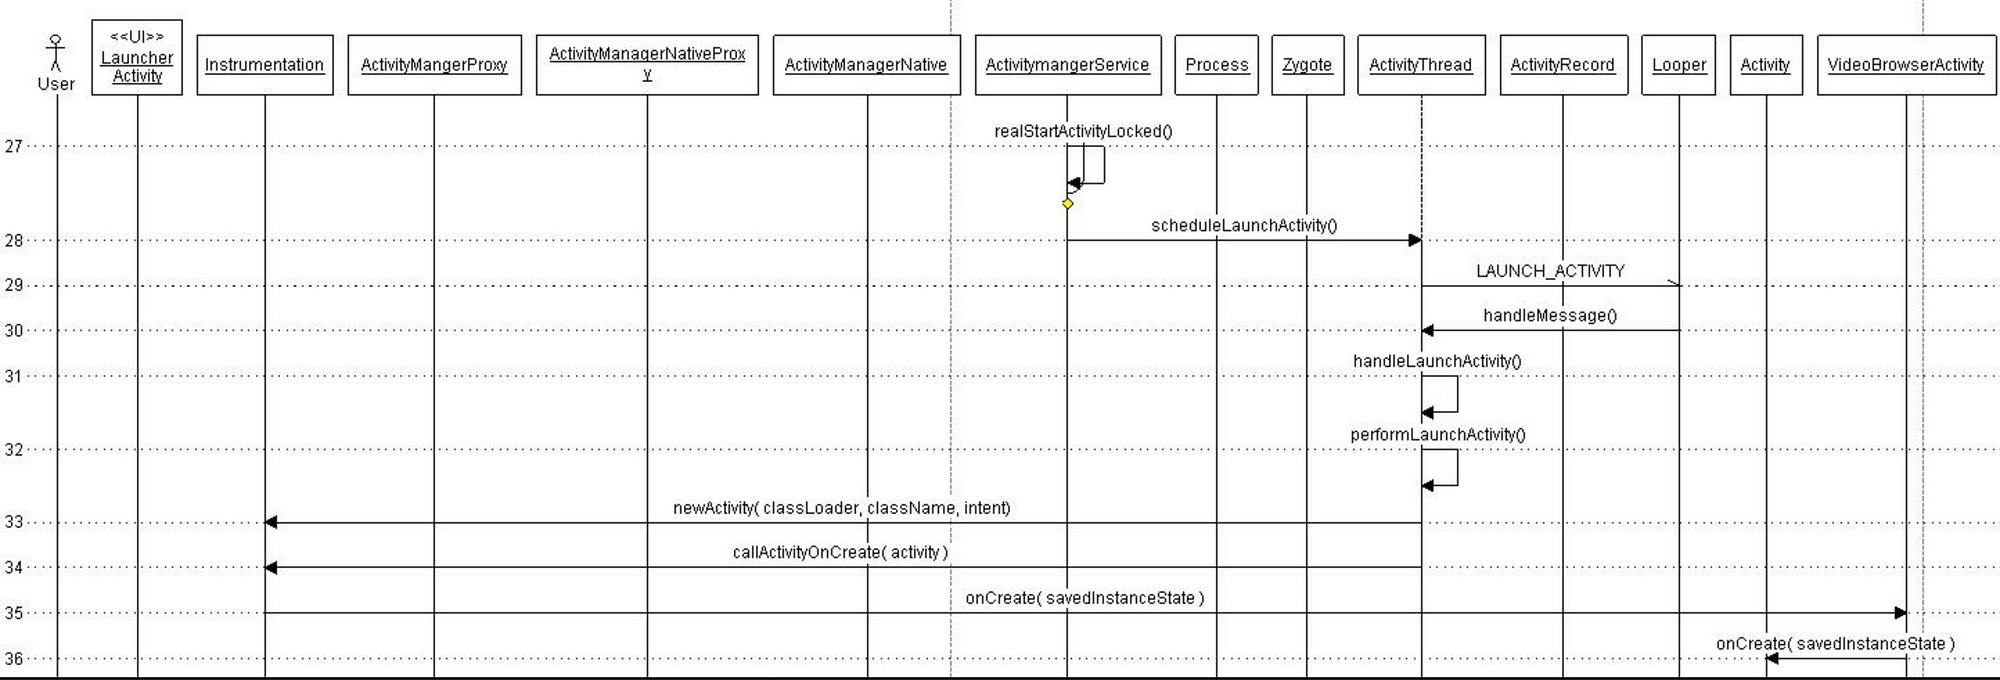
The actual process of launching starts in realStartActivity() method which calls sheduleLaunchActivity() on the application thread object. This method sends LAUNCH_ACTIVITY message to the message queue. The message is handled by handleLaunchActivity() method as shown below.
Assuming that user clicks on Video Browser application. the call sequence to launch the activity is as shown in the figure.
The Activity starts its managed lifecycle with onCreate() method call. The activity comes to foreground with onRestart() call and starts interacting with the user with onStart() call.
Thanks for reading through 🙌🏼. If you found this post useful, please applaud using the 👏 button and share it through your circles.
This article was initially published as two part series (Part 1 and Part 2) on my blog ./ mult-core-dump in 2010. These articles have been cited in multiple documents including the very famous Introduction to the Android Graphics Pipeline
Источник
WorkManager periodicity

Welcome to the fourth post of our WorkManager series. WorkManager is an Android Jetpack library that makes it easy to schedule deferrable, asynchronous tasks that must be run reliably. It is the current best practice for most background work on Android.
If you’re been following thus far, we’ve talked about:
In this blog post, I’ll cover:
- defining periodic work
- cancelling work
- customizing WorkManager configuration
Repeating work
In a previous blog, we’ve seen that you can schedule work using a OneTimeWorkRequest but if you want that your work is repeated periodically, you can use a PeriodicWorkRequest .
First, let’s see what are the differences between these two types of WorkRequest :
- Minimum period length is 15 minutes (same as JobScheduler)
- Worker classes cannot be chained in a PeriodicWorkRequest
- Before v2.1-alpha02 it’s not possible to create a PeriodicWorkRequest with an initial delay.
Some of the most common questions I get at conferences are around periodic work. In this article I’ll cover the basics of periodic work, some common use cases and some common errors. Plus we will cover a couple of ways to write tests for your Worker classes.
The call to build a periodic work request is not very different from the one we’ve seen for the one time work. We have an additional parameter that specifies the minimum repeat interval:
It’s called the minimum interval because of Android’s battery optimizations and because you can have constraints that extend the time between repetitions. For example, if you specify that the Work only runs when the device is charging, even if your minimum interval passes, if the device is not charging, this Work will not run until the device is plugged in.
In this case, we are adding a charging constraint to the PeriodicWorkRequest and we are enqueueing it:
A note regarding how to retrieve the WorkManager instance.
WorkManager v2.1 has deprecated WorkManager#getInstance() and there’s now a new WorkManager#getInstance(context: Context) that works in the same way but supports the new on-demand initialization. In this article I’m going to use this new syntax that expects that we pass a context to retrieve the WorkManager instance.
A reminder about the “minimal interval”. WorkManager is balancing two different requirements: the application with its WorkRequest , and the Android operating system with its need to limit battery consumption. For this reason, even if all the constraints set on a WorkRequest are satisfied, your Work can still be run with some additional delay.
Android includes a set of battery optimization strategies: when a user is not using the device, the OS minimizes the activities to preserve the battery. This has the effect that running a Work can be delayed to the next maintenance window if your device is in Doze mode.
Interval and FlexInterval
As we saw, WorkManager is not about executing at exact intervals. If that is your requirement, you’re looking at the wrong API. Given that the repetition interval is in reality a minimum interval, WorkManager makes available an additional parameter that you can use to specify a window where Android can execute your Work.
In a nutshell, you can specify a second interval that controls when your periodic Worker will be allowed to run inside a portion of the repetition period. This second interval (the flexInterval) it’s positioned at the end of the repetition interval itself.
Let’s look at an example. Imagine you want to build a periodic Work request with a 30 minutes period. You can specify a flexInterval, smaller than this period, say a 15 minute flexInterval.
The actual code to build a PeriodicWorkPequest with this parameters is:
The result is that our worker will be executed in the second half of the period (the flexInterval is always positioned at the end of the repetition period):
Keep in mind that these timings are always dependant on the constraints included in the work request and on the status of the device.
To learn more about this feature you can read the PeriodicWorkRequest.Builder documentation.
Daily Jobs
Because periodic intervals are not precise, you cannot build a periodic work request that is executed each day at a specific time. Not even if we relax the precision.
You can specify a 24 hours period, but because the work is executed respecting Android’s battery optimization strategies, you can only expect your Worker to be executed around that time. You can then have an execution at 5:00AM the first day, 5:25AM the second day, 5:15AM the third, then 5:30AM the following one and so on. With the error compounding over time.
The possibility to have a daily job run at around a specified time, is sometimes requested by developers coming from the Evernote Android-Job library.
At the moment, if you need to execute a worker at roughly the same time, every day, your best option is to use a OneTimeWorkRequest with an initial delay so that you execute it at the right time:
This will take care of the first execution. We need then to enqueue the next execution of this work when we complete successfully:
Please, remember that the exact time that the worker is going to be executed depends on the constraints that you’re using in your work request and on the optimizations done by the Android platforms.
Status for Periodic Work
We saw that one of the differences that periodic work has when compared with one time work is that is not possible to build chains of work with a periodic work request. The reason for this constraint is that in a chain of work you transition from one worker to the next one in the chain when a worker transitions to the SUCCEEDED status.
Periodic work never ends up in a SUCCEEDED status; it keeps running until it is cancelled. When you call Result#success() or Result#failure() from a periodic worker, it transitions back to the ENQUEUED status waiting for the next execution.
For this reason, when you work with periodic work, you cannot build chains, not even with a unique work request. In this case, periodic work requests lose the capability to append work: you can only use KEEP and REPLACE , but not APPEND .
Data in and out
WorkManager lets you pass a Data object into your worker and return a new Data object with your success or failure call (there’s no data out option when you return a Result#retry() simply because the worker execution is stateless).
In a chain of one time workers, what is returned as output from one worker becomes the input of the next worker in the chain. As we’ve seen, periodic work cannot be used in work chain because it really never “successfully” finishes; it can only ends with a cancellation.
So, where can we see and use the data returned with a Result#success(outData) ?
We can observe these Data through the WorkInfo of the PeriodicWorkRequest , but only until the next time the periodic Work is executed and we can only rely on the Worker to be in a ENQUEUED status to check it’s output:
This may not be your best option if you need to provide some results from your periodic Worker. A better option is to pass the data through another medium like a table in a database.
For more information on how to retrieve the status of your Work you can refer to the second blog post in this series and to the WorkManager documentation: Work States and observing work.
Unique Work
Some WorkManager use cases can fall into a pattern where the application enqueues some work as soon as it starts. This can be a background sync task that you want to run periodically, or a scheduled content download. Whatever it is, the common pattern is that it needs to be enqueued as soon as your application starts.
I’ve seen this pattern surfacing few times, in your Application#onCreate , the developer creates a work request and enqueues it. Everything is fine until you find that the same work is running twice or more times. This is especially relevant for periodic work, that never reaches a final state, if there are no cancellations.
We like to say that WorkManager guarantees the execution of your work even if your application is closed or the device is restarted. So, enqueueing your worker at each start of your application cause to add a new WorkRequest each time. If you’re using a OneTimeWorkRequest , it’s probably not a big deal. Once the work is run to completion, it’s done. But for periodic Work, “done” is a different concept, and you can easily end up with multiple periodic work request being enqueued.
The solution in this case is to enqueue your WorkRequest as unique Work using the WorkManager#enqueueUniquePeriodicWork() :
This keeps you from enqueuing your work multiple times.
KEEP or REPLACE?
Which of these policies you choose is really dependent on what you’re doing in your workers. Personally, I default to the KEEP policy as it is more lightweight, not having to replace an existing WorkRequest . It also avoids the possible cancellation of an already running worker.
I switch to REPLACE policy only if there’s a good reason for it (for example, if I want to reschedule a Worker from its doWork() method).
If you choose a REPLACE policy, your Worker should gracefully handle stoppages because WorkManager may have to cancel a running instance if a new WorkRequest is enqueued while the Worker is running. But you should do this anyway, given that WorkManager may stop your work if a constraint is not met anymore during the Worker’s execution.
For more information on unique work, you can refer to the documentation: Unique work.
Testing Periodic Work
WorkManager’s documentation on testing is quite comprehensive and covers the basic scenarios. After WorkManager v2.1 release there are now two ways to test your workers:
Using WorkManagerTestInitHelper you can test your Worker classes simulating delays, meeting the constraints and the period requirements. The advantage of this way of testing your Workers is that it can handle the situation where a Worker enqueues itself or another Worker class (like in the sample we saw above where we implemented a “DailyWorker” that runs at roughly the same time every day. To know more about this, you can read WorkManager’s Testing documentation.
If you need to test a CoroutineWorker , RxWorker or ListenableWorker , using WorkManagerTestInitHelper has some additional complexity because you cannot rely on its SynchronousExecutor .
To make testing these classes more straightforward, WorkManager v2.1 includes a set of new WorkRequest builder:
- TestWorkerBuilder to invoke directly a Worker class
- TestListenableWorkerBuilder to invoke directly a ListenableWorker , RxWorker or CoroutineWorker
These have the advantage that you can test any kind of Worker classes because in this case you’re running it directly.
You can read more about these in the documentation and you can see an example of a test using these new builders in the Sunflower sample application:
Conclusion
I hope that you find this article useful and I’d love to hear about how you’re using WorkManager or what WorkManager’s feature can be better explained or documented.
Источник


