- Где можно задать свои расположения пакета SDK для Android?
- Where can I set my Android SDK locations?
- How To Set Android SDK Path In Windows And Mac
- 1. Configure Android SDK Variable In Windows.
- 1.1 Get Android SDK Install Directory Path.
- 1.2 Set %ANDROID_HOME% and %Path% System Environment Variable.
- 2. Configure Android SDK Variable In macOS.
- SDK Manager
- Recommended Packages
- Adding New Sites
- Troubleshooting
Где можно задать свои расположения пакета SDK для Android?
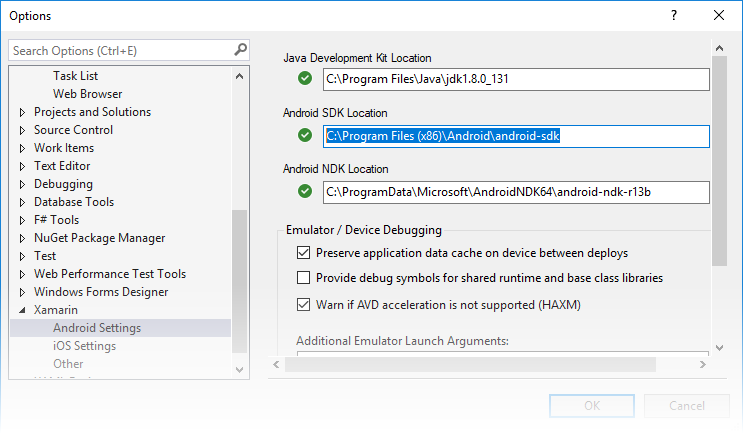
в Visual Studio перейдите в меню сервис параметры > Xamarin > Android Параметры , чтобы просмотреть и задать расположение пакет SDK для Android:

Расположение по умолчанию для каждого пути выглядит следующим образом:
Расположение пакета средств разработки Java:
C:\Program Филес\жава\ jdk1.8.0_131
Расположение пакета SDK для Android
C:\Program Files (x86) \Андроид\андроид-СДК
Расположение пакета Android NDK:
C:\ProgramData\Microsoft\AndroidNDK64\android-ndk-r13b
Обратите внимание, что номер версии NDK может отличаться. Например, вместо android-ndk-r13b может быть более ранняя версия, например android-ndk-r10e.
Чтобы задать расположение пакета SDK для Android, введите полный путь к каталогу пакета SDK для Android в поле Расположение пакета SDK для Android. Вы можете перейти к расположению пакета SDK для Android в проводнике, скопировать путь из адресной строки и вставить этот путь в поле Расположение пакета SDK для Android. Например, если расположение пакет SDK для Android находится на к:\усерс\усернаме\аппдата\локал\андроид\сдк, очистите старый путь в поле Расположение пакет SDK для Android , вставьте этот путь и нажмите кнопку ОК.
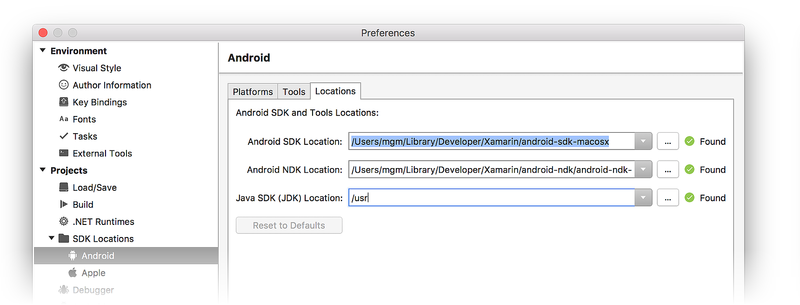
в Visual Studio для Mac перейдите к параметрам проекты > расположение пакета SDK для > Android. На странице Android перейдите на вкладку Расположения, чтобы просмотреть и задать расположение пакета SDK:

Расположение по умолчанию для каждого пути выглядит следующим образом:
Расположение пакета SDK для Android
Расположение пакета Android NDK:
Расположение пакета SDK для Java (JDK):
/usr
Обратите внимание, что номер версии NDK может отличаться. Например, вместо android-ndk-r14b может быть более ранняя версия, например android-ndk-r10e.
Чтобы задать расположение пакета SDK для Android, введите полный путь к каталогу пакета SDK для Android в поле Расположение пакета SDK для Android. Можно выбрать папку пакет SDK для Android в Finder, нажать клавиши CTRL + ⌘ + I , чтобы просмотреть сведения о папке, щелкнуть и перетащить путь справа от раздела :, скопировать, а затем вставить его в поле Расположение пакет SDK для Android на вкладке расположения . Например, если расположение пакет SDK для Android находится в папке
/либрари/девелопер/андроид/СДК, очистите старый путь в поле Расположение пакет SDK для Android , вставьте этот путь и нажмите кнопку ОК.
Источник
Where can I set my Android SDK locations?
In Visual Studio, navigate to Tools > Options > Xamarin > Android Settings to view and set the Android SDK location:
The default location for each path is as follows:
Java Development Kit Location:
C:\Program Files\Java\jdk1.8.0_131
Android SDK Location:
C:\Program Files (x86)\Android\android-sdk
Android NDK Location:
C:\ProgramData\Microsoft\AndroidNDK64\android-ndk-r13b
Note that the version number of the NDK may vary. For example, instead of android-ndk-r13b, it could be an earlier version such as android-ndk-r10e.
To set the Android SDK location, enter the full path of the Android SDK directory into the Android SDK Location box. You can navigate to the Android SDK location in File Explorer, copy the path from the address bar, and paste this path into the Android SDK Location box. For example, if your Android SDK location is at C:\Users\username\AppData\Local\Android\Sdk, clear the old path in the Android SDK Location box, paste in this path, and click OK.
In Visual Studio for Mac, navigate to Preferences > Projects > SDK Locations > Android. In the Android page, click the Locations tab to view and set the SDK location:
The default location for each path is as follows:
Android SDK Location:
Android NDK Location:
Java SDK (JDK) Location:
/usr
Note that the version number of the NDK may vary. For example, instead of android-ndk-r14b, it could be an earlier version such as android-ndk-r10e.
To set the Android SDK location, enter the full path of the Android SDK directory into the Android SDK Location box. You can select the Android SDK folder in the Finder, press CTRL+вЊ+I to view folder info, click and drag the path to the right of Where:, copy, then paste it to the Android SDK Location box in the Locations tab. For example, if your Android SDK location is at
/Library/Developer/Android/Sdk, clear the old path in the Android SDK Location box, paste in this path, and click OK.
Источник
How To Set Android SDK Path In Windows And Mac
After you installed android studio, you still need to configure some android SDK environment variables then you can use it easily. This article will tell you how to correctly configure Android SDK environment variables such as ANDROID_HOME, PATH on Windows and macOS.
1. Configure Android SDK Variable In Windows.
1.1 Get Android SDK Install Directory Path.
Before you can configure it, you should first get the android SDK install directory follow below steps.
- Open android studio, click File —> Settings menu item in the top men bar.
- Expand Appearance & Behavior —>System Settings —>Android SDK menu item on the left side of the popup window. Then you can find the Android SDK Location directory path on the right side ( in this example, the Android SDK location path is C:\Users\Jerry\AppData\Local\Android\Sdk ), remember it.
1.2 Set %ANDROID_HOME% and %Path% System Environment Variable.
- Right-click the computer icon in Windows file explorer left side, click Properties menu item in the popup menu list. This will open the windows system configuration window.
- Click the Advanced system settings link on left panel, it will popup the System Properties window, click the Environment Variables button to open Environment Variables window.
- Click the New… button to add a new system variable, input ANDROID_HOME as the variable name, and input the Android SDK location directory path ( such as C:\Users\Administrator\AppData\Local\Android\Sdk ) as the variable value.
- Select variable Path and click Edit button and add ;%ANDROID_HOME%\tools;%ANDROID_HOME%\tools\bin;%ANDROID_HOME%\platform-tools at the end of its value. Please note the ; must be English character otherwise it will not take effect .
- Click OK to close the system environment variables settings window, open a dos window, type command adb in it. If you see output like below that means the android SDK path variable has been configured successfully.
2. Configure Android SDK Variable In macOS.
- Open Android Studio on macOS, then click Android Studio —> Preferences menu item at the left top toolbar.
- Input search keyword sdk in the search box of the popup Preferences dialog window left side.
- It will focus on the Android SDK menu item on the left side, and you can get the Android SDK Location directory path value on the right side Android SDK Location text box.
- Generally, the Android SDK is installed in the /Users/user-name/Library/Android/sdk folder on macOS.
- If you can not find the above folder in macOS finder or terminal, this is because the Library folder is a hidden folder by default, you should make the hidden folder visible by executing the command $ defaults write com. apple . finder AppleShowAllFiles TRUE in a macOS terminal window ( please read article How To Show Hidden Files In Mac OS Finder And Select Hidden Files In Html Upload File Form ).
- You can also see the hidden Library folder by opening a macOS Finder window, then click Go —> Go to Folder… menu item, and input
/Library in the popup dialog input text box, then click Go button.
Источник
SDK Manager
The Android SDK separates tools, platforms, and other components into packages you can download using the SDK Manager. For example, when the SDK Tools are updated or a new version of the Android platform is released, you can use the SDK Manager to quickly download them to your environment.
You can launch the SDK Manager in one of the following ways:
- From Eclipse (with ADT), select Window >Android SDK Manager.
- From Android Studio, select Tools >Android >SDK Manager.
- On Windows, double-click the SDK Manager.exe file at the root of the Android SDK directory.
- On Mac or Linux, open a terminal and navigate to the tools/ directory in the location where the Android SDK is installed, then execute android sdk .
You can select which packages you want to download by toggling the checkboxes on the left, then click Install to install the selected packages.

Figure 1. The Android SDK Manager shows the SDK packages that are available, already installed, or for which an update is available.
There are several different packages available for the Android SDK. The table below describes most of the available packages and where they’re located in your SDK directory once you download them.
Recommended Packages
Here’s an outline of the packages required and those we recommend you use:
SDK Tools Required. Your new SDK installation already has the latest version. Make sure you keep this up to date. SDK Platform-tools Required. You must install this package when you install the SDK for the first time. SDK Platform Required.You must download at least one platform into your environment so you’re able to compile your application. In order to provide the best user experience on the latest devices, we recommend that you use the latest platform version as your build target. You’ll still be able to run your app on older versions, but you must build against the latest version in order to use new features when running on devices with the latest version of Android.
To get started, download the latest Android version, plus the lowest version you plan to support (we recommend Android 2.2 for your lowest version).
System Image Recommended. Although you might have one or more Android-powered devices on which to test your app, it’s unlikely you have a device for every version of Android your app supports. It’s a good practice to download system images for all versions of Android your app supports and test your app running on them with the Android emulator. Android Support Recommended. Includes a static library that allows you to use some of the latest Android APIs (such as fragments, plus others not included in the framework at all) on devices running a platform version as old as Android 1.6. All of the activity templates available when creating a new project with the ADT Plugin require this. For more information, read Support Library. SDK Samples Recommended. The samples give you source code that you can use to learn about Android, load as a project and run, or reuse in your own app. Note that multiple samples packages are available — one for each Android platform version. When you are choosing a samples package to download, select the one whose API Level matches the API Level of the Android platform that you plan to use.
Tip: For easy access to the SDK tools from a command line, add the location of the SDK’s tools/ and platform-tools to your PATH environment variable.
The above list is not comprehensive and you can add new sites to download additional packages from third-parties.
In some cases, an SDK package may require a specific minimum revision of another package or SDK tool. The development tools will notify you with warnings if there is dependency that you need to address. The Android SDK Manager also enforces dependencies by requiring that you download any packages that are needed by those you have selected.
Adding New Sites
By default, Available Packages displays packages available from the Android Repository and Third party Add-ons. You can add other sites that host their own Android SDK add-ons, then download the SDK add-ons from those sites.
For example, a mobile carrier or device manufacturer might offer additional API libraries that are supported by their own Android-powered devices. In order to develop using their libraries, you must install their Android SDK add-on, if it’s not already available under Third party Add-ons.
If a carrier or device manufacturer has hosted an SDK add-on repository file on their web site, follow these steps to add their site to the Android SDK Manager:
- Select Available Packages in the left panel.
- Click Add Add-on Site and enter the URL of the repository.xml file. Click OK.
Any SDK packages available from the site will now be listed under a new item named User Add-ons.
Troubleshooting
Problems connecting to the SDK repository
If you are using the Android SDK Manager to download packages and are encountering connection problems, try connecting over http, rather than https. To switch the protocol used by the Android SDK Manager, follow these steps:
Источник


