- Android / Eclipse эмулятор, как стереть данные?
- Протирать данные / Сбросить заводские данные через ADB
- How to restore an Android emulator to its initial «factory» settings (wipe the data)
- Using Android Studio
- Create and manage virtual devices
- About AVDs
- Hardware profile
- System images
- Storage area
- AVD and app features
- Create an AVD
- Create a hardware profile
- Edit existing AVDs
- Edit existing hardware profiles
- Run and stop an emulator, and clear data
- Import and export hardware profiles
- Hardware profile properties
- AVD properties
- Create an emulator skin
Android / Eclipse эмулятор, как стереть данные?
Я ошибся при попытке ответить на этот вопрос. Кто-нибудь знает, что происходит не так?
Вы можете стереть данные во время запуска эмулятора в плагине ADT, просто отметьте галочкой: 
Откройте командную строку,
Поэтому я знаю, что этот вопрос несколько лет. Но я собираюсь ответить в любом случае, потому что ответ не принят.
FIRST, убедитесь, что (ваш-android-sdk-location) / tools находится на вашем $ PATH. Это не помешало бы проверить это, используя which emulator с терминала. Например, когда я делаю это, он выводит:
SECOND, найдите, где находятся ваши AVD. По умолчанию он находится в каталоге .android / avd в папке с учетной записью пользователя. Так что для меня это здесь:
THIRD, cd в cd выше директорию и получить список устройств, которые вы создали, перечислив их с помощью ls
Обратите внимание, что каждое устройство имеет пару результатов, папку .avd и .ini-файл. Вы можете видеть, что у меня есть одно устройство, чье имя Nexus_5_API_19.
ЧЕТВЕРТЫЙ, чтобы стереть данные устройства с терминала, вы используете команду emulator -wipe-data. Некоторым людям может показаться, что это раздражает, потому что он также будет запускать эмулятор после завершения очистки данных. В любом случае, вот как вы это делаете:
Основная причина, по которой я нахожу этот подход для очистки данных, – это то, что эмулятор запускается с терминала. Это означает, что если я захочу сделать больше работы на терминале, мне придется либо открыть другой терминал (я ненавижу открытие нескольких терминалов), либо закрыть эмулятор, чтобы освободить терминал.
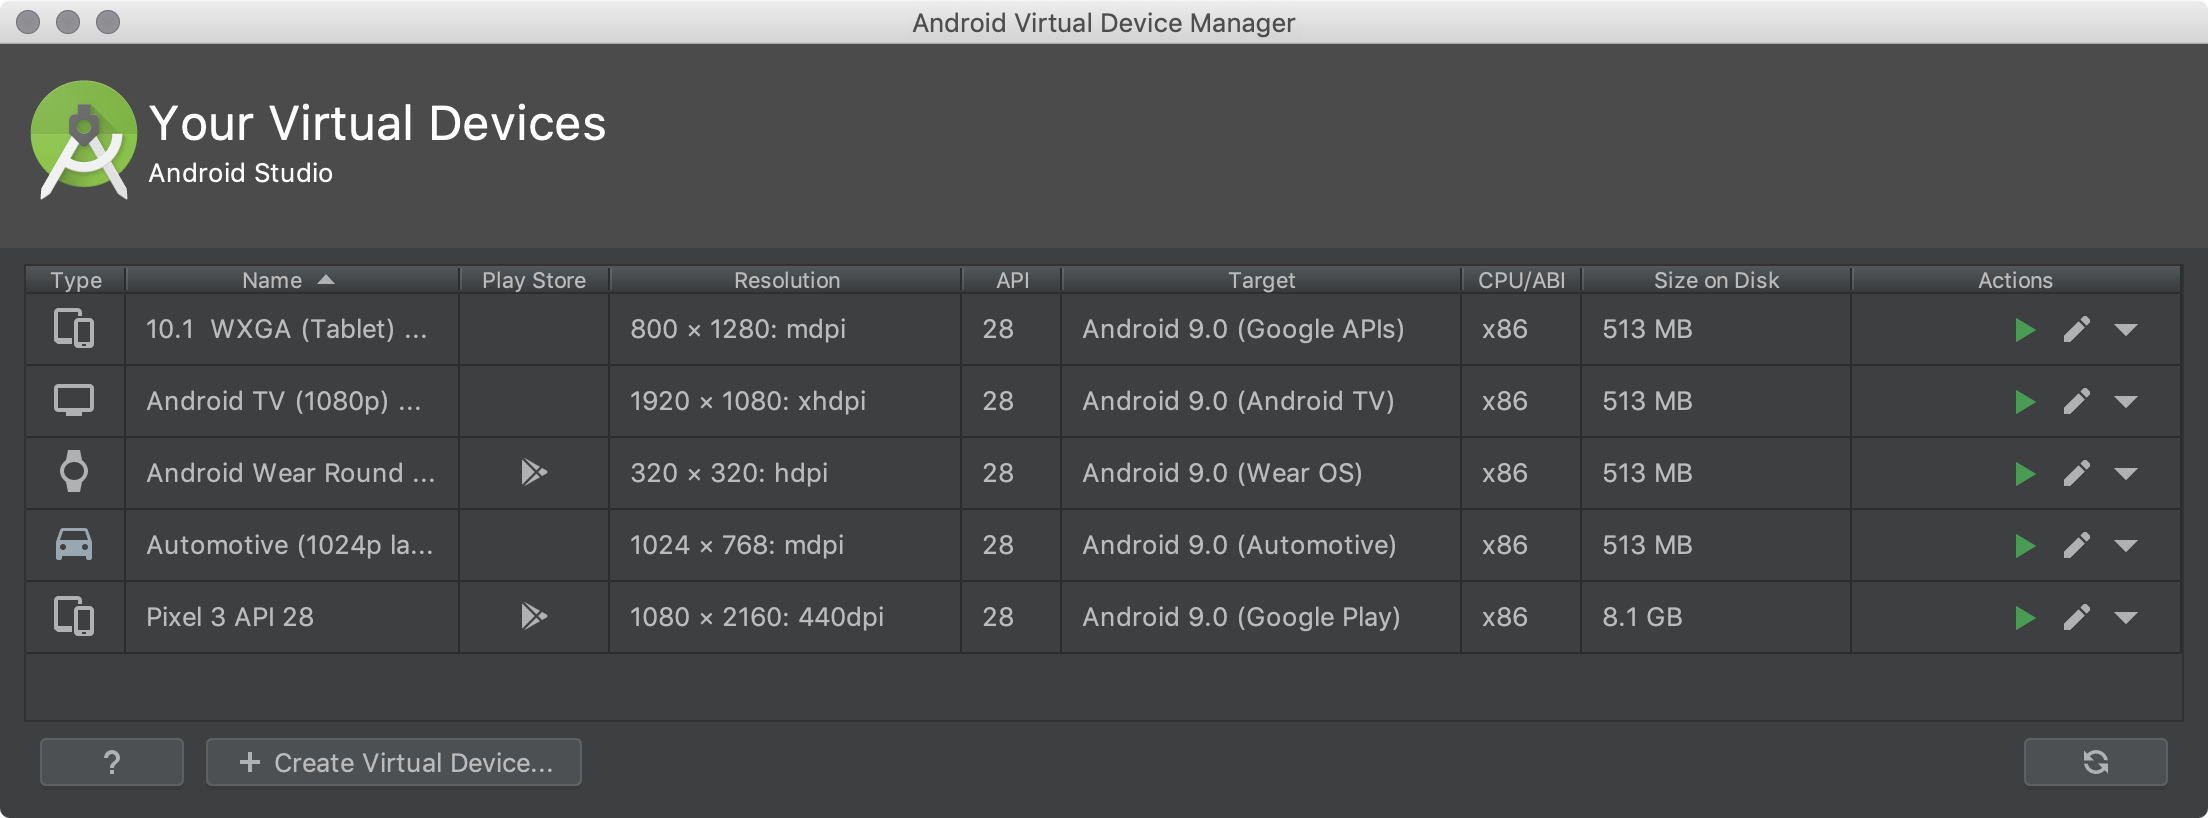
Для полноты я упомянул, что вы можете стереть данные эмулятора с AVD-менеджера (по крайней мере, тот, который встроен в Android Studio). Откройте диспетчер AVD и в списке устройств, на правой стороне вы щелкните стрелку вниз и выберите Wipe Data. Это стирает данные без запуска эмулятора.
Источник
Протирать данные / Сбросить заводские данные через ADB
В основном это моя проблема /
У меня есть еще 200 телефонов под управлением Android, которые нужно стереть (в режиме Wipe Data / Factory Reset), а затем новый ROM, установленный с некоторыми дополнительными apks.
В настоящее время у меня все автоматизировано, кроме части Wipe Data. Все остальное можно сделать через .bat с набором команд довольно счастливо, но я не могу на всю жизнь понять, как имитировать или заставить режим восстановления стереть данные.
Вещи, которые я сейчас пытался:
- Использование ADB для захвата экрана
- Как создать эмулятор Android?
- В чем разница между скриншотом и screencap в оболочке adb?
- Очистить данные пользователя приложения Android
- Как установить дату и время на Android-устройстве
- Вытирая данные самостоятельно, используя rm -r * в папках, которые он должен делать (данные, кеш, sd-ext и т. Д.). Это протирает, но затем ПЗУ не работает должным образом и застревает в бутлопе.
- Попытка использовать «adb input keyevent» для имитации нажатия клавиш. Я понятия не имею, к чему они привязаны, потому что они находятся в оболочке UNIX в основном, и даже тогда нет «ввода», потому что ОС не была загружена в любом случае.
- Попытка найти файл / скрипт в системе, которая фактически запускает очистку / сброс, а затем запускает это вручную. Это может быть самым простым способом, поскольку он уже написан для меня где-то, но я просто не вижу, где он скрыт, даже в чем-то вроде CWM.
Если у кого-то есть какой-либо метод, с помощью которого я мог бы выполнить сброс этой фабрики через .bat или через оболочку adb, я бы очень признателен. Старался решить эту проблему примерно на 2 дня с небольшим прогрессом.
После многого рытья я наконец закончил загрузку исходного кода раздела восстановления Android. Оказывается, вы можете отправлять команды на восстановление.
Это команды, которые вы можете использовать в соответствии с тем, который я нашел, но которые могут отличаться для файлов с измененным форматом. Поэтому, используя adb, вы можете сделать это:
Использование –wipe_data, казалось, делало то, что я искал, что было удобно, хотя я еще не полностью тестировал это.
Для тех, кто по-прежнему использует этот раздел, эти команды могут изменяться в зависимости от того, какое восстановление вы используете. Если вы используете восстановление временного слова, эти команды должны по-прежнему работать. Другие команды можно найти в / cache / recovery / command
Источник
How to restore an Android emulator to its initial «factory» settings (wipe the data)
 | to support my writing donate at ko-fi.com | |
To restore an Android emulator to its initial, default settings, you need to find its “image” file on your filesystem and delete it. The image file will be found in your $HOME/.android/avd/.avd folder.
For example, I was just working with an AVD named Nexus_6_API_21, and its directory on my Mac OS X system is /Users/al/.android/avd/Nexus_6_API_21.avd. I moved into that directory and found several “.img” files, deleted them, and then restarted the emulator, and it went back to its default settings.
Before this I was having a problem with the emulator/AVD, and I wanted to see if I could avoid deleting it and re-creating it, and this approach seems to work.
Note that I found this tip on Safari Books Online, though there was a little more to delete than that tip described.
Using Android Studio
I just found that this is easier to do if you’re using Android Studio. If so, open the AVD Manager, select your AVD, then choose the “Wipe Data” menu option. With Android Studio version 1.1, this is currently under the “Actions” items, on the right side of the AVD Manager dialog.
Источник
Create and manage virtual devices
An Android Virtual Device (AVD) is a configuration that defines the characteristics of an Android phone, tablet, Wear OS, Android TV, or Automotive OS device that you want to simulate in the Android Emulator. The AVD Manager is an interface you can launch from Android Studio that helps you create and manage AVDs.
To open the AVD Manager, do one of the following:
- Select Tools > AVD Manager.
- Click AVD Manager in the toolbar.
About AVDs
An AVD contains a hardware profile, system image, storage area, skin, and other properties.
We recommend that you create an AVD for each system image that your app could potentially support based on the setting in your manifest.
Hardware profile
The hardware profile defines the characteristics of a device as shipped from the factory. The AVD Manager comes preloaded with certain hardware profiles, such as Pixel devices, and you can define or customize the hardware profiles as needed.
Notice that only some hardware profiles are indicated to include Play Store. This indicates that these profiles are fully CTS compliant and may use system images that include the Play Store app.
System images
A system image labeled with Google APIs includes access to Google Play services. A system image labeled with the Google Play logo in the Play Store column includes the Google Play Store app and access to Google Play services, including a Google Play tab in the Extended controls dialog that provides a convenient button for updating Google Play services on the device.
To ensure app security and a consistent experience with physical devices, system images with the Google Play Store included are signed with a release key, which means that you cannot get elevated privileges (root) with these images. If you require elevated privileges (root) to aid with your app troubleshooting, you can use the Android Open Source Project (AOSP) system images that do not include Google apps or services.
Storage area
The AVD has a dedicated storage area on your development machine. It stores the device user data, such as installed apps and settings, as well as an emulated SD card. If needed, you can use the AVD Manager to wipe user data, so the device has the same data as if it were new.
An emulator skin specifies the appearance of a device. The AVD Manager provides some predefined skins. You can also define your own, or use skins provided by third parties.
AVD and app features
Be sure your AVD definition includes the device features your app depends on. See Hardware Profile Properties and AVD Properties for lists of features you can define in your AVDs.
Create an AVD
Tip: If you want to launch your app into an emulator, instead run your app from Android Studio and then in the Select Deployment Target dialog that appears, click Create New Virtual Device.
To create a new AVD:
- Open the AVD Manager by clicking Tools > AVD Manager.

- Click Create Virtual Device, at the bottom of the AVD Manager dialog.
The Select Hardware page appears.
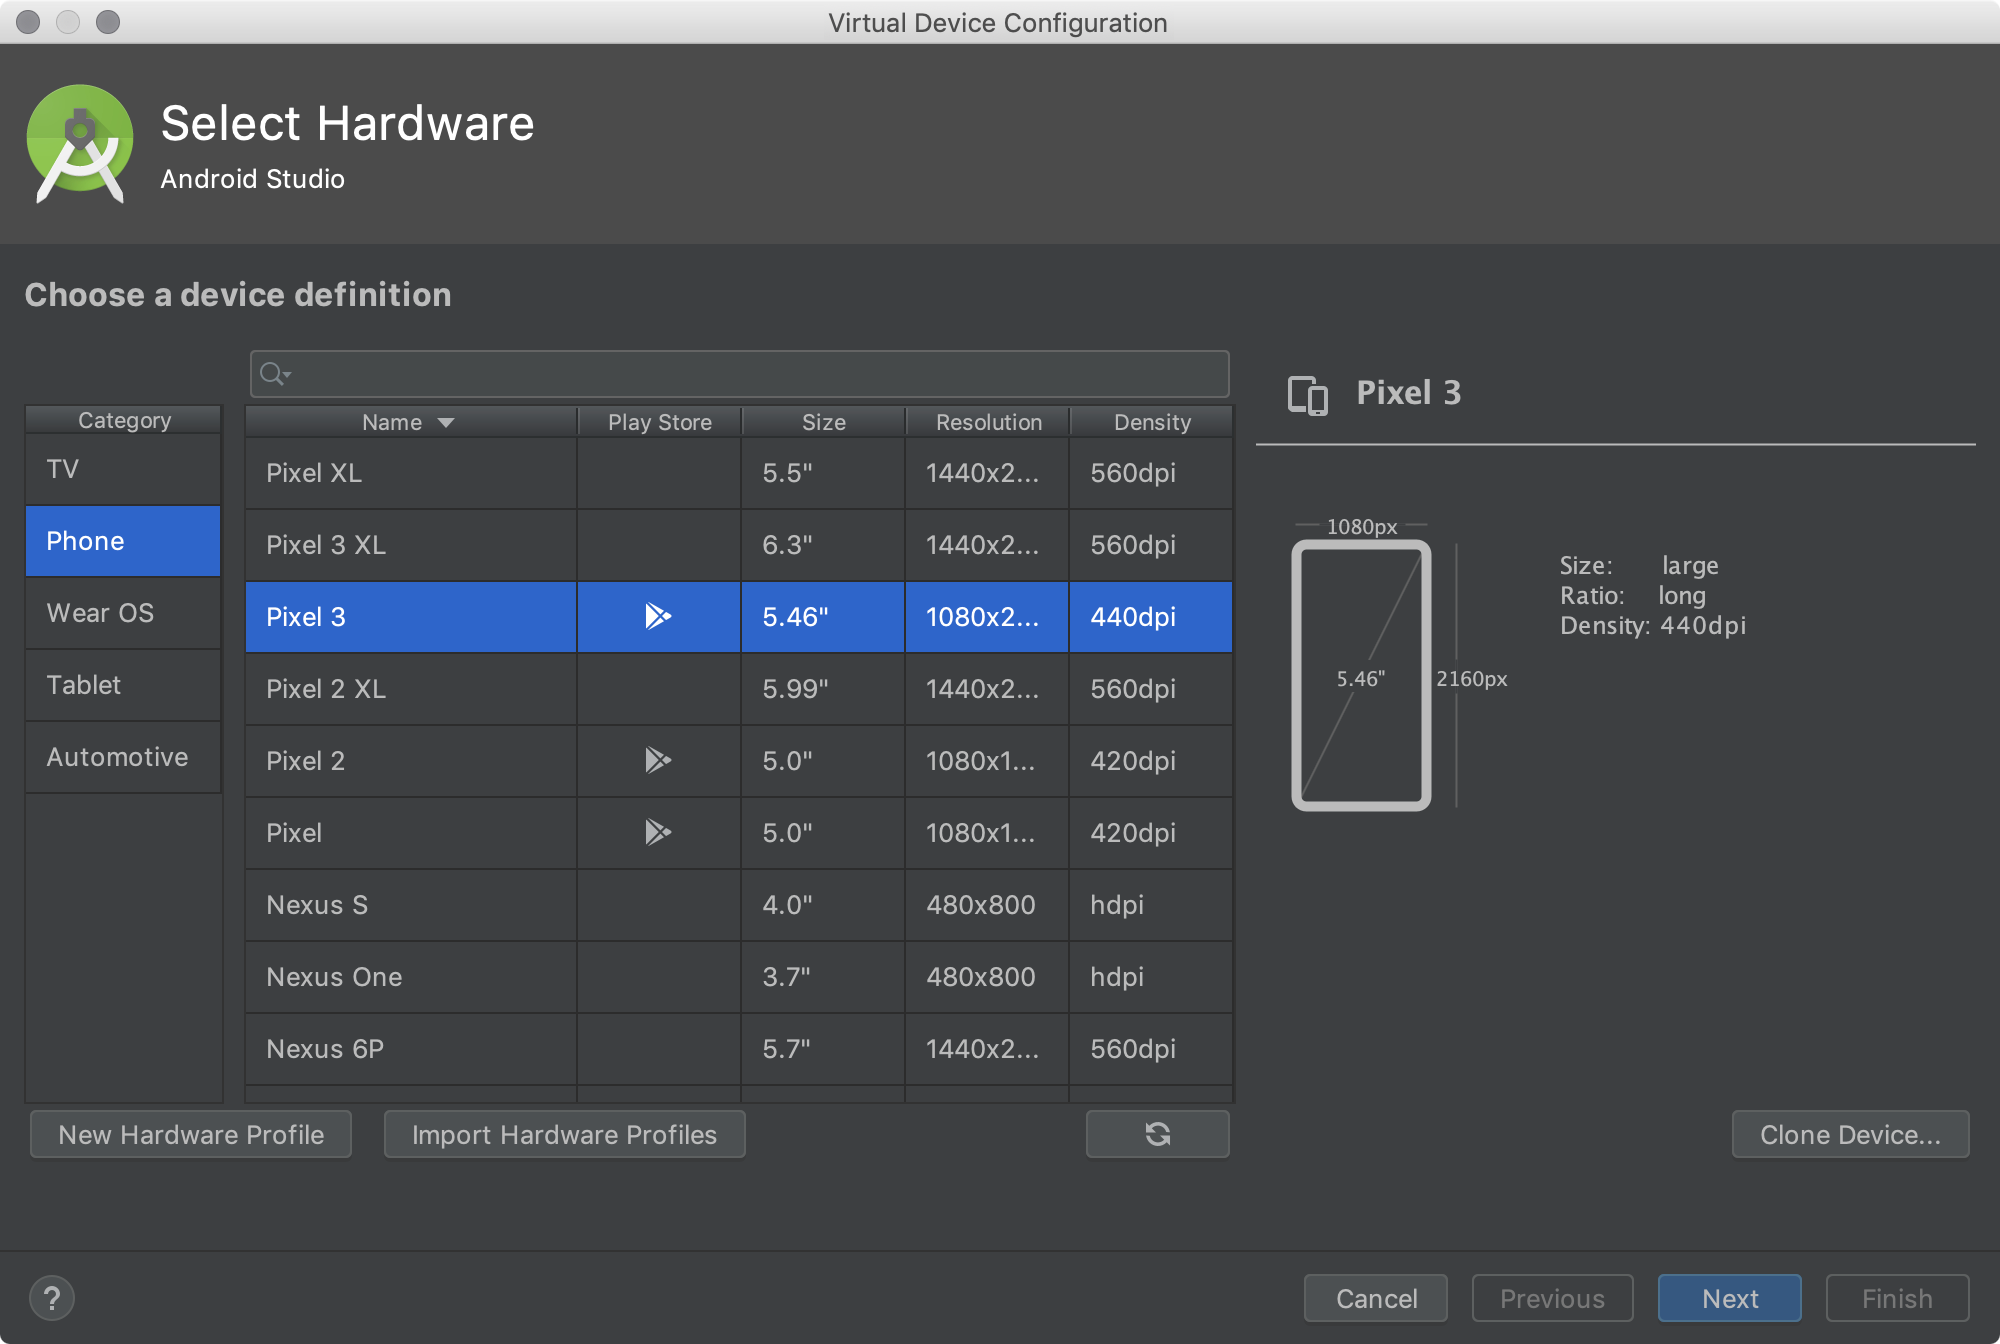
Notice that only some hardware profiles are indicated to include Play Store. This indicates that these profiles are fully CTS compliant and may use system images that include the Play Store app.
Select a hardware profile, and then click Next.
If you don’t see the hardware profile you want, you can create or import a hardware profile.
The System Image page appears.
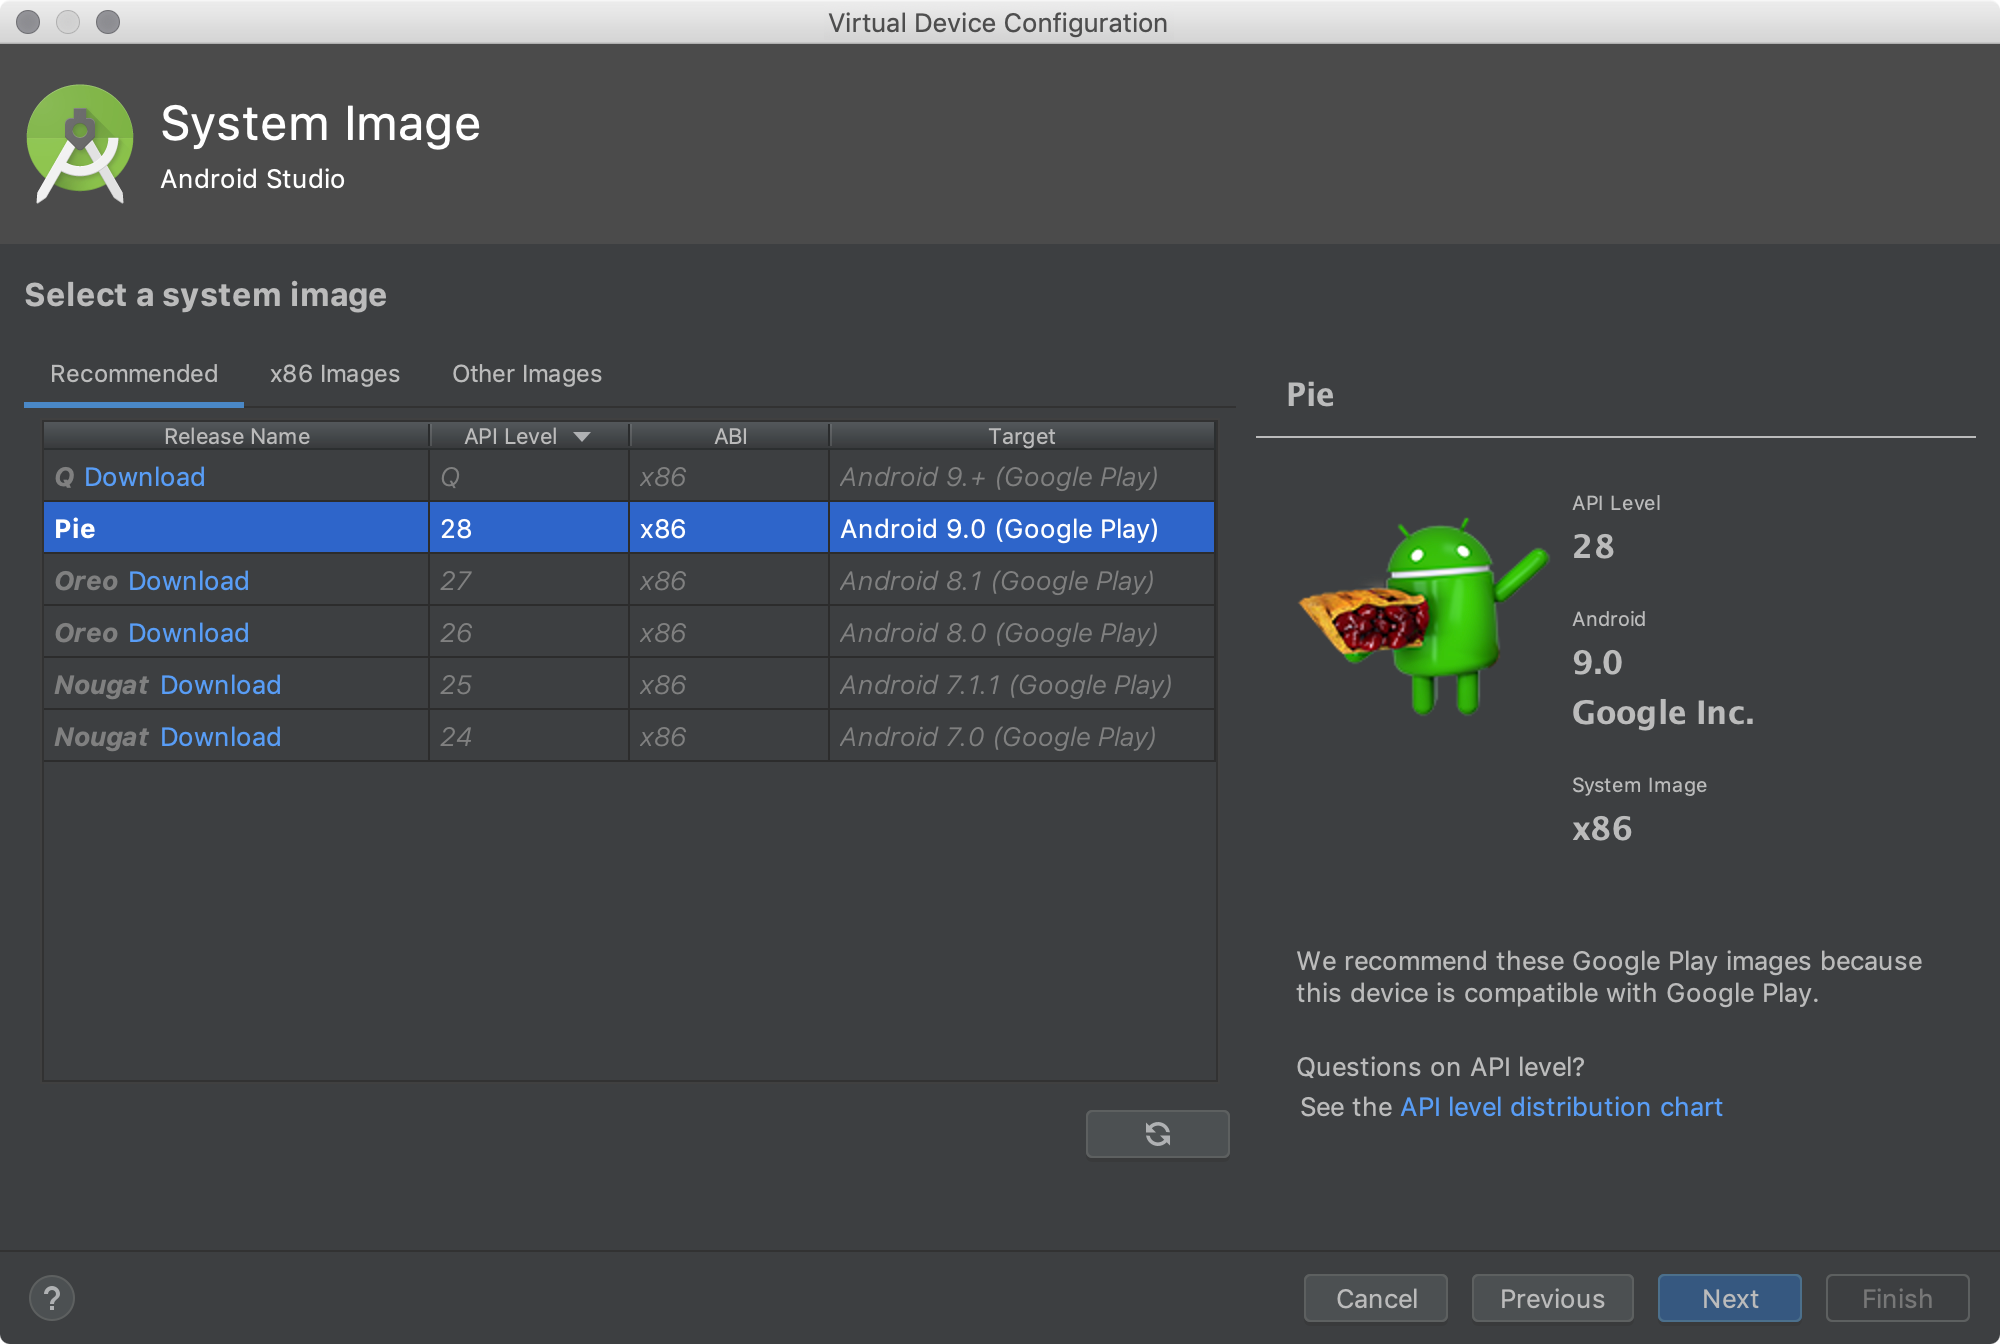
Select the system image for a particular API level, and then click Next.
The Recommended tab lists recommended system images. The other tabs include a more complete list. The right pane describes the selected system image. x86 images run the fastest in the emulator.
If you see Download next to the system image, you need to click it to download the system image. You must be connected to the internet to download it.
The API level of the target device is important, because your app won’t be able to run on a system image with an API level that’s less than that required by your app, as specified in the minSdkVersion attribute of the app manifest file. For more information about the relationship between system API level and minSdkVersion , see Versioning Your Apps.
If your app declares a element in the manifest file, the app requires a system image in which that external library is present. If you want to run your app on an emulator, create an AVD that includes the required library. To do so, you might need to use an add-on component for the AVD platform; for example, the Google APIs add-on contains the Google Maps library.
The Verify Configuration page appears.
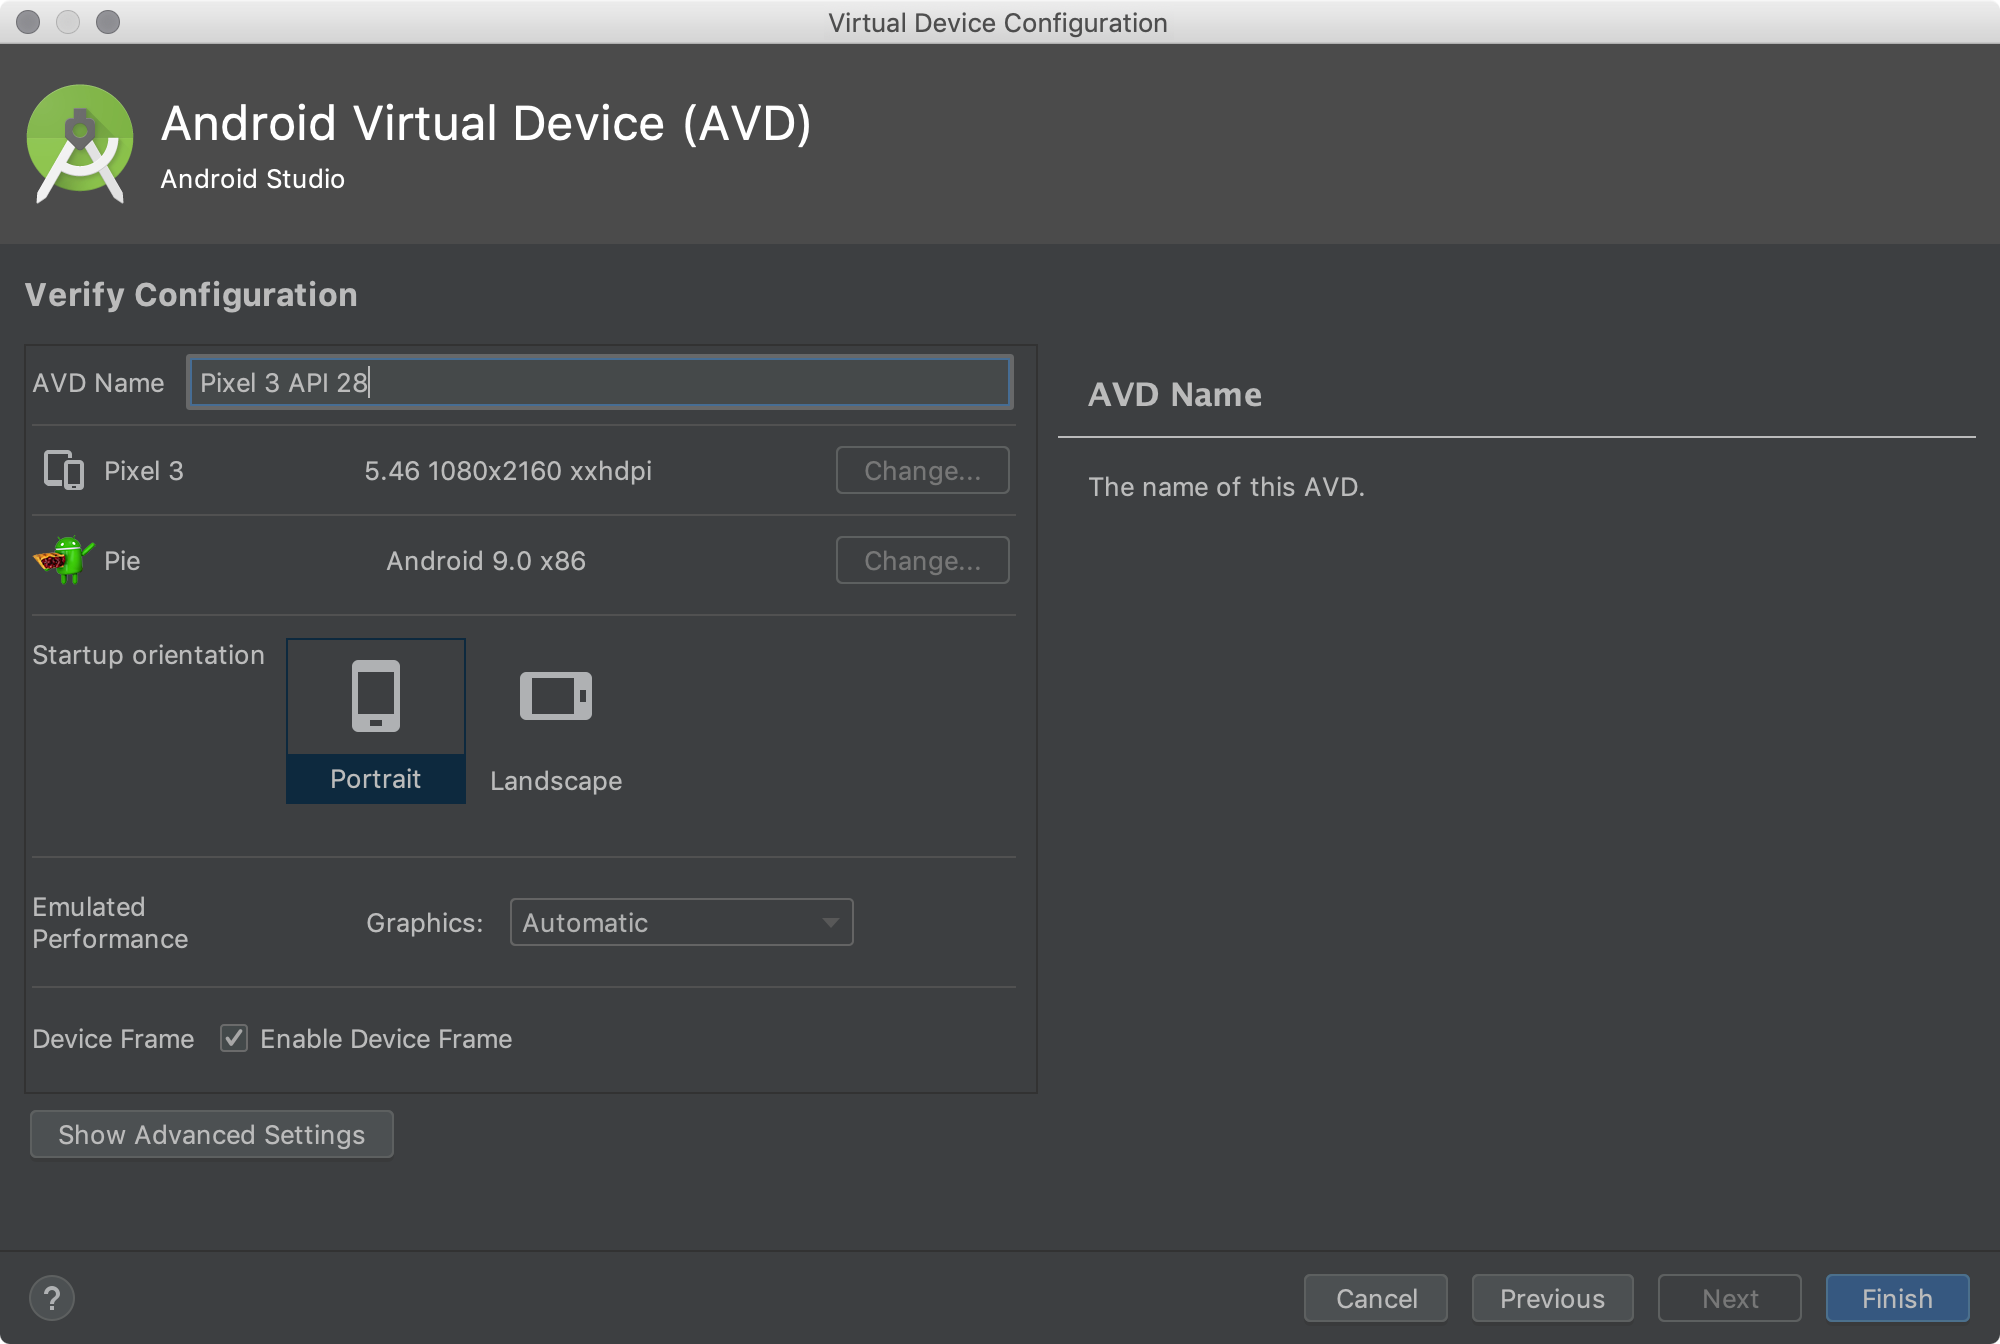
Change AVD properties as needed, and then click Finish.
Click Show Advanced Settings to show more settings, such as the skin.
The new AVD appears in the Your Virtual Devices page or the Select Deployment Target dialog.
To create an AVD starting with a copy:
- From the Your Virtual Devices page of the AVD Manager, right-click an AVD and select Duplicate.
Or click Menu and select Duplicate.
The AVD appears in the Your Virtual Devices page.
Create a hardware profile
The AVD Manager provides predefined hardware profiles for common devices so you can easily add them to your AVD definitions. If you need to define a different device, you can create a new hardware profile. You can define a new hardware profile from the beginning, or copy a hardware profile as a start. The preloaded hardware profiles aren’t editable.
To create a new hardware profile from the beginning:
- In the Select Hardware page, click New Hardware Profile.
- In the Configure Hardware Profile page, change the hardware profile properties as needed.
- Click Finish.
Your new hardware profile appears in the Select Hardware page. You can optionally create an AVD that uses the hardware profile by clicking Next. Or, click Cancel to return to the Your Virtual Devices page or Select Deployment Target dialog.
To create a hardware profile starting with a copy:
- In the Select Hardware page, select a hardware profile and click Clone Device.
Or right-click a hardware profile and select Clone.
In the Configure Hardware Profile page, change the hardware profile properties as needed.
Click Finish.
Your new hardware profile appears in the Select Hardware page. You can optionally create an AVD that uses the hardware profile by clicking Next. Or, click Cancel to return to the Your Virtual Devices page or Select Deployment Target dialog.
Edit existing AVDs
From the Your Virtual Devices page, you can perform the following operations on an existing AVD:
- To edit an AVD, click Edit this AVD and make your changes.
- To delete an AVD, right-click an AVD and select Delete. Or click Menu and select Delete.
- To show the associated AVD .ini and .img files on disk, right-click an AVD and select Show on Disk. Or click Menu and select Show on Disk.
- To view AVD configuration details that you can include in any bug reports to the Android Studio team, right-click an AVD and select View Details. Or click Menu and select View Details.
Edit existing hardware profiles
From the Select Hardware page, you can perform the following operations on an existing hardware profile:
- To edit a hardware profile, select it and click Edit Device. Or right-click a hardware profile and select Edit. Next, make your changes.
- To delete a hardware profile, right-click it and select Delete.
You can’t edit or delete the predefined hardware profiles.
Run and stop an emulator, and clear data
From the Your Virtual Devices page, you can perform the following operations on an emulator:
- To run an emulator that uses an AVD, double-click the AVD. Or click Launch.
- To stop a running emulator, right-click an AVD and select Stop. Or click Menu and select Stop.
- To clear the data for an emulator, and return it to the same state as when it was first defined, right-click an AVD and select Wipe Data. Or click Menu and select Wipe Data.
 .
.Import and export hardware profiles
From the Select Hardware page, you can import and export hardware profiles:
- To import a hardware profile, click Import Hardware Profiles and select the XML file containing the definition on your computer.
Hardware profile properties
You can specify the following properties of hardware profiles in the Configure Hardware Profile page. AVD configuration properties override hardware profile properties, and emulator properties that you set while the emulator is running override them both.
The predefined hardware profiles included with the AVD Manager aren’t editable. However, you can copy them and edit the copies.
| Hardware Profile Property | Description |
|---|---|
| Device Name | Name of the hardware profile. The name can contain uppercase or lowercase letters, numbers from 0 to 9, periods (.), underscores (_), parentheses ( () ), and spaces. The name of the file storing the hardware profile is derived from the hardware profile name. |
| Device Type | Select one of the following:
|
| Screen Size | The physical size of the screen, in inches, measured at the diagonal. If the size is larger than your computer screen, it’s reduced in size at launch. |
| Screen Resolution | Type a width and height in pixels to specify the total number of pixels on the simulated screen. |
| Round | Select this option if the device has a round screen, such as some Wear OS devices. |
| Memory: RAM | Type a RAM size for the device and select the units, one of B (byte), KB (kilobyte), MB (megabyte), GB (gigabyte), or TB (terabyte). |
| Input: Has Hardware Buttons (Back/Home/Menu) | Select this option if your device has hardware navigation buttons. Deselect it if these buttons are implemented in software only. If you select this option, the buttons won’t appear on the screen. You can use the emulator side panel to «press» the buttons, in either case. |
| Input: Has Hardware Keyboard | Select this option if your device has a hardware keyboard. Deselect it if it doesn’t. If you select this option, a keyboard won’t appear on the screen. You can use your computer keyboard to send keystrokes to the emulator, in either case. |
| Navigation Style | |
| Sensors: Accelerometer | Select if the device has hardware that helps the device determine its orientation. |
| Sensors: Gyroscope | Select if the device has hardware that detects rotation or twist. In combination with an accelerometer, it can provide smoother orientation detection and support a six-axis orientation system. |
| Sensors: GPS | Select if the device has hardware that supports the Global Positioning System (GPS) satellite-based navigation system. |
| Sensors: Proximity Sensor | Select if the device has hardware that detects if the device is close to your face during a phone call to disable input from the screen. |
| Default Skin | Select a skin that controls what the device looks like when displayed in the emulator. Remember that specifying a screen size that’s too big for the resolution can mean that the screen is cut off, so you can’t see the whole screen. See Create an emulator skin for more information. |
AVD properties
You can specify the following properties for AVD configurations in the Verify Configuration page. The AVD configuration specifies the interaction between the development computer and the emulator, as well as properties you want to override in the hardware profile.
AVD configuration properties override hardware profile properties. Emulator properties that you set while the emulator is running override them both.
| AVD Property | Description |
|---|---|
| AVD Name | Name of the AVD. The name can contain uppercase or lowercase letters, numbers from 0 to 9, periods (.), underscores (_), parentheses ( () ), dashes (-), and spaces. The name of the file storing the AVD configuration is derived from the AVD name. |
| AVD ID (Advanced) | The AVD filename is derived from the ID, and you can use the ID to refer to the AVD from the command line. |
| Hardware Profile | Click Change to select a different hardware profile in the Select Hardware page. |
| System Image | Click Change to select a different system image in the System Image page. An active internet connection is required to download a new image. |
| Startup Orientation | |
| Network: Latency (Advanced) | Select a network protocol to set how much time (delay) it takes for the protocol to transfer a data packet from one point to another point. |
| Emulated Performance: Graphics | |
| Emulated Performance: Boot option (Advanced) |
|
| Emulated Performance: Multi-Core CPU (Advanced) | Select the number of processor cores on your computer that you’d like to use for the emulator. Using more processor cores speeds up the emulator. |
| Memory and Storage: RAM | The amount of RAM on the device. This value is set by the hardware manufacturer, but you can override it, if needed, such as for faster emulator operation. Increasing the size uses more resources on your computer. Type a RAM size and select the units, one of B (byte), KB (kilobyte), MB (megabyte), GB (gigabyte), or TB (terabyte). |
| Memory and Storage: VM Heap | The VM heap size. This value is set by the hardware manufacturer, but you can override it, if needed. Type a heap size and select the units, one of B (byte), KB (kilobyte), MB (megabyte), GB (gigabyte), or TB (terabyte). For more information on Android VMs, see Memory Management for Different Virtual Machines. |
| Memory and Storage: Internal Storage | The amount of nonremovable memory space available on the device. This value is set by the hardware manufacturer, but you can override it, if needed. Type a size and select the units, one of B (byte), KB (kilobyte), MB (megabyte), GB (gigabyte), or TB (terabyte). |
| Memory and Storage: SD Card | The amount of removable memory space available to store data on the device. To use a virtual SD card managed by Android Studio, select Studio-managed, type a size, and select the units, one of B (byte), KB (kilobyte), MB (megabyte), GB (gigabyte), or TB (terabyte). A minimum of 100 MB is recommended to use the camera. To manage the space in a file, select External file and click . to specify the file and location. For more information, see mksdcard and AVD data directory. |
| Device Frame: Enable Device Frame | Select to enable a frame around the emulator window that mimics the look of a real device. |
| Custom Skin Definition (Advanced) | Select a skin that controls what the device looks like when displayed in the emulator. Remember that specifying a screen size that’s too big for the skin can mean that the screen is cut off, so you can’t see the whole screen. See Create an emulator skin for more information. |
| Keyboard: Enable Keyboard Input (Advanced) | Select this option if you want to use your hardware keyboard to interact with the emulator. It’s disabled for Wear OS and Android TV. |
Create an emulator skin
An Android emulator skin is a collection of files that define the visual and control elements of an emulator display. If the skin definitions available in the AVD settings don’t meet your requirements, you can create your own custom skin definition, and then apply it to your AVD.
Each emulator skin contains:
- A hardware.ini file
- Layout files for supported orientations (landscape, portrait) and physical configuration
- Image files for display elements, such as background, keys and buttons
To create and use a custom skin:
- Create a new directory where you will save your skin configuration files.
- Define the visual appearance of the skin in a text file named layout . This file defines many characteristics of the skin, such as the size and image assets for specific buttons. For example:
For more detailed information about creating emulator skins, see the Android Emulator Skin File Specification in the tools source code.
Content and code samples on this page are subject to the licenses described in the Content License. Java is a registered trademark of Oracle and/or its affiliates.
Источник


