- Generating WireGuard QR codes for fast mobile deployments
- QR Codes to the rescue!
- Prerequisites
- Creating the client keys
- Creating the client configuration file
- Generate your QR code
- Load it into the app
- How to configure a WireGuard Android VPN Client
- Download the WireGuard App
- Configure your connection
- Add your client to your server
- Getting connected
- Test your connection
- It’s really that easy!
- Support future content
- Written By Jay
- Like this? Subscribe
- Free Wireguard VPN service on AWS
- The reasoning
- Stages
- Useful links
- The authors
- 1. Register the AWS Free Account
- 1.1. Opening the AWS Management Console
- 1.2. AWS account creation
- 1.3. Contact information for AWS account
- 1.4. Specify billing information
- 1.5. Account Verification
- 1.6. Choosing an AWS support plan
- Login into AWS Management Console
- 1.8. Choosing the location of the Datacenter
- 1.8.1. Internet speed testing
- 2. Create an AWS instance
- 2.1 Create a virtual machine (instance)
- 2.1.0. Follow the instance creation steps
- 2.1.0.1. Go to the Instance Launch page, choose EC-2 service
- 2.1.0.2. Launch a virtual server, known as Amazon EC-2 Instance
- 2.1.0.3. Choose Amazon machine Image (Operating System) — the Ubuntu Server 18.04 LTS
- 2.1.1. Choose Instance type
- 2.1.2. Configure Instance details
- 2.1.3. Add storage
- 2.1.4. Add Tags
- 2.1.5. Opening ports
- 2.1.6. Review Instance Launch settings
- 2.1.7. Creating access keys
- 2.1.7.1. Save private keys (.pem)
- 2.1.8. Instance Launch Summary
- 2.2. Creating an external IP address
- 2.2.1. Create an External IP
- 2.2.2. External IP setup
- 2.2.3. IP address overview
- 2.2.4. List of external IP addresses
- 2.2.5. Assign an external IP to Instance
- 2.2.6. Associate address with Instance
- 2.2.7. External IP assignment Summary
- 3. Connect to AWS instance
- 3.1. Connect from a Windows PC via SSH
- 3.1.1. Import Private Key for Putty
- 3.1.1.1. Import AWS key into Putty
- 3.1.1.2. AWS key in PEM format
- 3.1.1.3. Set the Key import parameters
- 3.1.1.4. Save the imported .ppk key
- 3.1.2. Create and configure a connection in Putty
- 3.1.2.1. Make a connection
- 3.1.2.2. Set a user auto-login
- 3.1.2.3. Use a private key for an SSH connection
- 3.1.2.4. Open the private key file
- 3.1.2.5. Save changes and launch an SSH remote connection
- 3.1.2.7. Set a trust between hosts
- 3.1.2.8. Enter the password to activate the key
- 3.1.2.9. Successful connection
- 4. Configure Wireguard server
- 4.1. Install Wireguard
- 4.1.1. Clone the scripts repository
- 4.1.2. Directory of scripts repository
- 4.1.3 Initialization script
- 4.1.3.1. Set connection endpoint (IP:port)
- 4.1.3.2. Set internal IP address
- 4.1.3.3. Specify DNS Server
- 4.1.3.4. Specify WAN Interface
- 4.1.3.5. Specify customer name
- 4.2. Add new VPN user
- 4.2.1. User configuration file
- 4.2.2. Client configuration with QR code
- 5. Configure VPN Clients
- 5.1. Android mobile Client setup
- 5.2. Windows Client Setup
- 5.2.1. Create a local text file to import configuration
- 5.2.2. Copy the configuration file from the server
- 5.2.3. Paste the configuration text to a local text file
- 5.2.4. Save the local configuration file
- 5.2.5. Import local configuration file
- 5.2.6. Establish a VPN connection
- 6. Verify VPN connection
Generating WireGuard QR codes for fast mobile deployments
If you have been following along on my Gain Flexibility & Increase Privacy with WireGuard VPN “mini-course”, you’ll notice that there are a few areas that we need apply configurations in order for our devices to get connected.
Typing all of this in manually on mobile can be a massive pain, especially if you are supporting a remote device for a user.
QR Codes to the rescue!
We can use QR codes to send VPN configuration files out. This is brilliant engineering on WireGuard’s part.
Prerequisites
- You need a working Ubuntu 20.04 WireGuard VPN Server (learn how to set that up here)
- You will need the qrencode package installed on your server
Installing the package is easy. Run this command on your SERVER:
Creating the client keys
Unlike macOS and Windows (where our keys are generated on the server), we will need to create the configuration on the server itself.
I like to keep my client configurations in “/etc/wireguard/clients”, so let’s make that directory on the server. I am also going to create a keypair called mobile , so you will see me reference this name again throughout my post.
IMPORTANT NOTE: Be sure to change the mobile name in that command to a descriptive client name of your choice (for both the private and public key).
Creating the client configuration file
We’ll then need to create a client configuration file to be encoded into a QR code. We’ll use nano to do the trick:
This is what we will want our “/etc/clients/mobile.conf” file to look like:
IMPORTANT: You need to replace YOUR_SERVER_PUBLIC_KEY , YOUR_VPN_PRIVATE_IP and YOUR_SERVER_WAN_IP
ALSO IMPORTANT: Paste in the contents of your “mobile.key” for the value of PrivateKey . I used the example of abcdefg. but you can get the contents of your key by running the cat command in a separate window:
TO SAVE: While in nano , press CTRL + O to save and CTRL + X to quit.
Generate your QR code
Now that we have our file ready, we can now generate a QR code with it:
It will output an image like this:
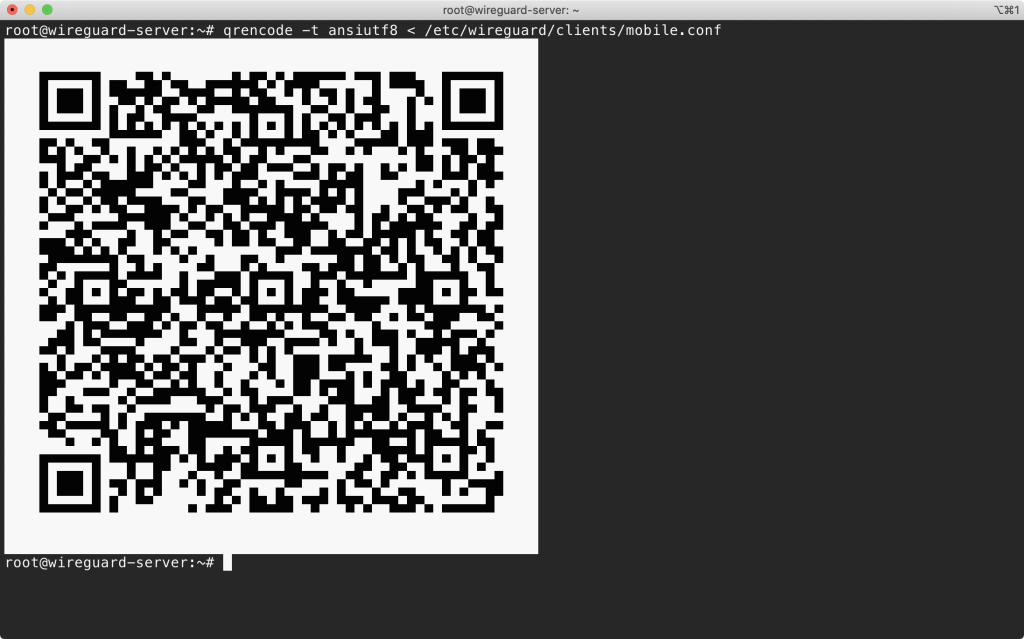
Treat this QR code like a password! Don’t just email it. You can take a screenshot and securely send it to your user so only they have access to it.
Load it into the app
All you need your user to do is open the app on their phone and hold their camera up to the QR code. You can see the entire process here:
Источник
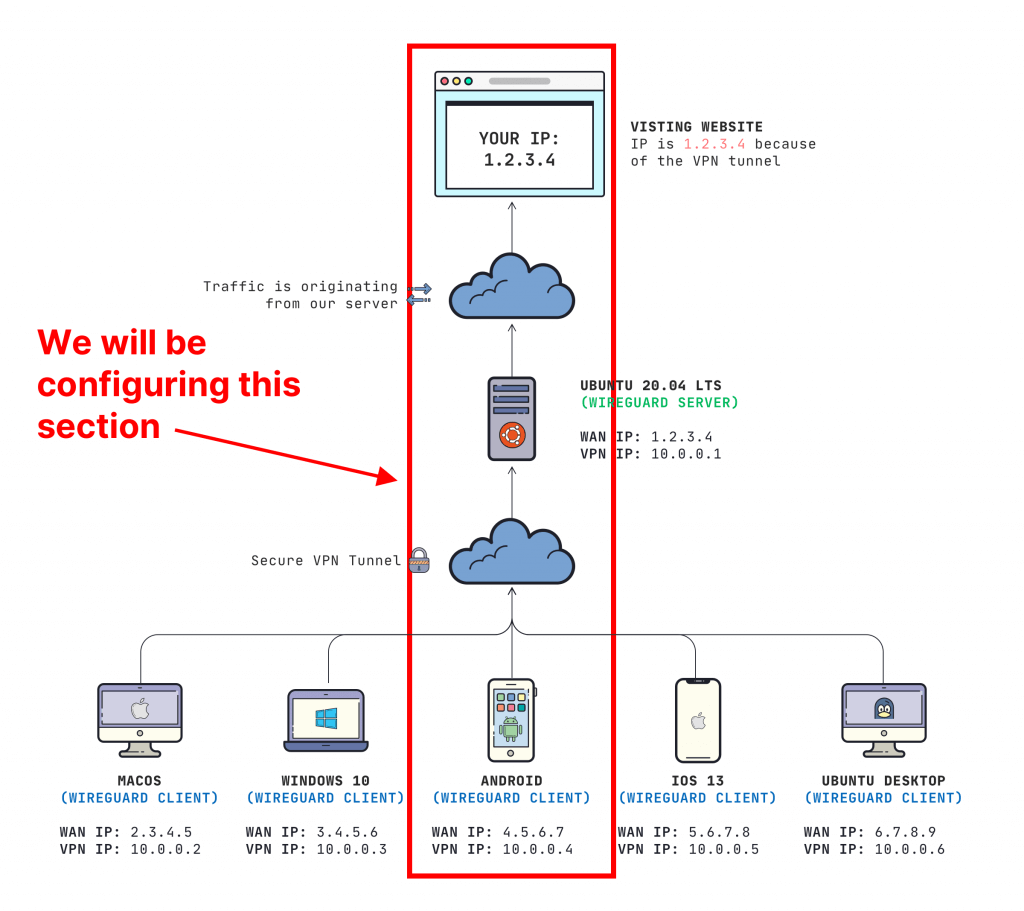
How to configure a WireGuard Android VPN Client
In this section of the Gain Flexibility & Increase Privacy with WireGuard VPN mini-course, we are going to be configuring WireGuard VPN on an Android device.
This is what it looks like:
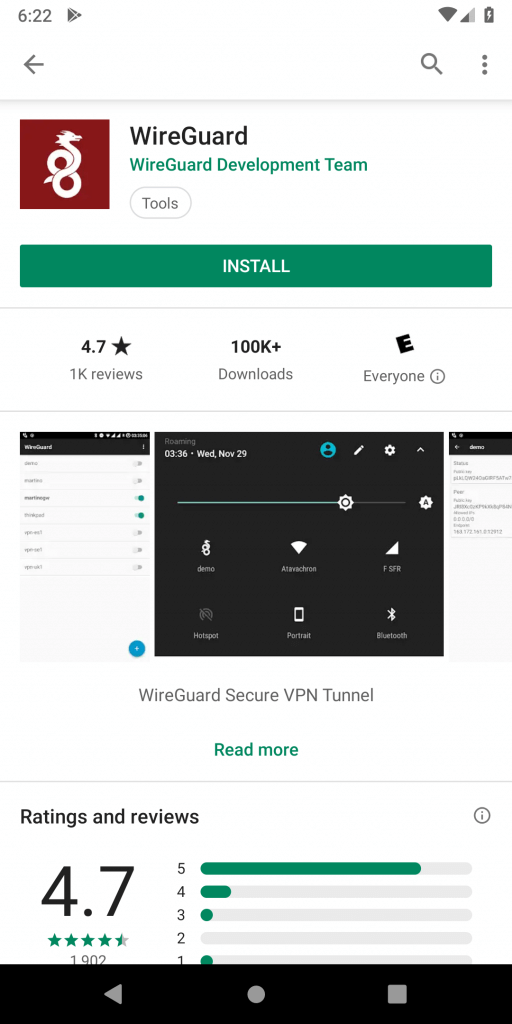
Download the WireGuard App
Configure your connection
Once the app is downloaded, we need to add a new configuration file.
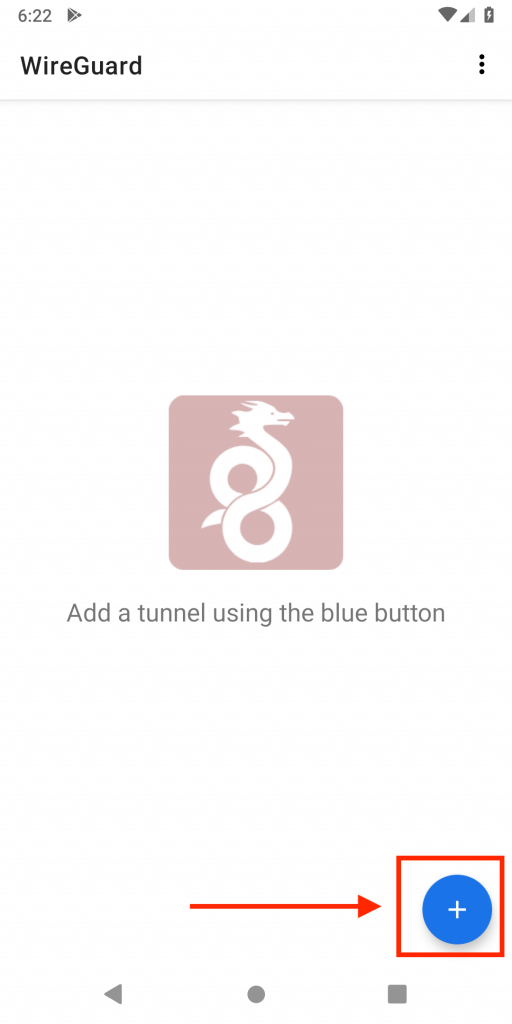
Rather than typing in everything manually, let’s use the QR code we generated from my other post to quickly import.
It will ask for camera permission, then you should be able to scan your code.

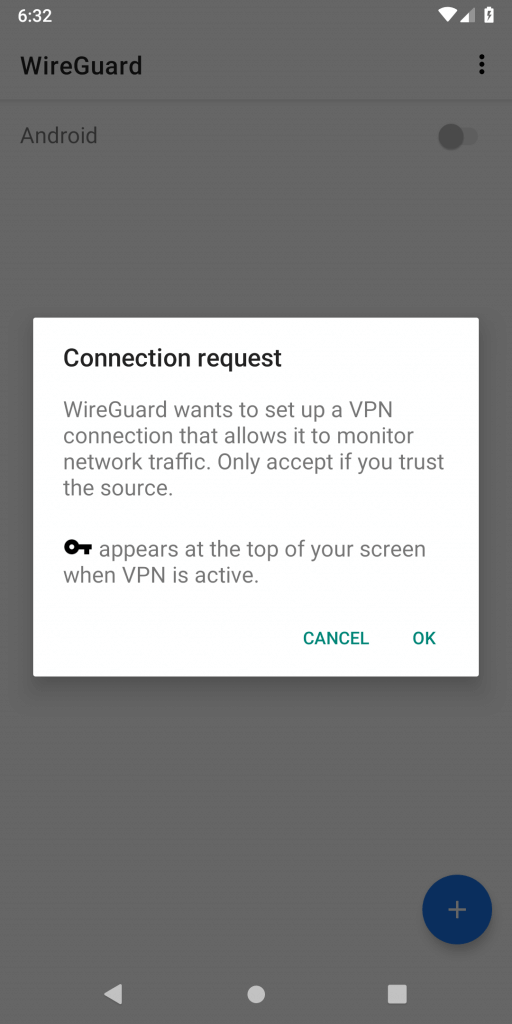
You’ll be prompted to confirm your action, but you should definitely press OK.
Add your client to your server
Your client is configured, but you need to authorize it on your server.
ON YOUR SERVER run this command:
IMPORTANT: You need to replace YOUR_CLIENT_PUBLIC_KEY and YOUR_CLIENT_VPN_IP
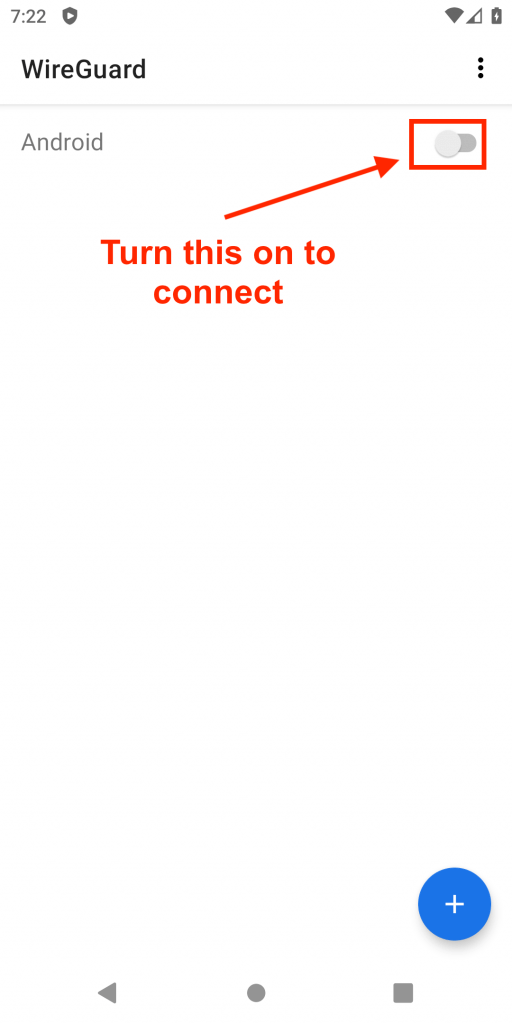
Getting connected
All you need to do now when you want to connect is open your WireGuard app and turn it on.
Test your connection
The easiest way to test your connection is visiting fast.com and dnsleaktest.com to make sure that everything is performing well.
It’s really that easy!
I hope you found this post to be helpful. If you have any questions, you can ask me in the comments below or ask me on Twitter. If you like content like this, sign up on our mailing list.
Support future content

Psst. any earnings that we make off of our book is being reinvested to bringing you more content . If you like what you read, consider getting our book or get sweet perks by becoming a sponsor.
Written By Jay
I’m a DevOps engineer who accidentally ended up in application & user-experience design. ?? I’m a husband and proud dog-dad who co-founded 521 Dimensions & Server Side Up. I like to having meaningful conversations with people who love building things. Please reach out and say hello!
Like this? Subscribe
We’re privacy advocates. We will never spam you and we only want to send you emails that you actually want to receive. One-click unsubscribes are instantly honored.
 ./footer
You’ve enjoyed another post by Server Side Up (hosted by Vultr).
Источник
Free Wireguard VPN service on AWS
The reasoning
The increase of Internet censorship by authoritarian regimes expands the blockage of useful internet resources making impossible the use of the WEB and in essence violates the fundamental right to freedom of opinion and expression enshrined in the Universal Declaration of Human Rights.
Article 19
Everyone has the right to freedom of opinion and expression; this right includes freedom to hold opinions without interference and to seek, receive and impart information and ideas through any media and regardless of frontiers.
The following is the detailed 6 steps instruction for non-IT people to deploy free* VPN service upon Wireguard technology in Amazon Web Services (AWS) cloud infrastructure, using a 12 months free account, on an Instance (virtual machine) run by Ubuntu Server 18.04 LTS.
I tried to make this walkthrough as friendly as possible to people far from IT. The only thing required is assiduity in repeating the steps described below.
Note
- AWS offers free usage tier for a period of 12 months limited to 15 GB of traffic monthly.
Stages
Useful links
The authors
1. Register the AWS Free Account
To register an AWS account, you need to submit a valid phone number and a bank card (Visa or Mastercard). I recommend using virtual cards provided for free by Yandex.Money or Qiwi wallet.
AWS checks the validity of the card by deducting 1$ at registration followed by the refund.
1.1. Opening the AWS Management Console
Follow the link: https://aws.amazon.com/, click on the Create an AWS account button.

1.2. AWS account creation
Fill in the data and click the Continue button.

1.3. Contact information for AWS account
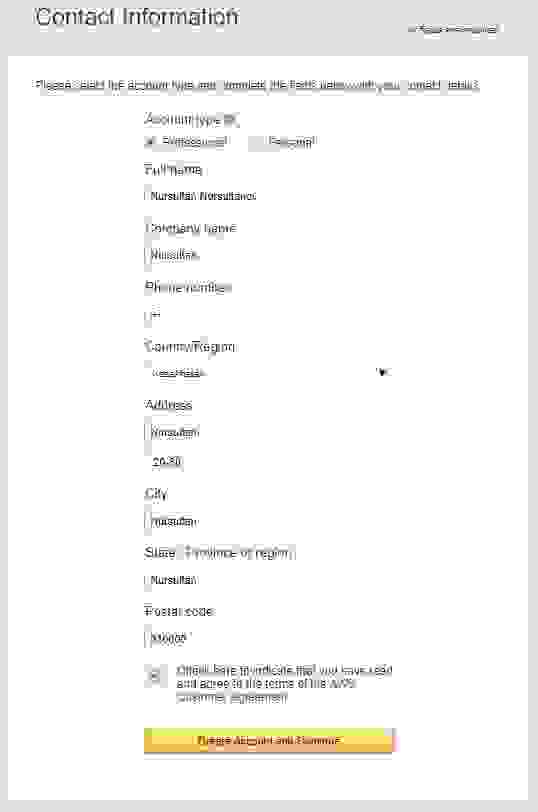
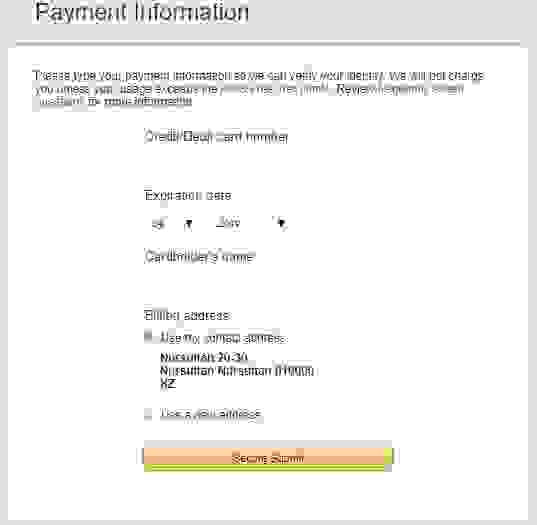
1.4. Specify billing information
Card number, expiry date, and a cardholder name.
1.5. Account Verification
AWS verifies your phone number and debits $ 1 from your bank card. Then you should get a 4-digit code on the computer screen and receive a call from Amazon. During a call, you need to dial the 4-digit code shown on the screen.

1.6. Choosing an AWS support plan
Choose a Basic plan (free).

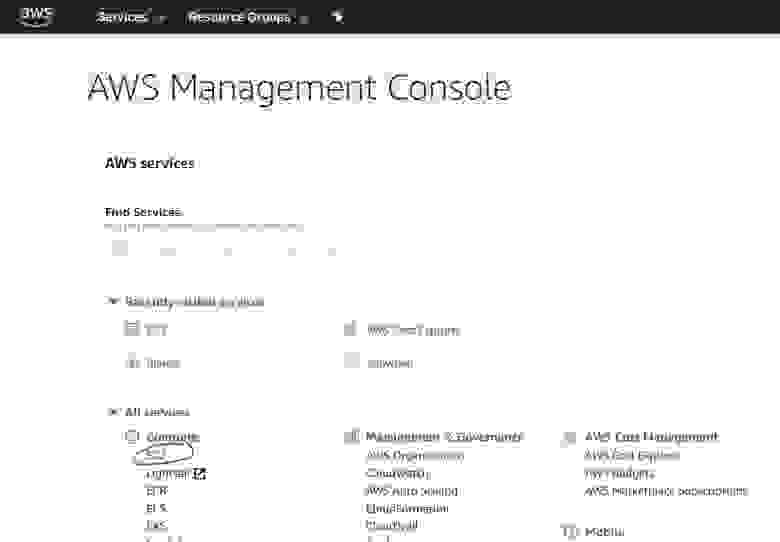
Login into AWS Management Console

1.8. Choosing the location of the Datacenter
1.8.1. Internet speed testing
I recommended you to run a speed test to the nearest Datacenters at https://speedtest.net/ and choose the best to connect to.
The following are the speed test results from my location:
- Singapore

- Paris
- Frankfurt
- Stockholm
- London


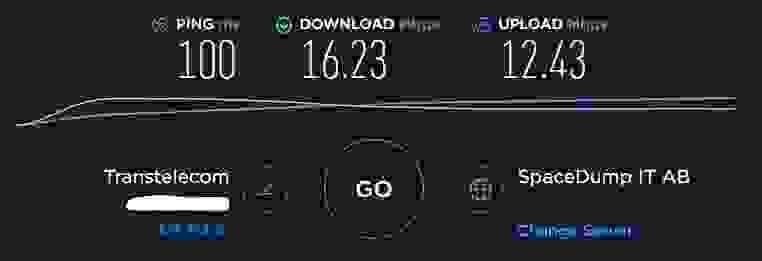
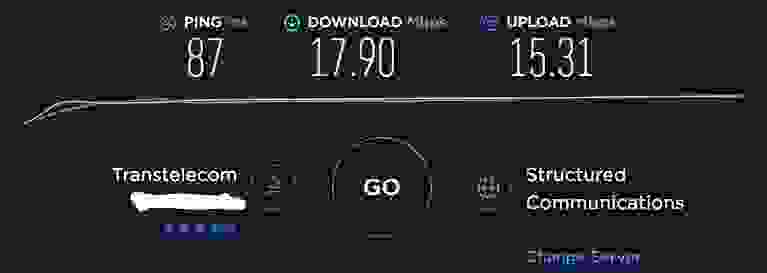
The Datacenter in London shows the best speed result, so I choose it to proceed with.
2. Create an AWS instance
2.1 Create a virtual machine (instance)
2.1.0. Follow the instance creation steps
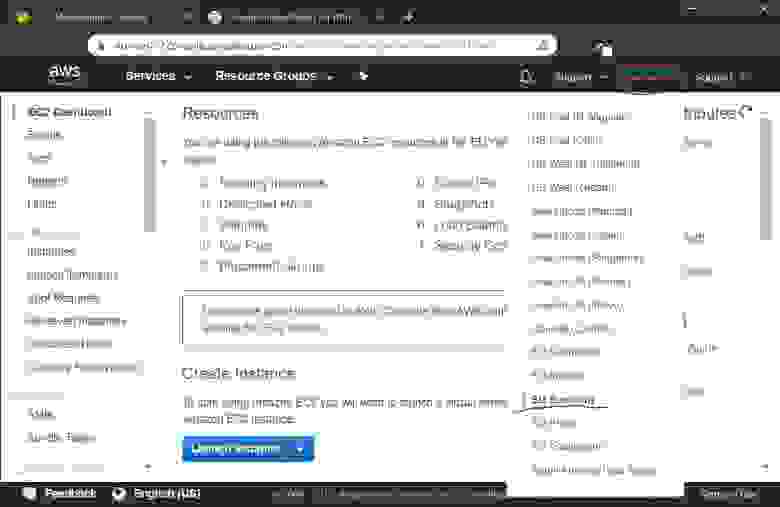
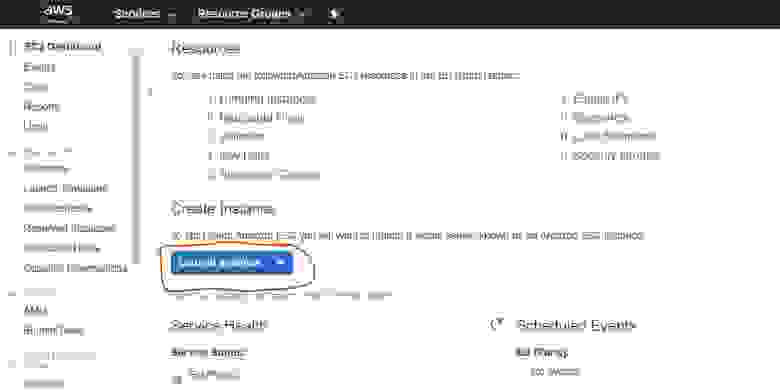
2.1.0.1. Go to the Instance Launch page, choose EC-2 service
2.1.0.2. Launch a virtual server, known as Amazon EC-2 Instance
2.1.0.3. Choose Amazon machine Image (Operating System) — the Ubuntu Server 18.04 LTS
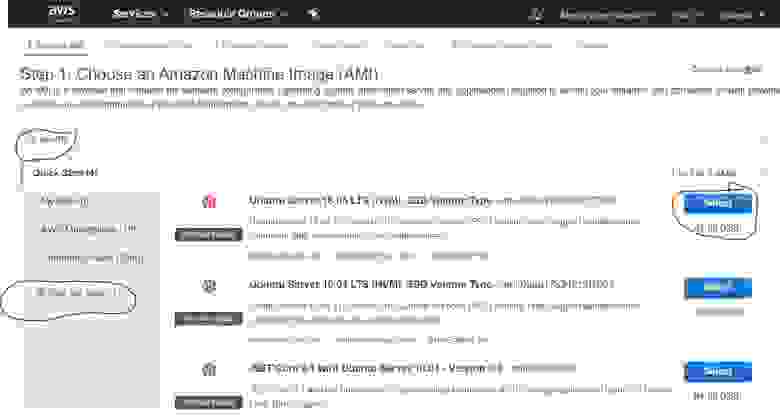
2.1.1. Choose Instance type
The t2.micro instance type is set by default and is the right one to go with. Click the Next: Configure Instance Details button to proceed.

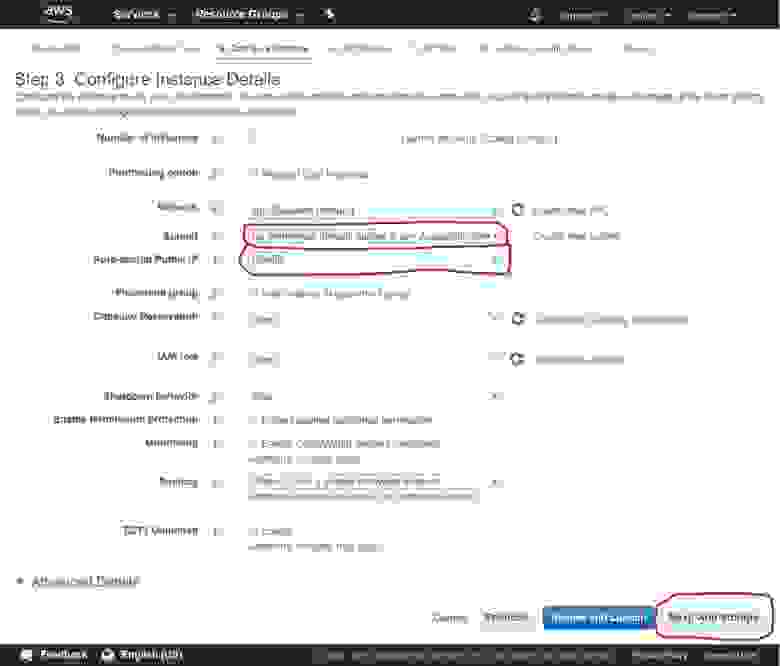
2.1.2. Configure Instance details
Disable the auto-assignment of the public IP as you will assign a static one to your Instance. Click the Next: Add Storage button.
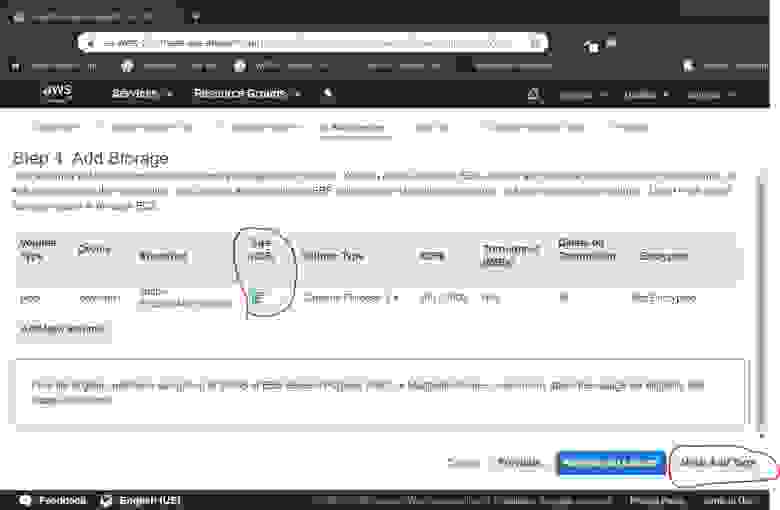
2.1.3. Add storage
Specify the size of the Drive — the 16GB is enough.
Click Next: Add Tags button.
2.1.4. Add Tags
If you have several instances, you may group them by tags to enable better administration. Yet, this functionality is surplus. So we skip this by pressing the Next: Configure Security Group button.
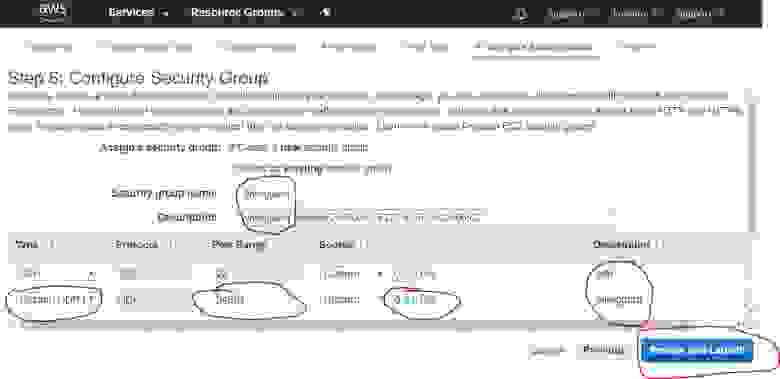
2.1.5. Opening ports
Configure the firewall by assigning open ports. The set of open ports is called the «Security Group». You need to create a new «Security Group», give it a name, a description and a UDP port (Custom UDP Rule).
In the Port Range field specify a port number from the range 49152 — 65535 of dynamic ports. In my case, I choose the 54321 port number.
Click the Review and Launch button to complete this step.
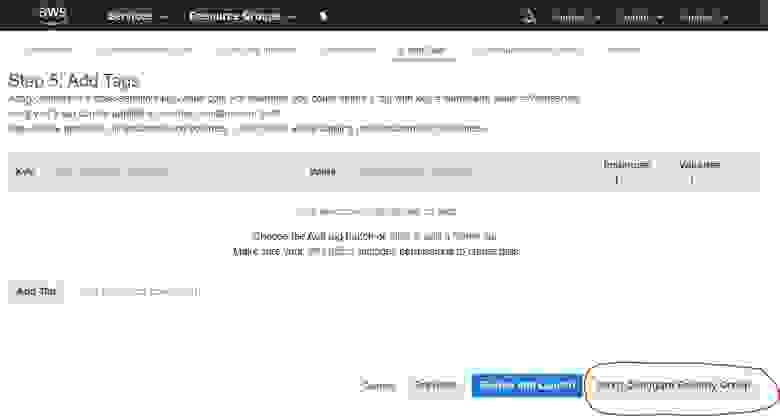
2.1.6. Review Instance Launch settings
Review and check all the settings for Instance Launch, and if all is OK click the Launch button.

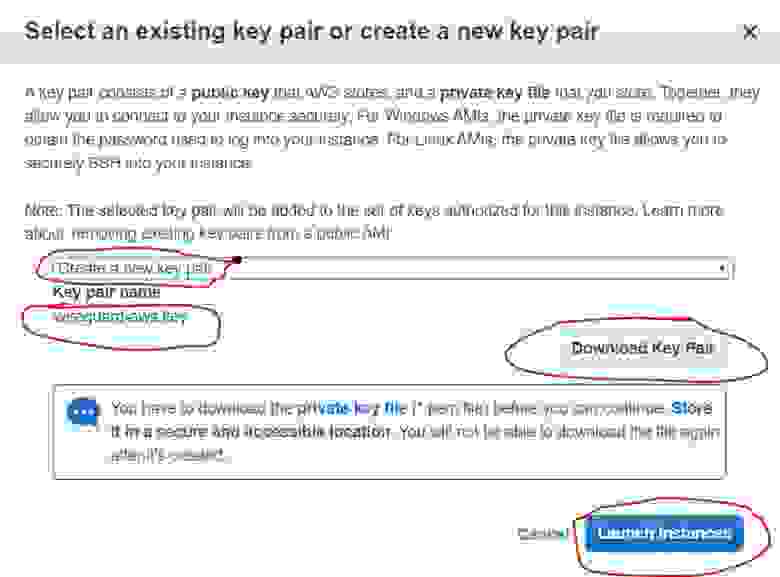
2.1.7. Creating access keys
Create or add an existing SSH key in the dialog box that you will use for remote connection to your instance.
Choose the «Create a new key pair» to generate a new key. Give it a name and click the Download Key Pair button to download the generated key to the PC drive. Click the Launch Instances button.
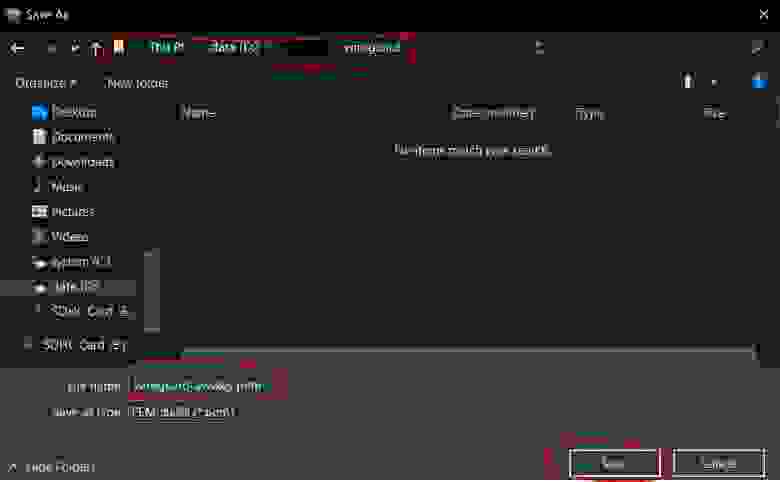
2.1.7.1. Save private keys (.pem)
When you click the Download Key Pair you save the key as a .pem file.
For better management, I assigned a wireguard-awskey.pem name to the file.
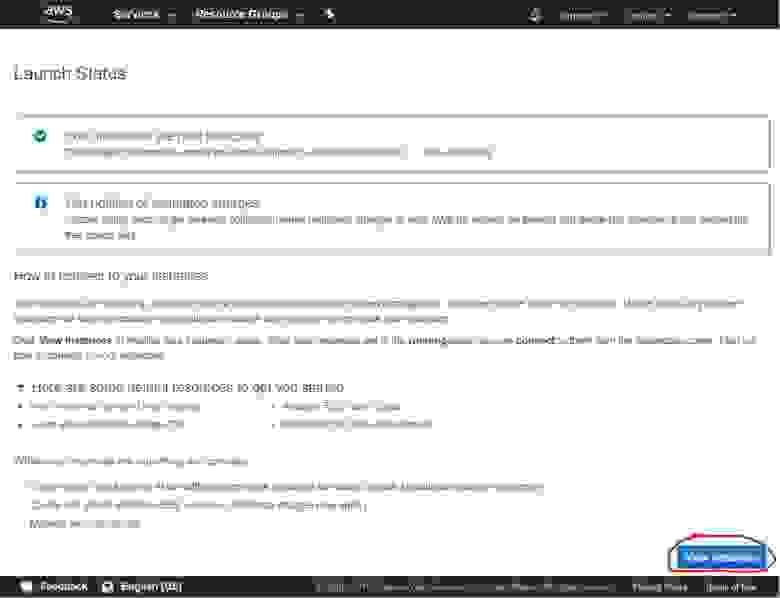
2.1.8. Instance Launch Summary
Next, you should see a message about the successful launch of the Instance that you have created. You can visit the list of your Instances by clicking the View instances button.
2.2. Creating an external IP address
2.2.1. Create an External IP
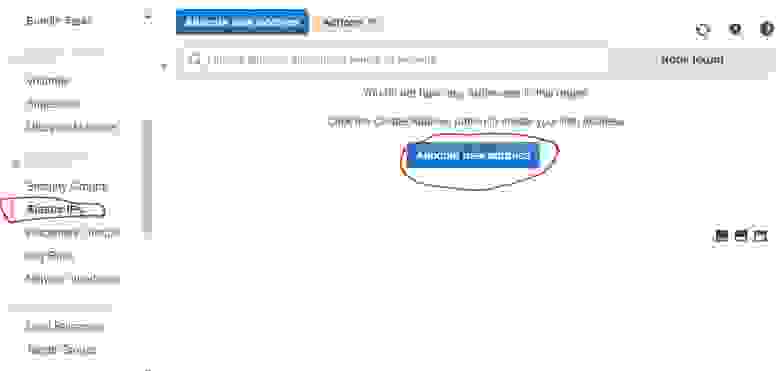
Next is the creation of an external IP address, that you will use to connect to the VPN server.
Find the Elastic IPs in the NETWORK & SECURITY category of the navigation panel. Click the Allocate new address button.
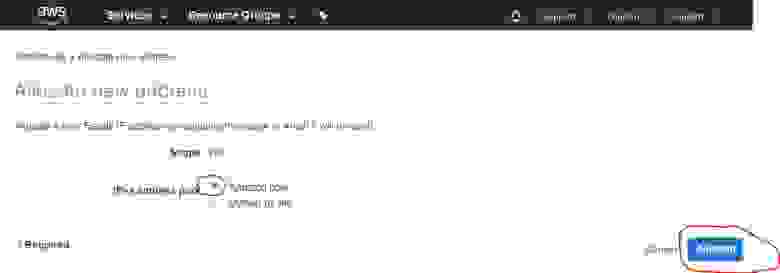
2.2.2. External IP setup
In the next step you need to enable the Amazon pool (which is by default), and click the Allocate button
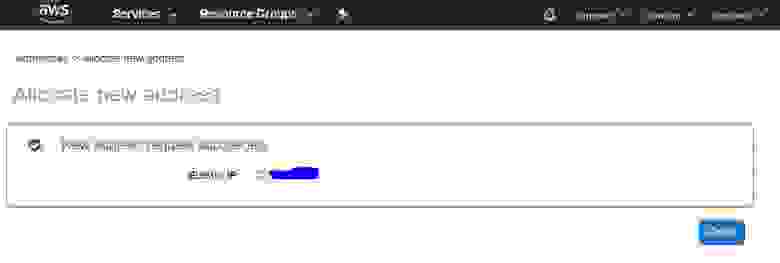
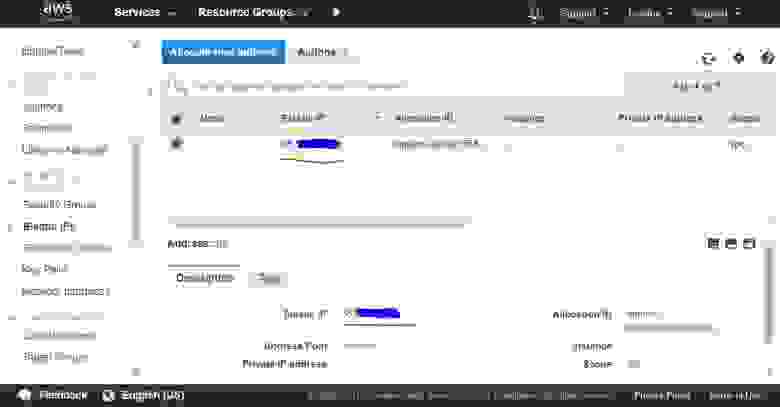
2.2.3. IP address overview
The next window displays an external IP address assigned by the Amazon pool. Write it down, as you will need it fo the configuration process and for VPN server setup. In this guide, as an example, I use the IP address 4.3.2.1.
Once you finish this step, click the Close button.
2.2.4. List of external IP addresses
Next, you should get a list of your public IP addresses (Elastics IPs).
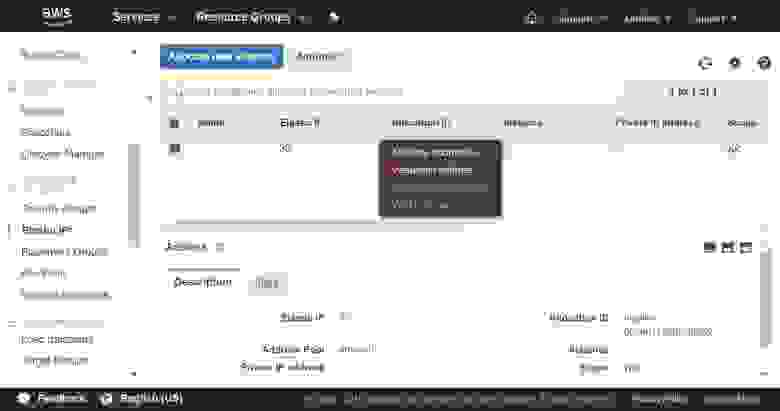
2.2.5. Assign an external IP to Instance
Choose the IP address from the list (see 2.2.3), and click the mouse right button for a drop-down menu.
In this menu choose the Associate address to assign an IP to the created Instance.
2.2.6. Associate address with Instance
In the drop-down menu select the created Instance, and click the Associate button.

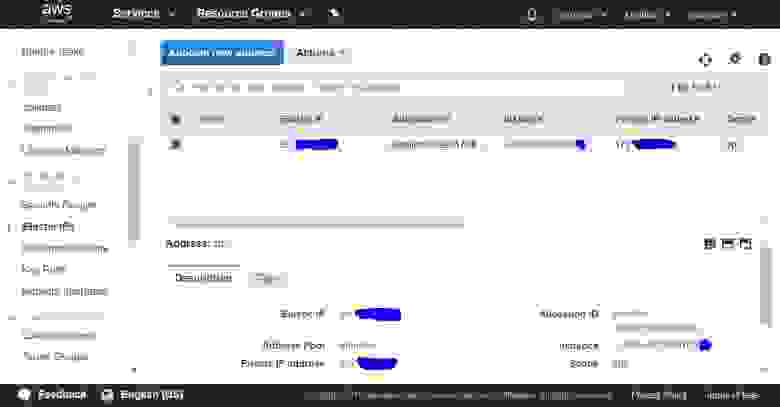
2.2.7. External IP assignment Summary
You should now have a created Instance with an assigned public IP address. This enables you to make a remote connection to the Instance from outside (from your PC) via SSH.
3. Connect to AWS instance
SSH is a secure protocol to manage remote computer devices.
3.1. Connect from a Windows PC via SSH
Download and install a Putty to make a connection from the Windows PC.
3.1.1. Import Private Key for Putty
3.1.1.1. Import AWS key into Putty
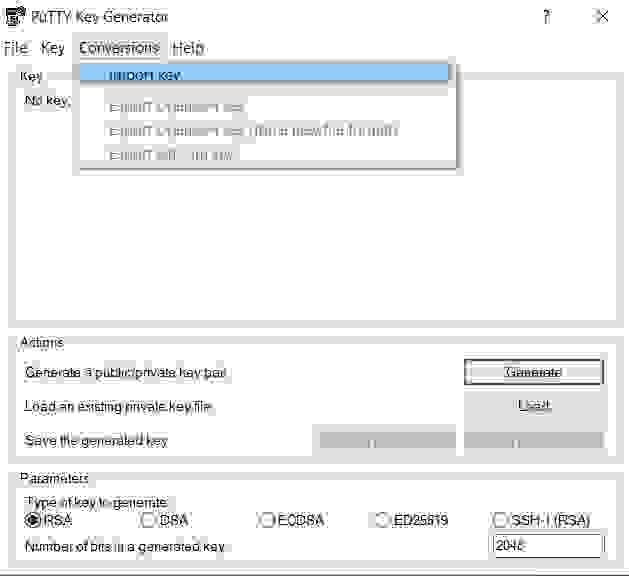
Launch a PuTTYgen utility to match your AWS key in .pem format with a .ppk format suitable for the Putty.
To do this select Conversions -> Import Key from the top menu.
3.1.1.2. AWS key in PEM format
Next, choose the key that you dealt with in 2.1.7.1
In my case it is wireguard-awskey.pem.
3.1.1.3. Set the Key import parameters
At this step, you need to specify the import parameters of the Key — the key comment and the key passphrase. You will need these at every connection. Also it protects the key itself with a password from unauthorized access.
You may skip the password assignment. But this will make your connection less secure in case the key falls into the wrong hands.
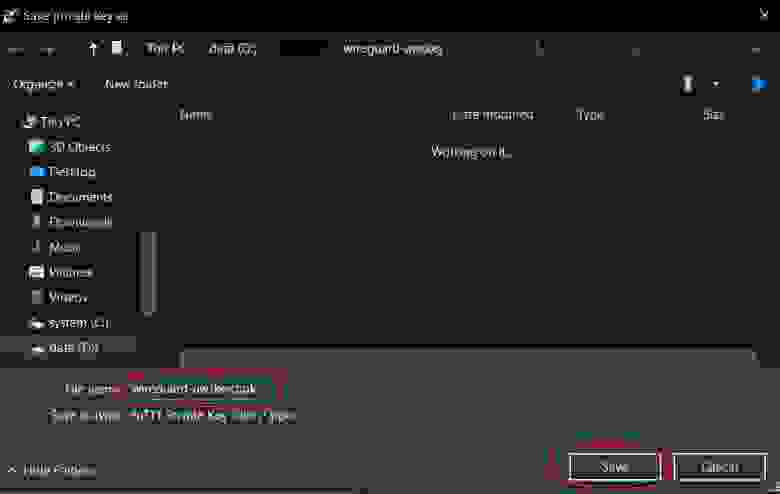
Once you finish, click the Save private key button.

3.1.1.4. Save the imported .ppk key
You can save your private key in a .ppk format suitable for Putty from the save file dialog box.
Specify the key name (in my case, wireguard-awskey.ppk ) and click the Save button.
3.1.2. Create and configure a connection in Putty
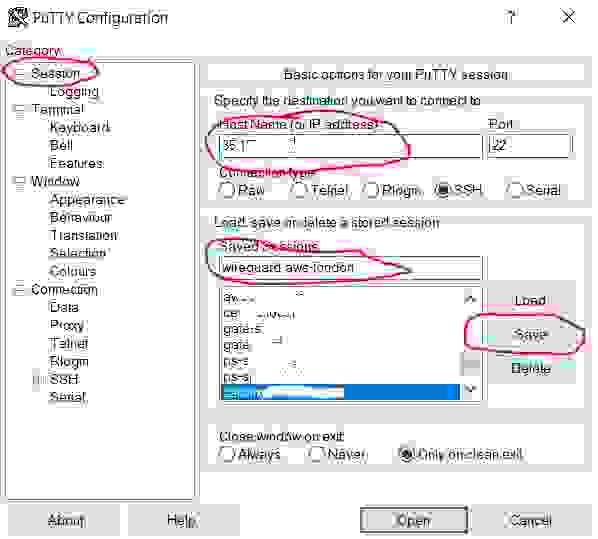
3.1.2.1. Make a connection
Run the Putty program, choose the Session category (it is open by default) and in the Host Name field enter the public IP address of the server. I remind that you got your public IP address in step 2.2.3.
Give any name to the connection in the Saved Session field (for me it is wireguard-aws-london ). Click the Save button.
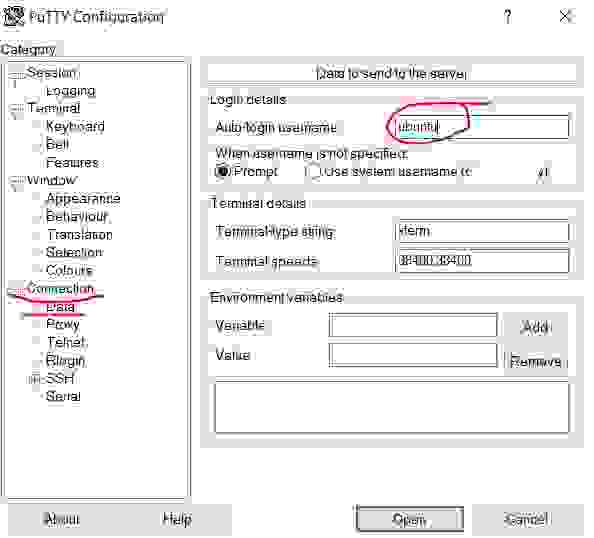
3.1.2.2. Set a user auto-login
Choose the Data subcategory from the Connection category. Enter the Auto-login username ubuntu in the Auto-login username field. (ubuntu is the standard instance user on AWS with Ubuntu).
3.1.2.3. Use a private key for an SSH connection
Follow the path Connection -> SSH -> Auth subcategory and click on the Browse button to choose the private key file.
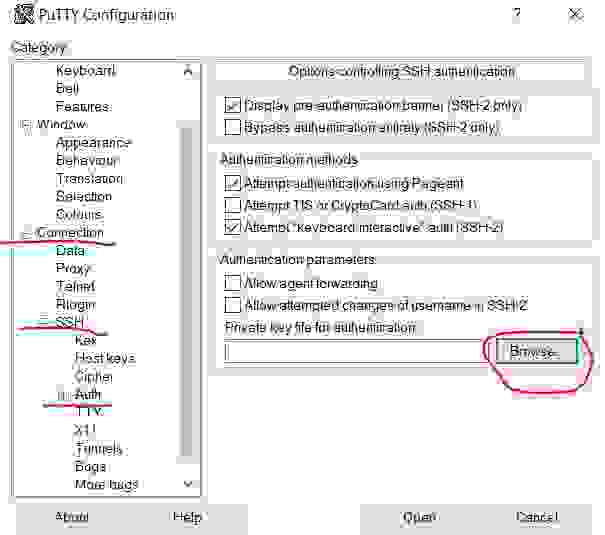
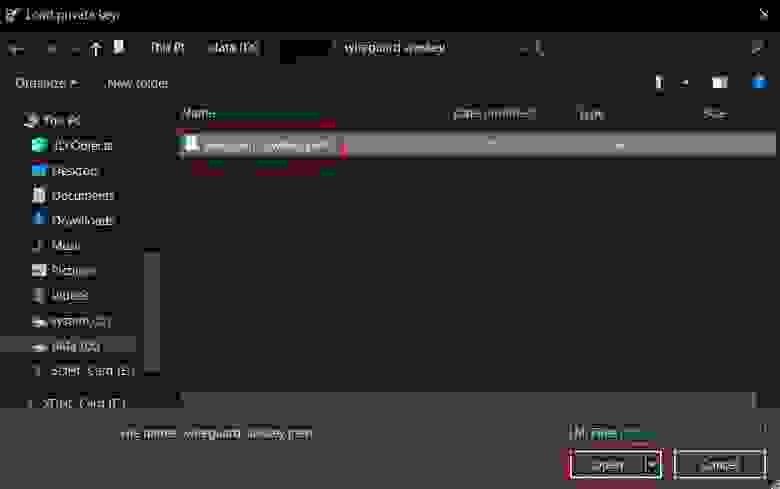
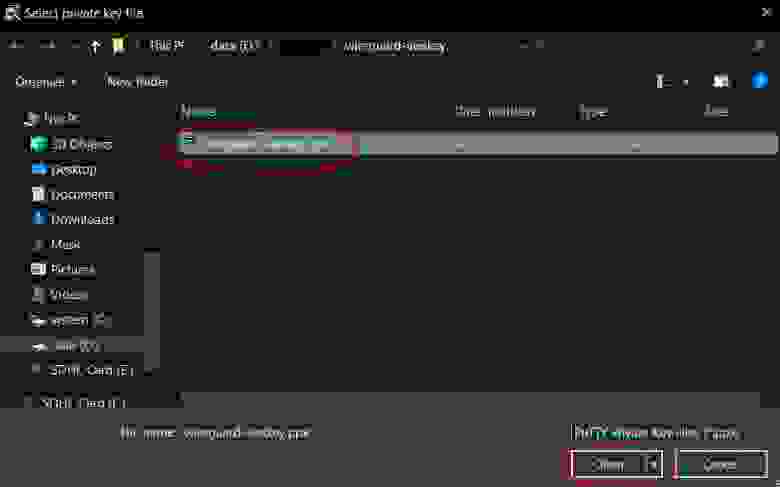
3.1.2.4. Open the private key file
Specify the key that you imported earlier in step 3.1.1.4 — wireguard-awskey.ppk , and click the Open button.
3.1.2.5. Save changes and launch an SSH remote connection
In the Session category of Putty configuration window press the Save button to apply all the changes you made in (3.1.2.2 — 3.1.2.4).
Click the Open button to launch the ready-to-go SSH remote connection.

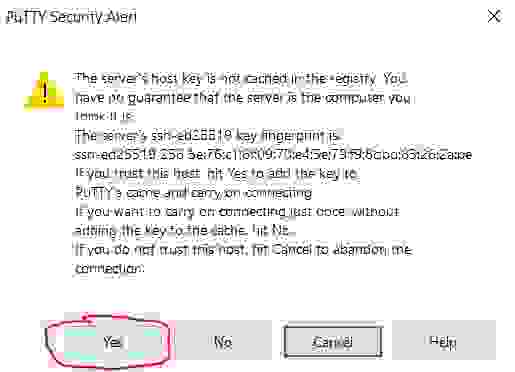
3.1.2.7. Set a trust between hosts
At the first connection, you should get a warning about the lack of trust between two computers (hosts). The system asks you whether you trust the remote host. Click Yes to add the remote host to the trust list.
3.1.2.8. Enter the password to activate the key
In a Putty terminal window enter the key password you set in step
3.1.1.3. When entering the password it does not show any action on the screen. No worries, if you make a mistake, you can use the backspace key.
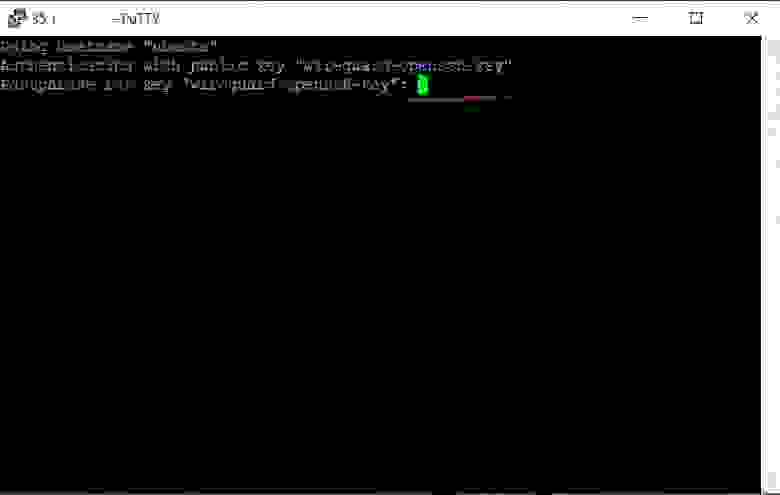
3.1.2.9. Successful connection
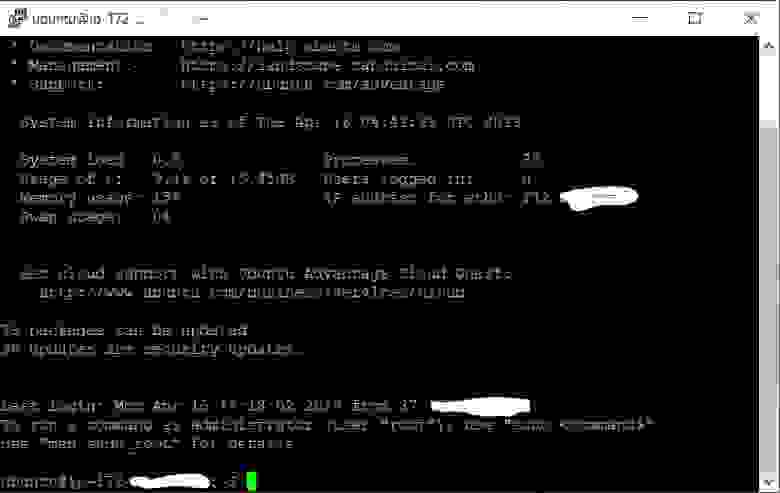
Once you enter the correct password, you should get a welcome text. It informs you that the remote system is ready to execute your commands.
4. Configure Wireguard server
Below is the instruction for a script-driven Wireguard installation and management.
I keep the latest version of the instruction in the repository: https://github.com/pprometey/wireguard_aws
4.1. Install Wireguard
Enter the following commands in the Putty terminal.
You can copy them to the clipboard, and paste in the terminal by pressing the right mouse button.
4.1.1. Clone the scripts repository
Clone a Wireguard installation scripts repository:
4.1.2. Directory of scripts repository
Go to the directory of the cloned repository:
4.1.3 Initialization script
Run the Wireguard installation script under admin (root user) rights:
The script asks you to provide the following data to configure Wireguard.
4.1.3.1. Set connection endpoint (IP:port)
Enter the external IP address (see 2.2.3) and the open port (see 2.1.5) of the Wireguard server. Use the following format IP:port, for example, 4.3.2.1:54321 . Press Enter key to confirm.
4.1.3.2. Set internal IP address
Enter the IP address of the Wireguard server in a secure VPN subnet. If you do not know what it is, press Enter key to set the default value ( 10.50.0.1 ).
4.1.3.3. Specify DNS Server
Enter the IP address of the DNS server, or press Enter key to set the default value 1.1.1.1 (Cloudflare public DNS).
4.1.3.4. Specify WAN Interface
Enter the name of the external network interface. This interface will sense the internal network interface of the VPN.
Press Enter to set the default for AWS ( eth0 )
4.1.3.5. Specify customer name
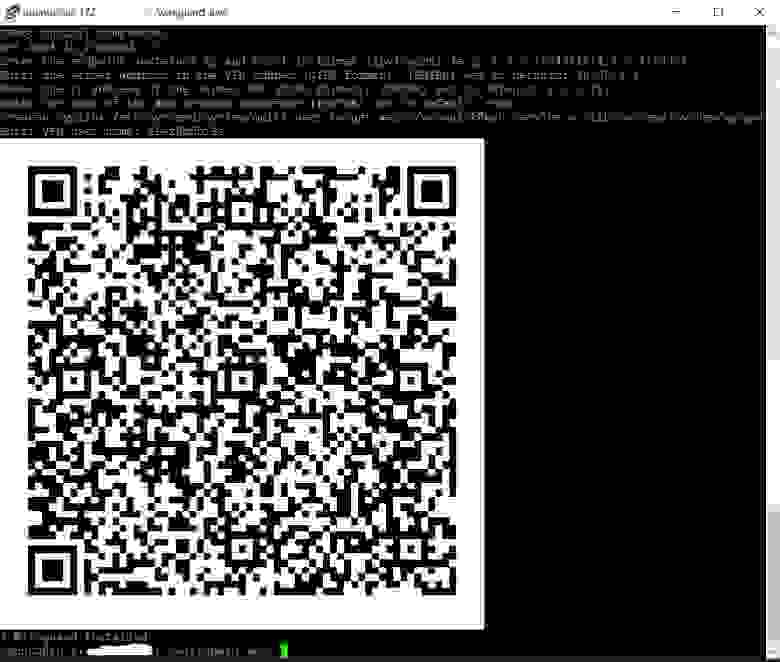
The Wireguard VPN server cannot start until you add at least one client. Enter a VPN username.
In my case, I entered Alex@mobil name.
After that, you should receive a QR code of an added client configuration. This QR applies the user config to Wireguard mobile client on Android or iOS.
The text of the configuration file is also displayed with QR. You will need in case of manual configuration of clients as discussed below.
4.2. Add new VPN user
To add a new user, you need to run the script add-client.sh in the terminal
The script asks for the username:
The username can go along as a script parameter (in my case, the username is Alex@mobile):
The execution of the script leads to the creation of the client config file in the client directory.
Client config file: /etc/wireguard/clients/
Client directory:
/etc/wireguard/clients/
4.2.1. User configuration file
Execute the cat command to get the contents of the .conf file for client manual configuration.
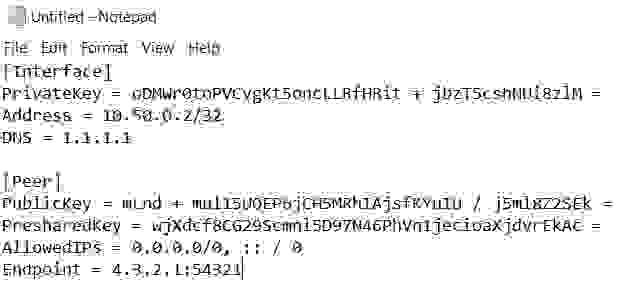
the result of command execution as follows:
description of client configuration file:
4.2.2. Client configuration with QR code
Execute the qrencode -t ansiutf8 command to get the QR of a created client config. (in my case, the new client name is Alex@mobile).
5. Configure VPN Clients
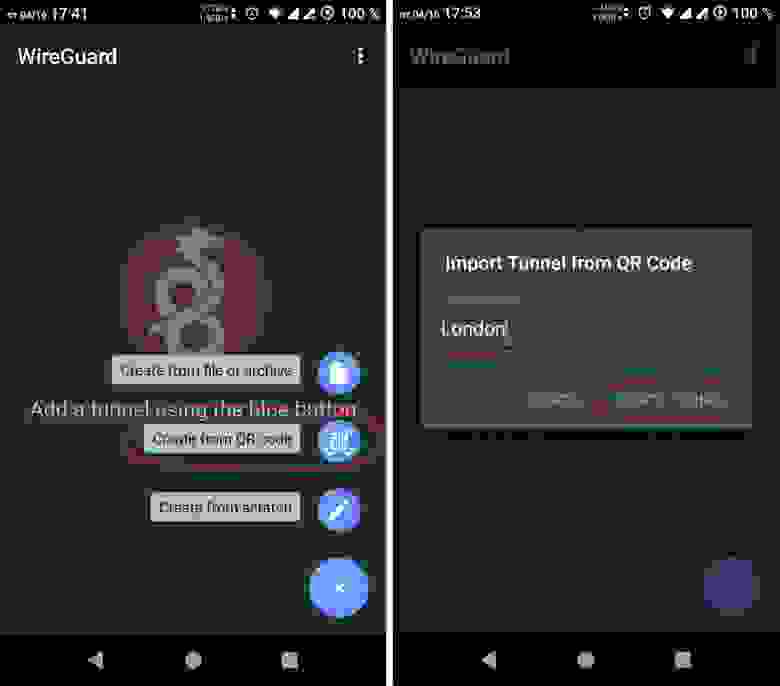
5.1. Android mobile Client setup
Download the Wireguard mobile client for Android from the official GooglePlay store.
Scan the QR code to import the client configuration (see 4.2.2) and assign it a name.
After importing the configuration, you can enable the VPN tunnel. A little key symbol in the Android system confirms the VPN connection.

5.2. Windows Client Setup
Download and install the TunSafe, which is a Wireguard client for Windows.
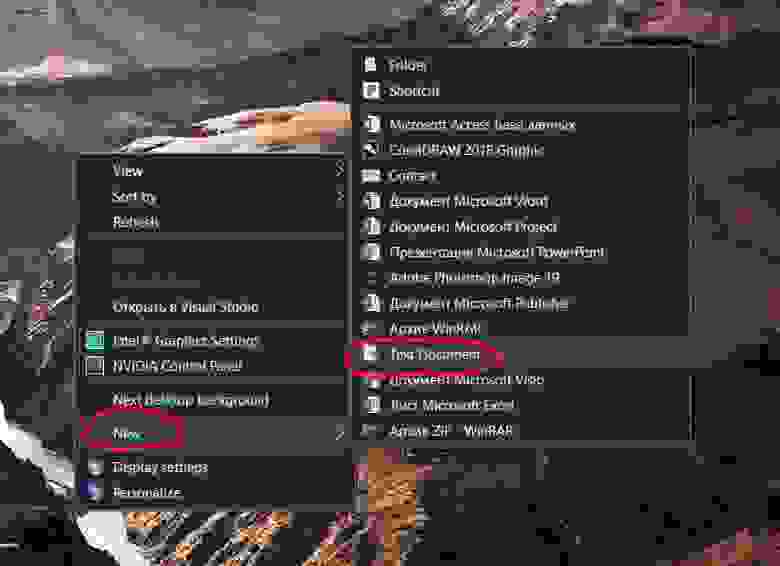
5.2.1. Create a local text file to import configuration
Create a dummy text file on the desktop of your PC.
5.2.2. Copy the configuration file from the server
Copy the contents of the configuration file from the server.
Then, go back to the Putty terminal and display the contents of the user configuration file (see 4.2.1).
Use right-click of the mouse to copy the configuration text in the Putty terminal.

5.2.3. Paste the configuration text to a local text file
Paste the configuration text from the clipboard to dummy text file we created earlier on the desktop (see 5.2.1).
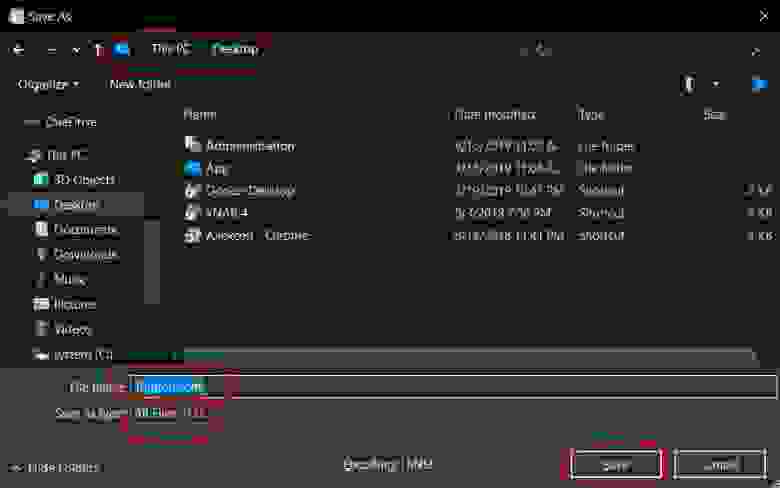
5.2.4. Save the local configuration file
Save the text file as the .conf format (in my case as london.conf )
5.2.5. Import local configuration file
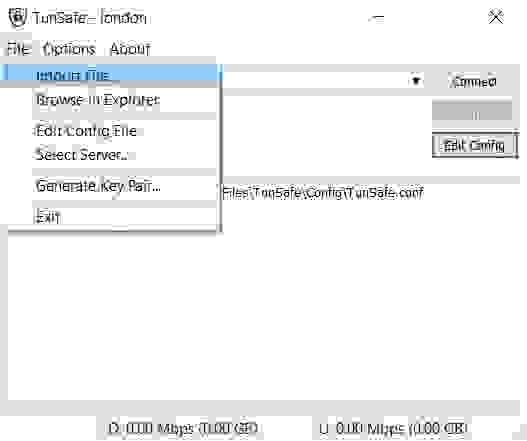
Import the configuration file into the TunSafe program.
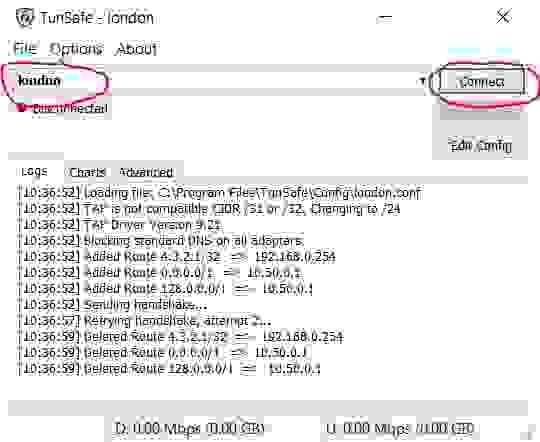
5.2.6. Establish a VPN connection
In TunSafe program select the imported configuration file and click the Connect button.
6. Verify VPN connection
Use https://2ip.ua/en/ resource to verify the VPN tunnel connection. If the displayed IP address matches the one we got in 2.2.3, so the VPN tunnel is up and running.

In a Linux terminal, you can check your IP address by executing the following command:
Источник


