- Взаимодействие Android-устройств в локальной сети
- О чем это и для кого это?
- Какие возможные способы решения существуют?
- Top 8 Free Android Apps for Wireless Networking
- Boost your Wi-Fi signal, share files, troubleshoot your connection, and more
- Get a Better Wi-Fi Signal: OpenSignal
- Troubleshoot Your Wireless Network: Wifi Analyzer by farproc
- Best Open Source Secure Shell (SSH) Client: ConnectBot
- Access Your Android From a Computer: AirDroid
- Share Files Without Wi-Fi: Bluetooth File Transfer by Medieval Software
- Find Wi-Fi Signals in Dead Zones: Network Signal Speed Booster 2 by mcstealth apps
- How to Connect an Android to a Wired Ethernet Connection
- Top 13 Solutions to Fix Android WiFi Authentication Problem
- Part 1. What Does It Mean When Wi-Fi Says Authentication Problem?
- Part 2. Why Does Authentication Error Occur with Wi-Fi on Android?
- Part 3. 6 Advanced Ways to Fix Authentication Problem on Android
- 1. Change Wireless Network Configuration from DHCP to Static
- 2. Update Android OS
- 3. Use WPS Push Button
- 4. Use A Specialized Android System Repair Tool
- 5. Factory Reset Your Android Device
- 6. Contact Your Mobile Carrier
- Part 4. Common Checks to Fix Android Wi-Fi Authentication Problem
- 1. Reset the Wi-Fi Network
- 2. Restart the Router
- 3. Reset Network Settings
- 4. Turn Airplane Mode on/off
- 5. Check the Number of Supported Devices
- 6. Check Network Security Type
- 7. Check the Network Name for Duplicates
Взаимодействие Android-устройств в локальной сети

Предположим, мы пишем игру для Android, которая подразумевает некое сетевое взаимодействие между устройствами. Причем наши устройства находятся в одной сети и мы хотим, чтобы взаимодействие между ними осуществлялось быстро, а значит вариант с обменом данными через интернет нам не подходит. Ах да, еще одна маленькая ложка дегтя — мы хотим охватить максимально возможную аудиторию, для чего нам необходимо поддерживать Android 2.3.
Что же нам делать? Давайте поговорим об этом, а заодно рассмотрим относительно новые возможности Android SDK для соединения двух и более устройств.
О чем это и для кого это?
Как-то раз, уйдя с предыдущего места работы и погрузившись в заслуженный отдых, я принялся писать сетевую игру, в которую могут играть люди, находящиеся в одной локальной сети. И сразу же столкнулся с тем, что для нормального функционирования подобной игры нам мало соорудить сетевое взаимодействие — нам нужно сделать нормальное и быстрое обнаружение устройств в сети. Собственно, в данной статье я поделюсь своим опытом в реализации решения для данной задачи.
Сразу оговорюсь, что статья предназначена в большей мере для тех, кто имеет опыт Android-разработки, написал несколько приложений и хочет расширить свой кругозор, а также улучшить профессиональные навыки.
Какие возможные способы решения существуют?
- Android Network Service Discovery. Простой и эффективный способ обнаружения устройств. На Android Developer есть пошаговое руководство по подключению NSD, есть пример NsdChat, который можно скачать там же. Но есть один существенный минус — данный метод поддерживается только начиная с API Level 16, то есть с Android 4.1 Jelly Bean;
- Второе решение, предлагаемое нам на сайте Android Developer — Wi-Fi Peer-to-Peer. Проблема этого метода та же самая — поддерживается он только начиная с API Level 16;
- Есть странное решение, которое предлагается некоторыми программистами на Stack Overflow — самостоятельно сканировать локальную сеть на предмет наличия сервера. То есть проходить по всем адресам сети. Это уже сейчас звучит как странный велосипед, а теперь представьте, что порт нашего сервера назначается автоматически. Таким образом, сканирование даже самую небольшой сети становится достаточно долгой и трудоемкой задачей;
- Наконец, мы можем обратить внимание на Java-библиотеки и написать что-нибудь с их использованием. Например, JmDNS.
Последний способ выглядит вполне адекватным и, кажется, может обеспечить нас требуемой скоростью и удобством обнаружения устройств в сети для конечного пользователя.
Я вооружился JmDNS и решил попробовать соорудить несколько классов, которые по максимуму упростят написание описанных выше приложений. Но для начала пришлось немного повырезать дубликаты .class-файлов из jar-пакета JmDNS (проблема описана здесь):
Далее я взял исходный код NsdChat с Android Developer и изменил его служебный класс, который отвечает за инициализацию сокетов и организацию сетевого взаимодействия. Также я написал wrapper для JmDNS
Здесь размещены 4 основные функции для работы Network Discovery:
- startServer для создания сервера и регистрации соответствующего сервиса в локальной сети;
- findServers для поиска серверов;
- reset для окончания работы с Network Discovery и последующего освобождения ресурсов;
- wifiLock для запроса блокировки Wi-Fi.
В завершении я написал универсальный класс ConnectionWrapper для полноценной организации обнаружения, а также обмена сообщениями в локальной сети. Таким образом, создание сервера в конечном приложении выглядит следующим образом:
А вот и mServerHandler, использующийся для приема и обработки сообщений:
Отправка сообщений еще проще:
И, наконец, метод для обнаружения и подключения к серверу:
Как видите, все очень просто. А главное, все это работает в любой версии Android для максимум двух устройств. Но сделать так, чтобы это работало для условно неограниченного числа устройств очень легко, и очевидное решение придет к вам почти сразу после детального изучения класса Connection. Пусть это будет в качестве домашнего задания.
Ах, да, весь код доступен для изучения и использования всеми желающими в моем репозитории на GitHub.. И, конечно, не исключаю то, что некоторые вещи можно сделать лучше и проще, поэтому не стесняйтесь форкать и делать pull request’ы.
Источник
Top 8 Free Android Apps for Wireless Networking
Boost your Wi-Fi signal, share files, troubleshoot your connection, and more
Android offers a powerful mix of features and customization options for wireless networking. Whether you’re a home or business network user, IT student, or networking professional, our list of the best Wi-Fi analyzer apps for Android can help increase your productivity.
Get a Better Wi-Fi Signal: OpenSignal
:max_bytes(150000):strip_icc()/001_android-apps-for-wireless-networking-818115-a2be832fc6d54f3ea9877129bf3496ef.jpg)
Accurate speed measurements.
Quickly find a stronger Wi-Fi.
Points you to better cellular reception.
Signal strengths are shared publicly.
Maps are not updated in real time.
OpenSignal has established itself as a leading cellular coverage map and Wi-Fi hotspot finder. Its database includes hundreds of thousands of cellular towers around the world as submitted by users.
Depending on your location, the app can help you find where to stand to get optimal signal strength on your phone. An integrated connection speed test feature, data usage statistics, and social networking options are also extremely useful.
Troubleshoot Your Wireless Network: Wifi Analyzer by farproc
:max_bytes(150000):strip_icc()/004_android-apps-for-wireless-networking-818115-a876f7880e4f4090b3cb7729ed53df37.jpg)
Shows signals by channel.
Free to download and use.
Clear indicators of Wi-Fi signal strengths.
Slight learning curve.
Cluttered with lots of information.
Many consider Wifi Analyzer the best signal analyzer app for Android. Its ability to scan and visually represent Wi-Fi signals by channel can be helpful when troubleshooting wireless signal interference issues in a home or office.
Best Open Source Secure Shell (SSH) Client: ConnectBot
:max_bytes(150000):strip_icc()/003_android-apps-for-wireless-networking-818115-ed8ab2d867704642aa2b0ddc7961ee1c.jpg)
Free to download and use.
Remotely control computers.
Open source and free.
Difficult to use on a phone screen.
Supports one SSH connection at a time.
Network professionals and remote access aficionados always need a good Secure Shell (SSH) client for system administration or scripting work on servers. ConnectBot has many loyal followers who appreciate its reliability, ease of use, and security features. Working with command shells isn’t for everyone, so don’t worry if this app sounds intimidating.
Access Your Android From a Computer: AirDroid
:max_bytes(150000):strip_icc()/002_android-apps-for-wireless-networking-818115-ae968c5f0ef04a9281fea4e5f9ae4fc0.jpg)
Affordable yearly plan.
Quickly transfer files.
Limited features with free version.
Commands are sometimes delayed.
Mirroring can be unreliable.
AirDroid supports wireless remote control of an Android device through its user interface. After installing the app and connecting the device to a local Wi-Fi network, you can access the device from other computers through a standard web browser. The app also allows you to manage Android text messages and phone calls.
Share Files Without Wi-Fi: Bluetooth File Transfer by Medieval Software
:max_bytes(150000):strip_icc()/005_android-apps-for-wireless-networking-818115-c877b8d1e3ba41a5b739c79fe7a95c6d.jpg)
Doesn’t require rooting the device.
Simple drag-and-drop file transfers.
Transferring large files can be slow.
Trial version expires after 10 days.
Numerous Android apps allow you to share files over a Wi-Fi connection, but most are useless when no Wi-Fi is available. That’s why it’s essential to keep an app like Bluetooth File Transfer handy that supports file sync over Bluetooth connections with other mobile devices.
This app is easy to use and includes some nice features like displaying thumbnail pictures for photos and movies, optional document encryption, and the ability to configure which devices are allowed to share with you.
Find Wi-Fi Signals in Dead Zones: Network Signal Speed Booster 2 by mcstealth apps
:max_bytes(150000):strip_icc()/006_android-apps-for-wireless-networking-818115-9d7f6dd79d404e07b07d2635a6a39a64.jpg)
Find low signals in dead zones.
Free to download and use.
No manual set up required.
Unreliable signal improvement.
Difficult to determine if the app is working.
This app (formerly called Fresh Network Booster) has been billed as the number one cell signal booster for Android. It automatically scans, resets, and reconfigures your phone’s cellular connection in an attempt to increase signal strength.
Designed to be used when the carrier’s signal is lost or weak, some reviewers claim the app improved some of their connections from zero or one bar to at least three bars. The app won’t always be able to improve your connection in all cases, though. It uses a set of built-in network speed tweak techniques that run automatically when the app is launched, so no user configuration is involved.
Источник
How to Connect an Android to a Wired Ethernet Connection
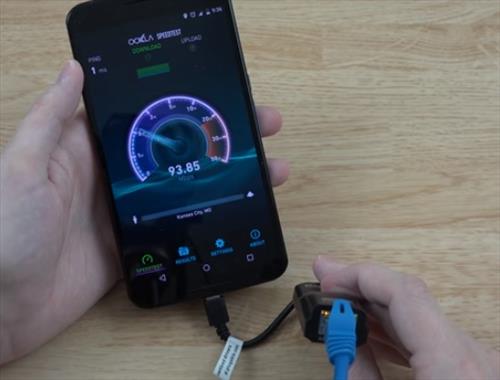
If you have an Android tablet or smartphone and want to use a wired Ethernet connection it is easy to do.
There are a few requirements.
UPDATE: While the below option still works for many Android Smartphones there is a new better way to connect to Ethernet. Using a Type-C Hub can add many ports including HDMI, VGA, Ethernet, Old USB standards, and SD-Card port. Type-C Hubs also have much better compatibility.
Android Ethernet Requirements
- FirstAndroid Marshmallow 6.0.1 which was released October 2015 must be installed.
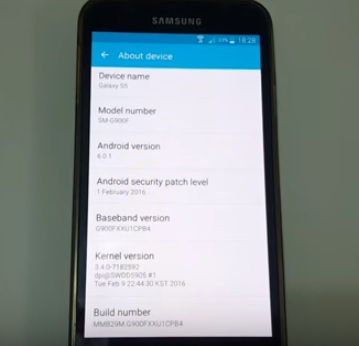
To see which version you have go to Settings –> About Device.
Previous Android versions needed to be rooted which is no longer the case with Android Marshmallow 6.0.1 and above.
Second an OTG to Ethernet adapter will be needed.

OTG stands for On-The-Go and simply plugs into an Android micro USB port. It is mainly used to copy files to external storage such as a flash drive but also can be used for a LAN internet connection.
The Ethernet adapter will transmit the signals over the network. These items can be bought separately or in one package ready to go.
Not all the adapters are compatible with every Android device and should be verified it works with your device.
While most will not have any problems the Chipset in the adapter and the phone/tablet must be compatible. Simply be sure an adapter will work with your Android device before getting one.
Be sure to know what type of port your phone uses, old Micro-USB or the new Type-C.
Most older Android smartphones use a Micro-USB port with the new Type-C port now on the Galaxy S10, S20 and similar units.
Type-C Android Ethernet Adapter on Amazon
USB C to Ethernet Adapter RJ45 to Type C Gigabit Network LAN Converter 10/100/1000Mbps for MacBook Pro Air/iPad Pro/Galaxy S20 S10 S9 XPS 13 15 /Surface Book 2 Go Chromebook-Silver
Most Android devices simply need to be plugged in and will automatically connect. Be sure to turn off your WiFi to know for sure it is only on Ethernet. 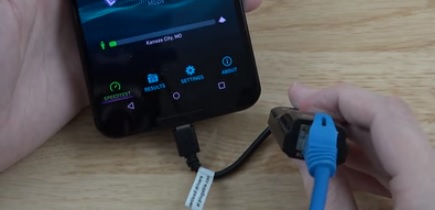
Some devices require it to be in Airplane mode in settings and depends on the ROM.
Summary
Hooking an Android smartphone or tablet to an Ethernet line is easy to do, with Android Marshmallow or higher.
While most will not have any issues the phone or tablet must have the drivers for the chipset in the Ethernet adapter to work.
Every manufacture customizes the Android OS for their devices and may remove or add drivers.
Simply be sure to read the specs of an adapter and the reviews to be sure it works with your smartphone or tablet.
Источник
Top 13 Solutions to Fix Android WiFi Authentication Problem


Did you try to connect to a Wi-Fi network recently, but got an authentication problem? Or, did you try to connect your Android device to a Wi-Fi network that you have used with the smartphone before, but authentication error occurred? Don’t worry, because this issue is common in some Android smartphones and can be fixed easily.
The authentication error may occur suddenly even if you are sure that you have used the correct Wi-Fi password. This can be annoying when you want to use the internet urgently and it can be even worse when you are unable to use your mobile network. This problem can occur because of various reasons. There can be an issue with the wireless network or with your Android phone or both.
We have given the top 13 solutions in this guide to solve the authentication error Wi-Fi problem. You just need to follow these steps carefully.
Part 1. What Does It Mean When Wi-Fi Says Authentication Problem?

The Wi-Fi authentication error occurs when you are unsuccessfully trying to connect to any Wi-Fi network with the correct password.
Normally, when you try to connect to a Wi-Fi network, the device will connect to that network and save the password. But with this problem, you will get a notification telling that it is authenticating and after a few minutes, you will see «authentication problem» under the network name you are trying to connect to.
When you are trying to connect to a Wi-Fi network, the device will first send a connection request, in an encrypted form, along with the password to the router. Then, the router will compare the password stored on it with the received data.
If the data matches, it will send a signal and the device will get connected. If it doesn’t, you will get an authentication error. So, the Android Wi-Fi authentication problem will not let your device connect to the Wi-Fi network.
Part 2. Why Does Authentication Error Occur with Wi-Fi on Android?
The Wi-Fi authentication problem can occur due to multiple reasons. Let’s see the possible reasons for this error.
Whenever the router malfunctions, your device will not connect to Wi-Fi and will deliver a notification saying an authentication error.
Have you recently updated your device? If yes, the issue might be with its drivers.
The connection between the device and router must be stable otherwise the authentication error can occur.
Are you sure you are connecting to the correct Wi-Fi network? You may try to connect to a network with the duplicate name for many times. In such a case, you will get the authentication error.
Sometimes, based on user’s settings, the number of devices that can use the Wi-Fi network is limited. Your device won’t connect to the network if that number exceeds.
Part 3. 6 Advanced Ways to Fix Authentication Problem on Android
Most users do not want to waste time trying too many ways to fix this, so the advanced ways are recommended first.
1. Change Wireless Network Configuration from DHCP to Static
An IP conflict can cause any type of connection to drop, regardless of the wireless router you use. Even the Android devices can face such kind of issue, giving you authentication error. Solve this issue by changing the setting from DHCP, which is the default setting, to Static IP.
Step 1: Open Settings and choose the Wi-Fi connection.
Step 2: Long press on the Wi-Fi name and choose Modify Network.
Step 3: Check the Show Advanced Settings box and then look for IP settings. Now, change the network from DHCP to Static.
Step 4: You will see an IP address field below. Note down and save the information that is in the static IP address field and then delete it.
Step 5: After a few seconds, re-enter the same information and then save it.

Contact your service provider if you are unsure of the settings that are displayed.
2. Update Android OS
Always make sure that your Android OS is updated to the latest version. When you don’t update the device, the chances are that many of the bugs will not be solved.
Step 1: Go to Settings -> About Phone.
Step 2: The «System Updates» option will be displayed. This will show if there is an update available. In some Android models, there will be a separate tab for System Update in the Settings.
Step 3: Now, if there is an update available, download the update first and then install it.
Step 4: You will be asked to reboot the device. Confirm and check if the issue is solved.

3. Use WPS Push Button
WPS, also known as Wi-Fi Protected Setup, is a security standard for creating a home network without any password.
Step 1: Go to Settings -> Wireless & Networks -> Advanced Settings. Depending on your modes, you can find multiple WPS options.
Step 2: Tap on a WPS Push-button. WPS setup, waiting for configuration from your router, will appear on your screen.
Step 3: On your router, press the WPS button and wait for the connection to establish.
4. Use A Specialized Android System Repair Tool
Sometimes this authentication error will occur due to unknown software problems, so the best way is to rely on a professional Android system repair tool to help you. Here iMyFone Fixppo for Android is highly recommended. It has the highest repairing rate and speed, so all related Android issues can be solved within minutes. In addition, it has been trusted by many famous websites.

The steps are very simple: download the proper firmware -> enter device into download mode with the on-screen instructions -> start to fix automatically. So what are you waiting for? Download the free trial version now!
5. Factory Reset Your Android Device
When you have tried all the possible solutions for solving this problem and still you are getting Wi-Fi authentication error, the last option is to factory reset your Android smartphone. Please note that this method will erase all the data on your device.
When you perform a factory reset, all the Android apps and data will be removed and all the settings will be reset to default. So before performing the factory reset, make sure that you back up all the personal data of your device.

6. Contact Your Mobile Carrier
Even after trying all the methods if you see Wi-Fi authentication error, you need to contact your mobile carrier to check whether there is something wrong with the hardware. Don’t forget to mention the solutions you have already tried for solving this error so that you don’t have to go through the above methods again.
Part 4. Common Checks to Fix Android Wi-Fi Authentication Problem
Just like most of the issues, there cannot be a single solution for the Wi-Fi authentication problem. If you want to use the simple ways first, try these following solutions one by one for solving the Android Wi-Fi authentication problem.
1. Reset the Wi-Fi Network
To solve this error, the first thing you can do is to reset the connection between the router and the Android device. This solution has helped many users in solving the Wi-Fi authentication error. When you reset, many other network-related issues also get solved.
Step 1: Open Settings and open Wi-Fi under Network Connections.
Step 2: Multiple Wi-Fi connection names will be listed. Find the one you are trying to connect to and then long-press on it. Two options will be shown-Forget Network and Modify Network.
Step 3: Choose the Forget Network option.
Step 4: Now enter the password and try to reconnect to the Wi-Fi network. Check if the device is connected to the network.

2. Restart the Router
Sometimes the electronic devices start working correctly when restarted. All the elements in the device will start afresh, thereby solving the issues you are facing. So, try to restart the router to see if you are able to connect your device to the Wi-Fi network.
Step 1: Press the switch and turn off the wireless router. Wait for a few minutes and then turn on the router.
Step 2: It will take time before any device can connect to the router.
Step 3: Now, connect your device and check if the connection is established.

3. Reset Network Settings
One of the simplest solutions is to reset the network settings of your Android device. All the Wi-Fi, Bluetooth and mobile network settings will be reset to the factory settings.
Step 1: Open Settings and go to Backup & Reset.
Step 2: Next, go to the Network Reset settings option.
Step 3: Tap on Reset Settings and wait for the process to complete.
Step 4: Once the process completes, open the Wi-Fi settings and try to connect to the Wi-Fi network.

4. Turn Airplane Mode on/off
Many of us use the Airplane mode either when we want to play a game without any disturbance or when we board a plane. Turning on Airplane mode can be useful because often the mobile network signal may interfere with the wireless network. When you enable the Airplane mode, the RF signal transmission on your phone is turned off.
Step 1: Open Settings on your device and turn off the mobile and Wi-Fi network. You can also do this by pulling down the quick settings menu.
Step 2: Now, turn on the Airplane mode.
Step 3: With the Airplane mode on, turn on Wi-Fi on your device and connect to the wireless network. If your device gets connected to the Wi-Fi network successfully, you can open settings and turn off the Airplane mode.

5. Check the Number of Supported Devices
Few modems can support only a certain number of devices. You need to check through the manufacturer or the service provider. Now, go to the Wi-Fi router settings and check the maximum number of devices that can connect to the wireless network. Increase the number of devices and save the settings.
6. Check Network Security Type
Sometimes the network security type can be a reason for this error. If you know the username and password of the wireless router, you can easily change the network security type.
If WPA is the security protocol, change it to WPA2 and vice versa. Now, in your Android smartphone, follow the steps given above and tap on Forget Network. After a few minutes, reconnect to the wireless network.

7. Check the Network Name for Duplicates
Often the authentication problem occurs when the username and password of the wireless network do not match. You might be confident of entering the right password, but the chances are that you are connecting to the wrong network with a similar name.
If you are connecting to some other wireless network by mistake, you will definitely experience this error. The only solution for this is to change the network name (if you are on the home wireless network) to avoid any confusion. Now check if your device is able to connect to the wireless network.
Conclusion
These are the top solutions for solving the authentication problem. After trying the above methods, we hope your device successfully got connected to the desired wireless network. You need to follow the steps carefully in order to solve this problem or you can give a try on Fixppo for Android. The authentication error can occur at any time, but now you know what to do when it occurs in the future.

By Robert Moore , to Android Issues
Posted on Jun 11, 2019 ( Updated: Oct 15, 2019 )
Источник


