Dr.Fone for Android

While if you need to recover deleted files from iOS device, please turn to Dr.Fone for iOS !


Recover lost files from android devices because of
Android phone card was formatted,
Files deleted by mistake without backup,
Android phone/tablets was smashed,
Factory set your android phone or tablet,
6 File types/ 47 file formats can be recovered with Dr.Fone for Android
Deleted Photos/Pictures from android devices: JPG, TIFF/TIF, PNG, BMP, GIF
Deleted Videos from android devices:MP4, 3GP, AVI, WMV, ASF, FLV,RM/RMVBпјЊ M4V, MOV, 3G2, SWF, MPG
Deleted audio from android devices:MP3, AIF/AIFF, M4A, WAV, WMA, MID/MIDI, OGG, AAC
Deleted Document from android devices:DOC/DOCX, XLS/XLSX, PPT/PPTX, PDF, CWK, HTML/HTM, INDD, EPS, ZIP, RAR, SIT
Deleted Messages from android devices:CSV, XML, HTML
Deleted Contacts from android devices:VCF, CSV, HTML
2000+ android devices supported and the list of devices and OS is still growing!
Available for hot Android phones and tablets from Samsung, HTC, LG, Sony, Motorola, ZET, Huawei, etc.
Support lots of Android OS versions.
All rooted Samsung devices are supported, regardless of Android OS.


* If your Samsung device is not in the list, you can root it by yourself (only root, not flash ROM), and then use Wondershare Dr.Fone for Android to recover your deleted data.
Quick, simple and safe
Just 3 steps to recover your lost files with android data recovery software.

Connect your Device Scan Android Device or Backup Recover your Android Data
Before recover your data, you can preview photos, read text or iMessages, view contact details and documents with Dr.Fone for Android. Just need to select the files you need to restore.
Dr.Fone for Android is read-only. It just scan and extract deleted files from your android phone or tablet and won’t do any damage to your android devices.
Get More Support
If you want more support here is the way.

Or you can get live support here.
Operating System:Windows 8.1(64bits)/8 (64&32 bits)/7 (64&32 bits)/Vista (64&32 bits)/XP (32 bit)
File System: FAT12,FAT16, FAT32, NTFS, NTFS5
CPU:1 GHz (32 bit or 64 bit)
RAM: 256 MB or more of RAM (1028MB Recommended)
Disk Space: 1GB or more
Dr.Fone for Android Step by Step Guide
Wondershare Dr.Fone for Android is a quick, simple and safe file recovery tool for android devices. Only 3 steps, Connect-Scan-Recover. You can recover your lost files like photos, video, audio, document, contact and text messages from android devices.
Download Wondershare Dr.Fone and installed it on your computer (Windows system). Launch the software and follow the guide below to perform an android file recovery.
Step 1, Connect your android phone or tablet to your computer.
When connecting android devices to your computer, please close any other phone management applications. During the recovery, do not write any new data into your android device.

During the android recovery, you need to enable USB debugging. If you have not enable USB debugging, Dr.Fone for Android will detect it and tell you how to enable it. If you have enabled USB debugging on your device before, you can directly go to step 2.
For Android 2.3 or earlier, you will see the window as below.

Follow the window below if your android device OS is 3.0 to 4.1.

For android 4.2 or newer, follow the below window to enable USB debug.

Step 2, Scan your android device or backup
Dr.Fone for Android will analyze the data on your android device after connecting. Click «Start » to analyze your data and scan your android device. The scanning will take a few minutes, so it is recommended that the battery is more than 20% to complete the scanning.

If your device was not rooted before, the program will directly scan it after the analysis. If you rooted your device before, you need to allow the program Superuser authorization on the screen of your device before the scan. Just click «Allow» when the message pops out on your device’s screen. Then back to your computer, and click «Start» on the program’s screen to scan your device.
If Dr.Fone for Android doesn’t support your android devices.
There are still 2 ways to recover deleted data from your device. the one is, Dr.Fone for android will lead you to set USB Mass Storage on your device to scan lost files. Then the other is root your device by yourself because all rooted Android phone are supported well by Dr.Fone for Android.

Please don’t disconnect your device during the scan, or the scan will fail.

Step 3, Preview lost files and recover them
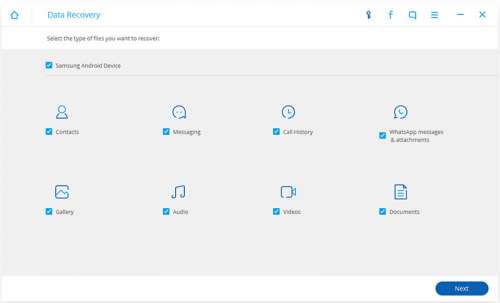
On the window, there are 6 catalogs appeared. Contacts, Messaging, Gallery(Photos), Videos, Audio and Documents. The current files are also scanned out in the result. You can check «Only display deleted items» on the top of the window. Here you can preview your deleted files from android phone or tablet, select the files you need to recover and then click «Recover» button on the lower right corner of the window.

If you still have any questions about recover deleted files from your android device, feel free to contact us.
Источник
Dr.Fone — Data Recovery (Android):
How To: Android Data Recovery using your PC
Try It Free Try It FreeStep 1. Connect Your Android Phone
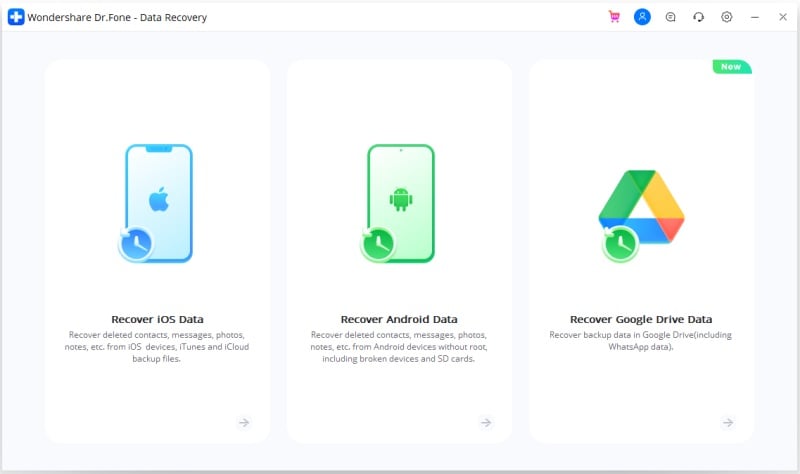
Launch Dr.Fone on your computer, and select «Data Recovery».
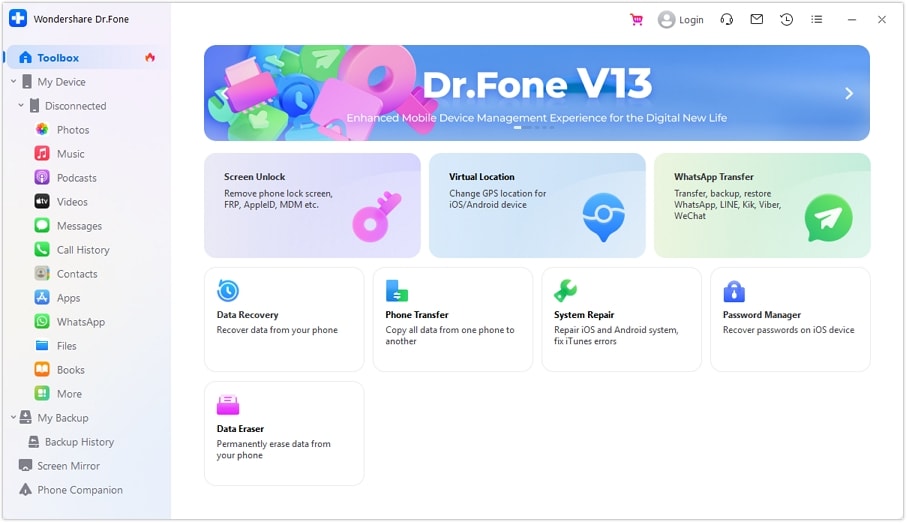
* Dr.Fone Mac version still has the old interface, but it does not affect the use of Dr.Fone function, we will update it as soon as possible.
Connect your Android phone to the computer using a USB cable. Please make sure you have enabled USB debugging on your Android phone. When your device is detected, you will see the screen as follows.
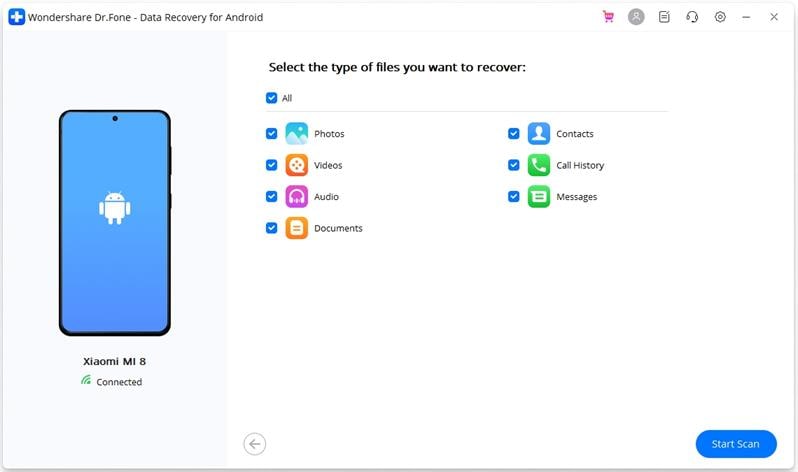
Step 2. Select file types to scan
After the phone is connected successfully, Dr.Fone for Android will display all the data types it supports to recover. By default, it has checked all the file types. You can just select the type of data that you’d like to recover.
And then click «Next» to continue the data recovery process. The program will analyze your device first.
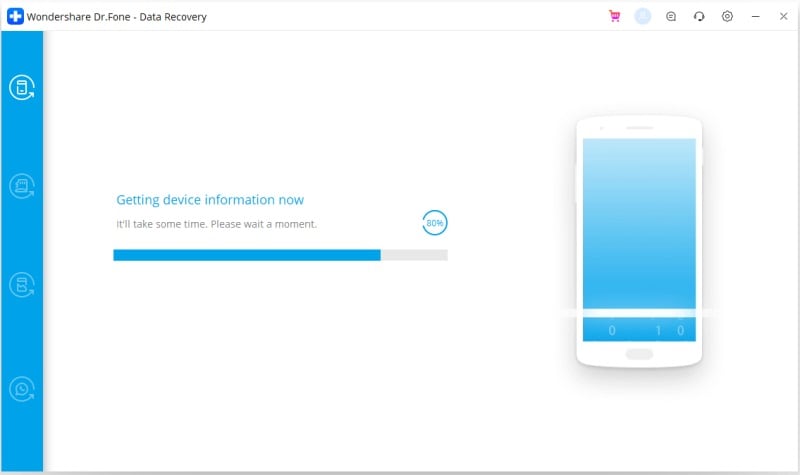
After that, it will continue scanning your Android phone to recover deleted data. This process will take a few minutes. Just be patient. Precious things are always worth waiting for.
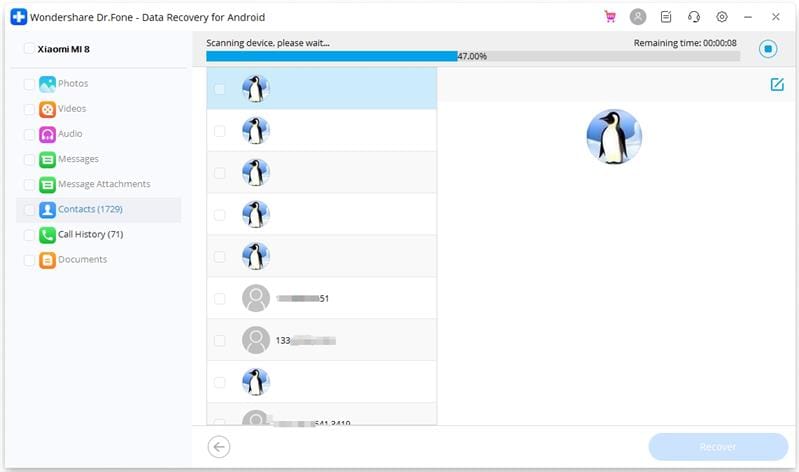
Step 3. Preview and recover deleted data on Android devices
When the scan is complete, you can preview the found data one by one. Check the items you want and click «Recover» to save them all on your computer.
Источник
Wondershare com data recovery android data recovery html
Краткое описание:
профессиональное приложение, предназначенное для восстановления файлов с Android устройств
Описание:
является профессиональным приложением, предназначенным для восстановления файлов с Android устройств, непосредственно восстановит удаленные SMS и контакты, в том числе имена, номера и e-mail адреса, с экспортом их в HTML, а также фотографии и видео, утраченных в результате удаления. Поддержка большинства Android устройств, планшетов от Samsung, HTC, LG, Sony, Motorola, ZET, Huawei и других.
Просто сделайте 3 шага, и вы сможете вернуть потерянные файлы.
Шаг 1: Подсоедените Android телефон к компьютеру и включите USB отладку.
Шаг 2: Отсканируйте, просмотрите и выберите нужные файлы, которые вы хотите восстановить.
Шаг 3: Восстановливайте файлы.
Восстанавливает файлы форматов:
• Сообщения: CSV, XML, HTML
• Контактов: VCF, CSV, HTML
• Фото: JPG, TIFF/TIF, PNG, BMP, GIF
• Видео: MP4, 3GP, AVI, WMV, ASF, FLV, RM/RMVB, M4V, MOV, 3G2, SWF, MPG
• Аудио: MP3, AIF/AIFF, M4A, WAV, WMA, MID/MIDI, OGG, AAC
• Документов: DOC/DOCX, XLS/XLSX, PPT/PPTX, PDF, CWK, HTML/HTM, INDD, EPS, ZIP, RAR, SIT
Сканирование и восстановление SMS, контактов, фотографий и видео
• Автоматически сканирует устройства после подключения к компьютеру
• После восстановления выдаёт сообщения, и экспортирует в HTML для легкого чтения и печати
• Восстанавливает удаленные контакты, в том числе имена, номера, e-mail адреса, экспорт в HTML, CSV
• Восстанавливает изображения и видео с SD карты внутри устройства
Обзор, резервное копирование и повторная синхронизация данных на вашем компьютере
• Существующие и удаленные данные разделяет разными цветами после сканирования
• Обзор и резервное копирование с устройства на компьютер
• Повторная синхронизация контактов резервного копирования на устройства через Wondershare MobileGo для Android
Советы: Перед использованием Dr.Fone, убедитесь, что ваш телефон подключен и обнаружен компьютером, и аккумулятор заряжен не менее 20.
Как установить программу для миграции на Xiaomi на MIUI
Системные требования: Windows XP/Vista/7/8/8.1/10
Русский интерфейс: Нет
версия: 8.33.64 + Patch Wondershare Dr.Fone for Android (Пост realost #64382022)
версия: 5.7.0 Patch Wondershare Dr.Fone for Android (Пост igorca #47381752)
версия: 5.7.0 offline installer для ПК Wondershare Dr.Fone for Android (Пост XAY #51218062)
версия: 5.5.0 offline installer для ПК Wondershare Dr.Fone for Android (Пост midnight9909 #44306717)
версия: 5.3.0 + Patch https://4pda.to/forum/d…cl.patch.by_igorca.zip
Патч для версии 5.3.3
версия: 4.8.2.142 + Patch
 https://4pda.to/forum/d…oneforAndroid4.8.2.rar
версия: 4.6.0.108 + Patch  Wondershare+Dr.Fone+for+Android+4.6.0.108.rar ( 41.02 МБ )
версия: 4.0.0.60 + Patch Dr.Fone_4.rar ( 41.34 МБ )
Сообщение отредактировал iMiKED — 16.03.21, 11:52
Источник
Wondershare com data recovery android data recovery html
Recover deleted data from 6000+ smartphones, including SMS, contacts, call logs, photos, video, etc.
You can remove screen lock for phones, including iPhone, Samsung, LG, Huawei, Lenovo, etc.
Transfer WhatsApp between iOS and Android devices. Backup and restore WhatsApp messages.
Phone to phone transfer lets you transfer data from one phone to another with one click, everything cloned.
Change GPS location to anywhere on iOS devices. An amazing tool to play AR games or location-based apps.
Preview and selective back up what you want from your smartphone to a computer. As well as to restore.
Erase phone data permanently before you sell a phone. Those data can’t be recovered after erasing.
You can transfer data between mobile phones and computers, managing your data seamlessly.
Repair the iOS & Android system to normal.
You can transfer or sync files between different clouds, as well as manage your clouds in one place.
You can mirror smartphones’ screen to a PC and reverse control it on a large screen computer.
Copyright В© Wondershare. All rights reserved. The order process, tax issue and invoicing to end user is conducted by Wondershare Technology Co., Ltd, which is the subsidiary of Wondershare group.
Источник
Dr.Fone — Data Recovery (Android):
How To Recover Data from Broken Android Devices
Many of us have been through situations like cracked screens, water-damaged, black screens when we use Android smartphones. When one of these situations happens, the worst thing is not the phone is broken, but we are unable to access the precious data, such as contacts, messages, and more that have been stored in the phone memory. Fortunately, now we have broken data recovery from Dr.Fone — Data Recovery (Android), which can help us to recover these data from broken Android phones. Let’s see how it works.
Try It FreeStep 1. Connect your Android phone to the computer
Launch Dr.Fone on your computer and select «Data Recovery».
* Dr.Fone Mac version still has the old interface, but it does not affect the use of Dr.Fone function, we will update it as soon as possible.
Connect your Android phone to the computer using a USB cable. Then choose «Recover Data from Android» from the program’s screen.
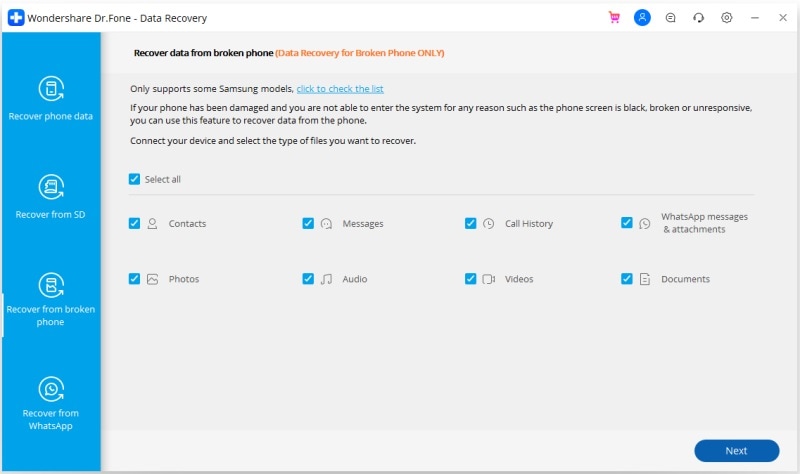
Step 2. Choose the data types you want to recover from the broken phone
By default, Dr.Fone already selects all the data types. You can also select the data types you want only. Click on «Next» to continue.
Please note that this function only helps you extract the existing data on the broken Android phone yet.
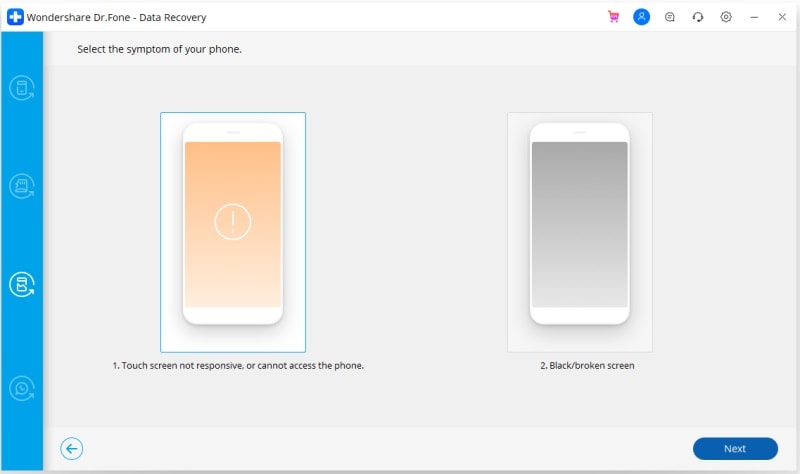
Step 3. Select the fault type which matches your situation
There are two types of the fault of the Android phone, which are Touch does not work or cannot access the phone, and Black/broken screen. Just click on the one which you have. Then it will lead you to the next step.
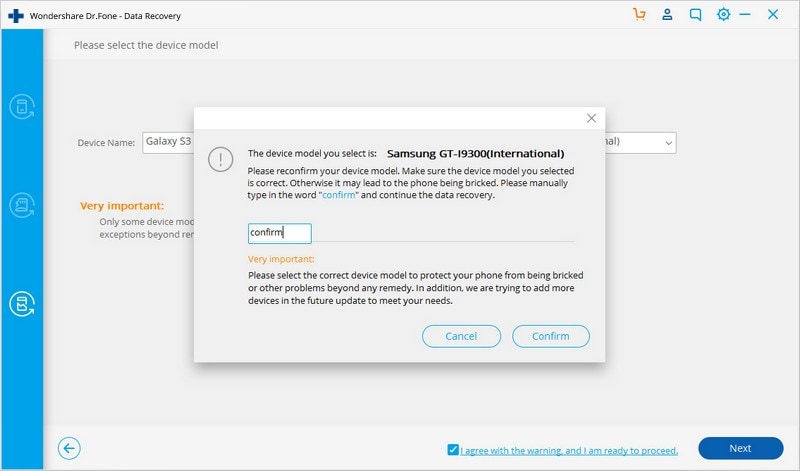
Then on the new window, choose the correct device name and the device model for your phone. Currently, this function only works for some Samsung devices in Galaxy S, Galaxy Note, and Galaxy Tab series. Then click on «Next».
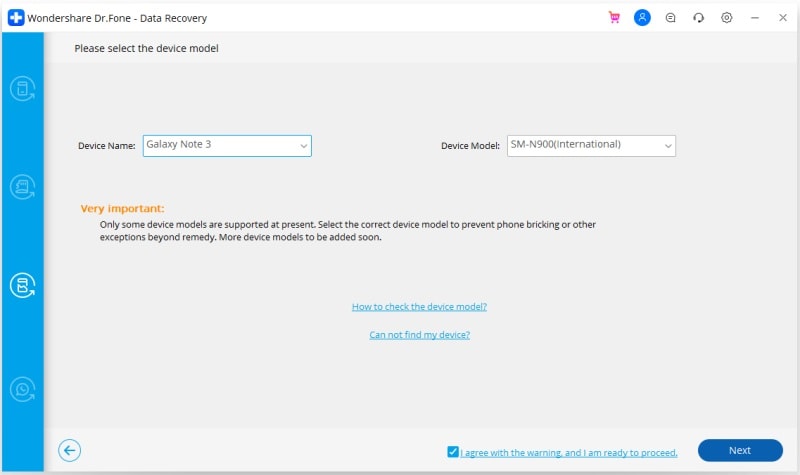
Please make sure you have selected the correct device name and the device model for your phone. The wrong information may lead to bricking your phone or any other errors. If the information is correct, put in «confirm» and click on the «Confirm» button to continue.
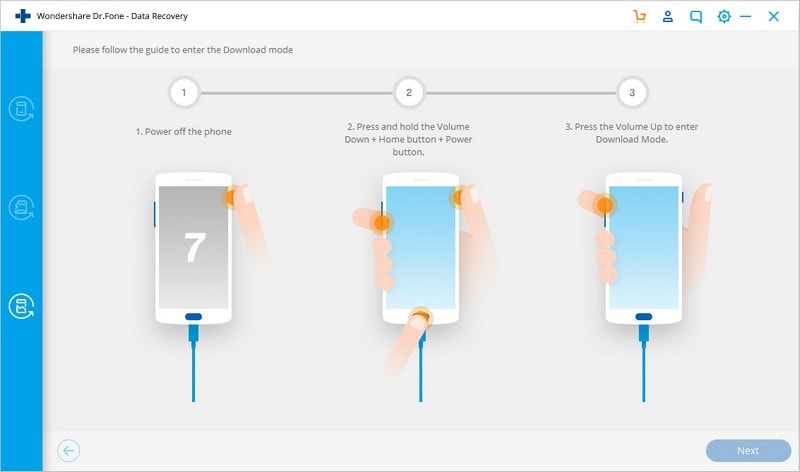
Step 4. Enter Download Mode on the Android phone
Now, just follow the instructions on the program to get the Android phone into the Download Mode.
- Power off the phone.
- Press and hold Volume «-«, «Home» and «Power» button on the phone.
- Press the «Volume +» button to enter download mode.
Step 5. Analyze the Android phone
After the phone is set in Download mode, Dr.Fone will start to analyze the phone and download the recovery package.
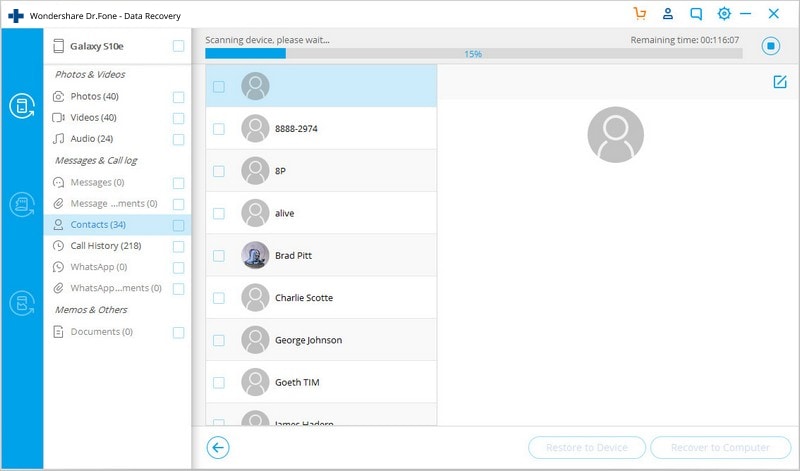
Step 5. Preview and recover the data from broken Android phone
Источник


