- TextView
- Программная установка текста
- Атрибуты
- Программная установка фона
- Реагируем на событие onClick
- Многострочный текст
- Увеличиваем интервалы между строками
- Бой с тенью
- Создание ссылок автоматом
- Совет: Используйте полупрозрачность с умом
- Выделить текст для копирования
- Xamarin Android — Reference custom fonts in XML
- John Thiriet
- Reference embedded fonts
- Emmbbed the font in the application bundle
- Create a font family file
- Use the font
- Reference downloadable fonts
- Define the font
- Define the font provider certificates
- Declare the downloadable fonts
- Conclusion
- Comments
- You May Also Enjoy
- Creating a Xamarin Android binding library — Writing the binding
- Creating a Xamarin Android binding library — Preparation
- Using Huawei Mobile Services with Xamarin
- Crashes and errors analytics with App Center and Application Insights
- Fonts in Xamarin.Forms
- Set font attributes
- Set the font size
- Set the font family
- Set font properties per platform
- Understand named font sizes
- Display font icons
TextView
Компонент TextView предназначен для отображения текста без возможности редактирования его пользователем, что видно из его названия (Text — текст, view — просмотр).
Находится в разделе Texts.
TextView — один из самых используемых компонентов. С его помощью пользователю удобнее ориентироваться в программе. По сути, это как таблички: Руками не трогать, По газону не ходить, Вход с собаками воспрещен, Часы работы с 9.00 до 18.00 и т.д., и служит для представления пользователю описательного текста.
Для отображения текста в TextView в файле разметки используется атрибут android:text, например:
Такой подход является нежелательным. Рекомендуется всегда использовать текстовые ресурсы. В будущем эта привычка позволит вам обеспечить многоязыковую поддержку:
Программная установка текста
Программно текст можно задать методом setText():
Атрибуты
Для всех вышеперечисленных атрибутов в классе TextView есть соответствующие методы для чтения или задания соответствующих свойств.
Программно установим размеры текста при помощи setTextSize() с различными единицами измерения.

По умолчанию у компонентов TextView отсутствует фоновый цвет. Чтобы задать цвет, укажите значение Drawable для атрибута android:background. В качестве значения Drawable может использоваться изображение или XML-представление фигуры, включающий ресурс Drawable (поместить в папку res/drawable).
Программная установка фона
В некоторых случаях программисты из-за невнимательности неправильно меняют фон элемента программным способом и удивляются, почему ничего не работает.
Предположим, у вас определён в ресурсах зелёный цвет:
Следующий код будет ошибочным:
Нужно так (два варианта):
Реагируем на событие onClick
Если вы хотите, чтобы TextView обрабатывал нажатия (атрибут android:onClick), то не забывайте также использовать в связке атрибут android:clickable=»true». Иначе работать не будет!
Многострочный текст
Если вы хотите создать многострочный текст в TextView, то используйте символы \n для переноса строк.
Например, в ресурсах:
Обратите внимание, что в тексте также применяется простое форматирование.
Также перенос на новую строку можно задать в коде:
Увеличиваем интервалы между строками
Вы можете управлять интервалом между соседними строчками текста через атрибут android:lineSpacingMultiplier, который является множителем. Установите дробное значение меньше единицы, чтобы сократить интервал или больше единицы, чтобы увеличить интервал между строками.
Бой с тенью
Чтобы оживить текст, можно дополнительно задействовать атрибуты для создания эффектов тени: shadowColor, shadowDx, shadowDy и shadowRadius. С их помощью вы можете установить цвет тени и ее смещение. Во время установки значений вы не увидите изменений, необходимо запустить пример в эмуляторе или на устройстве. В следующем примере я создал тень красного цвета со смещением в 2 пикселя по вертикали и горизонтали. Учтите, что для смещения используются единицы px (пиксели), единицы dp не поддерживаются.

Программный эквивалент — метод public void setShadowLayer (float radius, float dx, float dy, int color):
Создание ссылок автоматом
У TextView есть ещё два интересных свойства Auto link (атрибут autoLink) и Links clickable (атрибут linksClickable), которые позволяют автоматически создавать ссылки из текста.
Выглядит это следующим образом. Предположим, мы присвоим элементу TextView текст Мой сайт: developer.alexanderklimov.ru и применим к нему указанные свойства.
При этом уже на этапе разработки вы увидите, что строка адреса сайта после слов Мой адрес: стала ссылкой. Если вы запустите приложение и нажмете на ссылку, то откроется браузер с указанным адресом. Вам даже не придется писать дополнительный код. Аналогично, если указать номер телефона (параметр phone), то запустится звонилка.
У ссылки есть интересная особенность — при длительном нажатии на ссылку появляется диалоговое окно, позволяющее скопировать ссылку в буфер обмена.
Атрибут autoLink позволяет комбинировать различные виды ссылок для автоматического распознавания: веб-адрес, email, номер телефона.

Цвет ссылки можно поменять через свойство Text color link (XML-атрибут textColorLink), а программно через метод setTextLinkColor().
Программно можно установить ссылки на текст через класс Linkify:

Кроме константы ALL, можно также использовать Linkify.EMAIL_ADDRESSES, Linkify.MAP_ADDRESSES, Linkify.PHONE_NUMBERS. К сожалению, русские адреса не распознаются. В моём случае индекс был распознан как телефонный номер, а город и улица не стали ссылкой.
В таких случаях придётся самостоятельно добавить ссылки в текстах. Например, определим ссылку в ресурсе:
Присвоим созданный ресурс тексту в TextView и запустим пример. Сам текст будет выглядеть как ссылка, но реагировать не будет. Чтобы исправить данную проблему, добавим код:
Ссылки в тексте выглядят не совсем удобными. Есть отдельная библиотека, которая улучшает функциональность. Описание проблем и ссылка на библиотеку есть в статье A better way to handle links in TextView — Saket Narayan.
Совет: Используйте полупрозрачность с умом
Если вам нужно установить текст полупрозрачным, то не используйте атрибут android:alpha:
Дело в том, что такой подход затрачивает много ресурсов при перерисовке.
Атрибут textColor позволяет установить полупрозрачность без потери производительности:
Выделить текст для копирования
По умолчанию, текст в TextView нельзя выделить для копирования. Но в API 11 появилась такая возможность, которая может пригодиться. Делается либо при помощи XML-атрибута android:textIsSelectable, либо через метод setTextIsSelectable().
Добавьте в разметку два компонента TextView и одно текстовое поле EditText для вставки скопированного текста. У первой текстовой метки установим возможность выделения текста декларативно.
Для второго компонента возможность выделения создадим программно.
Сделайте долгий тап на тексте в любом TextView. Увидите стандартные ползунки для выбора длины текста. Скопируйте текст, сделайте длинный тап в EditText и вставьте текст.
Источник
Xamarin Android — Reference custom fonts in XML
Using custom fonts in Android application was a bit of a pain. Android 8 made things much easier for us with the ability to use local or remote custom fonts in XML.

John Thiriet
Enthusiast developer, former Microsoft MVP and Xamarin MVP, language nerd.
Using custom fonts in Android applications have always been a bit of a pain. Instead of being able to set fonts by XML, it was necessary to write code to set the desired font in a widget.
To circumvent this problem, I had been using the Calligraphy library for the past couple of years, as well as embedding those fonts inside the application.
At last, Android 8 (API level 26) introduced a native solution to this problem. This feature is also supported on devices till Android 4.1 by using Support Library 26 or more.
Reference embedded fonts
It was surprisingly not easy to find some proper steps to achieve this in Xamarin hence the writing of this blog post.
The natural way to use a custom font is to include it inside the application bundle. Android Studio comes with a wizard to do this, but unfortunately we do not have this luxury in Visual Studio. It is not a big issue though as doing it manually is pretty straightforward.
Emmbbed the font in the application bundle
- Get your font file ready or download one from Google Fonts for example the Modak
- Create a folder named font under the Resources folder.
- Put the font file inside it and ensure that there are no space in the file name like : modak_regular.ttf .
- Ensure that the file’s build action is set to AndroidResource .
Create a font family file
A font family file is necessary to reference the font. It consists of a collection of font elements which defines the font style or font weight.
- Still inside the font folder create a new xml file and give it a name like : modak.xml .
- Ensure that the file’s build action is set to AndroidResource .
- Edit the newly created xml by taking inspiration on the file below.
Use the font
Finally use the font in any widget by referencing the font family created above.
Of course embedding a font makes the application bigger and if lots of applications on the user’s device uses the same font he gets them several times for nothing. That is why Google introduced downloadables fonts.
Reference downloadable fonts
The implementation of downloadable fonts in Android is pretty simple and can be summed up like this : A font provider like Google Fonts has the font we want to use. In order to use it, we need to tell Android which font it is and from which font provider to get it.
Define the font
- Inside the font folder, create a new xml file for exemple : modak.xml .
- Ensure that the file’s build action is set to AndroidResource .
- Copy the following xml inside the newly created file.
The font provider in this case is Google Fonts. If you need to use another font provider, you will need to update the values above accordingly.
Define the font provider certificates
If you are using the support libraries, it is necessary to declare the certificates of the font providers.
The exemple below is for Google Fonts. If you have other providers you will need to add or update values in accordingly.
- Under the Resouces/values folder, create a new font_certs.xml file.
- Ensure that the file’s build action is set to AndroidResource .
- Copy the following xml inside the newly created file.
How did I got this values ? From a newly Android native project using custom fonts. The certificate are always the same so no worries in copy pasting.
Declare the downloadable fonts
Up until now, we have defined a downloadable font and the necessary certificates. But Android still does not know how to automatically download the font. To achieve this a little more work is necessary.
- Under the Resouces/values folder, create a new preloaded_fonts.xml file.
- Copy the following xml inside the newly created file
- Edit the Android manifest by adding the following metadata inside the application element
Do not forget to add your other downloadable fonts inside preloaded_fonts.xml if any !
Conclusion
Using custom fonts in XML requires a bit of initial work. But once done, it is easier than ever. Beside removing the need of writing code, it allows defining fonts inside styles. You can then inherit from those take and enjoy having the fonts defined only once in the application.
Downloadable fonts removes the need to include each and every fonts you need to use. By sharing fonts with all the others applications on the users device, as well as excluding fonts from each application updates, downloadable fonts saves your users bandwidth and storage. So be a good developer and use them if you can !
As always, please feel free to read my previous posts and to comment below, I will be more than happy to answer.
Comments
You May Also Enjoy
Creating a Xamarin Android binding library — Writing the binding
Creating a Xamarin Android binding library is not an easy task and is different for every native library. This article is the second of a series of 4 article.
Creating a Xamarin Android binding library — Preparation
Creating a Xamarin Android binding library is not an easy task and is different for every native library. This article is the first of a series of 4 articles.
Using Huawei Mobile Services with Xamarin
Huawei provides a set of tools to work on Android phones that do not use Google Play Services. In this post we will see how we can use them in a Xamarin Andr.
Crashes and errors analytics with App Center and Application Insights
Exporting analytics with App Center to Application Insights is pretty straightforward. Errors and crashes are not exposed directly though. Fortunately, there.
Источник
Fonts in Xamarin.Forms
By default, Xamarin.Forms uses a system font defined by each platform. However, controls that display text define properties that you can use to change this font:
- FontAttributes , of type FontAttributes , which is an enumeration with three members: None , Bold , and Italic . The default value of this property is None .
- FontSize , of type double .
- FontFamily , of type string .
These properties are backed by BindableProperty objects, which means that they can be targets of data bindings, and styled.
Set font attributes
Controls that display text can set the FontAttributes property to specify font attributes:
The equivalent C# code is:
Set the font size
Controls that display text can set the FontSize property to specify the font size. The FontSize property can be set to a double value directly, or by a NamedSize enumeration value:
The equivalent C# code is:
Alternatively, the Device.GetNamedSize method has an override that specifies the second argument as an Element :
The FontSize value, when specified as a double , is measured in device-independent units. For more information, see Units of Measurement.
For more information about named font sizes, see Understand named font sizes.
Set the font family
Controls that display text can set the FontFamily property to a font family name, such as «Times Roman». However, this will only work if that font family is supported on the particular platform.
There are a number of techniques that can be used to attempt to derive the fonts that are available on a platform. However, the presence of a TTF (True Type Format) font file does not necessarily imply a font family, and TTFs are often included that are not intended for use in applications. In addition, the fonts installed on a platform can change with platform version. Therefore, the most reliable approach for specifying a font family is to use a custom font.
Custom fonts can be added to your Xamarin.Forms shared project and consumed by platform projects without any additional work. The process for accomplishing this is as follows:
- Add the font to your Xamarin.Forms shared project as an embedded resource (Build Action: EmbeddedResource).
- Register the font file with the assembly, in a file such as AssemblyInfo.cs, using the ExportFont attribute. An optional alias can also be specified.
The following example shows the Lobster-Regular font being registered with the assembly, along with an alias:
The font can reside in any folder in the shared project, without having to specify the folder name when registering the font with the assembly.
On Windows, the font file name and font name may be different. To discover the font name on Windows, right-click the .ttf file and select Preview. The font name can then be determined from the preview window.
The font can then be consumed on each platform by referencing its name, without the file extension:
Alternatively, it can be consumed on each platform by referencing its alias:
The equivalent C# code is:
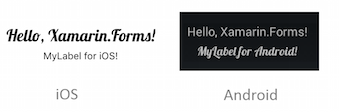
The following screenshots show the custom font:
For release builds on Windows, ensure the assembly containing the custom font is passed as an argument in the Forms.Init method call. For more information, see Troubleshooting.
Set font properties per platform
The OnPlatform and On classes can be used in XAML to set font properties per platform. The example below sets different font families and sizes on each platform:
The Device.RuntimePlatform property can be used in code to set font properties per platform
For more information about providing platform-specific values, see Provide platform-specific values. For information about the OnPlatform markup extension, see OnPlatform markup extension.
Understand named font sizes
Xamarin.Forms defines fields in the NamedSize enumeration that represent specific font sizes. The following table shows the NamedSize members, and their default sizes on iOS, Android, and the Universal Windows Platform (UWP):
| Member | iOS | Android | UWP |
|---|---|---|---|
| Default | 17 | 14 | 14 |
| Micro | 12 | 10 | 15.667 |
| Small | 14 | 14 | 18.667 |
| Medium | 17 | 17 | 22.667 |
| Large | 22 | 22 | 32 |
| Body | 17 | 16 | 14 |
| Header | 17 | 96 | 46 |
| Title | 28 | 24 | 24 |
| Subtitle | 22 | 16 | 20 |
| Caption | 12 | 12 | 12 |
The size values are measured in device-independent units. For more information, see Units of Measurement.
On iOS and Android, named font sizes will autoscale based on operating system accessibility options. This behavior can be disabled on iOS with a platform-specific. For more information, see Accessibility Scaling for Named Font Sizes on iOS.
Display font icons
Font icons can be displayed by Xamarin.Forms applications by specifying the font icon data in a FontImageSource object. This class, which derives from the ImageSource class, has the following properties:
- Glyph – the unicode character value of the font icon, specified as a string .
- Size – a double value that indicates the size, in device-independent units, of the rendered font icon. The default value is 30. In addition, this property can be set to a named font size.
- FontFamily – a string representing the font family to which the font icon belongs.
- Color – an optional Color value to be used when displaying the font icon.
This data is used to create a PNG, which can be displayed by any view that can display an ImageSource . This approach permits font icons, such as emojis, to be displayed by multiple views, as opposed to limiting font icon display to a single text presenting view, such as a Label .
Font icons can only currently be specified by their unicode character representation.
The following XAML example has a single font icon being displayed by an Image view:
This code displays an XBox icon, from the Ionicons font family, in an Image view. Note that while the unicode character for this icon is \uf30c , it has to be escaped in XAML and so becomes . The equivalent C# code is:
The following screenshots, from the Bindable Layouts sample, show several font icons being displayed by a bindable layout:
Источник


