- Настройка эмулятора Android
- Обзор
- Разделы
- Аппаратное ускорение для производительной работы эмулятора
- Управление виртуальными устройствами с помощью Android Device Manager
- Изменение свойств виртуальных устройств Android
- Устранение неполадок в Android Emulator
- Setting up the Android SDK for Xamarin.Android
- Overview
- Requirements
- SDK Manager
- Android SDK location
- Tools tab
- Platforms tab
- Repository selection
- Requirements
- SDK Manager
- Locations tab
- Tools tab
- Platforms tab
- Repository selection
- Summary
Настройка эмулятора Android
Это руководство описывает, как подготовить Android Emulator для тестирования приложения.
Обзор
Для имитации разнообразных устройств Android Emulator можно запускать в различных конфигурациях. Каждая конфигурация называется виртуальным устройством. При развертывании и тестировании приложения в эмуляторе вы выбираете предварительно настроенное или пользовательское виртуальное устройство, имитирующее физическое устройство Android, такое как телефон Pixel или Nexus.
В разделах ниже описано, как ускорить Android Emulator для достижения максимальной производительности, как использовать Android Device Manager для создания и настройки виртуальных устройств и как настроить свойства профиля для виртуального устройства. Кроме того, в разделе об устранении неполадок описаны общие проблемы эмулятора и приведены варианты их устранения.
Разделы
Аппаратное ускорение для производительной работы эмулятора
Как подготовить свой компьютер для достижения максимальной производительности Android Emulator с помощью технологии виртуализации Hyper-V или HAXM. Так как без аппаратного ускорения Android Emulator может работать слишком медленно, перед его использованием на компьютере рекомендуется включить аппаратное ускорение.
Управление виртуальными устройствами с помощью Android Device Manager
Сведения об использовании Android Device Manager для создания и настройки виртуальных устройств.
Изменение свойств виртуальных устройств Android
Сведения об изменении свойств профиля виртуального устройства с помощью Android Device Manager.
Устранение неполадок в Android Emulator
В этой статье описаны наиболее типичные ошибки и предупреждения, возникающие в Android Emulator, а также способы их устранения.
Если вы используете Mac с микросхемой Apple, например M1, вам потребуется установить Android Emulator для предварительной версии M1 из GitHub.
После настройки Android Emulator см. статью Отладка в Android Emulator, чтобы узнать, как запустить эмулятор и использовать его для тестирования и отладки приложения.
Источник
Setting up the Android SDK for Xamarin.Android
Visual Studio includes an Android SDK Manager that you use to download Android SDK tools, platforms, and other components that you need for developing Xamarin.Android apps.
Overview
This guide explains how to use the Xamarin Android SDK Manager in Visual Studio and Visual Studio for Mac.
This guide applies to Visual Studio 2019, Visual Studio 2017, and Visual Studio for Mac.
The Xamarin Android SDK Manager (installed as part of the Mobile development with .NET workload) helps you download the latest Android components that you need for developing your Xamarin.Android app. It replaces Google’s standalone SDK Manager, which has been deprecated.
Requirements
To use the Xamarin Android SDK Manager, you will need the following:
Visual Studio 2019 Community, Professional, or Enterprise.
OR Visual Studio 2017 (Community, Professional, or Enterprise edition). Visual Studio 2017 version 15.7 or later is required.
Visual Studio Tools for Xamarin version 4.10.0 or later (installed as part of the Mobile development with .NET workload).
The Xamarin Android SDK Manager also requires the Java Development Kit (which is automatically installed with Xamarin.Android). There are several JDK alternatives to choose from:
By default, Xamarin.Android uses JDK 8, which is required if you are developing for API level 24 or greater (JDK 8 also supports API levels earlier than 24).
You can continue to use JDK 7 if you are developing specifically for API level 23 or earlier.
If you are using Visual Studio 15.8 Preview 5 or later, you can try using Microsoft’s Mobile OpenJDK Distribution rather than JDK 8.
Xamarin.Android does not support JDK 9.
SDK Manager
To start the SDK Manager in Visual Studio, click Tools > Android > Android SDK Manager:
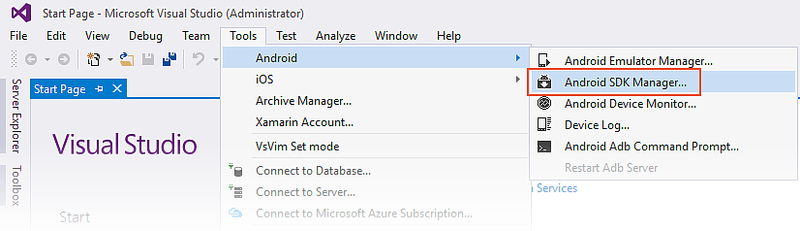
The Android SDK Manager opens in the Android SDKs and Tools screen. This screen has two tabs – Platforms and Tools:
The Android SDKs and Tools screen is described in more detail in the following sections.
Android SDK location
The Android SDK location is configured at the top of the Android SDKs and Tools screen, as seen in the previous screenshot. This location must be configured correctly before the Platforms and Tools tabs will function properly. You may need to set the location of the Android SDK for one or more of the following reasons:
The Android SDK Manager was unable to locate the Android SDK.
You have installed the Android SDK in a alternate (non-default) location.
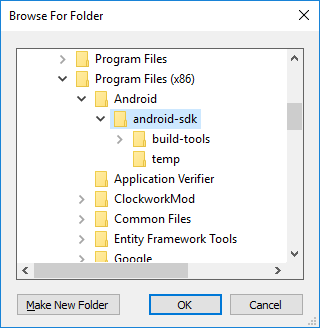
To set the location of the Android SDK, click the ellipsis (…) button to the far right of Android SDK Location. This opens the Browse For Folder dialog to use for navigating to the location of the Android SDK. In the following screenshot, the Android SDK under Program Files (x86)\Android is being selected:
When you click OK, the SDK Manager will manage the Android SDK that is installed at the selected location.
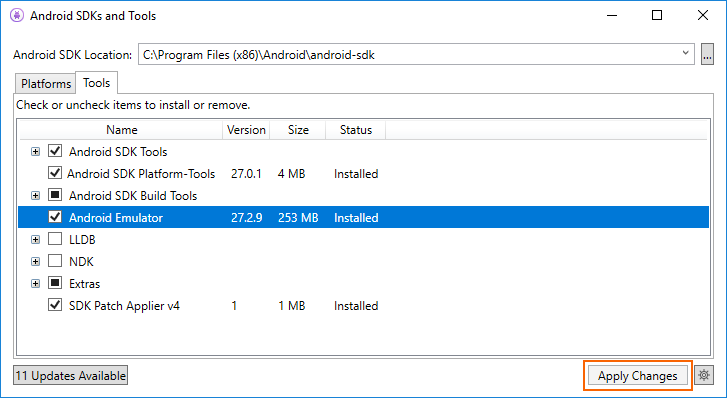
Tools tab
The Tools tab displays a list of tools and extras. Use this tab to install the Android SDK tools, platform tools, and build tools. Also, you can install the Android Emulator, the low-level debugger (LLDB), the NDK, HAXM acceleration, and Google Play libraries.
For example, to download the Google Android Emulator package, click the check mark next to Android Emulator and click the Apply Changes button:
A dialog may be shown with the message, The following package requires that you accept its license terms before installing:
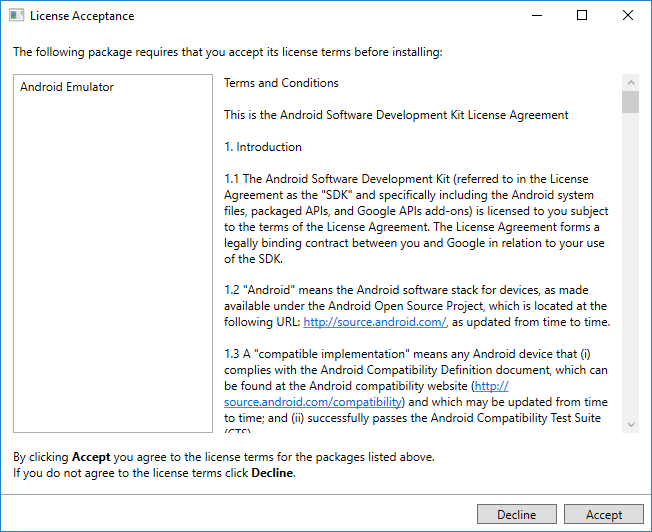
Click Accept if you accept the Terms and Conditions. At the bottom of the window, a progress bar indicates download and installation progress. After the installation completes, the Tools tab will show that the selected tools and extras were installed.
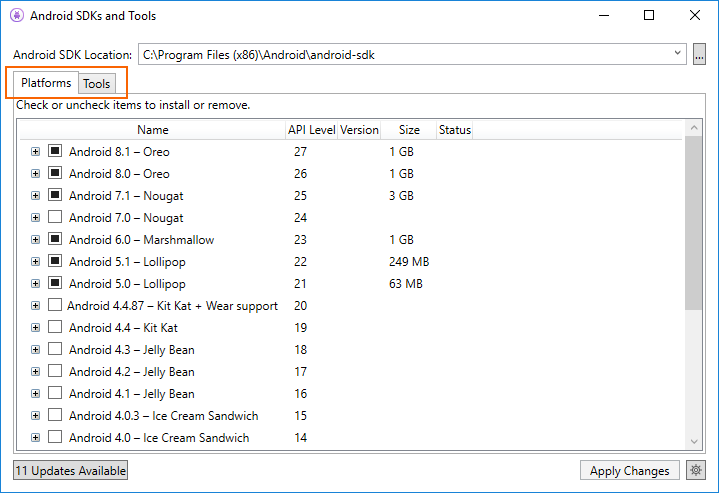
Platforms tab
The Platforms tab displays a list of platform SDK versions along with other resources (like system images) for each platform:
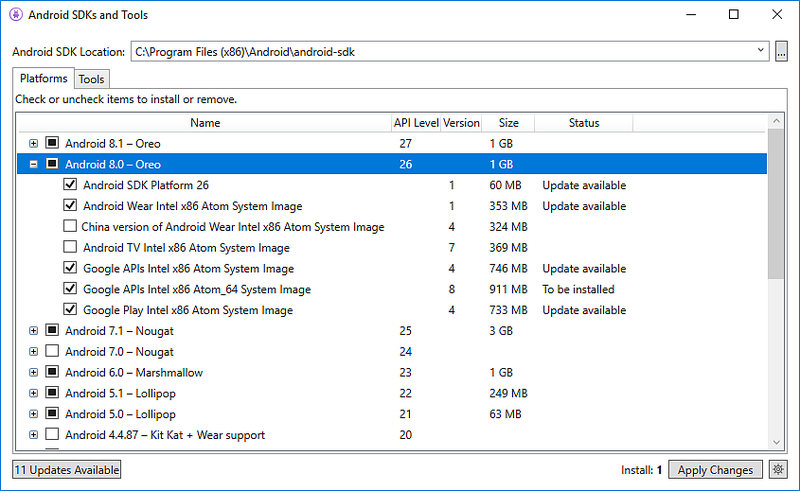
This screen lists the Android version (such as Android 8.0), the code name (Oreo), the API level (such as 26), and the sizes of the components for that platform (such as 1 GB). You use the Platforms tab to install components for the Android API level that you want to target. For more information about Android versions and API levels, see Understanding Android API Levels.
When all components of a platform are installed, a checkmark appears next to the platform name. If not all components of a platform are installed, the box for that platform is filled. You can expand a platform to see its components (and which components are installed) by clicking the + box to the left of the platform. Click — to unexpand the component listing for a platform.
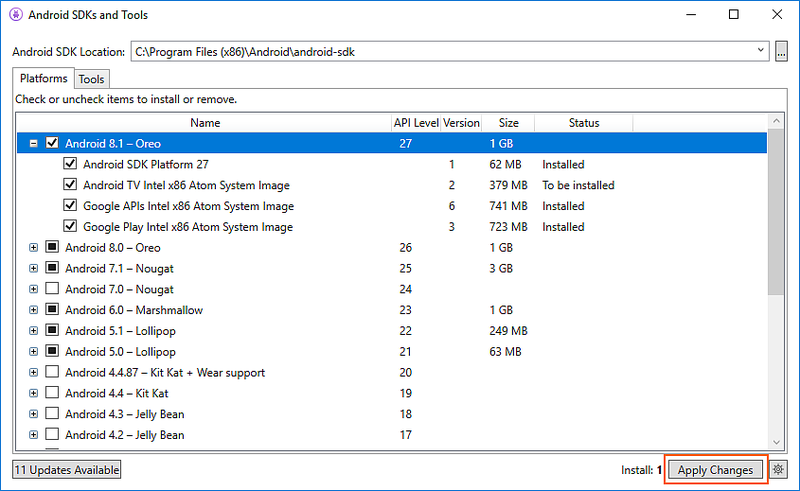
To add another platform to the SDK, click the box next to the platform until the checkmark appears to install all of its components, then click Apply Changes:
To install only specific components, click the box next to the platform once. You can then select any individual components that you need:

Notice that the number of components to install appears next to the Apply Changes button. After you click the Apply Changes button, you will see the License Acceptance screen as shown earlier. Click Accept if you accept the Terms and Conditions. You may see this dialog more than one time when there are multiple components to install. At the bottom of the window, a progress bar will indicate download and installation progress. When the download and installation process completes (this can take many minutes, depending on how many components need to be downloaded), the added components are marked with a checkmark and listed as Installed.
Repository selection
By default, the Android SDK Manager downloads platform components and tools from a Microsoft-managed repository. If you need access to experimental alpha/beta platforms and tools that are not yet available in the Microsoft repository, you can switch the SDK Manager to use Google’s repository. To make this switch, click the gear icon in the lower right-hand corner and select Repository > Google (Unsupported):
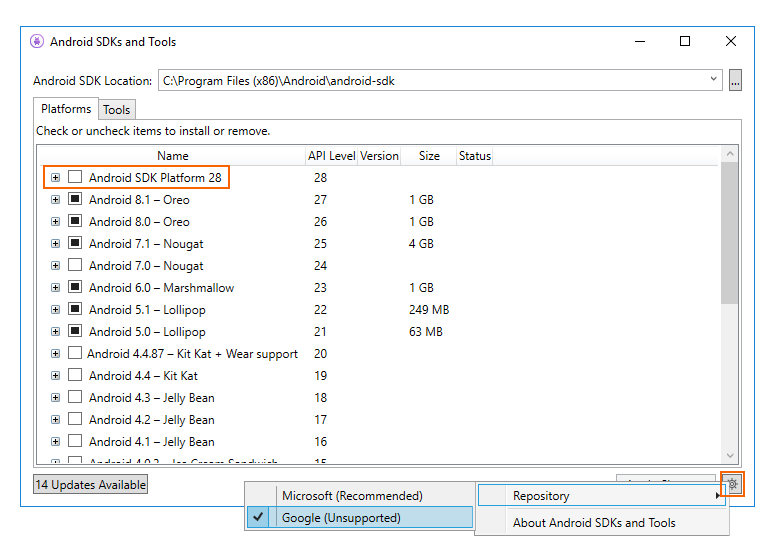
When the Google repository is selected, additional packages may appear in the Platforms tab that were not available previously. (In the above screenshot, Android SDK Platform 28 was added by switching to the Google repository.) Keep in mind that use of the Google repository is unsupported and is therefore not recommended for everyday development.
To switch back to the supported repository of platforms and tools, click Microsoft (Recommended). This restores the list of packages and tools to the default selection.
Requirements
To use the Xamarin Android SDK Manager, you will need the following:
- Visual Studio for Mac 7.5 (or later).
The Xamarin Android SDK Manager also requires the Java Development Kit (which is automatically installed with Xamarin.Android). There are several JDK alternatives to choose from:
By default, Xamarin.Android uses JDK 8, which is required if you are developing for API level 24 or greater (JDK 8 also supports API levels earlier than 24).
You can continue to use JDK 7 if you are developing specifically for API level 23 or earlier.
If you are using Visual Studio for Mac 7.7 or later, you can try using Microsoft’s Mobile OpenJDK Distribution rather than JDK 8.
Xamarin.Android does not support JDK 9.
SDK Manager
To start the SDK Manager in Visual Studio for Mac, click Tools > SDK Manager:

The Android SDK Manager opens in the Preferences window, which contains three tabs, Platforms, Tools, and Locations:
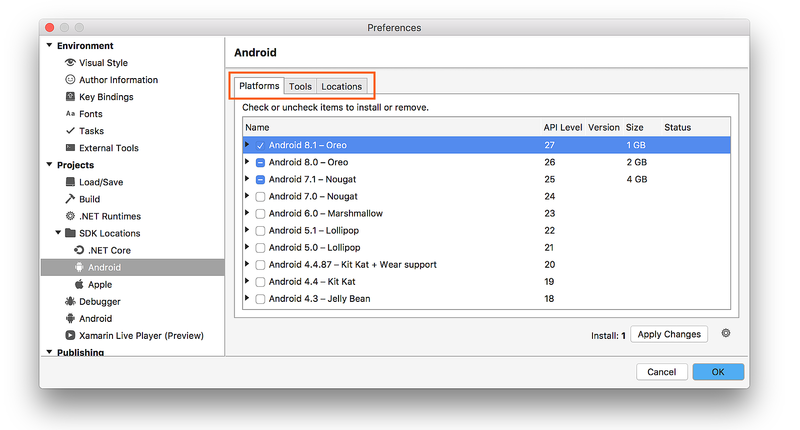
The tabs of the Android SDK Manager are described in the following sections.
Locations tab
The Locations tab has three settings for configuring the locations of the Android SDK, Android NDK, and the Java SDK (JDK). These locations must be configured correctly before the Platforms and Tools tabs will function properly.
When the SDK Manager starts, it automatically determines the path for each installed package and indicates that it was Found by placing a green checkmark icon next to the path:
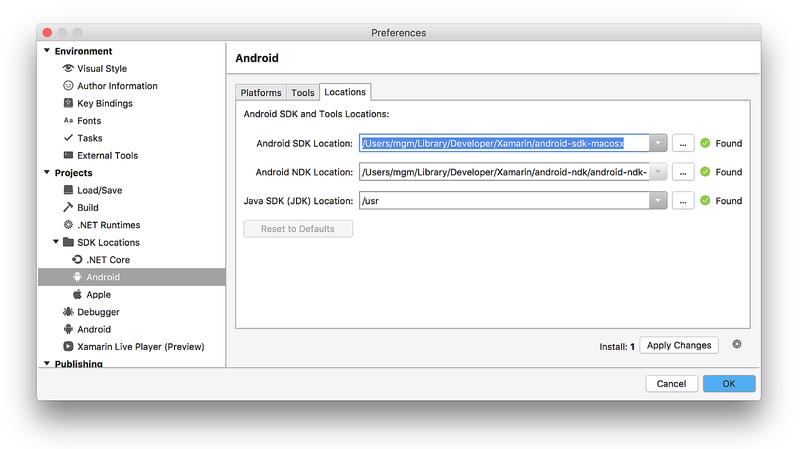
Click the Reset to Defaults button to cause the SDK Manager to look for the SDK, NDK, and JDK at their default locations.
Typically, you use the Locations tab to modify the location of the Android SDK and/or the Java JDK. You do not need to install the NDK to develop Xamarin.Android apps – the NDK is used only when you need to develop parts of your app using native-code languages such as C and C++.
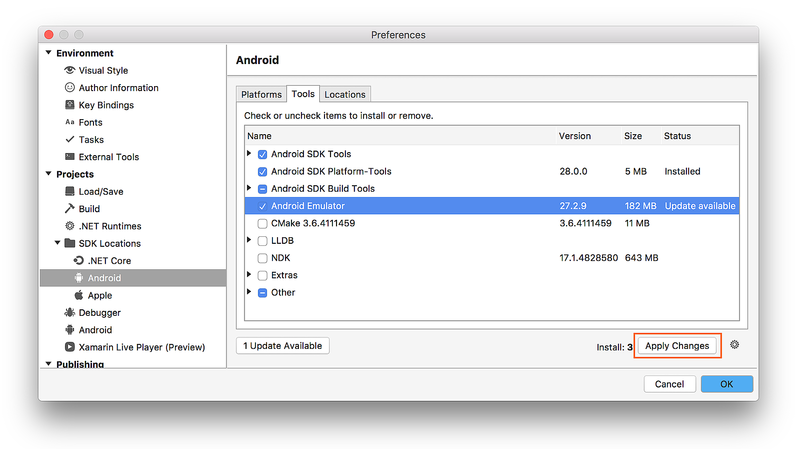
Tools tab
The Tools tab displays a list of tools and extras. Use this tab to install the Android SDK tools, platform tools, and build tools. Also, you can install the Android Emulator, the low-level debugger (LLDB), the NDK, HAXM acceleration, and Google Play libraries.
For example, to download the Google Android Emulator package, click the check mark next to Android Emulator and click the Apply Changes button:
A dialog may be shown with the message, The following package requires that you accept its license terms before installing:
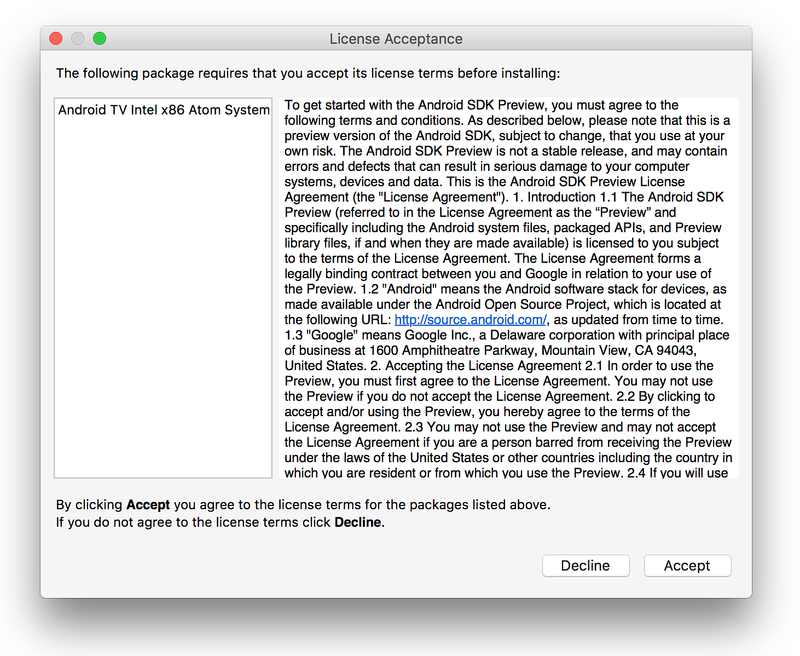
Click Accept if you accept the Terms and Conditions. At the bottom of the window, a progress bar indicates download and installation progress. After the installation completes, the Tools tab will show that the selected tools and extras were installed.
Platforms tab
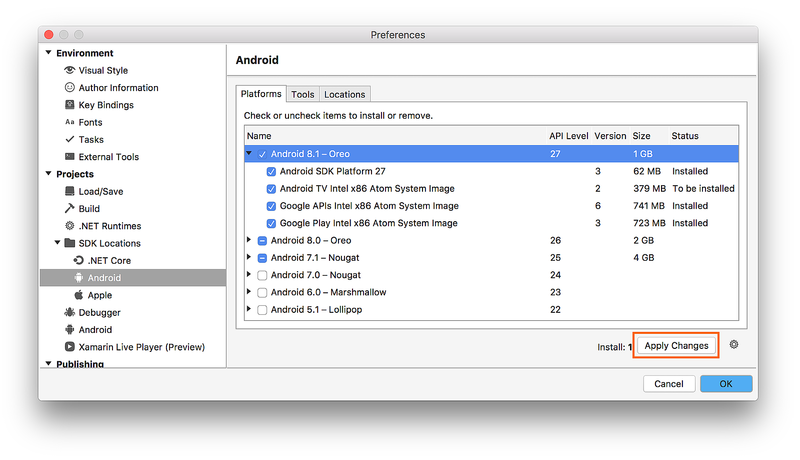
The Platforms tab displays a list of platform SDK versions along with other resources (like system images) for each platform:

This screen lists the Android version (such as Android 8.1), the code name (Oreo), the API level (such as 27), and the sizes of the components for that platform (such as 1 GB). You use the Platforms tab to install components for the Android API level that you want to target. For more information about Android versions and API levels, see Understanding Android API Levels.
When all components of a platform are installed, a checkmark appears next to the platform name. If not all components of a platform are installed, the box for that platform is filled. You can expand a platform to see its components (and which components are installed) by clicking the arrow to the left of the platform. Click down arrow to unexpand the component listing for a platform.
To add another platform to the SDK, click the box next to the platform until the checkmark appears to install all of its components, then click Apply Changes:
To install only some components, click the box next to the platform once. You can then select any individual components that you need:
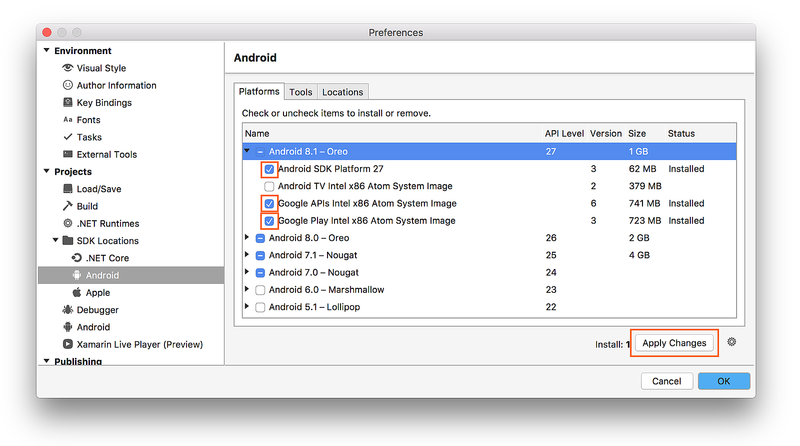
Notice that the number of components to install appears next to the Apply Changes button. After you click the Apply Changes button, you will see the License Acceptance screen as shown earlier. Click Accept if you accept the Terms and Conditions. You may see this dialog more than one time when there are multiple components to install. At the bottom of the window, a progress bar will indicate download and installation progress. When the download and installation process completes (this can take many minutes, depending on how many components need to be downloaded), the added components are marked with a checkmark and listed as Installed.
Repository selection
By default, the Android SDK Manager downloads platform components and tools from a Microsoft-managed repository. If you need access to experimental alpha/beta platforms and tools that are not yet available in the Microsoft repository, you can switch the SDK Manager to use Google’s repository. To make this switch, click the gear icon in the lower right-hand corner and select Repository > Google (Unsupported):
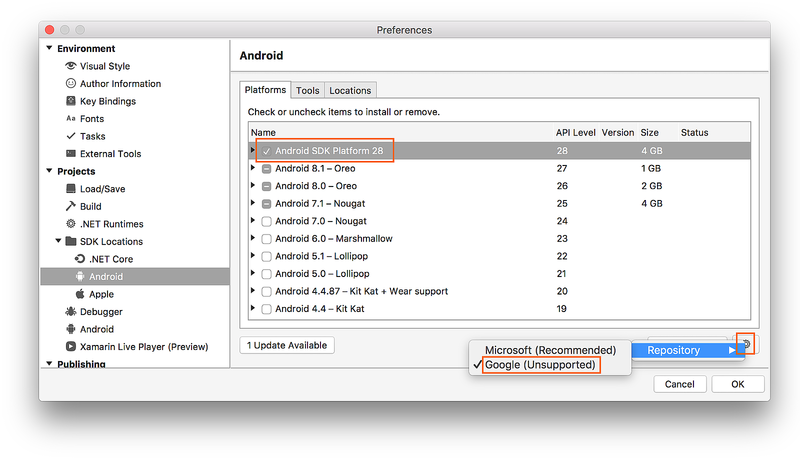
When the Google repository is selected, additional packages may appear in the Platforms tab that were not available previously. (In the above screenshot, Android SDK Platform 28 was added by switching to the Google repository.) Keep in mind that use of the Google repository is unsupported and is therefore not recommended for everyday development.
To switch back to the supported repository of platforms and tools, click Microsoft (Recommended). This restores the list of packages and tools to the default selection.
Summary
This guide explained how to install and use the Xamarin Android SDK Manager tool in Visual Studio and Visual Studio for Mac.
Источник


