- Android string.xml — несколько вещей, которые стоит помнить
- Не используйте повторно
- Разделяйте
- Форматирование
- Множественное число
- Подстветка слов
- Основы верстки для нативных андроид приложений
- FrameLayout
- LinearLayout
- RelativeLayout
- TableLayout
- Alternate Layouts
- Стили
- An introduction to XML for new Android developers – the powerful markup language
- A basic introduction to XML and markup languages
- XML in Android development
- Using XML in your Android app
- XML outside of layout files
- Getting started with XML code for Android
- Syntax
- Managing views and viewgroups
- Closing comments
Android string.xml — несколько вещей, которые стоит помнить
Доброго времени суток! Представляю вашему вниманию вольный перевод статьи от GDE (Google developer expert) Dmytro Danylyk. Собственно, вот оригинал. Статья описывает правильные подходы для работы со strings.xml и особенно полезно это будет разработчикам, которые разрабатывают мультиязыковые приложения. Прошу под кат.
Эта статья о такой тривиальной вещи android как string.xml.
Не используйте повторно
Не используйте повторно строки для разных экранов
Давайте представим, что у вас есть loading dialog на Sign In либо Sign Up экране. Так как оба экрана имеют loading dialog, вы решаете использовать те же строки — R.string.loading.

Позже, если вы решите использовать различные, вам нужно будет создать 2 разные строки и модифицировать их, непосредственно, в .java классах. Если вы используете разные строки с начала — вам бы пришлось модифицировать лишь strings.xml файл.
Вы никогда не будете заранее знать поддержку и перевод какого языка вам предстоит добавить. Всё дело в контексте: в одном языке вы можете использовать тоже слово в одном контексте, но в другом — это слово по смыслу не будет подходить.
Обратите внимание, что в данном случае английская версия strings.xml использует тоже самое слово — “Yes” для обоих случаев R.string.download_file_yes и R.string.terms_of_use_yes strings.
Но украинский вариант strings.xml использует 2 разных слова — “Гаразд” для R.string.download_file_yes и “Так” для R.string.terms_of_use_yes.
Разделяйте
Разделяйте строки, которые относятся к одному экрану с помощью префиксов и комментариев
- Добавляйте префикс в виде имени экрана к каждой строке для более простого понимания к какому экрану относится данный ресурс.
- Чистый string.xml файл поможет достаточно легко поддерживать и переводить различные языки — экран за экраном.
Создание различных strings.xml для каждого экрана
Если вы хотите, вы можете создать string.xml файл для каждого экрана — settings-strings.xml, profile-strings.xml. Но обычно приложение имеет около 10-20 экранов, соответственно, нужно иметь 10-20 string.xml файлов в каждой языковой папке. Я думаю, что это будет сопряжено с беспорядком.
Форматирование
Используйте Resources#getString(int id, Object… formatArgs) для форматирования строк
Никогда не делайте конкатенацию через + оператор, поскольку в других языках порядок слов может варьироваться.
Множественное число
Используйте Resources#getQuantityString(int id, int quantity) для количественных строк
Не решайте проблемы с множественным числом в java коде, поскольку разные языки имеют разные правила для согласования множественного числа
Подстветка слов
Используйте html text для подсветки статический слов
Источник
Основы верстки для нативных андроид приложений
( пользоваться не рекомендуется, deprecated )
AbsoluteLayout — означает что каждый элемент верстки будет иметь абсолютную позицию относительно верхнего левого угла экрана задаваемую с помощью координат x и y. Т.е. верхнийлевый угол экрана при AbsoluteLayout имеет координаты x = 0, y = 0.
Позиция указывается в атрибутах элемента android:layout_x и android:layout_y.
Пример кода:
FrameLayout
FrameLayout — тип верстки внутри которого может отображаться только один элемент в строке. Т.е. если внутри FrameLayout вы поместите несколько элементов, то следующий будет отображаться поверх предыдущего.
Пример кода:
LinearLayout
LinearLayout — тип верстки при котором область верстки делится на строки и в каждую строку помещается один элемент. Разбиение может быть вертикальное или горизонтальное, тип разбиения указывается в атрибуте LinearLayout android:orientation. Внутри верстки возможно комбинировать вертикальную и горизонтальную разбивки, а кроме того, возможна комбинация нескольких разных типов верстки например использование LinearLayout внутри FrameLayout.
Пример вертикальной разбивки LinearLayout:
Пример горизонтальной разбивки LinearLayout:
Комбинация нескольких LinearLayout:
RelativeLayout
RelativeLayout — тип верстки при котором позиционирование элементов происходит относительно друг друга и относительно главного контейнера.
За то, каким образом будут позиционироваться элементы отвечают следующие атрибуты:
Атрибуты позиционирования относительно контейнера
- android:layout_alignParentBottom – Низ элемента находится внизу контейнера
- android:layout_alignParentLeft – Левая часть элемента прилегает к левой части контейнера
- android:layout_alignParentRight – Правая часть элемента прилегает к правой части контейнера
- android:layout_alignParentTop – Элемент находится в верхней части контейнера
- android:layout_centerHorizontal – Элемент позиционируется по центру относительно горизонтального размера контейнера
- android:layout_centerInParent – Элемент позиционируется по центру относительно горизонтального и вертикального размеров размера контейнера
- android:layout_centerVertical – Элемент позиционируется по центру относительно вертикального размера контейнера
Атрибуты позиционирования относительно других элементов.
В качестве значений этих атрибутов ставятся id элемента относительно которого будет производится позиционирование.
android:layout_above – Распологает элемент над указанным
android:layout_below – Распологает элемент под указанным
android:layout_toLeftOf – Распологает элемент слева от указанного
android:layout_toRightOf – Распологает элемент справа от указанного
Выравнивание относительно других элементов.
android:layout_alignBaseline – Выравнивает baseline элемента с baseline указаннго элемента
android:layout_alignBottom – Выравнивает низ элемента по низу указанного элемента
android:layout_alignLeft – Выравнивает левый край элемента с левым краем указанного элемента
android:layout_alignRight – Выравнивает правый край элемента с правым краем указанного элемента
android:layout_alignTop – Выравнивает верхнюю часть элемента в соответствие с верхней частью указанного элемента
TableLayout
TableLayout — табличная верстка.
Организует элементы в строки и столбцы таблицы.
Для организации строк служит таг
Alternate Layouts
Alternate Layouts — альтернативная верстка. Позволяет использовать различную верстку для различных ориентаций экрана.
XML для альтернативной верстки помещается в папки проекта:
res/layout-land – альтернативная верстка для landscape UI
res/layout-port –альтернативная верстка для portrait UI
res/lauout-square – альтернативная верстка для square UI
и перед тем как получить макет из res/lauout система проверяет наличие файлов в этих папках.
И в завершении немного о стилях.
Стили
Во первых стили элемента могут быть описаны в атрибутах самого элемента.
Например:
Кроме того стили можно вынести в отдельный xml файл и сохранить его в папке res/values/
Напимер:
Если мы вынесем стили в отдельный файл, то для описания стилей элемента будем использовать атрибут style.
Источник
An introduction to XML for new Android developers – the powerful markup language

If you’re interested in Android development, chances are you’re going to need to learn some programming.
In most cases, that will mean learning Java or Kotlin, either of which is officially supported by Android Studio, the official “IDE” for Android Development from Google. However, no one ever talks about XML, and this can lead to confusion when you open up a new project for the first time and notice that there are actually two different main files and two different types of script. Hence this article, which will serve as your introduction to XML for Android development.
Unless you’re making a game using Unity or Unreal, chances are you’re also going to need to understand this “markup language” to define your layout. If you try and skip it, eventually you’ll hit a road block.
Read on then to discover what XML is, why you need it, and how to get started.
A basic introduction to XML and markup languages

XML stands for Extensible Markup Language, which gives us a clue to what it does.
A markup language is slightly different from a programming language. Whereas a programming language (C#, C++, Java, Kotlin, Python, BASIC) will allow you to define behaviors, interactions, and conditions; a markup language is used more to describe data, and in this case, layouts. Programming languages create dynamic interactions, whereas markup languages generally handle things like static user interfaces.

- Markup languages control presentation data.
- Scripting languages mediate between programs to generate data.
- Programming languages transform data.
Despite appearances, XML is not a programming language.
Another example of a markup language is HTML, which defines the appearance of a website. HTML places the images and text on a website and sets the font and color. You couldn’t make a computer game in HTML (not a very good one anyway), which is why you might turn to something like JavaScript for more interactive elements. Though just to complicate matters, JavaScript is technically a scripting language!

In fact, XML was originally introduced by the World Wide Web Consortium (W3C) to deal with the inherent limitations of HTML. Specifically, HTML is not terribly readable for a computer, because it doesn’t explain what anything on the page actually is.
Mrs. Mary McGoon
1401 Main Street
Anytown, NC 34829
Here, you and I know the information is an address, but all the browser or computer knows is where to start new lines. That’s where something like XML comes in handy.
Here’s how the same information might look in XML:
XML is used anywhere that can benefit from adding context to data. It is used across the web to make search smarter and simplify data exchange. XML is actually based on the Standard Generalized Markup Language (SGML), which has been used by the publishing industry for decades.
XML performs the same function in Android app development: describing data and introducing elements.

Specifically, XML sets the layout of things like buttons and images, and defines the font, color, and any text that shows by default. To make those buttons actually do anything, you will need to use a programming language like Java or Kotlin, though.
XML in Android development
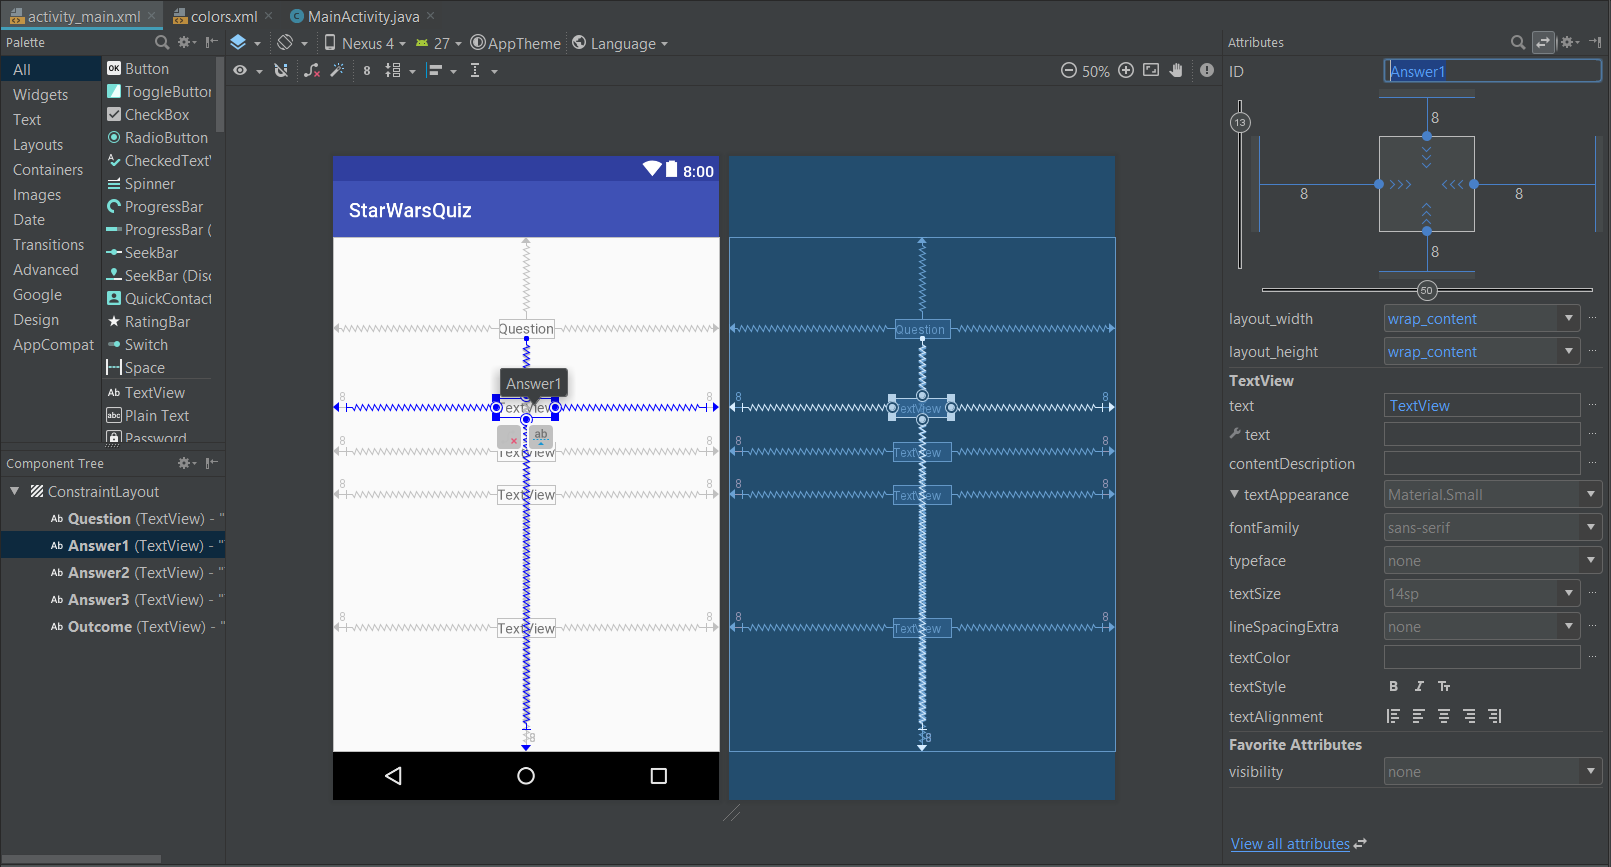
When you create a new project in Android Studio, you will be greeted by a hierarchy of different files and folders, which can be a little daunting for complete beginners. It’s a rather jarring introduction to XML, no doubt!
![]()
You just need to concentrate on two files for now: MainActivity.java and activity_main.xml.
To make life just a little simpler, Android Studio normally opens both these files as soon as it boots up.
You’ll also notice that both these files have a little bit of code already in them. This is called “boilerplate code,” which is code that almost every program needs, and so which Android Studio will populate for you in order to save time.
One line in MainActivity.java reads:
setContentView(R.layout.acivivty_main)
This means the activity this Java code controls will display the activity_main.xml file, and you may reference certain elements from that as you go.
You can assign any XML file to any Java file with this, and you can create as many of both as you like. However, by default MainActivity.java will always be the class (java file) Android loads first when running your programs.
Using XML in your Android app
To recap, XML describes the views in your activities, and Java tells them how to behave. To make changes to the layout of your app then, you have two main options.
The first is to use the Design view. Open up the activity_main.xml file in Android Studio and get your first introduction to XML. You’ll notice there are two tabs at the bottom of that window: Design and Text. The Text view will show you the actual XML code, but the Design view will let you manually edit the layout by dragging and dropping elements into the render of your activity.
XML files can also help store strings. Using the Design view is easier for beginners, though it can lead to complications. For one, you will run into the limitations of XML early on when the designer refuses to let you drop items into specific places. Without the knowledge of why, this can make designing your app an exercise in frustration!

At the same time, having a better understanding of XML will also help when it comes to handling the code. Otherwise you might find yourself stumped when it comes to things like finding the ID of the view, or remembering what type of view it is you’re working with.
It is also possible to “instantiate” views at runtime from within your code, but this can be tricky to juggle if you’re creating a complex UX.
XML outside of layout files
Sometimes XML will be used to describe types of data other than views in your apps; acting as a kind of index that your code can refer to. This is how most apps will define their color palettes for instance, meaning that there’s just one file you need to edit if you want to change the look of your entire app.
You can find this information in the colors.xml file, located in app > resources > values > colors.xml, which contains tags that assign different names to various color codes:
#008577
You can then refer to this tag subsequently in your Java code or your XML code to refer to that particular hue.
Another alternative use of XML is in the Android Manifest (AndroidManifest.xml). This holds a lot of data describing your app, like the label (the app’s name), the icon, and instructions about which activities to load first. This helps launchers display the app correctly on the homescreen, and it’s also used by app stores.
Getting started with XML code for Android
Most of the time you’ll use XML to define your layouts. While we won’t go too in depth in this introduction to XML for Android, let’s go over some basics to help you get started.
Syntax
Apart from being another markup language, something else XML has in common with HTML is its use of tags.

XML mainly uses tags to introduce elements into a layout, whether they’re Views or ViewGroups. A view is basically any of the widgets that make up a typical utility app. Examples include images (ImageViews), text (TextView), editable text boxes (EditText), web pages (WebViews), and buttons (err, Button).
You’ll start by using angle brackets to open the section, then you’ll introduce the view, and then you’ll set all the parameters. Some of these parameters will be compulsory, while others will be optional.
Managing views and viewgroups
As you may already have guessed, a ViewGroup is a group of these views. These are also referred to as layouts, and serve as hierarchical arrangements of views. A linear layout for example places all its children in a linear vertical or horizontal arrangement. Meanwhile, a ConstraintLayout will allow you to define the positions of views by their relationship with other views in the layout and the boundaries of the activity. This way, the views can maintain their relative positions, even as the dimensions of the device vary.

Some Views can also be ViewGroups, such as the RecyclerView, which arranges other views in a scrolling list.
If you open up your activity_main.xml file right at the start for instance, you’ll see it is already populated with some code. This is a simple TextView that shows the words “Hello World” as is traditional. If we look at this, it can give us some insight into how XML is used:
So basically, it starts out by opening a constraint layout and telling it to “match_parent” meaning it will fill the exact same size as the parent layout. In this case, there is no parent and so the activity itself becomes the default. All parameters are set before the closing angle bracket.
Next, it introduces the EditText and sets parameters such as the width, height, text to show, ID, and position. The ID is what we will use to refer to this EditText subsequently in our Java code, should we wish to change what it shows. Because we are using a ConstraintLayout, we need to control the layout by anchoring it to something else.
Let’s use the top, bottom, and sides of the “parent,” which is the ConstraintLayout. The View is now being pulled between those four points and will therefore sit comfortably at the point in the middle. If you switch to the Design view, you can see this in action, denoted by small white arrows.
Notice that we end this section with an ending tag: a forward slash, followed by the name, and the closing angle bracket. That tells Android we’ve finished talking about the EditText.
After that, we also need to create a closing tag to close off the ConstraintLayout ViewGroup. We could now introduce a new type of layout, or we could use nested layouts by adding a new ViewGroup tag inside the ConstraintLayout tags.
Closing comments
In reality, XML is actually supremely simple and follows only a few set rules. The main complication is learning all of the different views and all of the different properties each needs defined. Fortunately, you can find a lot of this information online, or simply use the design view to experiment and see how the code should look.
You might be bashing your head against the wall right now thinking that there is “yet another thing to learn,” but once you get the hang of it, it will actually make your life much simpler.

It might not “technically” be a programming language, but many people will describe it as such anyway. So now that you’ve read our introduction to XML, you can claim to actually know two new languages!
Источник


