- Android SDK/NDK setup
- 1. Download the Android SDK
- 2. Install the Android SDK
- 3. Enable USB debugging on your device
- 4. Connect your Android device to the SDK
- 5. Configure the Android SDK path in Unity
- 6. Download and set up the Android NDK
- Android environment setup
- 1. Install Android Build Support and the Android SDK & NDK tools
- 2. Enable USB debugging on your device
- Using an alternate Java Development Kit, Android SDK, or NDK
- Change the JDK
- Change the SDK
- Change the NDK
- How to install Unity Android SDK? (2021)
- Install the Unity android SDK to Program Android Games with Ease
- How to Install Unity Android SDK?
- 1. Unity Hub
- 2. Android Studio
- 1. Download Android Studio
- 2. Follow the Path of Android Studio SDK Manager
- 3. Adding the Android SDK Path to Unity
- Unity Build Issue and SDK Update
- Fix the Android SDK Compatibility Issue
- Leave a Comment Cancel reply
Android SDK/NDK setup
Whether you’re building an Android application in Unity or programming it from scratch, you need to set up the Android Software Development Kit (SDK) before you can build and run any code on your Android device.
1. Download the Android SDK
Download the Android SDK from the Android Studio and SDK Tools download page. You can either use an Android Studio and SDK bundle, or only download the SDK command line tools.
2. Install the Android SDK
Install or unpack the Android SDK. After installing, open the Android SDK Manager and add at least one Android SDK Platform, the Platform Tools, the Build Tools, and the USB drivers if you’re using Windows.
3. Enable USB debugging on your device
To enable USB debugging, you need to enable Developer options. To do this, find the build number in your device’s Settings menu. The location of the build number varies between devices. The stock Android setting can be found by navigating to Settings > About phone > Build number. For different devices and Android versions, refer to your hardware manufacturer.
 Build number as displayed in Android 5.0 (Lollipop) on a Samsung Galaxy Note 3
Note: On operating systems older than Android 4.2 (Jelly Bean), the Developer options aren’t hidden. Go to Settings > Developer options, then enable USB debugging.
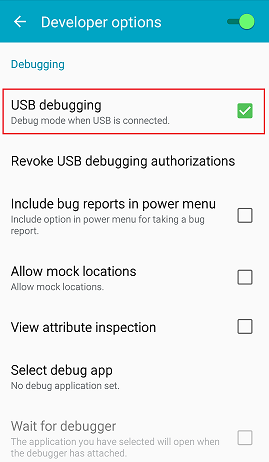
After you have navigated to the build number using the instructions above, tap on the build number seven times. A pop-up notification saying “You are now X steps away from being a developer” appears, with “X” being a number that counts down with every additional tap. On the seventh tap, Developer options are unlocked. Go to Settings > Developer options, and check the USB debugging checkbox to enable debug mode when the device is connected to a computer via USB.
 Developer options as displayed in Android 5.0 (Lollipop) — Samsung Galaxy Note 3
4. Connect your Android device to the SDK
Connect your Android device to your computer using a USB cable. If you are developing on a Windows computer, you need to install the appropriate USB driver for your device.
For more information on connecting your Android device to the SDK, refer to the Running Your App section of the Android Developer documentation.
5. Configure the Android SDK path in Unity
The first time you make a Project for Android (or if Unity later fails to locate the SDK), you will be asked to locate the folder where you installed the Android SDK. Select the root folder of your SDK installation. If you wish to change the location of the Android SDK, in the menu bar go to Unity > Preferences > External Tools.
6. Download and set up the Android NDK
If you are using the IL2CPP scripting back end for Android, you need the Android Native Development Kit (NDK). It contains the toolchains (such as compiler and linker) needed to build the necessary libraries, and finally produce the output package (APK). If you are not targeting the IL2CPP back end, you can skip this step.
Download the Android NDK version required by Unity from the NDK Downloads web page, and then extract it to a directory. The first time you build a project for Android using IL2CPP, you will be asked to locate the folder where you installed the Android NDK. Select the root folder of your NDK installation. If you wish to change the location of the Android NDK, in the Unity Editor, navigate to menu: Unity > Preferences… to display the Unity Preferences dialog box. Here, click External Tools.
Источник
Android environment setup
To build and run for Android, you must install the Unity Android Build Support platform module. You also need to install the Android Software Development Kit (SDK) and the Native Development Kit (NDK) to build and run any code on your Android device. By default, Unity installs a Java Development Kit based on OpenJDK.
1. Install Android Build Support and the Android SDK & NDK tools
Use the Unity Hub to install Android Build Support and the required Android SDK & NDK tools:
 Add Android modules
You can install Android Build Support and the Android SDK & NDK tools when you install the Unity Editor, or add them at a later time.
For information on adding the Android modules at install time, see Installing Unity.
For information on adding the Android modules to an existing installation, see Adding modules to the Editor.
If you are using a 2018 version of Unity, see the Unity 2018.4 documentation for information on manually installing the Android SDK and NDK.
2. Enable USB debugging on your device
To enable USB debugging, you must enable Developer options on your device. To do this, find the build number in your device’s Settings menu. The location of the build number varies between devices; for stock Android, it’s usually Settings > About phone > Build number. For specific information on your device and Android version, refer to your hardware manufacturer.
After you navigate to the build number using the instructions above, tap on the build number seven times. A pop-up notification saying “You are now X steps away from being a developer” appears, with “X” being a number that counts down with every additional tap. On the seventh tap, Developer options are unlocked.
Note: On Android versions prior to 4.2 (Jelly Bean), the Developer options are enabled by default.
Go to Settings > Developer options (or, if this does not work, on some devices the path is Settings > System > Developer options), and check the USB debugging checkbox. Android now enters debug mode when it is connected to a computer via USB.
Connect your device to your computer using a USB cable. If you are developing on a Windows computer, you might need to install a device-specific USB driver. See the manufacturer website for your device for additional information.
The setup process differs for Windows and macOS and is explained in detail on the Android developer website. For more information on connecting your Android device to the SDK, refer to the Running Your App section of the Android Developer documentation.
Using an alternate Java Development Kit, Android SDK, or NDK
Unity recommends that you use the Unity Hub to install Android SDK & NDK tools, to ensure that you receive the correct versions and configuration. Unity installs Android SDK & NDK tools respectively in the SDK and NDK folders under /Unity/Hub/Editor/[EditorVersion]/Editor/Data/PlaybackEngines/AndroidPlayer/.
If you manually install the Android SDK & NDK tools in another location, and you do not want to duplicate the installation, you can specify the location in the Unity Preferences window. To do this, go to Preferences > External tools and enter the directory paths in the SDK and NDK fields:
 Preferences window showing external tools settings for Android
Warning: Unity does not officially support versions of the JDK, SDK, or NDK other than the ones it supplies.
To change the JDK, SDK, or NDK that Unity uses to build Android apps:
- Open the Project.
- Open the Preferences window (Windows and Linux: Edit >Preferences; macOS: Unity >Preferences).
- In the left navigation column, select External Tools.
Change the JDK
- Uncheck JDK Installed with Unity (recommended).
- In the JDK field, enter the path to the JDK or use the Browse button to locate it.
Change the SDK
- Uncheck Android SDK Tools Installed with Unity (recommended).
- In the SDK field, enter the path to the SDK or use the Browse button to locate it.
Unity works with the most recent version of the Android SDK available at the time of the Unity version release.
Change the NDK
- Uncheck Android NDK Installed with Unity (recommended).
- In the NDK field, enter the path to the NDK or use the Browse button to locate it.
Each version of Unity requires a specific version of the Android NDK to be installed:
| Unity version | NDK version |
|---|---|
| 2017.4 LTS | r13d |
| 2018.4 LTS | r16b |
| 2019.1 | r16b |
| 2019.2 | r16b |
| 2019.3 | r19 |
2019–07–01 Page amended with editorial review
2018–11–21 Page amended with editorial review
Did you find this page useful? Please give it a rating:
Источник
How to install Unity Android SDK? (2021)
how to install android SDK for unity? In this lesson, I will explain the installation of the Unity Android SDK, which is necessary to develop games for Android in the UNITY 3D game engine. With Unity 2021, you can now automatically install it in Android SDK when installing the Android module. Along with the Unity SDK Manager, we may need to manually download the SDK for Google Play. (With recent updates)
 how to install unity android SDK
First of all, for the Android SDK to be installed, you must have Java JDK (Development Kit) installed on your system. From Java’s official website Oracle, you can supply JDK easily.
You can install the Android SDK in two ways: using Android Studio or using the Unity Hub SDK Manager. Now that the method recommended by Google is to install the SDK with Android Studio, this may be the best option. If you have developed an advanced project and are getting an API error, it may be right to choose Android Studio. In addition, the normal Unity Hub SDK installation is quite simple, but it can create problems for minimal API support for Google Play in the future.
Install the Unity android SDK to Program Android Games with Ease
Even though Android is an open-source platform, there are many common mistakes made during installation and development that can lead to significant errors afterward. Even though Android has some of the best user interfaces available, installing a Unity Android SDK can make it even more frustrating. , many users are unaware of these common errors and the problems they cause. Fortunately, having learned them, these mistakes can be easily corrected. It is worth reading the different issues that you need to avoid so that you don’t make common mistakes with them yourself.
First of all, if you are using a normal Unity, uninstall the Android SDK built into Unity. Unity Manager must already be installed. Help to use unity manager to speed up installation and license updates. To do this, download and run the Unity Manager application, it will display the current versions and select the latest stable version. Select the correct structure to install.
If you are not satisfied with the built-in administrator and want to use a third-party SDK, there are several ways to do it. The first is to download a zip from the Google Android installer and install it on your computer . If you don’t want to install the software, you can use the system files. But if you are comfortable using Windows, the zip method is best. After downloading the zip, launch the installer and follow the on-screen instructions.
How to Install Unity Android SDK?
To make the games or applications that you are developing with Unity 3D compatible with Google Play, you need to install the most up-to-date Android SDK (Software Development Kit). Although the processes are simple, the installation of Android Studio has become mandatory.
1. Unity Hub
The installation of the Unity Hub SDK, which is our first process, has been made very simple. With Unity Hub, you can install the Android SDK with just one click, depending on the corresponding Unity version.
How to install android SDK for Unity? Let’s start:
- Download Unity Hub Before You Start.
- Start the Unity Hub program.
- In the pop-up tab, just click the “Installs” tab on the left side.
- Locate the Unity version that you are using in the pop-up window.
- Click the ellipsis Section at the top right of the Unity version you found.
- Immediately after that, click” Add Modules“.
- Click on the “Android Build Support” option to install the SDK and DONE!
- You can also select the “iOS Build Support” option to install the iOS Sdk and start the download process.
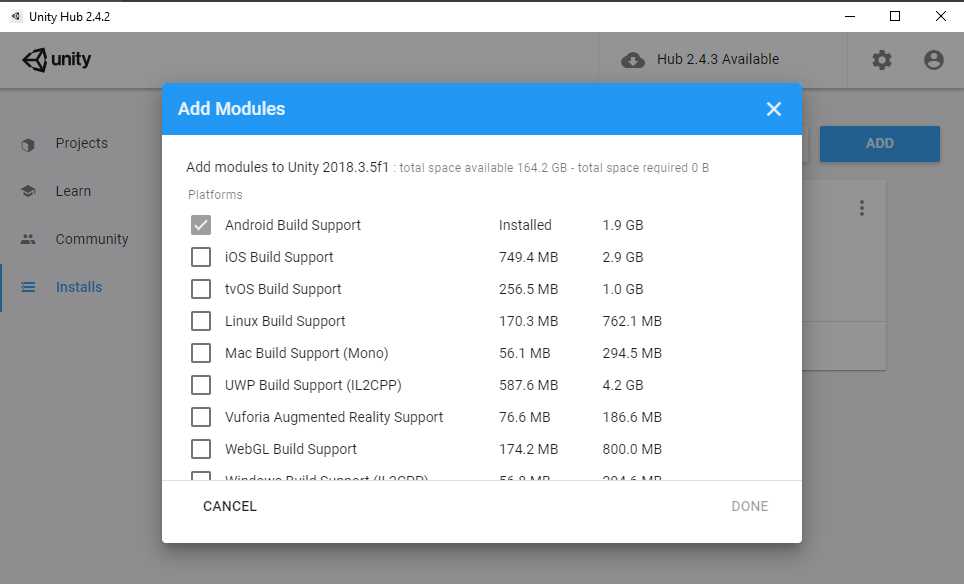 Unity Hub: Android SDK installation
As we can see in the photo, there are dozens of options available, and you can complete SDK installations depending on the project you are going to develop with Unity. At the top, when you install the “Android & iOS Build Support” SDK downloads, the processes will be automatically defined and you will be able to finish the necessary installations.
2. Android Studio
The Android Studio SDK installation may be the best option. As an example, the Unity Hub SDK installation has maximum API support of 29, while Android Studio has 30 API support. API support is a rule enforced by Google. To keep the user experience at the highest level, the latest API Support SDK is recommended to keep it up-to-date. For this, installing the SDK with Android Studio may be the right option. Also, if you have developed an Advanced project, you can fix vague errors in your project with Debugging for Android devices.
We can switch to Android Studio Installation and SDK installations:
1. Download Android Studio
Download Android Studio right here. Please note that for the installation of the Android Studio SDK, the normal Android Studio installation must be performed.
2. Follow the Path of Android Studio SDK Manager
Immediately after installing Android Studio, you need to create a sample project. After creating the sample project, follow the path Android Studio > Top Menu > Tools-Android-SDK Manager.
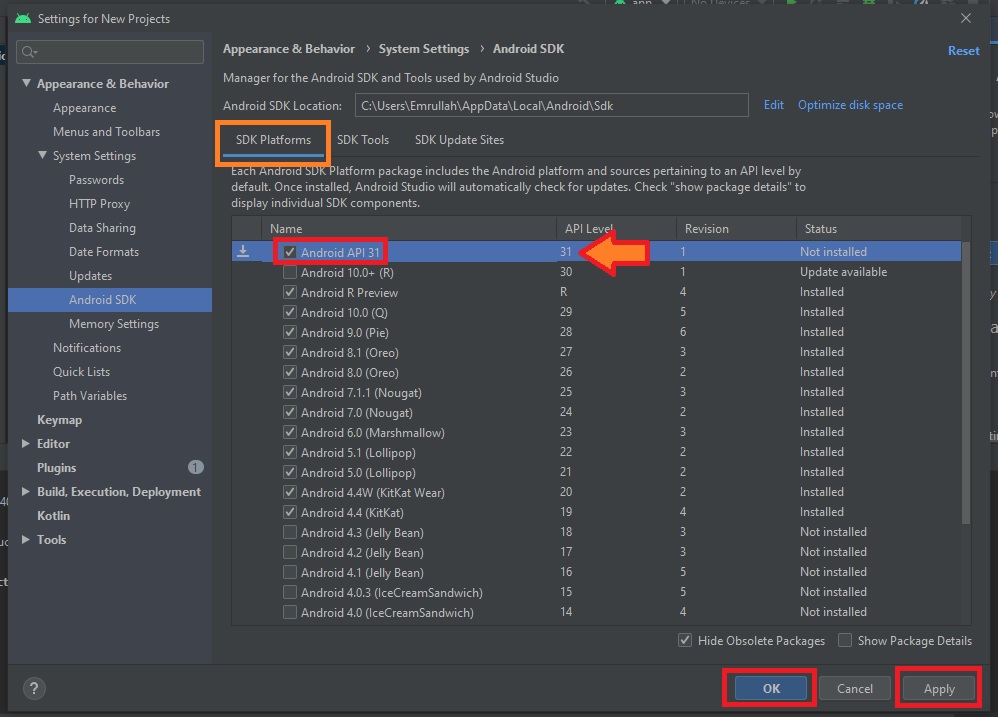 Android Studio SDK Platforms – Android API 31
As you can see in the picture, the Android API 31 is not installed correctly. You can install the SDK with the most up-to-date and highest API value. We make the Android SDK 31 part tick, and after clicking the Save > OK button, the installation of the SDK with the latest version starts automatically.
3. Adding the Android SDK Path to Unity
This part is really important. If you have downloaded the most up-to-date or optional SDK with the Android SDK, do not forget about the procedures here. Immediately run a sample project with Unity. Follow the path Edit > Preferences > External Tools.
As you can see in the photo below, we have removed the option in the SDK section. And finally, at the top, we add the ‘Android SDK Location‘ section in the Android SDK installation:
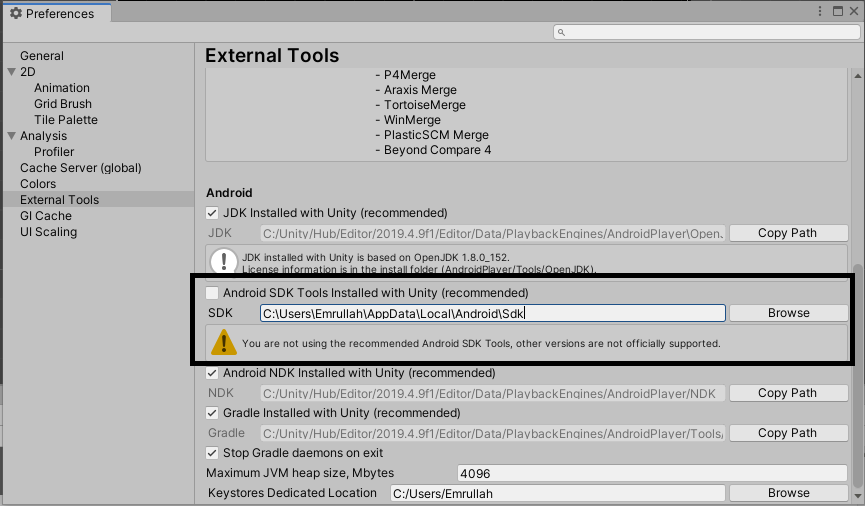 Android SDK Tools Installed with Unity.
After you do this, after you close and open the Unity program, the SDK that you have installed will work successfully.
Unity Build Issue and SDK Update
When you encounter a Unity Grandle SDK Build error, you need to update the SDK. You need to use Android Studio, as we showed in the photo at the top. You will see the SDK Tools > Update option. Here we select the SDK that we want to update and use and click Save. After the download process is finished, we will be able to update and fix errors.
Fix the Android SDK Compatibility Issue
Before running your Android games on the Unity interface, make sure that the Android installed on your computer has at least Android version 4.4. Another way to make sure that you always have the latest official developed version, your games will work properly on your computer that has the Android Android SDK installed and other programs/software/hardware to configure it to use the same methods as the installation in use. However, if you want to install the Android SDK to run the custom development app directly from the desktop, you can download the desktop app from the Android site.
Leave a Comment Cancel reply
This site uses Akismet to reduce spam. Learn how your comment data is processed.
Источник


