- SVARTLING
- Leta i den här bloggen
- This is how to fix «You don’t have any devices» in Google Play Store and Android Device Manager
- Here is a video about Google Play Store on Chromebooks:
- Do This To Fix Android You Don’t Have Any Devices
- Android and Google play store
- How to fix Android you don’t have any devices error
- You Don’t Have Any Devices
- Wireless Debugging through ADB in Android using WiFi
- Step 1 : Connect your adb host computer and your android phone to same network
- STEP 2 : If you are connecting to a Wear OS device, turn off Bluetooth on the phone that’s paired with the device.
- STEP 3: Connect the device to the host computer with a USB cable.
- STEP 4: locate your SDK
- STEP 5 : Check whether your device is properly connected
- Step 6 : Set the target device to listen for a TCP/IP connection on port 5555
- STEP 7 : Find the IP address of the Android device.
- STEP 8 : Connect to the device by its IP address.
- STEP 9 : Remove the USB cable
- STEP 10 : Confirm that your host computer is connected to the target device
- You’re now good to go! 🎉
- Change Device Name on Android for WiFi / Bluetooth / Hotspot
- Change Android Device Name from Settings
- Changing Bluetooth Name
- Change WiFi Direct Name on Android
- Change WiFi Hotspot Name on Android
SVARTLING
Leta i den här bloggen
This is how to fix «You don’t have any devices» in Google Play Store and Android Device Manager
- Get link
- Other Apps

If you ever get the message «You don’t have any devices» in Google Play Store on the web, or in the new Android Device Manager, then this is how to fix it.
You can get this problem if you flash custom roms for example, that’s what happened to me when I flashed CyanogenMod 10.2 on my Samsung Galaxy S3 4G (GT-i9305). Very annoying, because then you can’t install apps from the web version of Google Play store anymore, or use the new awesome Android Device Manager to find your device with.
But here is help.
What you need to do is:
1. Go into the app Google Settings from your device, click on Android Device Manager. Uncheck Allow remote factory reset.

2. Go to your device’s main Settings menu, then choose Apps > All > Google Play services. Click Clear Data.

3. Goto Menu >Settings > Apps > All > Google Framework Services > Clear Data

4. Goto Menu > Settings > Apps > All>Google Play Store > Clear Data


6. Reboot your phone
7. Add Google account again
8. Go into the app Google Settings from your device, click on Android Device Manager. Check Allow remote factory reset.
9. Reboot your phone again, just in case
10. Open Google Play Store on your device, wait some minutes with the app open
Now if you have done everything right, you should have your device show up in Google Play Store web version, and Android Device Manager should find your device.
All done! Enjoy and please share this guide.
Here is a video about Google Play Store on Chromebooks:
Источник
Do This To Fix Android You Don’t Have Any Devices

With Google play store activated and working, any Android device is able to download and install any application of choice. But what if Google play fails to recognize your device? You know it means, this error of “you don’t have any devices” will show up. If you are wondering how to fix it and make Google play store recognize your device, this tutorial is for you.
Like we all know, not all of all phones linked to a Google account will be recognized. Several factors can lead to such an error ranging from a malfunction to the linked phone itself. When I first encountered this error, the problem wasn’t related to my phone’s eligibility but rather, it was due to something a “malfunction” I guess.
Android and Google play store
Google play store is the official download app for android smart devices. In order to make use of Play store, one must have Google play services and play store apk installed in their devices. While all of the two are free to all supported phones, tablets and etc, not all devices support them.
And for those devices which are eligible for installing the above applications, an active Google account has to be linked to the corresponding device. Having an account linked means easy downloads for as long as the device is being recognized. In cases where the Play store can’t recognize any devices linked, then the error above will show up.
How to fix Android you don’t have any devices error
Solution 1: Force stop and clear data
Force stop and clear data is my number one solution. I have used this option on a number of devices with the above error and found it working. What you need is to access the Play store app and clear its cache.
How to force stop and clear app data
- Tap “Settings”.
- Tap “Apps.
- Tap “All”.
- Scroll and tap “Google Play Store”
- Tap “Force stop”
- Then tap “Clear data”.
Restart your phone and access Play store app with internet / data enabled on your device. It should be working with no error. In any case it still persists, try solution 2 below.
Solution 2: Force device visibility
This option shows all devices linked on your account. In order to show devices, tap play store app, settings, my devices and ensure the visibility mark is checked.
Источник
You Don’t Have Any Devices
I currently own two android devices: a Verizon Galaxy Nexus and a 2013 Nexus 7. Neither show up on the web on Google Play Store.
I don’t exactly remember when this started happening. It was either the last version of Google Play rollout or the Device Manager thingy. I have device manager turned on on both devices, and cannot use it because Google thinks I have no devices, yet both devices can use Google services such as Google Play, Drive, GMail, etc. just fine. I have only a single Google account, so that’s not the confusion either. Here are what I’ve tried:
- Power off the devices, power them back on, open Play Store app: no fix.
- Clear the cache and force close Google Play Store on both devices: no fix.
- Log out of Google, then clear the cache and force close Google Play Store on both devices: no fix.
I’d like to know three things if possible:
- How the hell do I fix this? I’m really frustrated at the moment.
- How is it possible that I actively use the Play Store app on them numerous times daily, update apps, download new ones, get billed for Play Music All Access, which I use on the web and my Nexus 7 daily, and yet web Play Store thinks I have no devices?
- What good is device manager if there’s a chance that Google will randomly «forget» about my devices and won’t let me manage them? Some security feature.
Thanks for the suggestion.
However, I tried this a couple of times now, nope, doesn’t work.
Any other ideas?
I’ve tried solution proposed but doesn’t work on my Nexus 7. Also noticed that Nexus 7 is not on the list of supported devices for google play store ��’ that doesnt make any sense
Model: Nexus 7
Android 4.3
Any idea how to solve this is welcome, thank you.
Источник
Wireless Debugging through ADB in Android using WiFi

Jan 4, 2019 · 3 min read

In this article I am going to show you how you can debug your android app over WiFi.
Yes I know it is very hectic to debug your Android app with USB cable if your cable is broken or not functioning or you don’t have a cable and you have borrowed it from someone for few minutes.
It will require only few steps to get this done.
Step 1 : Connect your adb host computer and your android phone to same network
Make sure that your android phone and your host computer are connected on the same network then you will be able to debug your app.
STEP 2 : If you are connecting to a Wear OS device, turn off Bluetooth on the phone that’s paired with the device.
STEP 3: Connect the device to the host computer with a USB cable.
STEP 4: locate your SDK
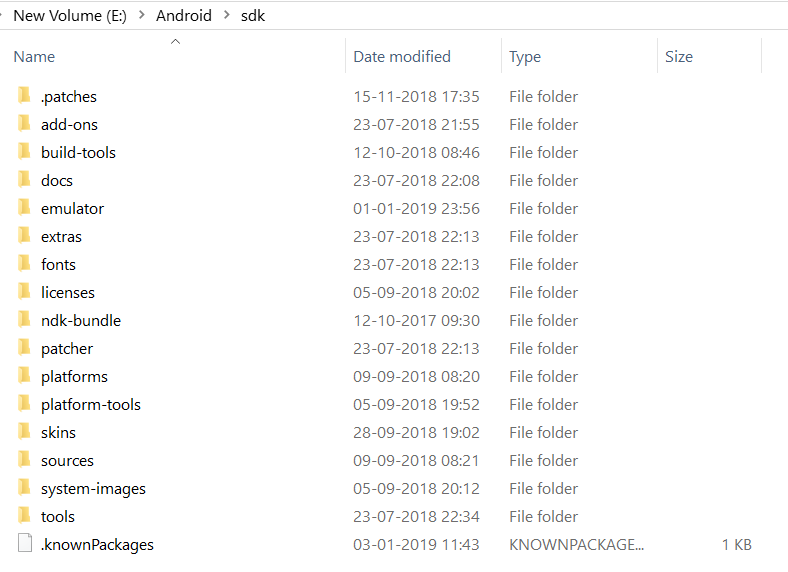
In the SDK you will find platform-tools

S e t this location as path on Command Prompt
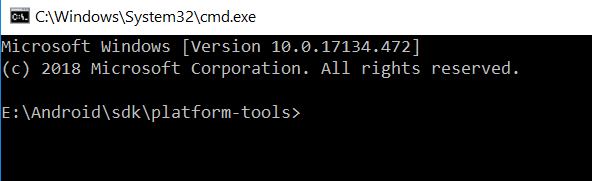
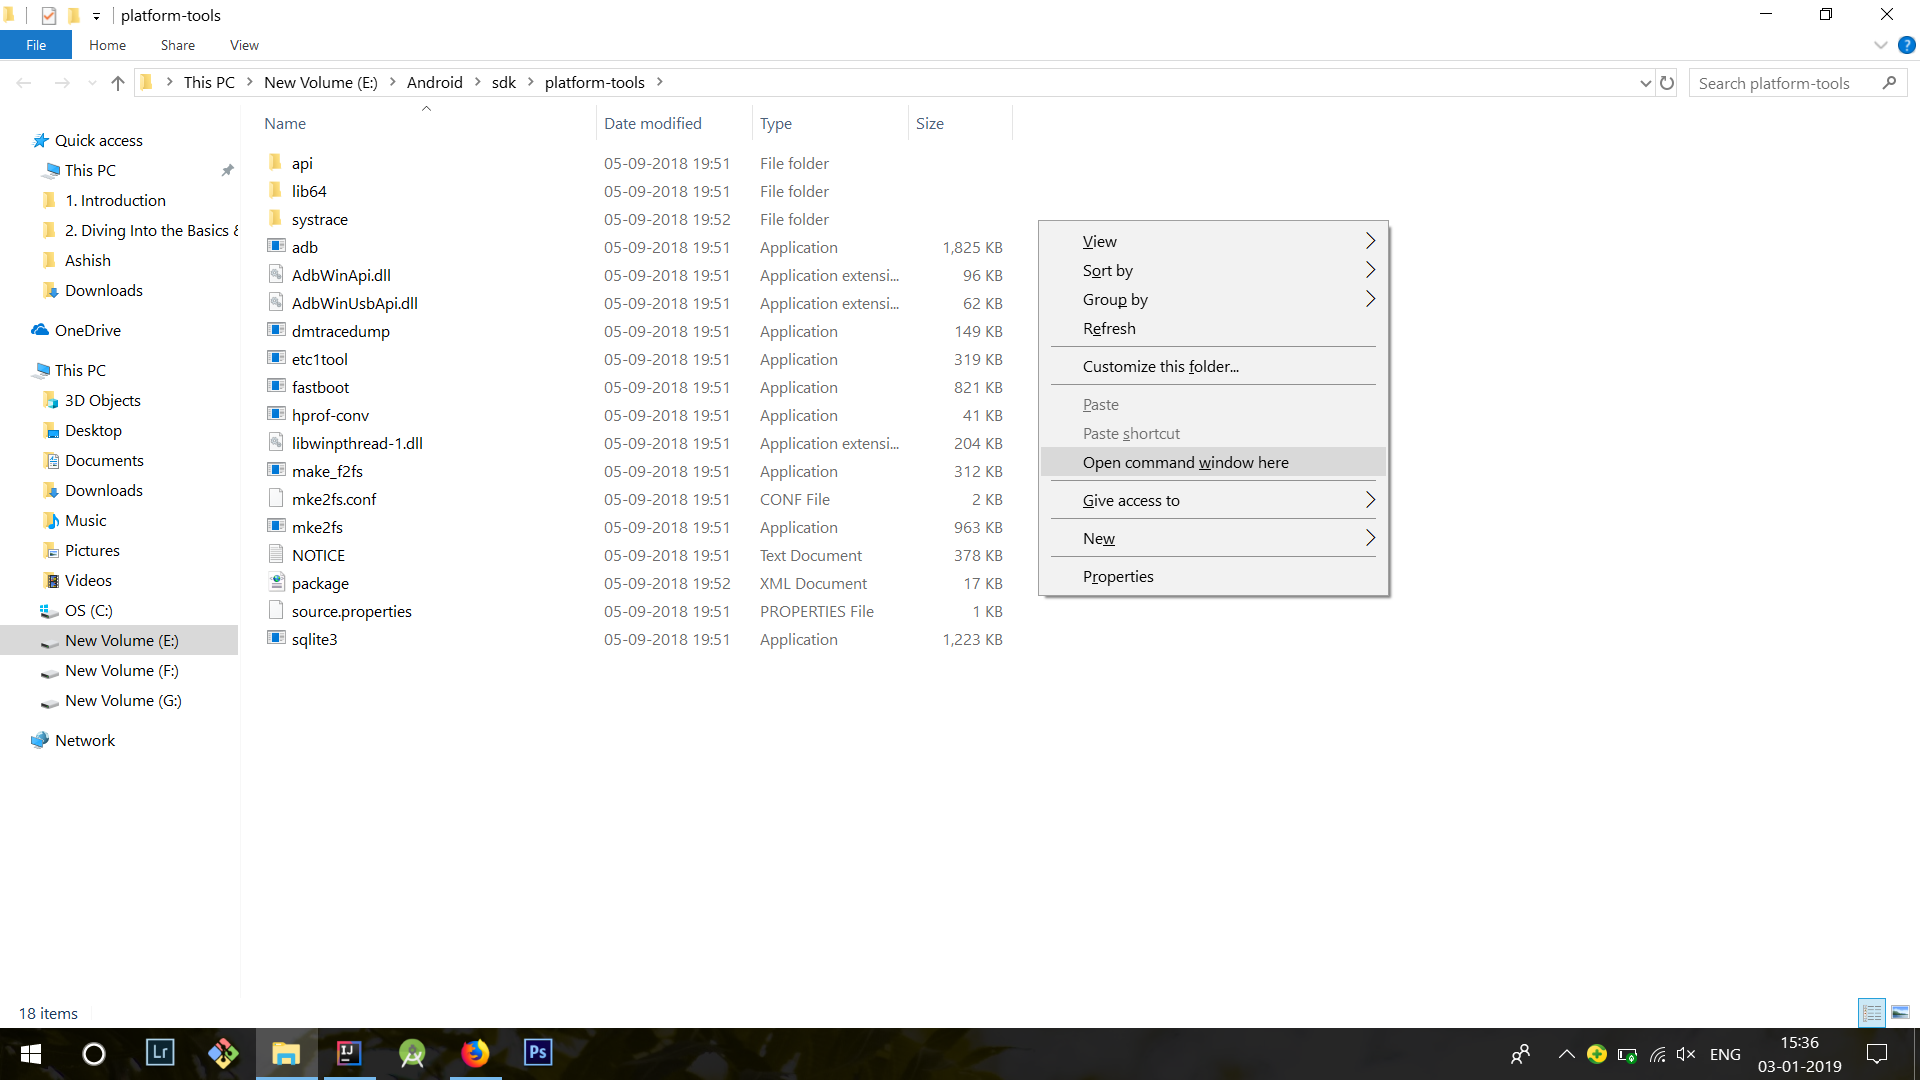
On the platform-tools folder
Select Open Command window here
STEP 5 : Check whether your device is properly connected
This will show all the devices connect through WiFi.
Step 6 : Set the target device to listen for a TCP/IP connection on port 5555

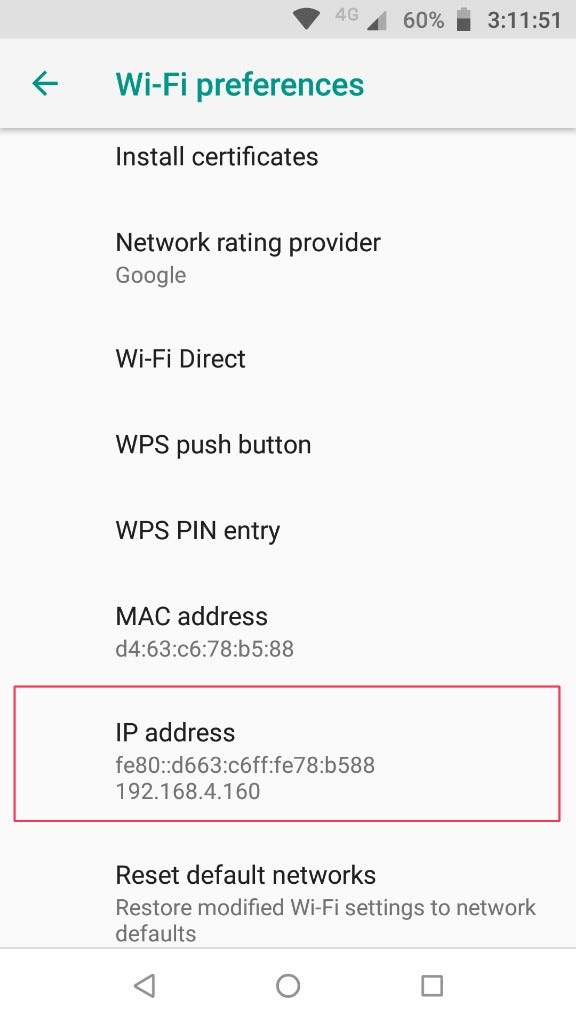
STEP 7 : Find the IP address of the Android device.
you can find the IP address at Settings > Wi-Fi Settings > Advanced > IP address.
STEP 8 : Connect to the device by its IP address.

STEP 9 : Remove the USB cable
Remove the USB cable and you should be connected to your device. If you don’t see it in adb devices then just reconnect using the previous steps command
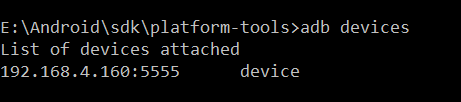
STEP 10 : Confirm that your host computer is connected to the target device
$ adb devices
List of devices attached
device_ip_address:5555 device
You’re now good to go! 🎉
If the adb connection is ever lost:
- Make sure that your host is still connected to the same Wi-Fi network your Android device is.
- Reconnect by executing the adb connect step again.
- Or if that doesn’t work, reset your adb host:
Then start over from the beginning.
Hope this helps you, if you have any query let me know in the comments section.
Источник
Change Device Name on Android for WiFi / Bluetooth / Hotspot

In this tutorial, we’ll see how we can change Android device name under device settings. Besides, we’ll also be describing the way to change WiFi Direct and Hotspot network name and the Bluetooth connection name for Android devices.
Wi-Fi and Bluetooth are the most used modes of connectivity features on smartphones for sharing internet data and transferring files from one device to another. If you scan for a Wi-Fi or Bluetooth connection with your Android phone or tablet, you will see either a generic or customized name of the detected devices. If you are new to Android, this little tutorial will help you assign a customized name for your Android phone or tablet that will be shown when other devices scan for yours. Let’s see how we can change device name for WiFi, Bluetooth, mobile hotspot or tethering.
There is nothing twisted about setting up a device name for WiFi and Bluetooth connection and that’s why I call it a beginner’s guide. If you are a smart Android user, please do not cross beyond this point. All options are already existing under phone settings, I will just be telling you how to dig into it.
Change Android Device Name from Settings
The easiest way to change the device name of your Android device is by doing it from the About phone screen itself. Open Settings on your phone or tablet, scroll to About phone or device and tap on it. On the next screen, tap on Device Name, and then type the desired name for your device in the text field and select OK.
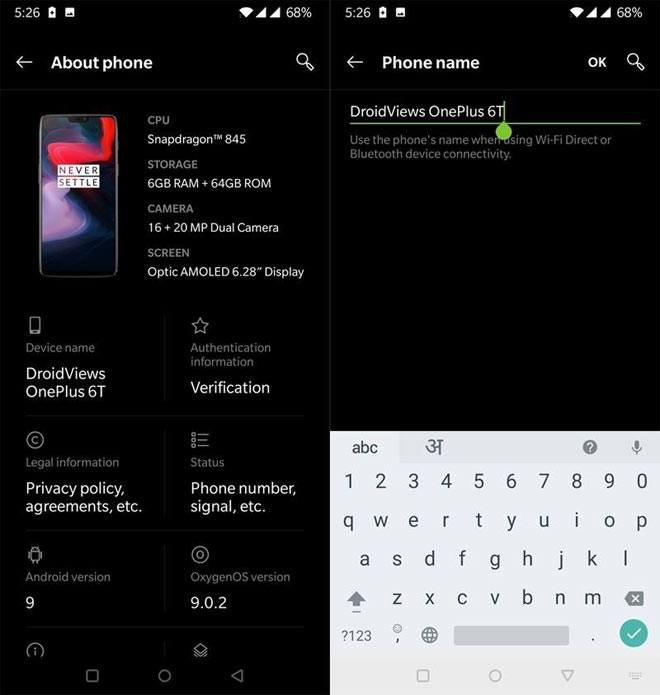 Change Android Device Name – OnePlus 6
Please Note: If you have a Samsung Galaxy device, you need to change the device name only and your Bluetooth name and WiFi Direct name will be automatically set. Go to Settings> About Phone and tap the Edit option under the device name. Type your custom device name and select Done.
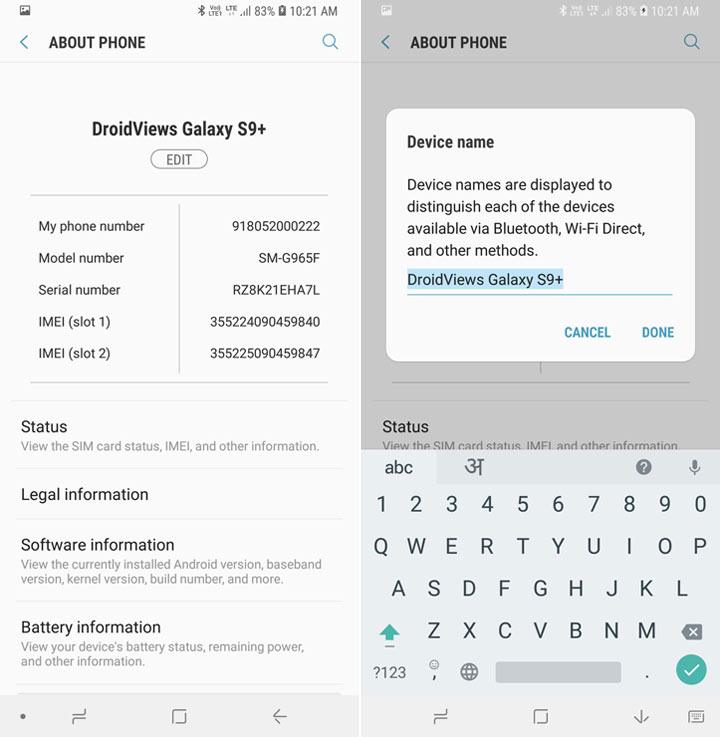 Change Android Device Name – Samsung Galaxy S9+
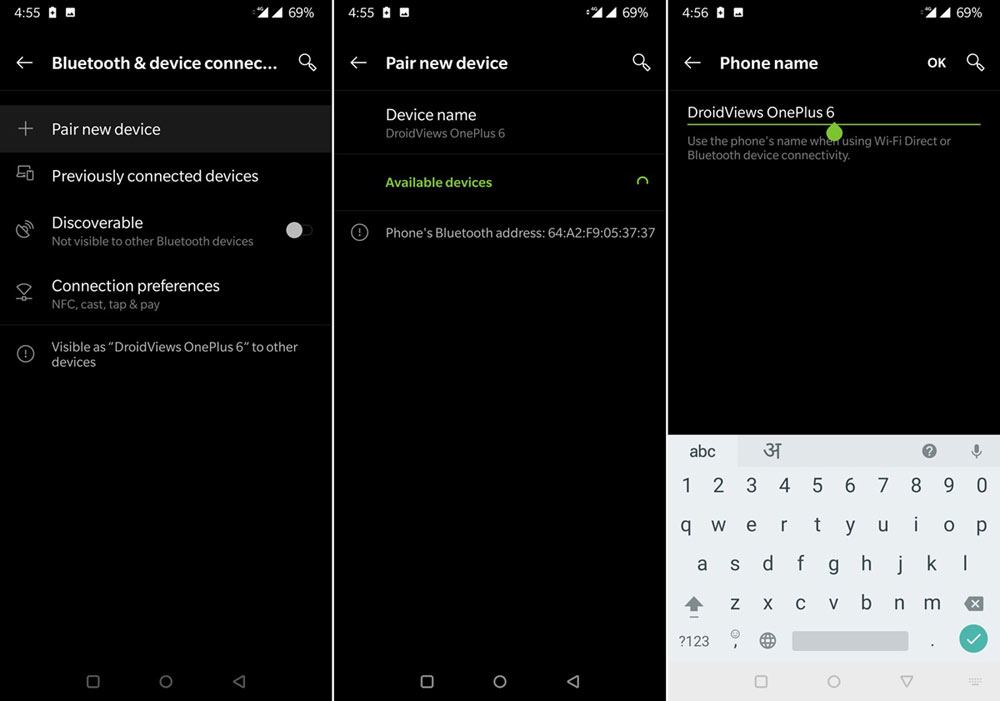
Changing Bluetooth Name
- To be able to edit the settings for Bluetooth, you will have to turn it on first. Bluetooth can also be enabled by tapping on the slider from Settings> Bluetooth.
- Open Settings on your Android device and tap on Bluetooth option.
- Tap the Device name and enter the new name for your phone or tablet and tap OK. On OnePlus devices, you’ll be able to see the Device name after selecting Pair new device option. On some Android devices other you need to tap the 3-dot vertical menu icon to see the device rename option.
 Change Bluetooth Name on Android
 Change Bluetooth Name on Android
Change WiFi Direct Name on Android
Assigning the desired device name is pretty much the same as that of Bluetooth. Let’s see how you can do it.
- Again, to edit WiFi settings, you will have to enable it first. Go to your device’s Settings panel and tap on the toggle slider to enable it
- Next, tap on the “Wi-Fi” text to see the configuration screen.
- Tap on “Wi-Fi Direct”, or launch options menu to see the “Wi-Fi Direct” option (for AOSP) and then tap on it.
- Now tap on the 3-vertical-dot menu icon to see the “Rename Phone” or “Rename Device” option.
- Type in the preferred name in the text box and select OK to save it. Change WiFi Direct Name on Android
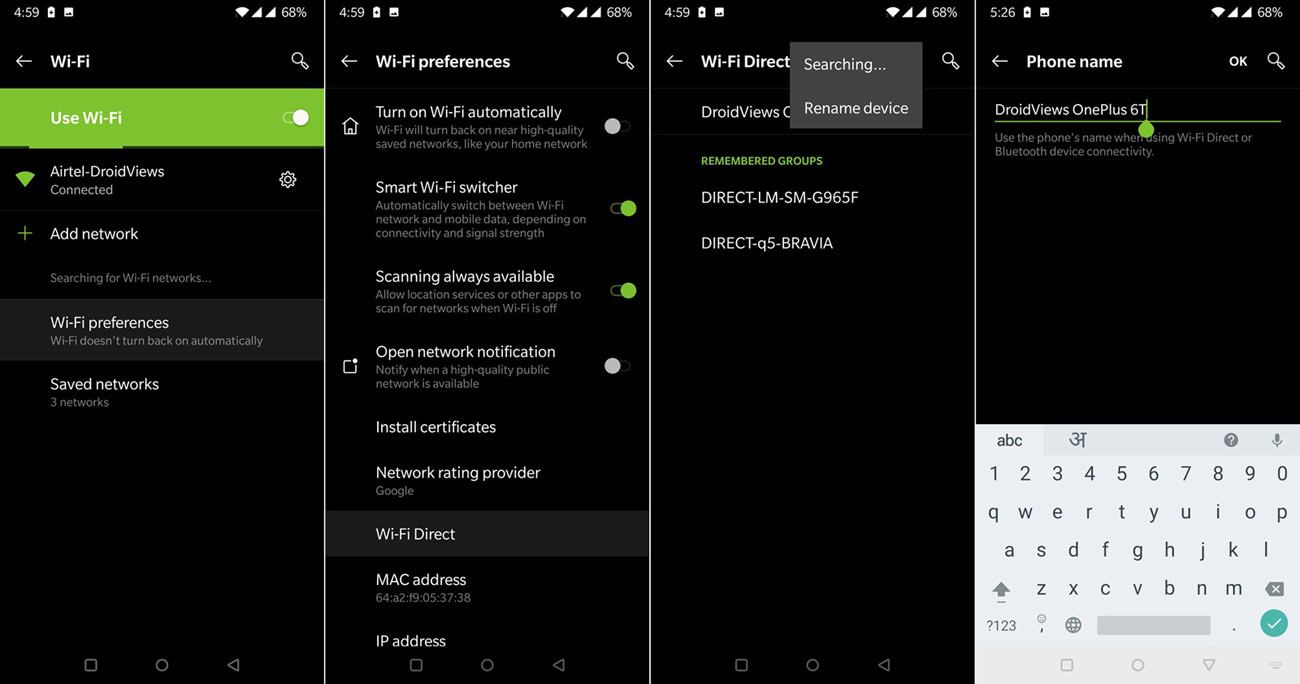 Change WiFi Direct Name on Android
Change WiFi Hotspot Name on Android
If you want to customize your Android phone’s name for WiFi hotspot and tethering, go to Settings> Mobile/Wi-Fi Hotspot and Tethering and turn it on. Then tap the Hotspot name option and type the name you want to show. On some Android phones, you need to tap the 3-dot menu icon and select Configure Mobile Hotspot option to replace the existing name with a name of your choice.
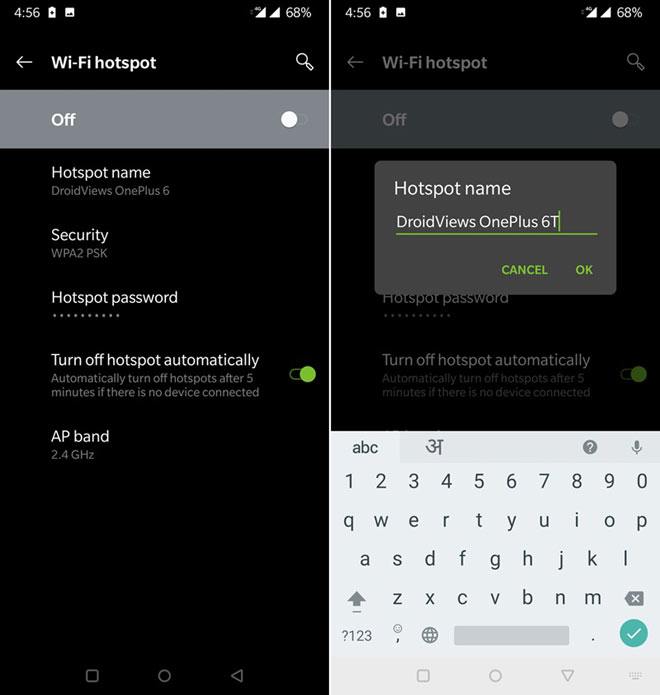 Change WiFi Hotspot Name on Android
So here ends our easy tutorial, if it really is, for beginners. We just hope it helps to change your Android device name. Bluetooth name, Hotspot name, and WiFi Direct name. For more useful tips and tricks for Android devices, do not forget to take a tour of our useful tutorials. Cheers!
Источник


