- Set Up Your Android Development Environment
- What You’ll Learn
- Prerequisites
- About the Android Development Environment
- Install Java Development Kit
- Install Android Studio (Latest) with Gradle 4.6
- Install Required Android SDK Versions
- Install Forcedroid
- Setup Android Environment for Development
- Java Development Kit(JDK)
- Android SDK/Android Studio/Eclipse
- Setup and Installation of Android Studio
- Your android development environment from
Set Up Your Android Development Environment
What You’ll Learn
In this step, you’ll learn:
- The software setup required for Android development.
- How to check for preinstalled software.
- How to install missing software.
Prerequisites
- A Mac OS X or Windows development machine.
- Successful completion of step 1, Install Common Components.
About the Android Development Environment
Android development components include:
- Java Development Kit (JDK)
- Android Studio with Gradle
- Android SDK
You install the JDK and Android Studio, and then you install the Android SDK from within Android Studio. The Android Studio installer also installs the Gradle command line build tool.
The minimum versions Mobile SDK 9.0.0 requires are:
- JDK 8 (reported as version 1.8.x at the command line)
- Android Studio (latest version) with Gradle 4.6
- Android SDK level 23 (minimum API) through 30 (target API)

- On Windows, Android is required for Mobile SDK development.
- On Mac OS X, if you don’t intend to support the Android platform, you can skip this section. You can always come back to it later if you change your mind.
Install Java Development Kit
- To check if it is already installed, at the OS command prompt, type: java -version
- If this command reports Java version 1.8.x or later, you’re done—proceed to the next installation. If the reported version is earlier than 1.8.x, continue to step 2.
- If you get a “command not found” error message, continue to step 2.
- Go to oracle.com/java.
- Download and run the installer for your operating system.
- When the installer finishes, return to step 1.
Install Android Studio (Latest) with Gradle 4.6
You download installers for Android Studio tools from developer.android.com/studio.
- To check if it’s already installed, look for the program file: Android Studio.app on Mac OS; studio.exe or studio64.exe (or a shortcut to Android Studio) on Windows.
- If you can’t find the program file, continue to step 2.
- If you found the program file, run it, and then click About Android Studio in the menu. If the dialog box lists version 3.5.3 or later, you can skip ahead to Install Required Android SDK Versions. If it’s earlier than that version, continue to step 2.
- Go to developer.android.com/studio.
- Download and run the installer for your operating system.
- Step through the Android Studio Setup Wizard, then click Finish.
Install Required Android SDK Versions
Mobile SDK 9.0.0 uses Android Marshmallow (API 23) as its minimum and Android 11 (API 30) as its target.
- Open Android Studio.
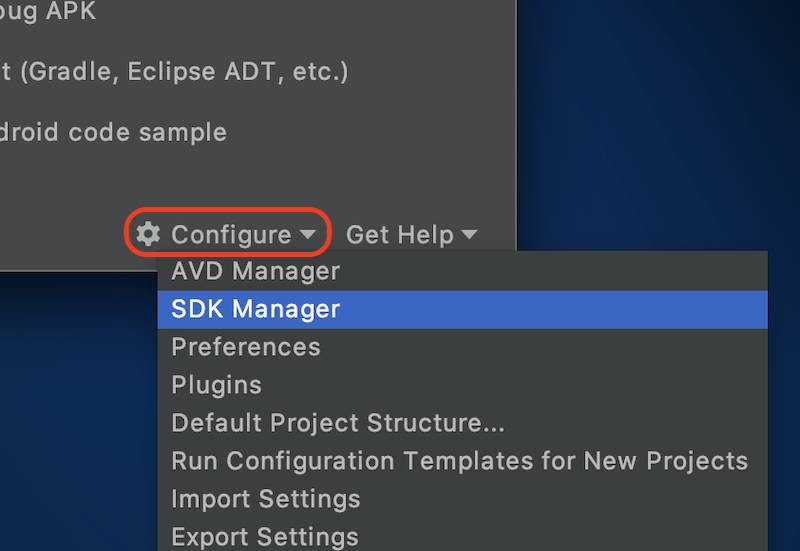
- At the bottom of the Welcome screen, click Configure, and in the dropdown menu, click SDK Manager.
 The Android SDK Manager appears. In a new Android Studio installation, the SDK Manager shows a check for only the latest API level. For Mobile SDK, it’s common practice to add all versions from the minimum API to the target API.
 - Select all API Levels from 23 to 30, then click OK. If prompted, confirm your download, then accept the license agreement and click Next. Installing the new API versions can take several minutes. Relax, and perhaps enjoy a refreshing beverage.
- When the downloads are finished, dismiss the SDK Manager. Now that you’ve installed the SDK, create an emulator for testing and debugging your apps. It’s a good idea to test your Mobile SDK apps against the minimum supported API target. Let’s choose a system image that supports API 23. To get into Android Studio, create a throwaway project from the Welcome screen.
- From the Android Studio Welcome screen, select Start a New Android Studio Project.
- In the wizard, click Next as prompted to accept all defaults, then click Finish.
- If prompted, click Allow to accept incoming network connections.
- In Android Studio, click the AVD Manager tool.
- On the Your Virtual Devices page, click Create Virtual Device…
- Select a device definition, and click Next.
- Under Select a System Image, click x86 Images. In a new Android Studio installation, none of the images are downloaded.
- Scroll down to an image that supports API level 23, and click Download next to the image’s name.
- After the download completes, select the image and click Next. If you like, you can change the AVD Name field to any value that helps you identify the AVD configuration. Leave the other values set to their defaults.
- Click Finish.
 The Android SDK Manager appears. In a new Android Studio installation, the SDK Manager shows a check for only the latest API level. For Mobile SDK, it’s common practice to add all versions from the minimum API to the target API.
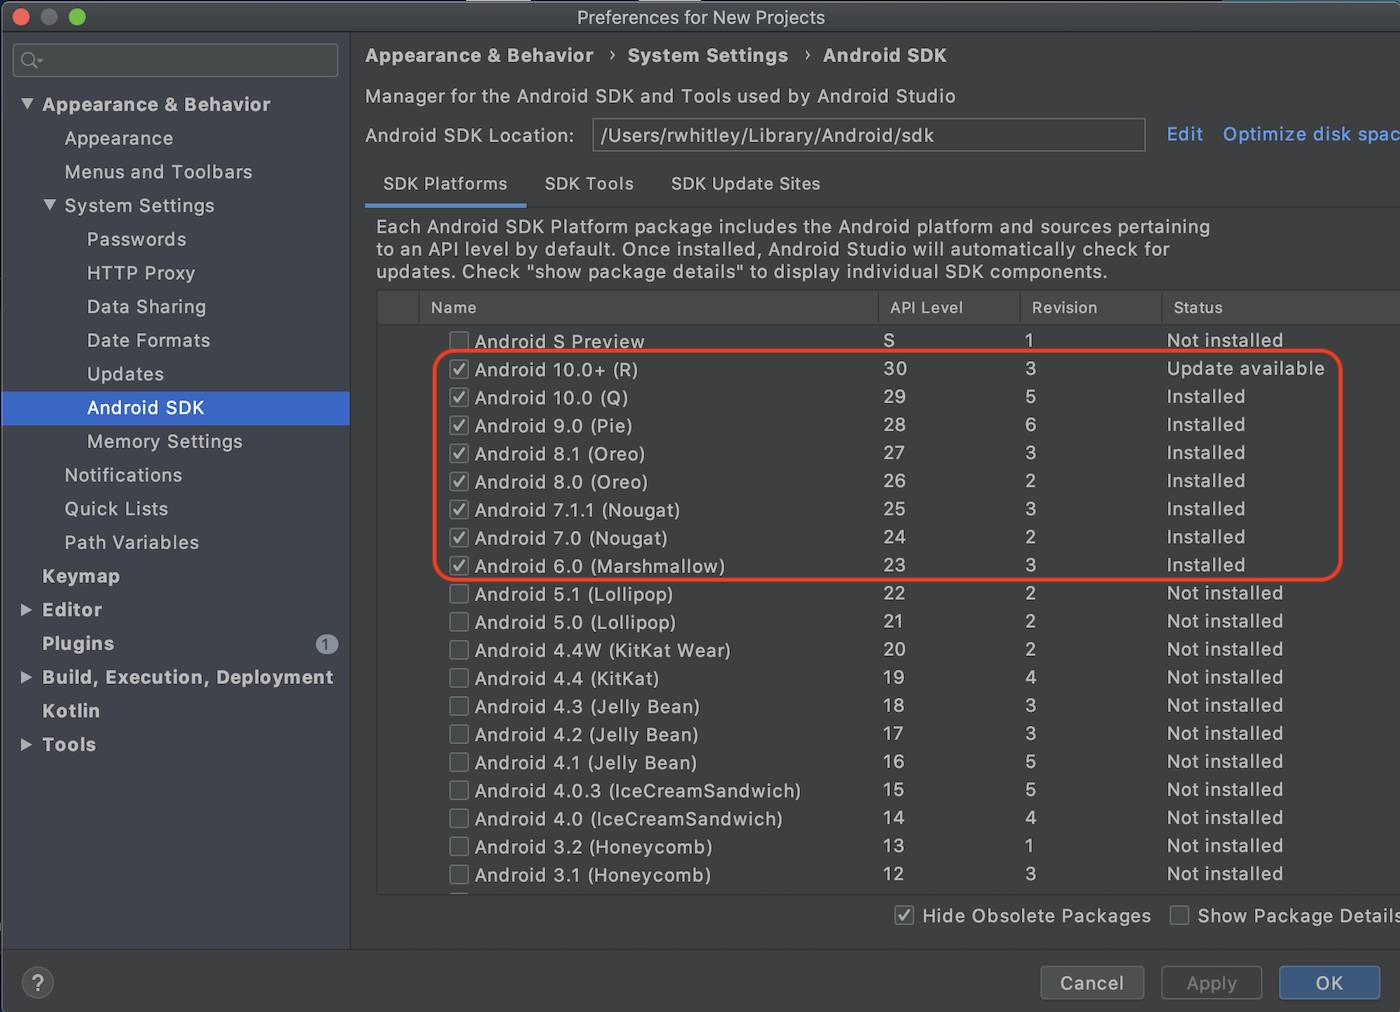 Installing the new API versions can take several minutes. Relax, and perhaps enjoy a refreshing beverage.

Install Forcedroid
To create Android apps that are compatible with Mobile SDK, you use a node.js command-line utility named forcedroid. Forcedroid is the quickest and easiest way to create all types of Mobile SDK apps for Android. You just enter some metadata as prompted, and a few minutes later you have a fully configured Gradle project that you can open in Android Studio.
To install forcedroid, you use the npm install command.
- Open the Terminal app on Mac, or the command prompt on Windows.
- Define an ANDROID_HOME system variable that points to your installed Android SDK. For example, on a Mac, the path is typically /Users/ /Library/Android/sdk . Be sure to store the variable in your persistent environment settings so that you don’t have to keep retyping it.
- To install forcedroid:
- On a Mac, type sudo npm install -g forcedroid and press Return. If prompted, enter your system password.
- On Windows, type npm install -g forcedroid and press Return.
- To verify your installation, type forcedroid version and press Return. For example:
- Your command-line printout should reflect the Mobile SDK version—currently, forcedroid version 9.x.x.
- To view forcedroid usage information, type forcedroid and press Return.
You’re finished! Your Android development environment is ready for Mobile SDK native app development. If you’re interested, you can now continue either to the iOS, hybrid, or React Native installation step.
That’s it. We won’t check any of your setup. Click Verify Step to proceed to the next step in the project.
Источник
Setup Android Environment for Development
Finally, it’s a showdown time. It’s time to develop your own Android Applications. But wait, where are you going to type your code? You need some environment to develop your apps. Therefore, first you will be required to download the necessary tools, SDKs and setup files to setup the environment for development. You can use a macOS, Windows or a Linux platform for your Android Application Development. All required packages, tools and other required files can be downloaded from the internet. Following are the names of the files, along with their descriptions that you will be required for developing Android apps.
Java Development Kit(JDK)
Android SDK works on Java SE Development Kit(JDK). Therefore, first your system must have JDK installed. If you don’t have it on your system, you can download it from here.
Note: Make sure you download proper JDK based upon your system configurations as there are separate setup files for macOS, Windows and Linux platform.
So the first requirement for setting up the environment is that JDK must be installed on your system. Once you are done with this, you can go for the next step.
Note: Once you have installed JDK, you will also have to set PATH and JAVA_HOME variables. Usually, this is done automatically by the system. Still If you face any problem regarding this, you can read more about it here.
Android SDK/Android Studio/Eclipse
Next comes Android SDK. It contains libraries, debugger, an emulator, documentations, sample codes and tutorials for each API level of the released versions of Android.
Note: Before the release of Android Studio, SDK was a standalone part of the Android Application development tools that could be integrated with other IDE’s like Eclipse with the help of Android ADT Bundle. Later on, Google made Android SDK as a part of the Android Studio, which is the official IDE for Android development.
You can download the complete Android Development Environment bundle(Android Studio + SDK) from the link here.

Setup and Installation of Android Studio
Once you have finished with installing JDK and downloading Android Studio IDE setup file, double click on the .exe file (setup file) of the Android Studio. It’ll prepare the file for setup and will ask you for the location where you want to install it, as shown in image below.

Select an appropriate location and click on Next button.

Click on Install button. It will start installing as shown below.

Click on Next button.

Android Studio has been installed directly and it is ready for use. Click on finish button and Android Studio will open.
Note: If you have installed any previous version of Android Studio, Android Studio setup will first remove your previous version and then it will install the new one, as shown in the images below. Settings and Configurations are not deleted in this process.


Android Studio will automatically get the location of the Android SDK if it is in the same location as itself. But if it fails to discover, then it’ll ask you to browse to the Android SDK’s location.
In the next tutorial, we will talk about the Android SDK manager and the additional packages required in the SDK manager to complete the system setup for development.
Источник
Your android development environment from
![]()
Hi, I faced the same issue. Then I fixed it by downloading the required gradel version (1.10) and mapped with the Android Studio.
Please follow the steps:
1. Download required gradle version (1.10) from the following site: http://www.gradle.org/downloads[^]
2. Unzip the downloaded file and place the folder in «c:\Program Files»
3. Open Android Studio
4. Go to File menu > Settings > click Gradle
5. click on «Use local gradle distribution» and update the Gradle home as C:/Program Files/gradle-1.10
6. Click OK to save the changes.
Now, go to Tools menu > Android > click Sync Project with Gradle Files. This should resolve the issue you’re facing. 

 | android studio  |  | Member 10994802 | 5-Aug-14 23:15 |
 | Re: android studio |  | Ranjan.D | 6-Aug-14 17:36 |
| Last Visit: 31-Dec-99 19:00 Last Update: 6-Dec-21 0:51 | Refresh | 1 |
 General
  News
News  Suggestion Question
  Bug Answer
  Joke
Joke  Praise
  Rant
Rant  Admin
Admin
Use Ctrl+Left/Right to switch messages, Ctrl+Up/Down to switch threads, Ctrl+Shift+Left/Right to switch pages.
Источник


