- Where can I set my Android SDK locations?
- Устраняем ошибку: Your SDK location contains non-ASCII characters при установке Android Studio
- Причина ошибки
- Варианты устранения ошибки
- Вариант 1: изменение пути
- Вариант 2: смена имени пользователя
- How To Set Android SDK Path In Windows And Mac
- 1. Configure Android SDK Variable In Windows.
- 1.1 Get Android SDK Install Directory Path.
- 1.2 Set %ANDROID_HOME% and %Path% System Environment Variable.
- 2. Configure Android SDK Variable In macOS.
- Где можно задать свои расположения пакета SDK для Android?
- How to Fix “SDK location not found” in Android Studio?
- When switching from one IDE to another (Like from Eclipse to Android Studio)
Where can I set my Android SDK locations?
In Visual Studio, navigate to Tools > Options > Xamarin > Android Settings to view and set the Android SDK location:
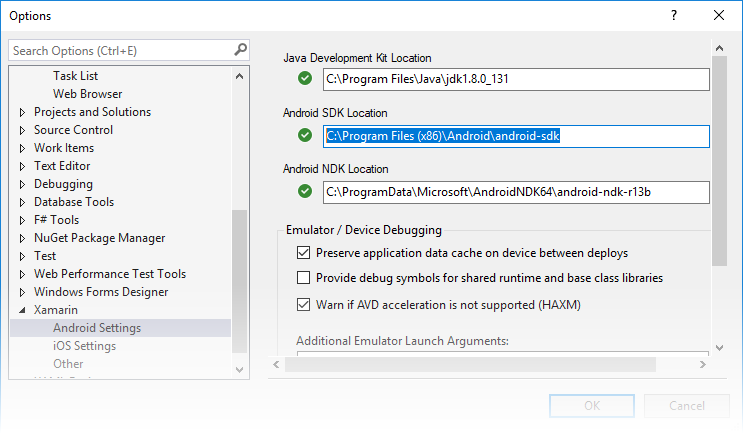
The default location for each path is as follows:
Java Development Kit Location:
C:\Program Files\Java\jdk1.8.0_131
Android SDK Location:
C:\Program Files (x86)\Android\android-sdk
Android NDK Location:
C:\ProgramData\Microsoft\AndroidNDK64\android-ndk-r13b
Note that the version number of the NDK may vary. For example, instead of android-ndk-r13b, it could be an earlier version such as android-ndk-r10e.
To set the Android SDK location, enter the full path of the Android SDK directory into the Android SDK Location box. You can navigate to the Android SDK location in File Explorer, copy the path from the address bar, and paste this path into the Android SDK Location box. For example, if your Android SDK location is at C:\Users\username\AppData\Local\Android\Sdk, clear the old path in the Android SDK Location box, paste in this path, and click OK.
In Visual Studio for Mac, navigate to Preferences > Projects > SDK Locations > Android. In the Android page, click the Locations tab to view and set the SDK location:
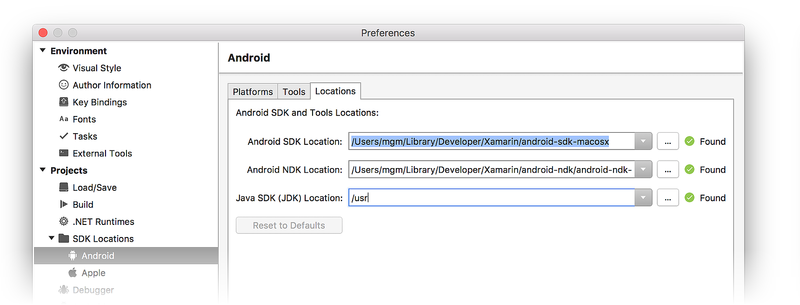
The default location for each path is as follows:
Android SDK Location:
Android NDK Location:
Java SDK (JDK) Location:
/usr
Note that the version number of the NDK may vary. For example, instead of android-ndk-r14b, it could be an earlier version such as android-ndk-r10e.
To set the Android SDK location, enter the full path of the Android SDK directory into the Android SDK Location box. You can select the Android SDK folder in the Finder, press CTRL+вЊ+I to view folder info, click and drag the path to the right of Where:, copy, then paste it to the Android SDK Location box in the Locations tab. For example, if your Android SDK location is at
/Library/Developer/Android/Sdk, clear the old path in the Android SDK Location box, paste in this path, and click OK.
Источник
Устраняем ошибку: Your SDK location contains non-ASCII characters при установке Android Studio
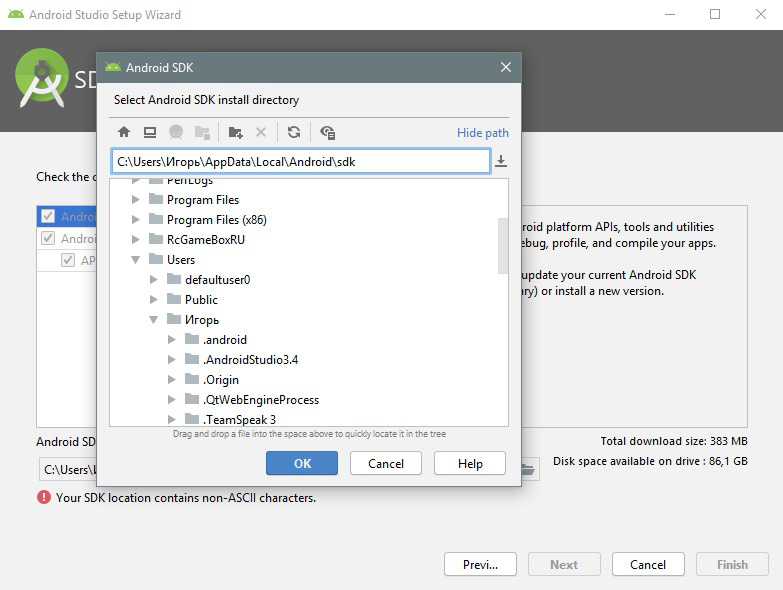
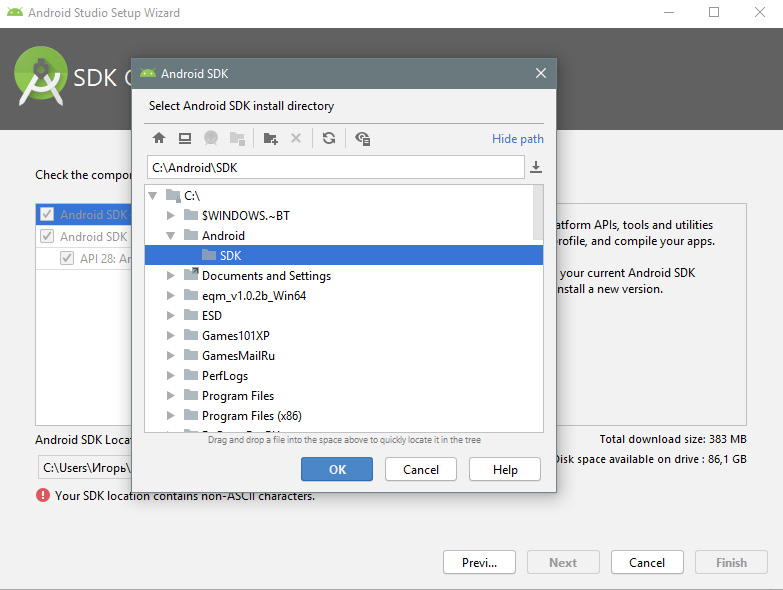
При установке Android Studio столкнулся с проблемой установки SDK. Нажать кнопку «Next» нельзя, а внизу с пометкой «внимание» находится надпись: Your SDK location contains non-ASCII characters . Что делать в такой ситуации? Я нашел два рабочих решения.
Причина ошибки
Она банальна. Имя вашей учетной записи Windows написано не на английском. А программа брезгует устанавливать файлы в директорию, если папка в ней указана на другом языке (русский, турецкий, испанский, арабский и прочее).
Варианты устранения ошибки
Процесс устранения сводится к тому, чтобы обеспечить англоязычный путь к Android\ SDK.
Вариант 1: изменение пути
Банальный способ, который помог обойти ошибку:
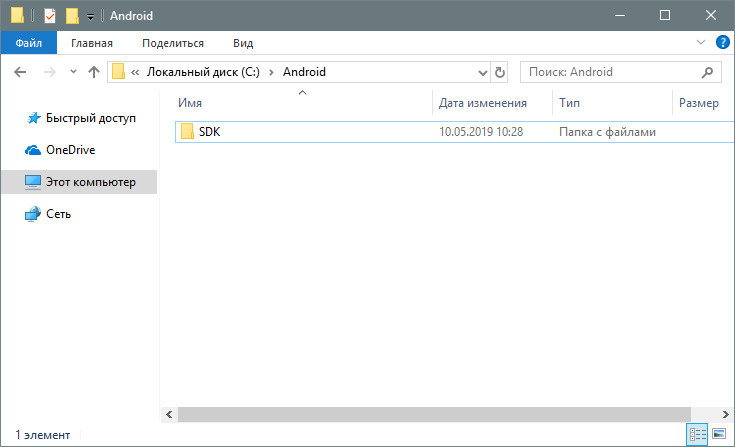
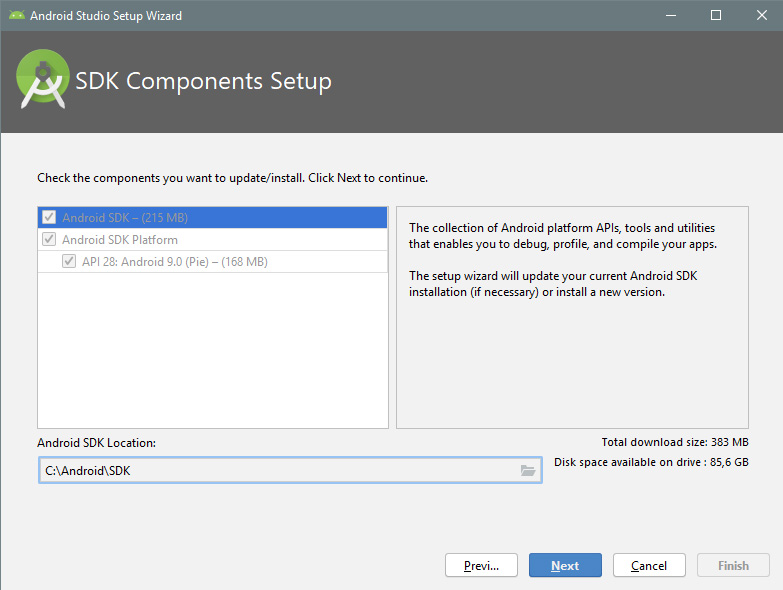
- Зайдите на диск C: и создайте две папки Android\SDK.
Нажимайте Next и ждите завершения установки.
Вариант 2: смена имени пользователя
Более замороченный способ со сменой имени профиля на англоязычное. Пока вы находитесь в этой учетной записи, переименовать папку невозможно. Поэтому:
- Через поиск найдите CMD и откройте от имени администратора.
- Введите команду net user Администратор /active:yes
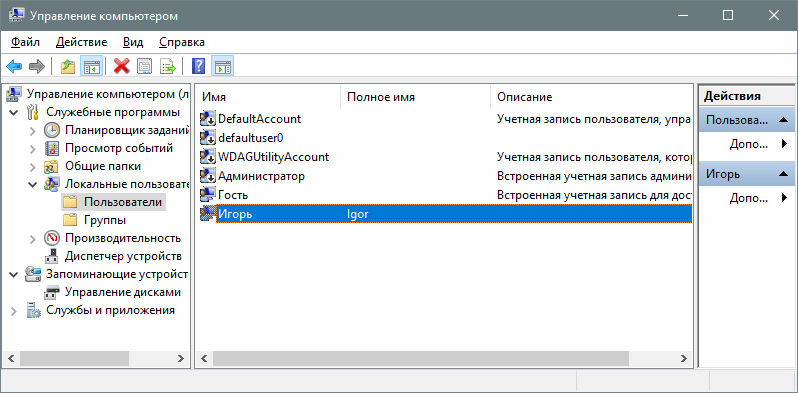
- Выйдите из системы и зайдите в профиль только что включенной учетки администратора.
- Нажмите ПКМ на Пуск и выберите «Управление компьютером».
- Перейдите в раздел Управление компьютером — Локальные пользователи — Пользователи, нажмите ПКМ по имени учетной записи и отредактируйте ее.

Кстати говоря, способ, который находится в поиске, на первой странице в ютубе, не работает. По отзывам видно, что не у одного меня.
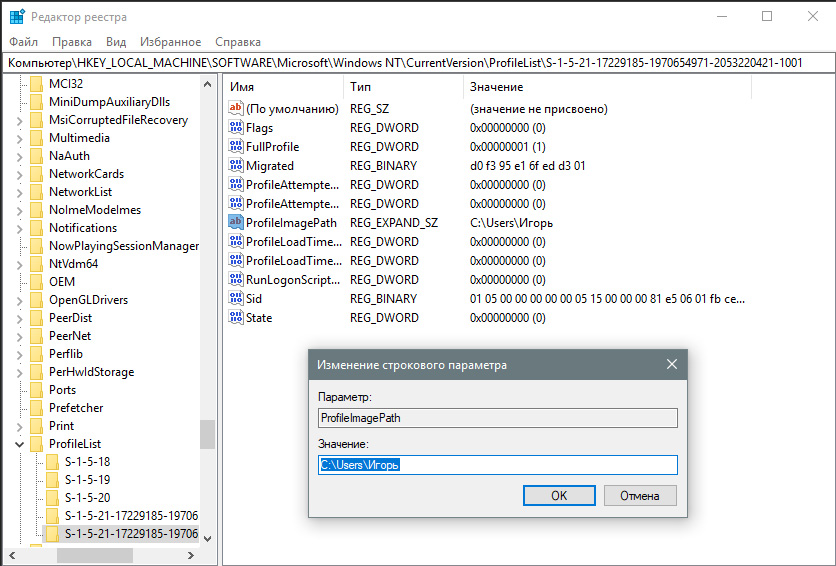
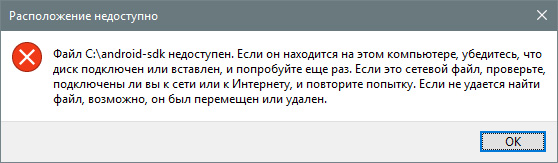
При создании символической ссылки командой mklink /D «C:\ android-sdk» «C:\ Users\ Игорь\ AppData\ Local\ Android\ sdk, она не отображается в пути установщика, а через проводник выдает «расположение недоступно».
В общем, устаняйте ошибку Android Studio, а сайт добавляйте в закладки. И до скорых встречь!
Источник
How To Set Android SDK Path In Windows And Mac
After you installed android studio, you still need to configure some android SDK environment variables then you can use it easily. This article will tell you how to correctly configure Android SDK environment variables such as ANDROID_HOME, PATH on Windows and macOS.
1. Configure Android SDK Variable In Windows.
1.1 Get Android SDK Install Directory Path.
Before you can configure it, you should first get the android SDK install directory follow below steps.
- Open android studio, click File —> Settings menu item in the top men bar.
- Expand Appearance & Behavior —>System Settings —>Android SDK menu item on the left side of the popup window. Then you can find the Android SDK Location directory path on the right side ( in this example, the Android SDK location path is C:\Users\Jerry\AppData\Local\Android\Sdk ), remember it.
1.2 Set %ANDROID_HOME% and %Path% System Environment Variable.
- Right-click the computer icon in Windows file explorer left side, click Properties menu item in the popup menu list. This will open the windows system configuration window.
- Click the Advanced system settings link on left panel, it will popup the System Properties window, click the Environment Variables button to open Environment Variables window.
- Click the New… button to add a new system variable, input ANDROID_HOME as the variable name, and input the Android SDK location directory path ( such as C:\Users\Administrator\AppData\Local\Android\Sdk ) as the variable value.
- Select variable Path and click Edit button and add ;%ANDROID_HOME%\tools;%ANDROID_HOME%\tools\bin;%ANDROID_HOME%\platform-tools at the end of its value. Please note the ; must be English character otherwise it will not take effect .
- Click OK to close the system environment variables settings window, open a dos window, type command adb in it. If you see output like below that means the android SDK path variable has been configured successfully.
2. Configure Android SDK Variable In macOS.
- Open Android Studio on macOS, then click Android Studio —> Preferences menu item at the left top toolbar.
- Input search keyword sdk in the search box of the popup Preferences dialog window left side.
- It will focus on the Android SDK menu item on the left side, and you can get the Android SDK Location directory path value on the right side Android SDK Location text box.
- Generally, the Android SDK is installed in the /Users/user-name/Library/Android/sdk folder on macOS.
- If you can not find the above folder in macOS finder or terminal, this is because the Library folder is a hidden folder by default, you should make the hidden folder visible by executing the command $ defaults write com. apple . finder AppleShowAllFiles TRUE in a macOS terminal window ( please read article How To Show Hidden Files In Mac OS Finder And Select Hidden Files In Html Upload File Form ).
- You can also see the hidden Library folder by opening a macOS Finder window, then click Go —> Go to Folder… menu item, and input
/Library in the popup dialog input text box, then click Go button.
Источник
Где можно задать свои расположения пакета SDK для Android?
в Visual Studio перейдите в меню сервис параметры > Xamarin > Android Параметры , чтобы просмотреть и задать расположение пакет SDK для Android:

Расположение по умолчанию для каждого пути выглядит следующим образом:
Расположение пакета средств разработки Java:
C:\Program Филес\жава\ jdk1.8.0_131
Расположение пакета SDK для Android
C:\Program Files (x86) \Андроид\андроид-СДК
Расположение пакета Android NDK:
C:\ProgramData\Microsoft\AndroidNDK64\android-ndk-r13b
Обратите внимание, что номер версии NDK может отличаться. Например, вместо android-ndk-r13b может быть более ранняя версия, например android-ndk-r10e.
Чтобы задать расположение пакета SDK для Android, введите полный путь к каталогу пакета SDK для Android в поле Расположение пакета SDK для Android. Вы можете перейти к расположению пакета SDK для Android в проводнике, скопировать путь из адресной строки и вставить этот путь в поле Расположение пакета SDK для Android. Например, если расположение пакет SDK для Android находится на к:\усерс\усернаме\аппдата\локал\андроид\сдк, очистите старый путь в поле Расположение пакет SDK для Android , вставьте этот путь и нажмите кнопку ОК.
в Visual Studio для Mac перейдите к параметрам проекты > расположение пакета SDK для > Android. На странице Android перейдите на вкладку Расположения, чтобы просмотреть и задать расположение пакета SDK:

Расположение по умолчанию для каждого пути выглядит следующим образом:
Расположение пакета SDK для Android
Расположение пакета Android NDK:
Расположение пакета SDK для Java (JDK):
/usr
Обратите внимание, что номер версии NDK может отличаться. Например, вместо android-ndk-r14b может быть более ранняя версия, например android-ndk-r10e.
Чтобы задать расположение пакета SDK для Android, введите полный путь к каталогу пакета SDK для Android в поле Расположение пакета SDK для Android. Можно выбрать папку пакет SDK для Android в Finder, нажать клавиши CTRL + ⌘ + I , чтобы просмотреть сведения о папке, щелкнуть и перетащить путь справа от раздела :, скопировать, а затем вставить его в поле Расположение пакет SDK для Android на вкладке расположения . Например, если расположение пакет SDK для Android находится в папке
/либрари/девелопер/андроид/СДК, очистите старый путь в поле Расположение пакет SDK для Android , вставьте этот путь и нажмите кнопку ОК.
Источник
How to Fix “SDK location not found” in Android Studio?
Google developed Android SDK which is a Software Development Kit developed by Google for the Android platform. You can create Android apps using Android SDK, and you don’t need to be an expert to use it. Android SDK and Android Studio come bundled together, with Google’s official integrated development environment (IDE) for the Android operating system.
In this article, we see how to fix an error that is related to the main Android building component of Android Studio that is the Android SDK. The most common error related to Android SDK is “SDK location not found“. This message pops up stating that the location of Android SDK was not detected when the path of SDK is assigned incorrectly. There can also be other reasons for this error message as well and we will see ways to get rid of this error.
When switching from one IDE to another (Like from Eclipse to Android Studio)
Method 1
In this case, follow the below steps:
Method 2
In case the above procedure doesn’t work then add the ANDROID_HOME variable in “Environment Variables” as C:\Users\Username\AppData\Local\Android\Sdk.
Method 3
In case it does not work even then, then you need to change the directory path on Project Structure as well.
- Close the current project and you’ll see a pop-up with a dialog which will then proceed to Configure option.
- Configure -> Project Defaults -> Project Structure -> SDKs on left column -> Android SDK Home Path -> give the exact path as you did on local.properties and select Valid Target.
Method 4
A settings.gradle file might be missing from the project. Make sure that the file exists from the project you are importing. If not add the settings.gradle file with the following:
Save the file and put it in the top-level folder in your project.
Источник


