- How to use YUV (YUV_420_888) Image in Android
- Theory
- pseudo-code
- Convert YUV_420_888 to ——– ?
- How to convert YUV_420_888 Image to Bitmap ?
- Pure Java approach
- Renderscript approach
- Native approach
- How to convert YUV_420_888 Image to YuvImage ?
- Running time at different resolutions
- How to convert YUV_420_888 Image to JPEG format?
- Running time at imageQuality = 100 at different resolution
- agent10 / ImageConverter.kt
- How to convert android.media.Image to bitmap object?
- 6 Answers 6
How to use YUV (YUV_420_888) Image in Android
ImageFormat#YUV_420_888 is one of the most common image format supported by Android Cameras. It’s a multi-plane YUV (YCbCr) format represented by three separate planes in android.media.Image and the order of the planes is guaranteed to be:
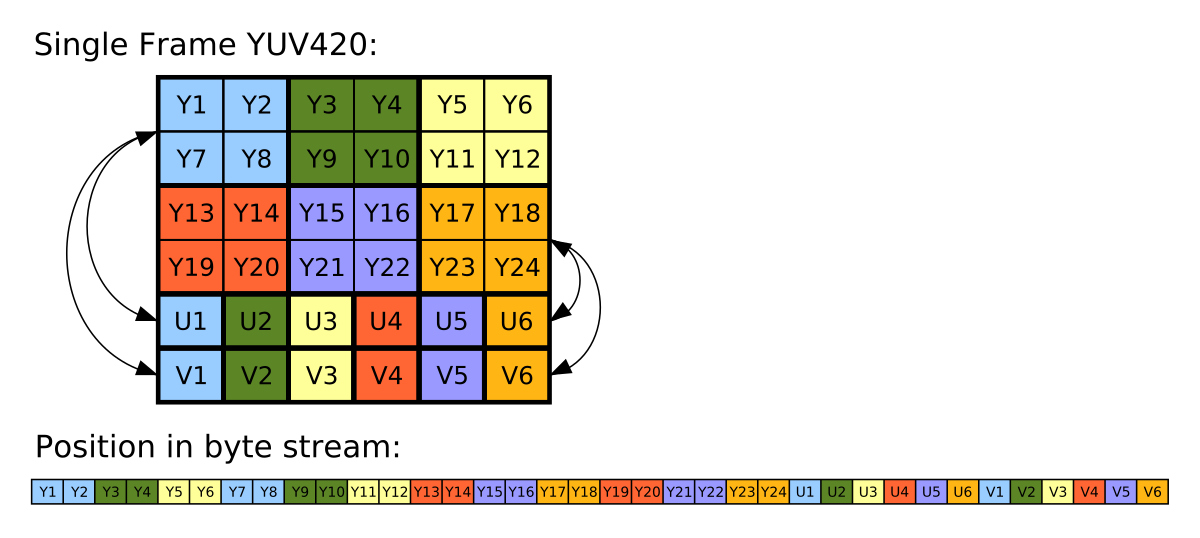
Figure: YUV420 representation, 8 bits for Y and 4 bits for UV (interleaved). Source: Wikipedia
This format can be used for processing the input frames before saving to disk or some other action. A very common question around YUV is how to consume it in Android. In this article, I’d describe different ways it can be used. The most common question is how to convert YUV to Bitmap or jpeg format in Android.
Theory
Y′UV was invented when engineers wanted color television in a black-and-white infrastructure. They needed a signal transmission method that was compatible with black-and-white (B&W) TV while being able to add color. The luma component already existed as the black and white signal; they added the UV signal to this as a solution.
Super cool no? Source: Wikipedia
YUV images can be represented in different formats like YUV444 , YUV422 , YUV4111 or YUV420p . It’s easiest to convert between RGB888 and YUV444 .
pseudo-code
In general you can convert a YUV420 to RGB using following logic
Convert YUV_420_888 to ——– ?
In this section, I’ll cover various how to questions. If you have gone through the theory section, the solutions should look more intuitive.
How to convert YUV_420_888 Image to Bitmap ?
There are a couple of popular questions related to this in StackOverflow, like:
Most common suggestions there is to either use RenderScript based approach or a much hackier approach where we first convert the Image to YuvImage as mentioned here. And then encode to jpeg as mentioned here. Then use android.graphics.BitmapFactory to decode the jpeg byte array.
It was when I read the latter solution I decided to write this article. If you are reading this article please do not convert the Yuv Image to jpeg just to convert it to Bitmap .
Pure Java approach
If you look at how the YUV image looks like once again:
Per definition of YUV_420_888 format (very important — the code below is based on following principles):
Multi-plane Android YUV 420 format
This format is a generic YCbCr format, capable of describing any 4:2:0 chroma-subsampled planar or semiplanar buffer (but not fully interleaved), with 8 bits per color sample.
Images in this format are always represented by three separate buffers of data, one for each color plane. Additional information always accompanies the buffers, describing the row stride and the pixel stride for each plane.
The order of planes in the array returned by Image#getPlanes() is guaranteed such that plane #0 is always Y, plane #1 is always U (Cb), and plane #2 is always V (Cr).
The Y-plane is guaranteed not to be interleaved with the U/V planes.
The U/V planes are guaranteed to have the same row stride and pixel stride.
You will see there is one U & V (chroma) value for four luma values. I’ll try to use this information along with the yuv to rgb translation above to bring up some java code.
This can easily become a costly approach when handled in the java layer as soon as the image resolutions crosses a certain limit. Let’s take a look at benchmarks of this by running on a certain low end device (with viewfinder running):
| Resolution | Convertion time (ms) |
|---|---|
| 320 X 240 | 29.26 ms |
| 1600 X 1200 (2MP) | 683.0 ms |
| 3264 X 2488 (8MP) | 2826.9 ms |
Table 1: Running time for algorithm above on a certain Android device (low end)
Also, there are high chances that you might start to see logs that look like:
Background concurrent copying GC freed 1648(142KB) AllocSpace objects, 2(38MB) LOS objects, 50% free, 20MB/41MB, paused 1.135ms total 128.325ms
High frequency of such logs or high value of paused ms are an indicator of increased GC pressure.
So JVM probably is not suited to handle really big images both w.r.t latency and reliability. JVM also sets a limit on max heap memory allocations by an application in Android which can be bypassed to a higher limit but even higher limit comes with restriction. This is just FYI, converting a single image shouldn’t lead to such high allocations. If you must know a YUV_420_888 image takes 1.5 bytes per pixel so an 8MP (3264 x 2488) = 8120832 pixels image should be 11.61 Mb in memory while a single ARGB_8888 bitmap would take 4 bytes per pixel leading to 30.97 Mb per image of the same size.
Renderscript approach
RenderScript is a framework for running computationally intensive tasks at high performance on Android. RenderScript is primarily oriented for use with data-parallel computation, although serial workloads can benefit as well. The RenderScript runtime parallelizes work across processors available on a device, such as multi-core CPUs and GPUs. This allows you to focus on expressing algorithms rather than scheduling work. RenderScript is especially useful for applications performing image processing, computational photography, or computer vision.
Android team has published an intrinsic for converting an Android YUV buffer to RGB. The input allocation is supplied as 8bit NV12 YUV byte array and the output is 4 channel 8 bit ARGB buffer which can be converted to a Bitmap . The name of intrinsic is ScriptIntrinsicYuvToRGB.
Here’s a java code sample on how to use it:
For benchmarking I’ll be looking at the setup part (i.e. creating RenderScrip allocations) separately and the actual conversions separately. In this article, I am only investigating the latency aspect of the algorithm but while using this in the applications it’d be worthwhile to track the peak heap memory usage using the Android Studio profiler.
| Resolution | Setup time (ms) | Convertion time (ms) | Speedup as compared to Java approach |
|---|---|---|---|
| 320 X 240 | 2.88 ms ms | 10.2x | |
| 1600 X 1200 (2MP) | 35.64 ms | 19.2x | |
| 3264 X 2488 (8MP) | 44.14 ms | 64x |
Table 2: Running time for algorithm above on a certain Android device (low end)
RenderScript is a winner as compared to the pure java approach and considering what it’s build for it makes complete sense for this approach to be fast. Considering realtime applications this can be a fair approach even for low-end devices.
Native approach
Another approach is to leverage JNI (Java Native Interface) in Android. I don’t have exact code examples here but in my experience JNI is very well suited for low latency image processing in Android. You can also use shaders like OpenGL ES for realtime applications. For our YUV_420_888 to Bitamp conversion the API would look like:
And then consume this data in the native code and use the same logic as mentioned above to convert YUV_420_888 to argb . I do not have the exact numbers with me w.r.t peformance latency.
How to convert YUV_420_888 Image to YuvImage ?
Running time at different resolutions
| Resolution | Average (ms) | Min (ms) | Max (ms) |
|---|---|---|---|
| 176 x 144 | 2.6 ms | — | 14 ms |
| 320 X 240 | 3.6 ms | 1 ms | 18 ms |
| 1600 X 1200 (2MP) | 47.5 ms | 43 ms | 70 ms |
| 3264 X 2488 (8MP) | 68.3 ms | 63 ms | 88 ms |
Table 4: Running time for algorithm above on Pixel 4a.
Overall these algorithms didn’t seem to have an inherent high cost on its own — its primarily memory copy. This can probably be optimised a more CPU centric for loop structure — but that is out of scope of this article.
How to convert YUV_420_888 Image to JPEG format?
You can convert the android.media.Image to JPEG format (like single plane byte[] ):
Running time at imageQuality = 100 at different resolution
| Resolution | Average (ms) | Min (ms) | Max (ms) |
|---|---|---|---|
| 320 X 240 | 3.60 ms | 3.00 ms | 6.00 ms |
| 1600 X 1200 (2MP) | 74.20 ms | 72.00 ms | 85.00 ms |
| 3264 X 2488 (8MP) | 98.35 ms | 94.00 ms | 110.00 ms |
Table 5: Running time for algorithm above on a certain Android device (low end).
Источник
agent10 / ImageConverter.kt
This file contains bidirectional Unicode text that may be interpreted or compiled differently than what appears below. To review, open the file in an editor that reveals hidden Unicode characters. Learn more about bidirectional Unicode characters
| import android.content.Context |
| import android.graphics.Bitmap |
| import android.graphics.ImageFormat |
| import android.graphics.Matrix |
| import android.media.Image |
| import android.renderscript.* |
| class ImageConverter ( private val context : Context ) < |
| class ImageConvertFailed : Exception (» Image converting failed») |
| companion object < |
| private const val HARDCODE_SCALE = 0.15f |
| > |
| fun convert ( img : Image , rotation : Int = 0): Bitmap < |
| return yuv420toNV21(img)?. let < |
| nv21ToBitmap(it, img.width, img.height, rotation) |
| > ? : throw ImageConvertFailed () |
| > |
| private fun nv21ToBitmap ( bytes : ByteArray , width : Int , height : Int , rotate : Int ): Bitmap < |
| val rs = RenderScript .create(context) |
| val yuvToRgbIntrinsic = ScriptIntrinsicYuvToRGB .create(rs, Element . U8_4 (rs)) |
| val yuvType = Type . Builder (rs, Element . U8 (rs)).setX(bytes.size) |
| val input = Allocation .createTyped(rs, yuvType.create(), Allocation . USAGE_SCRIPT ) |
| val rgbaType = Type . Builder (rs, Element . RGBA_8888 (rs)).setX(width).setY(height) |
| val output = Allocation .createTyped(rs, rgbaType.create(), Allocation . USAGE_SCRIPT ) |
| input.copyFrom(bytes) |
| yuvToRgbIntrinsic.setInput(input) |
| yuvToRgbIntrinsic.forEach(output) |
| val bitmap = Bitmap .createBitmap(width, height, Bitmap . Config . ARGB_8888 ) |
| output.copyTo(bitmap) |
| input.destroy() |
| output.destroy() |
| yuvToRgbIntrinsic.destroy() |
| rs.destroy() |
| return bitmap.scaleAndRotate( HARDCODE_SCALE , rotate) |
| > |
| private fun Bitmap. scaleAndRotate ( scale : Float , rotate : Int ): Bitmap < |
| val m = Matrix () |
| m.postScale(scale, scale) |
| if (rotate != 0 ) < |
| m.postRotate(rotate.toFloat()) |
| > |
| return Bitmap .createBitmap( this , 0 , 0 , width, height, m, true ) |
| > |
| private fun yuv420toNV21 ( image : Image ): ByteArray? < |
| val crop = image.cropRect |
| val format = image.format |
| val width = crop.width() |
| val height = crop.height() |
| val planes = image.planes |
| val data = ByteArray (width * height * ImageFormat .getBitsPerPixel(format) / 8 ) |
| val rowData = ByteArray (planes[ 0 ].rowStride) |
| var channelOffset = 0 |
| var outputStride = 1 |
| for (i in planes.indices) < |
| when (i) < |
| 0 -> < |
| channelOffset = 0 |
| outputStride = 1 |
| > |
| 1 -> < |
| channelOffset = width * height + 1 |
| outputStride = 2 |
| > |
| 2 -> < |
| channelOffset = width * height |
| outputStride = 2 |
| > |
| > |
| val buffer = planes[i].buffer |
| val rowStride = planes[i].rowStride |
| val pixelStride = planes[i].pixelStride |
| val shift = if (i == 0 ) 0 else 1 |
| val w = width shr shift |
| val h = height shr shift |
| buffer.position(rowStride * (crop.top shr shift) + pixelStride * (crop.left shr shift)) |
| for (row in 0 until h) < |
| var length : Int |
| if (pixelStride == 1 && outputStride == 1 ) < |
| length = w |
| buffer[data, channelOffset, length] |
| channelOffset + = length |
| > else < |
| length = (w — 1 ) * pixelStride + 1 |
| buffer[rowData, 0 , length] |
| for (col in 0 until w) < |
| data[channelOffset] = rowData[col * pixelStride] |
| channelOffset + = outputStride |
| > |
| > |
| if (row h — 1 ) < |
| buffer.position(buffer.position() + rowStride — length) |
| > |
| > |
| > |
| return data |
| > |
| > |
You can’t perform that action at this time.
You signed in with another tab or window. Reload to refresh your session. You signed out in another tab or window. Reload to refresh your session.
Источник
How to convert android.media.Image to bitmap object?
In android, I get an Image object from here https://inducesmile.com/android/android-camera2-api-example-tutorial/ this camera tutorial. But I want to now loop through the pixel values, does anyone know how I can do that? Do I need to convert it to something else and how can I do that?
6 Answers 6
If you want to loop all throughout the pixel then you need to convert it first to Bitmap object. Now since what I see in the source code that it returns an Image , you can directly convert the bytes to bitmap.
Then once you get the bitmap object, you can now iterate through all of the pixels.

YuvToRgbConverter is useful for conversion from Image to Bitmap.
Actually you have two questions in one 1) How do you loop throw android.media.Image pixels 2) How do you convert android.media.image to Bitmap
The 1-st is easy. Note that the Image object that you get from the camera, it’s just a YUV frame, where Y, and U+V components are in different planes. In many Image Processing cases you need only the Y plane, that means the gray part of the image. To get it I suggest code like this:
The yImage byte buffer is actually the gray pixels of the frame. In same manner you can get the U+V parts to. Note that they can be U first, and V after, or V and after it U, and maybe interlived (that is the common case case with Camera2 API). So you get UVUV.
For debug purposes, I often write the frame to a file, and trying to open it with Vooya app (Linux) to check the format.
The 2-th question is a little bit more complex. To get a Bitmap object I found some code example from TensorFlow project here. The most interesting functions for you is «convertImageToBitmap» that will return you with RGB values.
To convert them to a real Bitmap do the next:
Note: There is more options of converting YUV to RGB frames, so if you need the pixels value, maybe Bitmap is not the best choice, as it may consume more memory than you need, to just get the RGB values
Источник


