- About Scanner SDK for Android
- Overview
- Supported Devices
- Supported Android Operating System
- Barcode Scanning API Programmer’s Guide
- Overview
- Configuring Development Environment
- Adding the Barcode Scanner SDK to the Android Studio Project
- Adding Permissions in the Manifest File
- Connecting the Scanner to the Device
- SDK Installation
- Establishing a Connection with the Scanner
- Making the Scanner Beep
- LED On/Off
- Firmware Update
- Connect Scanner Using Scan-To-Connect (STC) Barcode
- Scanner Connect Event
- Scanner Connect Event
- Scanner Enable/Disable
- Get Currently Connected Scanner and Paired Devices
- Scanner SDK for Android v1.1.10.0 Release Notes
- Description
- Device Compatibility
About Scanner SDK for Android
Overview
The Android SDK for Scanners allows a developer to create an Android application that controls a Zebra Scanner. The SDK supports both corded and cordless scanners. The SDK supports tablets, phones and other android devices.
Supported Devices
- CS6080
- DS2208-HC
- DS2208-SR
- DS2278-HC
- DS2278-SR
- DS3608-DP DS3678-DP Ultra Rugged Scanners
- DS3608-ER DS3678-ER Ultra Rugged Scanners
- DS3608-HD DS3678-HD Ultra Rugged Scanners
- DS3608-HP DS3678-HP Ultra Rugged Scanners
- DS457 Series
- DS4608-DL
- DS4608-DPE
- DS4608-HC
- DS4608-HD
- DS4608-SR
- DS4608-XD
- DS4800 Series
- DS6878-DL
- DS6878-SR Cordless Bluetooth 2D Imager
- DS8108-HC
- DS8108-SR
- DS8178-HC
- DS8178-SR
- DS9308
- DS9908-HD
- DS9908-SR
- LI2208
- LI3608-ER
- LI3608-SR
- LI3678-ER
- LI3678-SR
- LI4278
- MP7000 Multi-Plane Scanner
- MS4717
- PL5000 Series
- RFD8500 RFID Reader
- RS5100
- SE2707 OEM Array Imager Scan Engine
- SE4107
- Symbol CS4070 Companion Scanner
- Symbol DS4308
- Symbol DS4308-HC
- Symbol DS4308P
- Symbol DS9808 Hybrid Presentation Imager
- Symbol LS2208 General Purpose Bar Code Scanner
NOTE: OEM Imagers Engines and Decoders Boards usually come without integrated LED and beeper. This functionality can only be tested with connected external beeper/LED.
Supported Android Operating System
Barcode Scanner SDK for Android support the following Android versions.
Источник
Barcode Scanning API Programmer’s Guide
Overview
The aim of this guide is to familiarize the user with the Barcode Scanner SDK for Android and its functionalities. Instructions are given in detail about integrating the Barcode Scanner SDK to Android Studio Project and to work with APIs for users to develop their applications. The provided code snippets can benefit the user in implementing LED, Beeper, Firmware Updates etc. Each functionality is explained individually with screenshots where necessary for the easy understanding of the user and to make development with reduced time and effort.
Configuring Development Environment
Adding the Barcode Scanner SDK to the Android Studio Project
Add the barcode_scanner_library_vx.x.x.x (ex: barcode_scanner_library_v2.4.10.0) as a Module in your Android Studio Project by navigating to, File -> Project Structure -> Modules
Click on the ‘+» icon to add the ‘barcode_scanner_library_vx.x.x.x.aar’ file. Then select ‘import JAR/AAR Package’ and click ‘Next’.
Locate the Android SDK library package, ‘.aar’ file to add to the project.
After adding the Module successfully, select the Dependencies from the options given. In the Modules section select ‘app’. Then in ‘Declared Dependencies’ section click the ‘+’ icon.
From the dropdown select ‘Module Dependency’.
Select the added Module and click ‘OK’ to proceed.
Adding Permissions in the Manifest File
Following permissions should be added in the Manifest File in order for the app to establish a Bluetooth connection with the scanner.
Connecting the Scanner to the Device
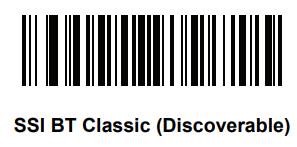
User can make a connection between the scanner and the device using either ‘SSI BT Classic (discoverable)’ Barcode or ‘Scan-To-Connect’ Barcode.
Using the ‘SSI BT Classic (discoverable)’ barcode (This is available in the Program Reference Guide of the Zebra Scanner Product), a Bluetooth connection can be established with the scanner and the device on which the app is running. Scan the barcode and start a Bluetooth scan in your device. Once the scanner is detected, pair with it.
The noteworthy difference between the two barcodes is that, Scan-To-Connect doesn’t require setting up the connection manually with the Android device. Unlike ‘SSI BT Classic (discoverable)’, a one scan of the Scan-To-Connect barcode establishes a connection with both the device and the app in one go.
SDK Installation
Inside the ‘onCreate’ method SDK must be initialized. Out of the several available operational modes (such as DCSSDK_MODE.DCSSDK_OPMODE_SNAPI, DCSSDK_MODE.DCSSDK_OPMODE_BTLE), Operational Mode of the Scanner must be set to DCSSDK_OPMODE_BT_NORMAL. Even though other operational modes are present, this guide is mainly focused on making a connection via DCSSDK_OPMODE_BT_NORMAL and carrying out the functions. Along with the initialization of the SDK an ArrayList to contain scanner information must be created.
Establishing a Connection with the Scanner
For the ease of explaining, two buttons have been used in the UI to establish the connection with the connected scanner and to make the scanner beep. With the press of the button used for connecting, the following ‘connectToScanner’ method gets called. If the ‘sdkHandler’ is not null, ‘scannerInfoList’ will get filled with all the Scanners that are connected to the device. Here inside the try catch block the ‘scanner ID’ of the first connected scanner in the ‘scannerInfoList’ is taken and then ‘connectScanner’ AsyncTask gets executed. Here an AsyncTask is used to prevent the main thread from being blocked while the scanner connection task is taking place.
With ‘dcssdkEstablishCommunicationSession’ the app makes a connection with the Scanner.
Making the Scanner Beep
Here the ‘BeepScanner’ AsyncTask gets called and then the ‘executeCommand’ method gets executed. One has the option to replace 1 in the ‘inXml’ with any integer between 0 and 26 as there are 27 beep combinations available.
Given below is a code snippet detailing the 27 combinations available for the scanner.
Inside the ‘BeepScanner’ AsyncTask, parameters such as ‘scannerId’, ‘opcode’, ‘outXml’ get passed on to the ‘executeCommand’ method which finally gives out the corresponding beep.
LED On/Off
The following UI is used to explain the LED ON/OFF states of the scanner. Code snippets for establishing a Bluetooth connection with the scanner are given above.
The method ‘redLedOnClicked’ gets called with the press of the ‘LED ON’ button. Similarly, ‘redLedOffClicked’ gets called with the press of the button ‘LED OFF’.
Using the following code, ‘inXml’ is created based on the ‘RMD attribute value’ passed on to it by ‘redLedOnClicked’ and ‘redLedOffClicked’ methods.
LED ON/OFF takes place when the ‘Scanner ID’ and the ‘opcode’ parameters are sent to the ‘executeCommand’ method.
Firmware Update
Firmware can be updated using ‘.SCNPLG’ files. These plugins can be obtained using the 123Scan Configuration Utility. Once 123Scan is installed, Plugin files for supported scanners can be found in ‘C:\ProgramData\123Scan2\Plug-ins’.
First of all, permissions have to be included in the Manifest file for the device to access firmware files in the storage.
Secondly, the class ‘IDcsSdkApiDelegate’ must be implemented. Then the declaration of the String ‘inXml’ must take place.
The object ‘sdkHandler’ should be notified of the implemented class. Then it is necessary to subscribe to events in order to be updated when the scanner gets reconnected, especially after a firmware update. The following code snippet takes care of that.
With the implementation of ‘IDcsSdkApiDelegate’ interface the following methods will be implemented as well.
Once the ‘Update Firmware’ button of the given UI is clicked, the following ‘updateFirmware’ method gets called. Note that the location of the firmware file is given in the ‘inXml’ String. The ‘UpdatingFirmware’ ‘AsyncTask’ gets executed as the next statement fulfilling requested task.
Finally, ‘executeCommand’ is called when the ‘scannerId’,’opcode’ and ‘outXml’ are all set.
Once a firmware update has started, user can be notified of the firmware update events. This is achieved by declaring a ‘handler’ inside ‘dcssdkEventFirmwareUpdate(FirmwareUpdateEvent firmwareUpdateEvent)’ method. Integer ‘FW_UPDATE_EVENT’ must be defined at the beginning of the class.
It is required to use handlers so as not to block the Event thread. With the use of a handler, the main thread will not be halted for the current process to execute. Multiple threads can run parallelly without interrupting each other.
Inside the handler, ‘firmwareUpdateEvent’ parameter gets passed on to the method ‘processFirmwareUpdateEvents’.
Several types of Firmware Update events are available. Namely SCANNER_UF_SESS_START, SCANNER_UF_SESS_END, SCANNER_UF_DL_PROGRESS, SCANNER_UF_STATUS, SCANNER_UF_DL_START and SCANNER_UF_DL_END. SCANNER_UF_STATUS event will only take place in the event of a firmware update error.
Once the firmware update process is finished, it is required for the firmware to be launched on to the scanner and be rebooted. This is achieved by the code inside the event ‘SCANNER_UF_SESS_END’. It is important for the working thread to sleep for a second before rebooting takes place.
As a final step, a call to ‘executeCommand’ method is made for the launching of the firmware on to the scanner to be completed. This can be verified with the rebooting beep of the scanner.
After rebooting of the scanner, it will be automatically reconnected to the app if Scan-To-Connect barcode had been used initially to connect the scanner to the app. If the connection had been made with the SSI BT Classic (Discoverable), scanner must be reconnected to the app manually. This can be achieved by pressing the ‘connect’ button in the UI. Once rebooting is completed and if the ‘connect’ button of the UI is pressed, the user can be notified of this reconnection by the ‘dcssdkEventCommunicationSessionEstablished’ event.
Connect Scanner Using Scan-To-Connect (STC) Barcode
Preliminary environment setting has been described in previous sections. First it is ensured that the ACCESS_COARSE_LOCATION permission is given, if not, permission is set inside the ‘onCreate’ method along with the execution of the ‘initializeDcsSdk’ method where initializations take place.
Inside the ‘initializeDcsSdk’ method, Bluetooth operational mode is set and a call is made to ‘generatePairingBarcode’.
Inside the ‘generatePairingBarcode’, value of ‘barCodeView’ is checked. For devices with Android versions 6.xxx and below, the method ‘updateBarcodeView’ is called directly and the Bluetooth Address of the device is retrieved automatically rendering the STC barcode across the screen.
The code snippet given below explains how the SDK manages to obtain the Bluetooth Address of Android 6.xxx and below versions. Please note that this snippet of code is already present in the SDK and doesn’t need to be included in any custom application development.
For Android versions 7.0 and above value of ‘barCodeView’ will be null and displaying the STC barcode will require the user to manually enter the Bluetooth address of the android device. The following explanation of the UI screenshot is for the easy understanding of users with Android 7 or higher version devices. An EditText is provided in the dialog box for the user to enter the Bluetooth address. Once the Bluetooth Address is entered and the ‘OK’ button is pressed, the ‘displayStc’ method gets called after which the STC barcode gets displayed on the screen.
Here the barcode is generated based on the Bluetooth Address, Bluetooth Protocol and the Scanner Configuration provided to the method dcssdkGetPairingBarcode(DCSSDKDefs.DCSSDK_BT_PROTOCOL.SSI_BT_LE, DCSSDKDefs.DCSSDK_BT_SCANNER_CONFIG.SET_FACTORY_DEFAULTS, bluetoothAddress).
Given below is the set of available Bluetooth protocols in the Barcode Scanner SDK.
Provided below is the set of supported Bluetooth scanner configurations in Barcode Scanner SDK.
Code snippets extracted from Barcode Scanner SDK are for information purpose only and need not be included in the Java file.
Note that the operational mode set using the method, ‘sdkHandler.dcssdkSetOperationalMode(DCSSDK_OPMODE_BT_LE)’ should be compatible with the Bluetooth protocol used. For instance, if ‘DCSSDK_OPMODE_BT_NORMAL’ is used as the operational mode, then the Bluetooth protocol to be used is the ‘SSI_BT_CRADLE_HOST’.
Scanner Connect Event
Once the STC barcode is available on the screen, the connection can be established by scanning the barcode with the Bluetooth scanner. The beep tone of the scanner confirms that the scanner has paired with the device as well as with the App.
Scanner Connect Event
If the user wishes to disconnect the scanner from the App as well as from the device, it can be achieved by pressing the ‘Disconnect’ button in the UI. Here the ‘scannerId’ is obtained from the ‘scannerInfoList’ and the method, ‘dcssdkTerminateCommunicationSession(scannerId)’ is provided with the obtained ‘scannerId’ to terminate the connection.
Scanner Enable/Disable
When the connection between the device and the scanner has been established, enabling and disabling the scanner can be achieved using the following two methods.
With the press of the ‘ENABLE’ button the following method gets called. When the OPCODE is given as ‘DCSSDK_DEVICE_SCAN_ENABLE’ along with the corresponding inXml, the scanner can be used for barcode scanning purpose.
With the press of the button ‘DISABLE’ barcode scanning functionality of the scanner will be disabled.
Get Currently Connected Scanner and Paired Devices
All the paired Bluetooth devices can be obtained using the API call ‘dcssdkGetAvailableScannersList’.
First the array list must be initialized inside the class.
With the API call ‘dcssdkGetActiveScannersList’, information about the scanner that is paired with the device as well as connected to the app can be obtained. This is accomplished by the ‘getActiveScanners’ method.
Источник
Scanner SDK for Android v1.1.10.0 Release Notes
Description
The Zebra Scanner SDK for Android enables cordless scanners to be connected and controlled by a tablet / smart phone without using a cradle, after pairing over Bluetooth. Scanning a pairing barcode appeared in tablet/smart phone display will make the device paired and connoted with the application. Furthermore it support controlling USB scanner connected to tablet / smart phone.
1. Display bar code data within a tablet / phone application
2. Apps using the SDK can command and control the scanner
- LED and Beeper Control
- Aim Control
- Enable/disable symbologies
- Scanning control
1. Remote scanner trigger (i.e. Host app initiated triggering)
2. Enable/disable scanning
- Event notification
1. Scanner available / unavailable
2. Scanner connected / disconnected from host
3. Bar code data transmission (i.e. host gets event stating bar code has been scanned)
- Automatic reconnection to last connected scanner (i.e. scanner goes out range and then returns)
- Enable/Disable the pager vibrating motor
3. Device Configuration (Get, Set and Store Scanner attributes)
4. Asset Tracking
- Model number
- Serial number
- Date of manufacture
- Firmware
5. Get Pairing barcode
The SDK also includes source code for the “Zebra Scanner Control” app available from the Google Play store (https://play.google.com/store/apps/details?id=com.zebra.scannercontrol.app).
Device Compatibility
Listed below are the scanners supported by this Zebra Scanner SDK.
Источник


