Tek Eye
Barcodes and Quick Response (QR) codes are useful for storing short sequences of data that can be recognised by a variety of machines and devices. They are particularly good for stock control hence the universal use on packaging and for logistics. QR codes are useful for communicating web addresses and contact details. Adding support for barcodes and QR codes in an App opens up new interface, communication and feature possibilities. Here is this website’s address as a QR Code.

One of the great features of Android is how easy it is to tap into existing functionality. Scanning barcodes and Quick Response (QR) codes is a good example. Google has a free scanning App that can be accessed from another App, using an Intent . This tutorial is an example of how to access the Google Barcode Scanner. For the following example code to work the scanner needs to be installed. Search for Barcode Scanner on Google Play and install it. It’s published by the Google ZXing team, this link takes you to their Play page. ZXing stands for Zebra Crossing (a.k.a. pedestrian crosswalk) which sort of look like barcodes.
(This Android tutorial assumes that Android Studio is installed; a basic App can be created and run; and code can be correctly copied into Studio. Here, for the tutorial App, the Application name is set to Scan Barcode and an Empty Activity is used. Adapt the tutorial code as required.)
Creating a Basic Barcode Scanning App
In Studio delete the TextView on the starting activity_main.xml layout. Drop three Button widgets on to the screen and set their text to QR CODE, PRODUCT and OTHER. Set their ids to butQR, butProd and butOther. Add a Large Text below the buttons setting the background property to black, the textColor property to white and the id to tvStatus. Add another Large Text and set the layout:width and layout:height to fill_parent and the id to tvResult:
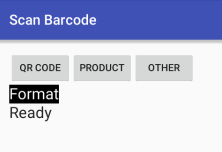
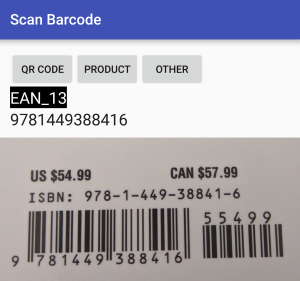
The two TextViews will display the type of barcode scanned and the data it contains. In MainActivity.java a function called HandleClick processes the pressed button (using the button id to determine which mode to call the scanner). Depending upon which button is pressed the program puts the relevant parameters into an Intent. The Intent initiates the scan barcode ZXing activity. The result is returned and processed in the onActivityResult function. Here’s the code (when prompted in Studio use Alt-Enter to add required imports, e.g. for View , Intent and TextView ):
The layout should resemble this:
Scan Formats
Notice how it is possbile to scan for a family of barcodes (using SCAN_MODE ) or a specific type of barcode (using SCAN_FORMATS ). If you know what type barcode is being decoded than setting a scan format to that single particular type may result in faster decoding (it will not be trying to run through all the barcode decoding algorithms), e.g. intent.putExtra(«SCAN_FORMATS», «CODE_39»). For mutliple SCAN_FORMATS pass a comma separated list as shown in the example code.
| SCAN_MODE | SCAN_FORMATS |
|---|---|
| QR_CODE_MODE | QR_CODE |
| PRODUCT_MODE | EAN_13 |
| EAN_8 | |
| UPC_A | |
| UPC_E | |
| RSS_14 | |
| RSS_EXPANDED | |
| ONE_D_MODE | As for product mode plus. |
| CODE_39 | |
| CODE_93 | |
| CODE_128 | |
| ITF | |
| CODABAR | |
| DATA_MATRIX_MODE | DATA_MATRIX |
| AZTEC_MODE | AZTEC (beta) |
| PDF417_MODE | PDF_417 (beta) |
Example Project Code
Download some code that covers this article ready for importing into Android Studio. The code can also be accessed via the Android Example Projects page. A version of this article was produced for the Android Cookbook. Read the ZXing project Wiki for detailed information on the ZXing code.
See Also
Archived Comments
Thet on February 28, 2012 at 2:56 am
Thank you very much for this code. How about scanning several barcodes and listing the information of them? eg Barcode1 = product1 with price $100, Barcode 2= product2 with price $100 etc.
Tek Eye in reply to Thet on February 28, 2012 at 2:30 pm
That would make a good follow up topic. Unfortunately with the billions of product barcodes that exist it is not something that is possible with a stand alone app. For a networked app there is no universal database of barcodes that is easily and freely available. A tutorial using a company’s internal database will be produced at later date.
Thet in reply to Tek Eye on February 28, 2012 at 3:00 pm
Hi, how about if we use just google product for source? Just for normal flow. Because I am not that familiar with ListView.
Tek Eye in reply to Thet on February 28, 2012 at 4:11 pm
See how ZXing does it at https://github.com/zxing/zxing (UPDATED) integrating with the Google Shopper App. Alternativley use an Intent with ACTION_WEB_SEARCH, or add the scanned code to the end of https://www.google.co.uk/search?tbm=shop&q= (UPDATED) and give it to an Intent with ACTION_VIEW.
Daniel on April 19, 2012 at 5:19 pm
Hi nice work around with ZXing, but it crashes when it can’t find the barcode scanner app. But is it possible to check if the barcode scanner is installed and if not send the user to Google Play (UPDATED) for installing.
Tek Eye in reply to Daniel on April 20, 2012 at 1:51 pm
Yes that can be done. Your App can prompt the user to download the ZXing App if it is not installed when your App attempts to read a barcode. Look at the IntentIntegrator.java class in android-integration of the main trunk. Basically is uses PackageManager to query for an intent and then prompts to download it. (UPDATED — Now see https://github.com/zxing/zxing/wiki/Scanning-Via-Intent).
ahmad upi on May 1, 2012 at 7:24 am
thanks for the tutorial, it’s very rewarding for me.
Simon S on November 21, 2012 at 3:57 pm
Brilliant. Thank you.
Zoran Kukulj on January 27, 2013 at 3:01 pm
Hi,it is a great example, thanks for it, but seems to erase found result when changing position of the phone. What could cause that kind of behaviour?
Tek Eye in reply to Zoran Kukulj on January 28, 2013 at 11:05 am
When the phone rotates by default activities are torn down and recreated (to allow screens to redraw for the new orientation). Controls, with ids, that users can change preserve their current state when this happens (see Saving Activity State in an App when it’s Interrupted). Here a TextView was used (not user changable) so the state was not preserved. Either change the result TextView to an EditText, or use onSaveInstanceState and onRestoreInstanceState:
Zoran Kukulj in reply to Tek Eye on January 28, 2013 at 11:48 am
Hi, Tek Eye, I have changed TextView-s to EditText-s and it works perfectly! But I have quite a bit of a hassle with attaching it to a widget.
I here there are several errors I am unable to find fix. Could You share some thoughts on how the error occurs? Many thanks!
Tek Eye in reply to Zoran Kukulj on January 28, 2013 at 6:48 pm
stackoverflow.com is a good site to get help on errors in your code. Without seeing your entire project I cannot provide much help. However, the code you posted can be simplified:
Zoran Kukulj in reply to Tek Eye on January 28, 2013 at 7:19 pm
vohaongtuit on June 26, 2013 at 10:11 am
Help! when i run project and click button Qrcode or Barcode, it stop & messenge from logcat: 06-26 10:08:13.602: D/gralloc_goldfish(1043): Emulator without GPU emulation detected. 06-26 10:09:37.242: I/Choreographer(1043): Skipped 58 frames! The application may be doing too much work on its main thread.
Tek Eye in reply to vohaongtuit on June 26, 2013 at 1:14 pm
Are you trying to run it on an AVD (Android Virtual Device)? You need a physical device with a camera to test the code. You need to look deeper into the log file for the message relating directly to the fault, these two messages are misleading, see https://stackoverflow.com/questions/8968238/gralloc-goldfish634-emulator-without-gpu-emulation-detected and https://stackoverflow.com/questions/11266535/meaning-of-choreographer-messages-in-logcat.
Yury on December 17, 2014 at 5:43 am
Hey, great starter for the project, I’ve made some modifications and it’s working well!
However, I ran into an issue on some of the Android devices. When I tap on one the buttons that call SCAN activity I get an error “Unfortunately, Google Search has stopped”. Maybe you know the cause of this error?
This is what I get in the Eclipse:
12-17 13:38:33.641: V/InputMethodManager(2975): Starting input: view=com.android.internal.policy.impl.PhoneWindow$DecorView@414fcf78 12-17 13:38:33.642: V/InputMethodManager(2975): Starting input: tba=android.view.inputmethod.EditorInfo@41513e88 ic=null 12-17 13:38:33.722: D/jdwp(2975): processIncoming 12-17 13:38:33.722: D/jdwp(2975): handlePacket : cmd=0x1, cmdSet=0xB, len=0x13, flags=0x0, dataLen=0x8 12-17 13:38:33.723: D/jdwp(2975): processIncoming 12-17 13:38:33.723: D/jdwp(2975): handlePacket : cmd=0x1, cmdSet=0xB, len=0x13, flags=0x0, dataLen=0x8 12-17 13:38:42.290: I/SurfaceTextureClient(2975): [STC::queueBuffer] this:0x518e7480, api:2, last queue time elapsed :8651 ms 12-17 13:38:42.290: I/SurfaceTextureClient(2975): [0x518e7480] frames:2, duration:8.651000, fps:0.231168 12-17 13:38:42.301: V/Provider/Setting(2975): from db cache, name = sound_effects_enabled value = 0 12-17 13:38:42.352: D/ActivityThread(2975): ACT-AM_ON_PAUSE_CALLED ActivityRecord<414f56b8 token=android.os.BinderProxy@414f1c00
Yury on December 17, 2014 at 6:44 am
I resolved the issue, some devices did not have the zxing library and were calling google search service by default. I installed barcode scanner app from zxing and now the application works on all of the devices.
Author: Daniel S. Fowler Published: 2012-02-25 Updated: 2016-07-31


Do you have a question or comment about this article?
(Alternatively, use the email address at the bottom of the web page.)
↓markdown↓ CMS is fast and simple. Build websites quickly and publish easily. For beginner to expert.
Free Android Projects and Samples:
Источник
Распознавание Barcode Android
В данной статье мы будем использовать ZXing (Zebra Crossing), чтобы расшифровать штрихкод в нашем Android приложении.
Используя ZXing, нам не нужно думать о том, что у пользователя нет сканера barcode, так как классы, предоставляемые библиотекой позаботятся об этом. Интегрируя ZXing в наше приложение мы можем предоставить пользователю более простую возможность сканировать шрихкоды, также это позволит нам сфокусироваться на разработке основной части приложения.
Создание нового проекта
Шаг 1
В Eclipse создайте новый Android проект. Введите имя приложения, проекта и название пакета. 
Шаг 2
Откройте основной шаблон. Eclipse должен был создать стандартный шаблон. Внутри него замените существующий контент на кнопку
После кнопки добавим два текстовых поля, которые будут отображать результаты отсканированной информации.
Добавьте к кнопке текст. Откройте файл res/values/strings
Чтобы просканировать пользователь должен будет нажать на кнопку. Когда приложение получает результат распознавания, оно отобразит его в текстовых полях.
Интегрируем ZXing
Шаг 1
ZXing — библиотека с открытым исходным кодом, предоставляющая возможность распознавания штрихкодов на Android. Некоторые пользователи уже имеют установленное приложение ZXing, поэтому достаточно передать ему код и дождаться результатов. В данном приложении мы рассмотрим способ, вызывающий соответствующую функцию другого приложения. Если данное приложение отсутствует у пользователя, то будет выведено предложение скачать его.
В Eclipse добавим новый пакет в Ваш проект. Для этого кликнем правой кнопкой мыши по папке src и выберем «New»->«Package», а затем введем com.google.zxing.integration.android в качестве имени пакета.
Шаг 2
Eclipse предлагает несколько способов импортирования существующего кода в проект. В данной статье самым простым методом будет создание двух классов, содержащий код из ZXing. Кликните правой кнопкой мыши по Вашему проекту, выберете «New»->«Class» и введите «IntentIntegrator» в качестве названия класса. Остальные параметры Вы можете не изменять. Как только Вы создали класс, проделайте тоже самое, но назовите класс «IntentResult».
Скопируйте код из обоих классов библиотеки, а затем вставьте его в созданные классы.
Теперь Вы можете подключить файлы в основной класс
Вернемся на минутку и также подключим следующие файлы. Обратите внимание, что Eclipse мог уже их подключить за Вас
Изучите содержание двух классов. Изучив их Вы обнаружите, что они не считывают код. Эти два класса являются просто интерфейсами, предоставляющими доступ к функционалу сканирования.
Сканируем
Шаг 1
Давайте реализуем сканирование, когда пользователь нажимает на нашу кнопку. В главном файле приложения существует метод onCreate, который должен выглядеть примерно так
Перед данной функцией создайте следующие переменные, которые будут хранить нашу кнопку и два текстовых поля, созданных в шаблоне
После существующего кода в onCreate добавьте строки, которые будут инициализировать переменные
Теперь, добавим обработчик нажатия
Расширим класс, чтобы объявить интерфейс OnClickListener
Шаг 2
Теперь, мы можем реагировать на нажатие кнопки началом процесса сканирования. Добавим метод onClick
Проверяем, была ли нажата именно кнопка сканирования
Внутри блока с условием создадим экземпляр класса IntentIntegrator, который мы импортировали
Сейчас, давайте вызовем процедуру, которая начнет сканирование
В данный момент должно начаться распознавание, но только, если у пользователя установлено необходимое приложение. Если его нет, то будет предложено начать загрузку. Результат сканирования будет возвращен приложению.
Обработка результатов сканирования
Шаг 1
Сканер будет запущен, когда нажата кнопка. Затем будет возвращен результат сканирования в метод onActivityResult. Добавим его в наш код
Внутри функции постараемся обработать результат
Шаг 2
Как и любые другие данные, полученные от другого приложения, было бы не плохо проверить, что результат не пуст. Продолжим мы только, если у нас есть правильный результат
Если мы не получили результат сканирования (например, пользователь отменил сканирование), то мы просто выведем сообщение
Вернемся в блок с условием, давайте разберемся с тем, что нам вернула библиотека. Объект Intent Result имеет метод, обеспечивающий получение результата сканирования. Получим результат сканирования, как строку
Также, получим вид barcode
Шаг 3
Теперь, наше приложение имеет всю необходимую для отображения информацию. В нашей статье мы просто отобразим ее пользователю.
Запустите наше приложение на реальном устройстве вместо эмулятора, чтобы увидеть, как работает функционал распознавания штрихкодов. Попробуйте просканировать штрихкод с какой-нибудь книги или любого другого товара.
Результаты сканирования
Источник


